前言
现在公司需要使用unity模型来展示数据。作为我本人使用的是Swift3.0语言。其中遇到了无数的坑。终于大致解决了问题。但是现在的办法并不是最好的,希望大家可以共同探讨。
参考
童冀的swift 2.3融合unity
Nothing_lu的swift3.0融合Unity
下载Unity.xcconfig,由blitzagency提供
准备工作
- 基于Swift的一个工程
- Unity导出的Xcode工程
- ios-unity5-master
- 使用CocoaPods
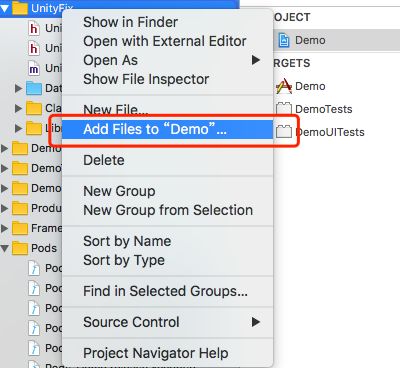
1.在Swift工程文件下新建一个名为UnityFix文件夹(你可以使用其他的名字),用来存放Unity的文件。
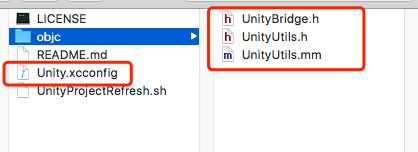
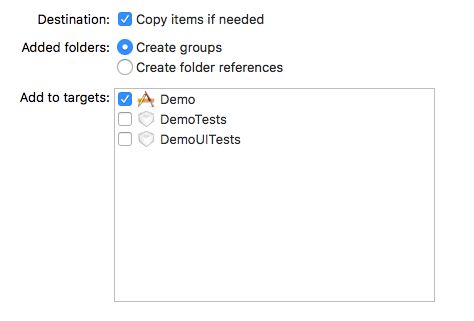
2.将下载文件夹中的Unity.xconfig、UnityBridge.h、UnityUtils.h和UnityUtils.mm这4个文件拉入UnityFix中。桥接头文件选择不创建。因为在拉入的文件中已经有了桥接头文件。
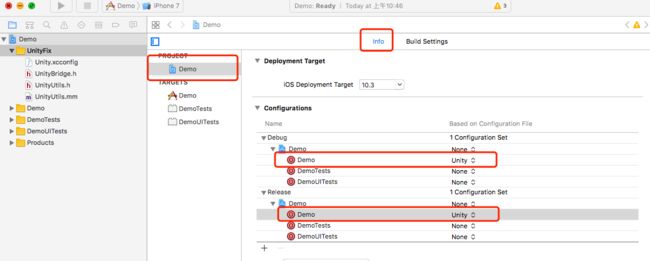
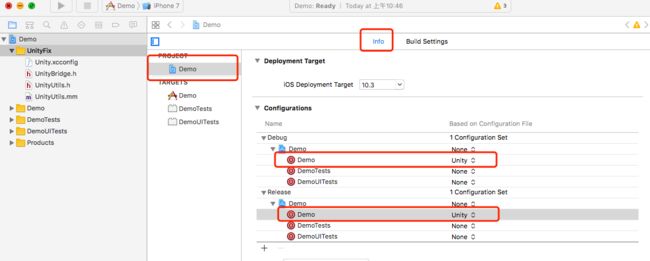
3.设置使用Unity.xcconfig配置。
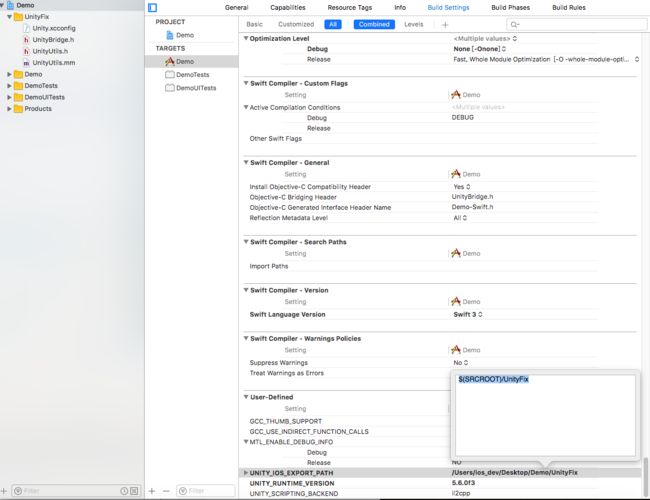
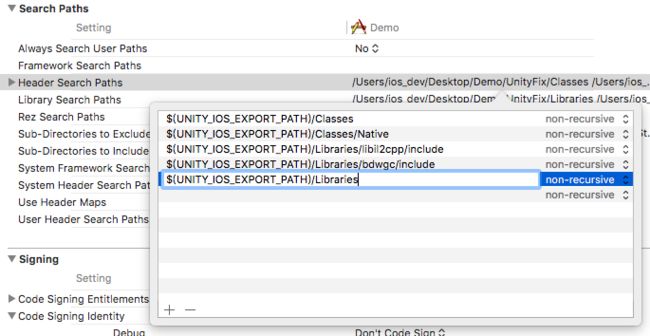
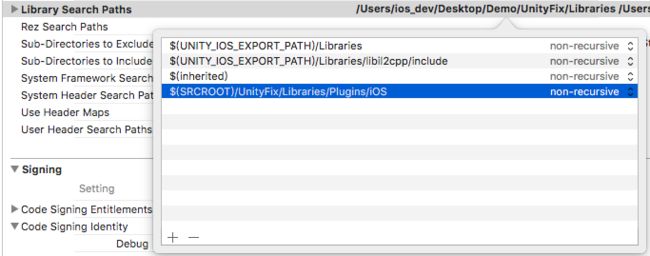
- 修改BuildSetting配置,路径和Unity版本号
这里科普一下$(SRCROOT)代表项目根目录,$(PROJECT_DIR)代表整个项目
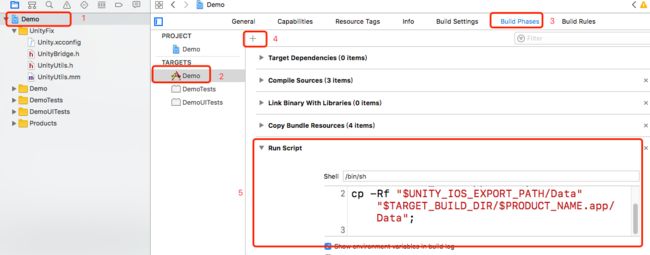
- buildPhases中添加运行脚本,内容为最开始下载的UnityProjectRefresh.sh中的内容
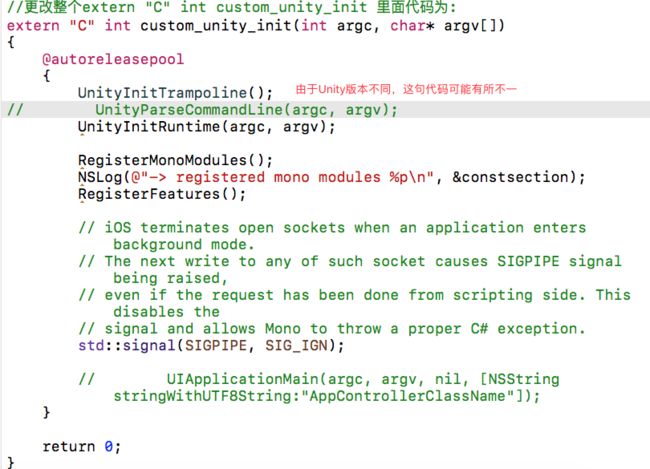
4.修改UnityUtils.mm文件内容
extern "C" int custom_unity_init(int argc, char* argv[])
{
    @autoreleasepool
    {
        UnityInitTrampoline();
//        UnityParseCommandLine(argc, argv);
        UnityInitRuntime(argc, argv);

        RegisterMonoModules();
        NSLog(@"-> registered mono modules %p\n", &constsection);
        RegisterFeatures();

        // iOS terminates open sockets when an application enters background mode.
        // The next write to any of such socket causes SIGPIPE signal being raised,
        // even if the request has been done from scripting side. This disables the
        // signal and allows Mono to throw a proper C# exception.
        std::signal(SIGPIPE, SIG_IGN);

        //        UIApplicationMain(argc, argv, nil, [NSString stringWithUTF8String:"AppControllerClassName"]);
    }

    return 0;
}
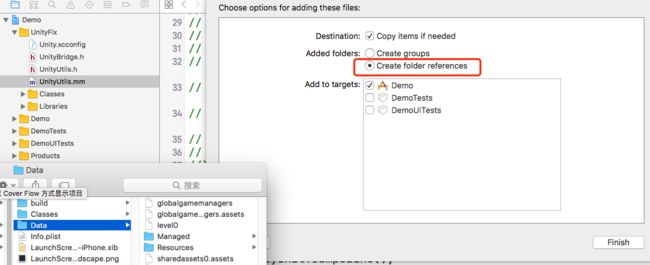
5.把Unity导出的Xcode工程中Classes、Data、Libraries文件按照如下方式添加到Unity文件夹中
- Classes和Libraries需要选择copy if needs、create groups(文件较多,需要等一会儿)
- Data需要选择Create folder references
(PS:删除引用,libraries里面的libil2cpp文件夹,然后再删除Classes里面的Native文件夹里面的所有.h文件.这里都是删除引用,不要move to trash。这里也可以不删除,对程序本身的运行没有任何影响)
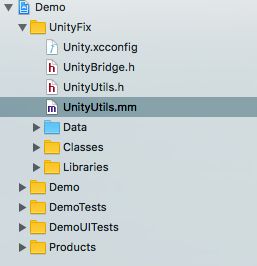
6.文件拖拽完成如图所示
7.修改unity里的方法,引用。在UnityFix的Classes文件目录下找到main.mm,替换这个方法
//int main(int argc, char* argv[])
//{
//    signed long long startTime = mach_absolute_time();
//    @autoreleasepool
//    {
//        UnitySetStartupTime(startTime);
//        UnityInitTrampoline();
//        UnityInitRuntime(argc, argv);
//
//        RegisterMonoModules();
//        NSLog(@"-> registered mono modules %p\n", &constsection);
//        RegisterFeatures();
//
//        // iOS terminates open sockets when an application enters background mode.
//        // The next write to any of such socket causes SIGPIPE signal being raised,
//        // even if the request has been done from scripting side. This disables the
//        // signal and allows Mono to throw a proper C# exception.
//        std::signal(SIGPIPE, SIG_IGN);
//
//        UIApplicationMain(argc, argv, nil, [NSString stringWithUTF8String: AppControllerClassName]);
//    }
//
//    return 0;
//}

int main_unity_default(int argc, char* argv[])
{
    @autoreleasepool
    {
        UnityInitTrampoline();
//        UnityParseCommandLine(argc, argv);
        UnityInitRuntime(argc, argv);
        RegisterMonoModules();
        NSLog(@"-> registered mono modules %p\n", &constsection);
        RegisterFeatures();

        // iOS terminates open sockets when an application enters background mode.
        // The next write to any of such socket causes SIGPIPE signal being raised,
        // even if the request has been done from scripting side. This disables the
        // signal and allows Mono to throw a proper C# exception.
        std::signal(SIGPIPE, SIG_IGN);

        //UIApplicationMain(argc, argv, nil, [NSString stringWithUTF8String:AppControllerClassName]);
        //        UIApplicationMain(argc, argv, nil, NSStringFromClass([UnitySubAppDelegate class]));
        UIApplicationMain(argc, argv, nil, [NSString stringWithUTF8String:AppControllerClassName]);
    }

    return 0;
}
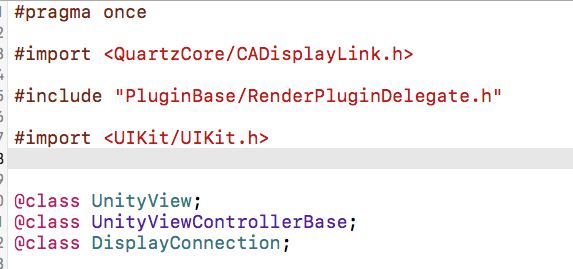
在Classes文件目录下找到UnityAppController.h,添加:(如果你的.h本来有@class UnityViewControllerBase,就不需要再导入了)
#import
@class UnityViewControllerBase;
在代码大概80行的位置替换如下方法:
//inline UnityAppController*  GetAppController()
//{
//    return (UnityAppController*)[UIApplication sharedApplication].delegate;
//}

NS_INLINE UnityAppController* GetAppController()
{
    NSObject* delegate = [UIApplication sharedApplication].delegate;
    UnityAppController* currentUnityController = (UnityAppController *)[delegate valueForKey:@"currentUnityController"];
    return currentUnityController;
}
8.修改Swift工程
新建一个main.swift,作为程序入口,注意m要小写,代码如下:
import Foundation
import UIKit
// overriding @UIApplicationMain
custom_unity_init(CommandLine.argc, CommandLine.unsafeArgv)
UIApplicationMain(
    CommandLine.argc,
    UnsafeMutableRawPointer(CommandLine.unsafeArgv)
        .bindMemory(
            to: UnsafeMutablePointer.self,
            capacity: Int(CommandLine.argc)),
    nil,
    NSStringFromClass(AppDelegate.self)
)
找到appdelegate.swift,注释掉@UIApplicationMain(让我们新建的main.Swift作为程序入口),按图添加代码:
import UIKit

//@UIApplicationMain
class AppDelegate: UIResponder, UIApplicationDelegate {

    var window: UIWindow?
    var currentUnityController: UnityAppController!


    func application(_ application: UIApplication, didFinishLaunchingWithOptions launchOptions: [UIApplicationLaunchOptionsKey: Any]?) -> Bool {
        // Override point for customization after application launch.

        currentUnityController = UnityAppController()
        currentUnityController.application(application,didFinishLaunchingWithOptions: launchOptions)

        return true
    }

    func applicationWillResignActive(_ application: UIApplication) {
        // Sent when the application is about to move from active to inactive state. This can occur for certain types of temporary interruptions (such as an incoming phone call or SMS message) or when the user quits the application and it begins the transition to the background state.
        // Use this method to pause ongoing tasks, disable timers, and invalidate graphics rendering callbacks. Games should use this method to pause the game.
        currentUnityController.applicationWillResignActive(application)
    }

    func applicationDidEnterBackground(_ application: UIApplication) {
        // Use this method to release shared resources, save user data, invalidate timers, and store enough application state information to restore your application to its current state in case it is terminated later.
        // If your application supports background execution, this method is called instead of applicationWillTerminate: when the user quits.
        currentUnityController.applicationDidEnterBackground(application)
    }

    func applicationWillEnterForeground(_ application: UIApplication) {
        // Called as part of the transition from the background to the active state; here you can undo many of the changes made on entering the background.
        currentUnityController.applicationWillEnterForeground(application)
    }

    func applicationDidBecomeActive(_ application: UIApplication) {
        // Restart any tasks that were paused (or not yet started) while the application was inactive. If the application was previously in the background, optionally refresh the user interface.
        currentUnityController.applicationDidBecomeActive(application)
    }

    func applicationWillTerminate(_ application: UIApplication) {
        // Called when the application is about to terminate. Save data if appropriate. See also applicationDidEnterBackground:.
        currentUnityController.applicationWillTerminate(application)
    }


}
9.添加依赖库,每个Unity版本需要的库可能都会不一样
需要的库均以Unity导出Xcode工程里面需要的依赖库为标准
dylib类型的库添加方法:
Build Phases -> Link Binary With Libraries —> + , 在对话框中点 Add Other, 然后在新的对话框用快捷键Command+Shift+G打开新的Folder对话框,输入/usr/lib/,然后点Go,在新弹出的dylib库目录选择libc++.dylib并添加。
10.Unity.xcconfig修改
SWIFT_OBJC_BRIDGING_HEADER = UnityFix/UnityBridge.h;
如果你编译遇到如下错误
11.编译器修改
感谢JingWang_48ec提供方法:
在Target -> Building Setting 选中 All,然后在搜索框里搜Compiler,更改下面两处的设置
Apple LLVM 8.0-Language -> C language dialect -> GNU99[-std=gnu99]
Apple LLVM 8.0-Language C++ -> C++ language dialect -> GNU++11[-std=gnu++11]
如果不用CocoaPods管理第三方库的话,到这里已经全部成功了
导入CocoaPods
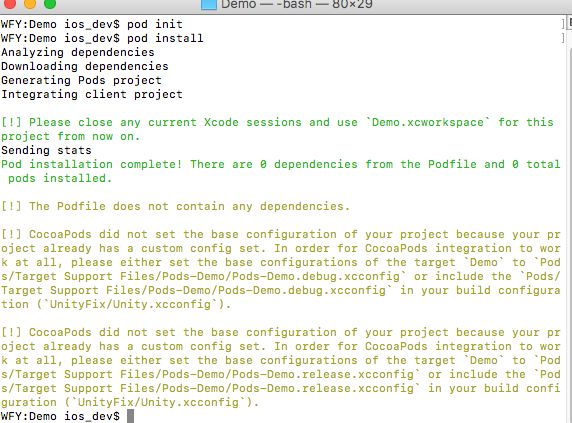
1.在终端中cd 你的项目
- pod init
- pod install
- 按照黄色字体给出的提示在Unity.xcconfig里面添加如下代码:
#include "Pods/Target Support Files/Pods-Demo/Pods-Demo.debug.xcconfig"
#include "Pods/Target Support Files/Pods-Demo/Pods-Demo.release.xcconfig"
- 导入一个第三库,编译不过
结论按照黄色字体给出的提示不能解决CocoaPods的使用
- 此处删除Unity.xccofig的引用
在重新一次pod install
我们在Header Search Paths中添加如下:
- 此时我们在将这个Unity.xcconfig文件添加回来
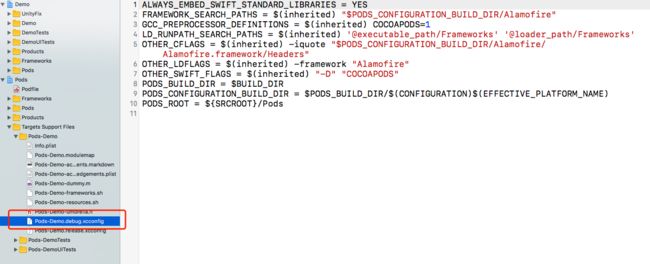
- 找到在Pod下的xcconfig文件:
- 将里面的代码拷入Unity.xccofig(PS:里面有几处地方需要合并)
- 最后在修改一下配置,到这里基本能编译成功了!
结语
结合这个话了很多时间,也发现了很多有意思的东西,比如为什么需要合并,因为在Unity 的配置和Pods的配置有字段是冲突的。所以我们需要手动的将pod配置文件中的内容合并到Unity的配置文件中。当然这个方法并不是最好的,如果有朋友有更好的方法,希望提出~
5月18日更新
在Unity界面里面有按钮,点击按钮想要跳转新的界面。
直接调在Swift的方法执行,但没有效果。
解决办法:使用通知,调用方法。 原因:Unity和IOS之间只存在值传递

