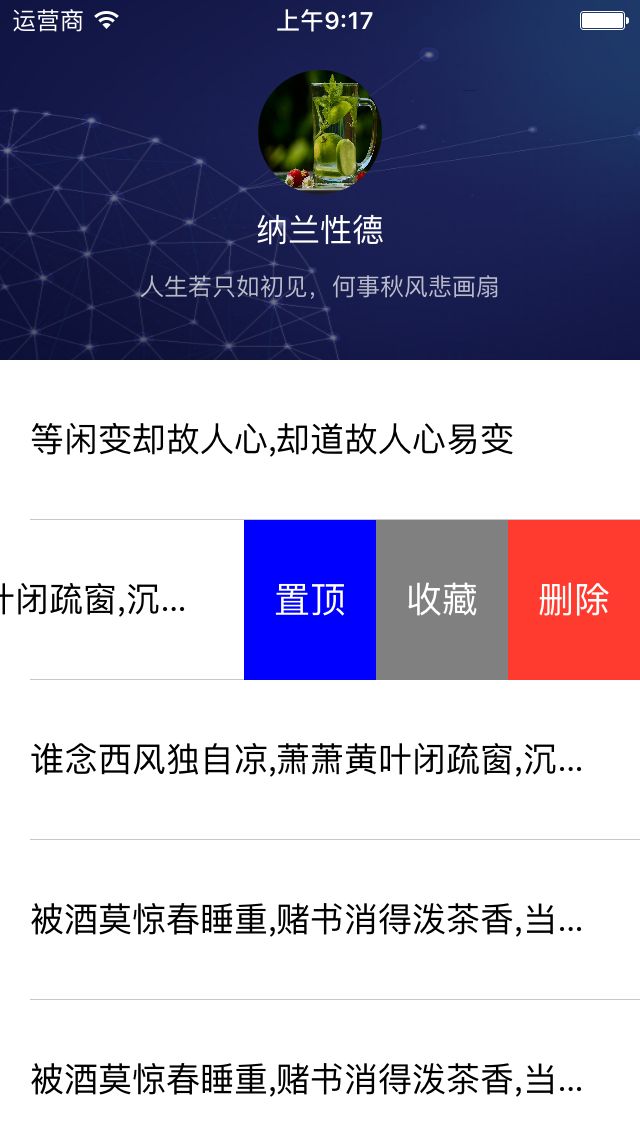
很多app的在有关于用户信息的页面中,都会有头部下拉放大的效果,类似QQ空间一样。还有想微信的聊天列表中,左滑会出现删除的按钮。今天呢和大家分享一下如何去实现这些小功能。
首先,我们先创建一个tableview
#define RGBACOLOR(r,g,b,a) [UIColor colorWithRed:(r)/255.0f green:(g)/255.0f blue:(b)/255.0f alpha:(a)]
#define ScreenWidth [UIScreen mainScreen].bounds.size.width
#define ScreenHeight [UIScreen mainScreen].bounds.size.height
@interface ViewController ()
@property(nonatomic, strong)UITableView *tableView;
@property(nonatomic, strong)NSMutableArray *dataSourceArray;
@property(nonatomic, strong)UIImageView *headerBackView;
@property(nonatomic, strong)UIImageView *photoImageView;
@property(nonatomic, strong)UILabel *userNameLabel;
@property(nonatomic, strong)UILabel *introduceLabel;
@property(nonatomic, strong)UIView *tableViewHeaderView;
@property(nonatomic, assign)NSInteger imageHeight;

@end

@implementation ViewController

- (void)viewDidLoad {
    [super viewDidLoad];
    self.view.backgroundColor = [UIColor whiteColor];
    self.navigationController.navigationBar.hidden = YES;
    [[UIApplication sharedApplication] setStatusBarStyle:UIStatusBarStyleLightContent];

    _dataSourceArray = [NSMutableArray arrayWithObjects:@"谁念西风独自凉,萧萧黄叶闭疏窗,沉思往事立残阳",@"被酒莫惊春睡重,赌书消得泼茶香,当时只道是寻常",@"等闲变却故人心,却道故人心易变",@"谁念西风独自凉,萧萧黄叶闭疏窗,沉思往事立残阳",@"被酒莫惊春睡重,赌书消得泼茶香,当时只道是寻常",@"等闲变却故人心,却道故人心易变",nil];

}
-(void)loadView{
    [super loadView];
     _imageHeight = 160;//背景图片的高度
    _tableView = [[UITableView alloc] initWithFrame:self.view.frame style:UITableViewStylePlain];
    _tableView.dataSource = self;
    _tableView.delegate = self;
    [self.view addSubview:_tableView];
    [self createTableViewHeaderView];

}
下拉放大效果
下拉放大效果,主要是将背景图放在TableView的头视图上,通过下拉的距离从而去改变背景图的frame
创建头视图
-(void)createTableViewHeaderView{


    _tableViewHeaderView = [[UIView alloc] initWithFrame:(CGRectMake(0, 0, ScreenWidth, _imageHeight))];
    _headerBackView = [[UIImageView alloc] init];

//    背景图
    _headerBackView.frame = CGRectMake(0, 0, ScreenWidth, _imageHeight);
    _headerBackView.image = [UIImage imageNamed:@"[email protected]"];

    [_tableViewHeaderView addSubview:_headerBackView];
    _photoImageView = [[UIImageView alloc] initWithFrame:CGRectMake((ScreenWidth - 62)/2, 15 , 62 , 62 )];
    [self.tableViewHeaderView addSubview:self.photoImageView];
    _photoImageView.layer.cornerRadius = 31 ;
    _photoImageView.layer.masksToBounds = YES;

    _photoImageView.image = [UIImage imageNamed:@"2.jpg"];

    _userNameLabel = [[UILabel alloc] initWithFrame:CGRectMake(0, _photoImageView.frame.origin.y + _photoImageView.frame.size.height + 8 , ScreenWidth, 20 )];
    _userNameLabel.font = [UIFont fontWithName:@"iconfont" size:16 ];
    _userNameLabel.text = @"纳兰性德";
    _userNameLabel.textAlignment = 1;
    _userNameLabel.font = [UIFont systemFontOfSize:16  ];
    _userNameLabel.textColor = [UIColor whiteColor];
    [_tableViewHeaderView addSubview:self.userNameLabel];

    _introduceLabel = [[UILabel alloc] initWithFrame:CGRectMake((ScreenWidth - 229 )/2, _userNameLabel.frame.origin.y + _userNameLabel.frame.size.height + 10 , 229 , 16 )];
    _introduceLabel.alpha = .7;
    _introduceLabel.text = @"人生若只如初见,何事秋风悲画扇";
    _introduceLabel.textAlignment = 1;
    _introduceLabel.font = [UIFont systemFontOfSize:12 ];
    _introduceLabel.textColor = _userNameLabel.textColor;
    [_tableViewHeaderView addSubview:self.introduceLabel];

    self.tableView.tableHeaderView = _tableViewHeaderView;

}
接下来,就是实现下拉放大功能了,在- (void)scrollViewDidScroll:(UIScrollView *)scrollView方法里做相应的操作
- (void)scrollViewDidScroll:(UIScrollView *)scrollView
{

    CGFloat width = self.view.frame.size.width; // 图片宽度
    CGFloat yOffset = scrollView.contentOffset.y;  // 偏移的y值
    if (yOffset < 0) {
        CGFloat totalOffset = _imageHeight + ABS(yOffset);
        CGFloat f = totalOffset / _imageHeight;
        self.headerBackView.frame =  CGRectMake(- (width * f - width) / 2, yOffset, width * f, totalOffset); //拉伸后的图片的frame应该是同比例缩放。
    }


}
这样就达到了我们想要的下拉放大效果
滑动UITableViewCell显示多个按钮
这个主要通过UITableViewRowAction这个类去实现
-(void)tableView:(UITableView *)tableView commitEditingStyle:(UITableViewCellEditingStyle)editingStyle forRowAtIndexPath:(NSIndexPath *)indexPath这个方法里面的代码只在iOS8.0以前版本有作用,也可以不实现。
-(void)tableView:(UITableView *)tableView commitEditingStyle:(UITableViewCellEditingStyle)editingStyle forRowAtIndexPath:(NSIndexPath *)indexPath
{
    editingStyle = UITableViewCellEditingStyleDelete;//此处的EditingStyle可等于任意UITableViewCellEditingStyle,该行代码只在iOS8.0以前版本有作用,也可以不实现。
}
设置相应的按钮。通过UITableViewRowAction来实现对应的按钮及按钮的响应事件,按钮的排列顺序可以通过更换按钮的响应事件在数组中的位置来调整
-(NSArray *)tableView:(UITableView *)tableView editActionsForRowAtIndexPath:(NSIndexPath *)indexPath


{

    //设置删除按钮

    UITableViewRowAction *deleteRowAction = [UITableViewRowAction rowActionWithStyle:UITableViewRowActionStyleDestructive title:@"删除"handler:^(UITableViewRowAction *action,NSIndexPath *indexPath) {
//        更新数据
        [self.dataSourceArray removeObjectAtIndex:indexPath.row];

//        更新UI
        [self.tableView deleteRowsAtIndexPaths:@[indexPath] withRowAnimation:UITableViewRowAnimationAutomatic];

    }];

    //设置收藏按钮

    UITableViewRowAction *collectRowAction = [UITableViewRowAction rowActionWithStyle:UITableViewRowActionStyleDefault title:@"收藏"handler:^(UITableViewRowAction *action,NSIndexPath *indexPath) {

        collectRowAction.backgroundColor = [UIColor greenColor];

        //实现收藏功能
        NSLog(@"收藏成功");

    }];

    //设置置顶按钮

    UITableViewRowAction *topRowAction = [UITableViewRowAction rowActionWithStyle:UITableViewRowActionStyleDefault title:@"置顶" handler:^(UITableViewRowAction *action, NSIndexPath *indexPath) {

        [self.dataSourceArray exchangeObjectAtIndex:indexPath.row withObjectAtIndex:0];

        NSIndexPath *firstIndexPath = [NSIndexPath indexPathForRow:0 inSection:indexPath.section];

        [tableView moveRowAtIndexPath:indexPath toIndexPath:firstIndexPath];

        [_tableView reloadData];

    }];

// 设置按钮的背景颜色
    topRowAction.backgroundColor = [UIColor blueColor];

    collectRowAction.backgroundColor = [UIColor grayColor];

    return  @[deleteRowAction,collectRowAction,topRowAction];//可以通过调整数组的顺序而改变按钮的排序


}
这样滑动显示按钮的效果就实现了。不过UITableViewRowAction这个类只有在iOS8以后才能用
界面如下:
GIF动图如下:
下拉放大与滑动显示.gif
demo地址
