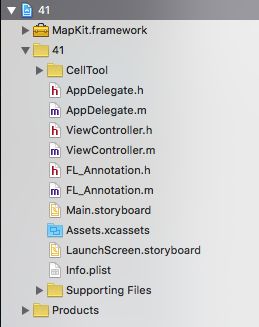
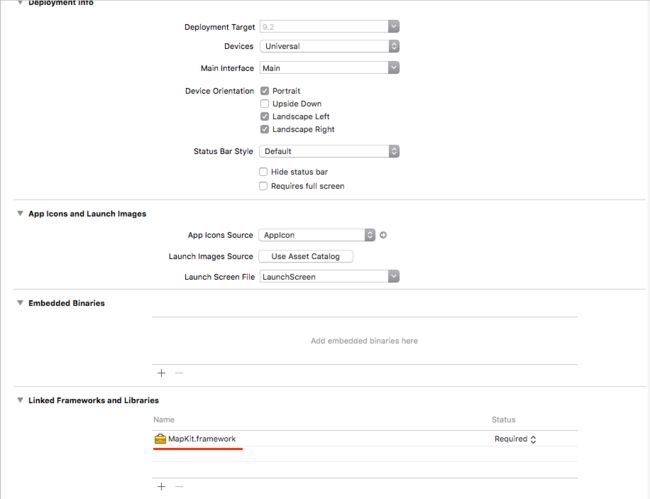
- 首先,我们单击项目
- 导入依赖库
- 新建了类FL_Annotation, 继承自NSObject
FL_Annotation.h代码
#import
#import //地图框架
//大头针标注模型, 在自定义的时候必须遵循MKAnnotation协议
@interface FL_Annotation : NSObject

//遵循协议后,必须实现的三个属性
//经纬度
@property (nonatomic, assign) CLLocationCoordinate2D coordinate;//为什么使用assign

//主标题
@property (nonatomic, copy) NSString* title;

//副标题
@property (nonatomic, copy) NSString *subtitle;

@end
ViewController.m
#import "ViewController.h"
//大头针标注模型
#import
#import "FL_Annotation.h"

//使用地图,必须在工程中引入框架,而且,地图的使用都依赖定位服务
@interface ViewController ()

//地图属性
@property (nonatomic, strong) MKMapView *mapView;

//定位管理对象
@property (nonatomic, strong) CLLocationManager *locationManger;

//记录最后一次插入大头针的位置(待用...)
@property (nonatomic, assign) CGPoint lastPoint;

//地理编码对象
@property (nonatomic, strong) CLGeocoder *geocoder;

@end

@implementation ViewController
//懒加载
-(CLLocationManager *)locationManger {
    if (_locationManger == nil) {
        self.locationManger = [CLLocationManager new];
    }
    return _locationManger;
}

- (void)viewDidLoad {
    [super viewDidLoad];

    self.mapView = [[MKMapView alloc]initWithFrame:self.view.frame];

    [self.view addSubview:self.mapView];

    UITapGestureRecognizer *tapGesture = [[UITapGestureRecognizer alloc]initWithTarget:self action:@selector(tapGestureAction:)];

    [self.mapView addGestureRecognizer:tapGesture];

    //1.在info.plist中配置允许定位设置
    //NSLocationWhenInUseUsageDiscription

    //2.查看手机定位服务是否开启
    if (![CLLocationManager locationServicesEnabled]) {
        NSLog(@"请在设置中打开定位服务");
        return;
    }

    //3.请求用户授权
    if ([CLLocationManager authorizationStatus] == kCLAuthorizationStatusNotDetermined) {
        //请求用户授权
        [self.locationManger requestWhenInUseAuthorization];
    }

    //4.重要,让地图显示当前用户的位置
    self.mapView.userTrackingMode = MKUserTrackingModeFollow;

    //设置代理对象
    self.mapView.delegate = self;

    //添加按钮
    [self addButton];


}

#pragma mark - 添加按钮
-(void)addButton
{
    UIButton *removeButton = [[UIButton alloc]initWithFrame:(CGRectMake(20, 40, 150, 42))];

    removeButton.tintColor = [UIColor blackColor];

    removeButton.backgroundColor = [UIColor lightGrayColor];

    [removeButton setTitle:@"移除坐标" forState:UIControlStateNormal];

    [removeButton addTarget:self action:@selector(removeButtonAction:) forControlEvents:(UIControlEventTouchUpInside)];

    [self.view addSubview:removeButton];


    UIButton *playLine = [[UIButton alloc]initWithFrame:(CGRectMake(249, 40, 150, 42))];

    playLine.tintColor = [UIColor blackColor];

    playLine.backgroundColor = [UIColor lightGrayColor];

    [playLine setTitle:@"规划路线" forState:UIControlStateNormal];

    [playLine addTarget:self action:@selector(playLineAction:) forControlEvents:(UIControlEventTouchUpInside)];

    [self.view addSubview:playLine];

}

#pragma mark - 轻拍手势,添加大头针
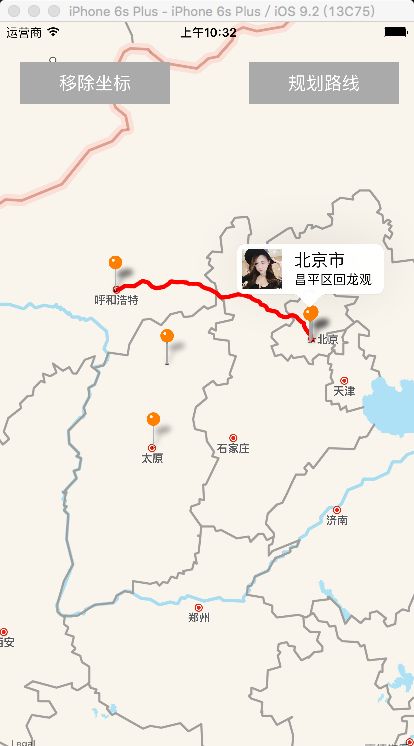
//轻拍地图,立马添加大头针.但是,添加大头针视图不需要我们来创建,我们只能添加大头针标注模型,标注模型相当于数据层(model)  大头针视图相当于View层(相当于cell)
-(void)tapGestureAction:(UITapGestureRecognizer *)sender
{
    //1.获取触摸点的位置
    CGPoint touchPoint = [sender locationInView:self.mapView];

    //2.判断触摸点,位置相同就不能再添加大头针
    if (self.lastPoint.x == touchPoint.x && self.lastPoint.y == touchPoint.y) {
        return;//触摸点重复
    }

    //3.获取触摸点x, y的值,并且转为经纬度
    CLLocationCoordinate2D coordinate = [self.mapView convertPoint:touchPoint toCoordinateFromView:self.mapView];

    //4.创建大头针标注模型(用来展示大头针所定是位置信息)
    FL_Annotation *annotation = [[FL_Annotation alloc] init];

    //给模型的属性赋值
    annotation.coordinate = coordinate;

    annotation.title = @"北京市";

    annotation.subtitle = @"昌平区回龙观";

    //添加大头针标注模型(用来展示大头针所定的位置上信息)
    [self.mapView addAnnotation:annotation];

    //记录当前点的位置,为下一次点击做准备
    self.lastPoint = touchPoint;
}

#pragma mark - 地图的代理方法
//这个方法就是地图控件根据标注模型信息创建大头针的方法
-(MKAnnotationView *)mapView:(MKMapView *)mapView viewForAnnotation:(id)annotation
{
    //判断大头针标注模型是否是自定义模型
    if ([annotation isKindOfClass:[FL_Annotation class]]) {
        //如果需要展示的模型确实是自定义模型
        //1.创建静态标识符
        static NSString *identifier = @"view";

        //2.去重用队列中取出可用的大头针对象
        MKPinAnnotationView *view = (MKPinAnnotationView *)[mapView dequeueReusableAnnotationViewWithIdentifier:identifier];

        //3.判断是否可用
        if (view == nil) {
            view = [[MKPinAnnotationView alloc]initWithAnnotation:annotation reuseIdentifier:identifier];
        }

        //给大头针赋值
        view.annotation = annotation;

        //设置图片<需要赋的值>
        //MARK - 大头针有两种模式(父类:MKAnnotationView 子类:MKPinAnnotationView)
        //父类中的view,image 属性是有效的,在子类中无效, 代替大头针的图片
        view.image = [UIImage imageNamed:@"tab_01.jpg"];

        //MARK - 动画属性和大头针�颜色属性属于子类属性, 父类中不可用
        //大头针是否从天而降
        view.animatesDrop = YES;

        //可以设置大头针的颜色
        view.pinTintColor = [UIColor orangeColor];

        //设置弹出标注模型的弹出框
        view.canShowCallout = YES;

        //在弹出框中添加图片,比如:在左侧添加图片
        UIImageView *imageView = [[UIImageView alloc]initWithImage:[UIImage imageNamed:@"tab_01.jpg"]];

        imageView.frame = CGRectMake(0, 0, 40, 40);

        view.leftCalloutAccessoryView = imageView;

        return view;

    }
    return nil;
}

#pragma mark - 移除大头针事件
-(void)removeButtonAction:(UIButton *)sender
{
    //我们不能移除大头针,我们只需要移除大头针标注模型即可
    [self.mapView removeAnnotations:self.mapView.annotations];
}
#pragma mark - 规划路线
- (void)playLineAction:(UIButton *)sender {

    [self drawLineBetweenBeginCity:@"北京" endCity:@"内蒙古"];
}
#pragma mark -- 封装方法
//懒加载---给地理编码对象开空间
- (CLGeocoder *)geocoder {
    if (_geocoder == nil) {
        self.geocoder = [[CLGeocoder alloc]init];
    }
    return _geocoder;
}
- (void)drawLineBetweenBeginCity:(NSString *)scourceCity endCity:(NSString *)destinationCity {
    //1.因为传入的城市名称是中文字符串.所以先进行地理编码.
    [self.geocoder geocodeAddressString:scourceCity completionHandler:^(NSArray * _Nullable placemarks, NSError * _Nullable error) {
        //获取起点城市地标
        CLPlacemark *mark1 = [placemarks firstObject];
        //设置路线显示范围
        [self.mapView setRegion:MKCoordinateRegionMake(mark1.location.coordinate, MKCoordinateSpanMake(10.0, 10.0)) animated:YES];

        //2.获取目的城市的地标对象
        [self.geocoder geocodeAddressString:destinationCity completionHandler:^(NSArray * _Nullable placemarks, NSError * _Nullable error) {
            //获取地标对象
            CLPlacemark *mark2 = [placemarks firstObject];
#pragma mark -- 获取了两个城市的地标对象后.开始添加路段模型.显示路线
            [self addLineFrom:mark1 to:mark2];

        }];

    }];
}

#pragma mark - 规划路线
- (void)addLineFrom:(CLPlacemark *)from to:(CLPlacemark *)to {
    //1.在起始和结束位置上插入两个大头针
    FL_Annotation *oneAnnotation = [[FL_Annotation alloc]init];
    oneAnnotation.coordinate = from.location.coordinate;
    FL_Annotation *twoAnnotation = [[FL_Annotation alloc]init];
    twoAnnotation.coordinate = to.location.coordinate;
    //添加在地图上
    [self.mapView addAnnotations:@[oneAnnotation, twoAnnotation]];
    //2.开始路线请求
    MKDirectionsRequest *request = [[MKDirectionsRequest alloc]init];
    //3.选择出行模式
    request.transportType = MKDirectionsTransportTypeAutomobile;//自驾
    //4.设置路线的起点
    MKPlacemark *sourcePlace = [[MKPlacemark alloc]initWithPlacemark:from];
    request.source = [[MKMapItem alloc]initWithPlacemark:sourcePlace];
    //5.设置路线的终点
    MKPlacemark *destinationPlace = [[MKPlacemark alloc]initWithPlacemark:to];
    request.destination = [[MKMapItem alloc]initWithPlacemark:destinationPlace];
    //6.根据请求对象获取路线对象
    MKDirections *direction = [[MKDirections alloc]initWithRequest:request];
    //7.计算路线(路线由一条条路段组成.而路段由一个个的轨迹点组成)
    [direction calculateDirectionsWithCompletionHandler:^(MKDirectionsResponse * _Nullable response, NSError * _Nullable error) {
        NSLog(@"总共有%lu条路线组成", response.routes.count);
        //填充轨迹点模型.
        for (MKRoute *route in response.routes) {
            [self.mapView addOverlay:route.polyline];
        }
    }];

    //polyline 轨迹点模型.还有MKPolylineView 这个是轨迹点视图.他们的关系类似于(大头针和大头针标注模型的关系).我们不创建轨迹点视图.但是只要先添加了轨迹点模型到地图上.就会获取轨迹点视图进行展示
    //一旦轨迹点添加完毕.系统就会自动调用绘制地图上路线的代理方法.来展示路线
}

#pragma mark -- 绘制路线的代理方法
- (MKOverlayRenderer *)mapView:(MKMapView *)mapView rendererForOverlay:(id)overlay {
    MKPolylineRenderer *renderer = [[MKPolylineRenderer alloc]initWithOverlay:overlay];
    //设置路线的颜色
    renderer.strokeColor = [UIColor redColor];
    return renderer;

}

@end


