title: imageLoader解析
date: 2017-09-02 19:00:47
categories: 源码解读
tags: 图片加载
ImageLoader是最早开源的Android图片缓存库, 强大的缓存机制, 早期使用这个图片加载框架的android应用非常多, 至今仍然有不少Android开发者在使用。
ImagerLoader特征
- 支持本地、网络图片,且支持图片下载的进度监听
- 支持个性化配置ImagerLoader,如线程池,内存缓存策略,图片显示选项等
- 三层缓存加快图片的加载速度
- 支持图片压缩
开始使用
鉴于这篇是对ImageLoader源码来进行解析,我们首先回顾一下ImageLoader的使用。
可以通过这里下载universal-imager-loader的jar包,并将其导入到自己的项目中。
然后可以在Application或者Activity中初始化ImageLoade,参考如下:
public class YourApplication extends Application {

    @Override
    public void onCreate() {
        super.onCreate();
        //创建默认的ImageLoader配置参数
        ImageLoaderConfiguration configuration = ImageLoaderConfiguration
                .createDefault(this);

        //Initialize ImageLoader with configuration.
        ImageLoader.getInstance().init(configuration);
    }
}
当然,如果涉及到网络操作和磁盘缓存的话,有或者是在Application中进行初始化的话,记得要在Manifest中进行申明:
    ...

        ...
接下来我们就可以愉快的来加载图片了,如下所示:
ImageLoader.getInstance().displayImage(imageUri, imageView);
当然,如果你想添加监听,可以这么写:
ImageLoader.getInstance().loadImage(imageUrl, new SimpleImageLoadingListener(){

            @Override
            public void onLoadingComplete(String imageUri, View view,
                    Bitmap loadedImage) {
                super.onLoadingComplete(imageUri, view, loadedImage);
                mImageView.setImageBitmap(loadedImage);
            }

        });
至于更多的用法这里就不介绍了,如果有需要,可以参看这篇博客,了解更多关于ImageLoader的用法。下面就开始了源码的解析之路。
ImageLoaderConfiguration配置实现
我们首先还是从imageLoader的配置开始开始源码的探究之旅把。在上面的使用实例中,我们使用createDefault()方法来初始化配置,那么imageLoader的默认配置究竟是些什么呢?下面直接上代码:
public static ImageLoaderConfiguration createDefault(Context context) {
    return new Builder(context).build();
}

public ImageLoaderConfiguration build() {
    initEmptyFieldsWithDefaultValues();
    return new ImageLoaderConfiguration(this);
}

private void initEmptyFieldsWithDefaultValues() {
    if (taskExecutor == null) {
        taskExecutor = DefaultConfigurationFactory
                .createExecutor(threadPoolSize, threadPriority, tasksProcessingType);
    } else {
        customExecutor = true;
    }
    if (taskExecutorForCachedImages == null) {
        taskExecutorForCachedImages = DefaultConfigurationFactory
                .createExecutor(threadPoolSize, threadPriority, tasksProcessingType);
    } else {
        customExecutorForCachedImages = true;
    }
    if (diskCache == null) {
        if (diskCacheFileNameGenerator == null) {
            diskCacheFileNameGenerator = DefaultConfigurationFactory.createFileNameGenerator();
        }
        diskCache = DefaultConfigurationFactory
                .createDiskCache(context, diskCacheFileNameGenerator, diskCacheSize, diskCacheFileCount);
    }
    if (memoryCache == null) {
        memoryCache = DefaultConfigurationFactory.createMemoryCache(context, memoryCacheSize);
    }
    if (denyCacheImageMultipleSizesInMemory) {
        memoryCache = new FuzzyKeyMemoryCache(memoryCache, MemoryCacheUtils.createFuzzyKeyComparator());
    }
    if (downloader == null) {
        downloader = DefaultConfigurationFactory.createImageDownloader(context);
    }
    if (decoder == null) {
        decoder = DefaultConfigurationFactory.createImageDecoder(writeLogs);
    }
    if (defaultDisplayImageOptions == null) {
        defaultDisplayImageOptions = DisplayImageOptions.createSimple();
    }
  }
}

private ImageLoaderConfiguration(final Builder builder) {
    resources = builder.context.getResources();//程序本地资源访问器
    maxImageWidthForMemoryCache = builder.maxImageWidthForMemoryCache;//内存缓存的图片最大宽度
    maxImageHeightForMemoryCache = builder.maxImageHeightForMemoryCache;//内存缓存的图片最大高度
    maxImageWidthForDiskCache = builder.maxImageWidthForDiskCache;//磁盘缓存的图片最大宽度
    maxImageHeightForDiskCache = builder.maxImageHeightForDiskCache;//磁盘缓存的图片最大高度
    processorForDiskCache = builder.processorForDiskCache;//图片处理器,用于处理从磁盘缓存中读取到的图片
    taskExecutor = builder.taskExecutor;//ImageLoaderEngine中用于执行从源获取图片任务的 Executor。
    taskExecutorForCachedImages = builder.taskExecutorForCachedImages;//ImageLoaderEngine中用于执行从缓存获取图片任务的 Executor。
    threadPoolSize = builder.threadPoolSize;//上面两个默认线程池的核心池大小,即最大并发数。
    threadPriority = builder.threadPriority;//上面两个默认线程池的线程优先级。
    tasksProcessingType = builder.tasksProcessingType;//上面两个默认线程池的线程队列类型。目前只有 FIFO, LIFO 两种可供选择。
    diskCache = builder.diskCache;//图片磁盘缓存,一般放在 SD 卡。
    memoryCache = builder.memoryCache;//图片内存缓存。
    defaultDisplayImageOptions = builder.defaultDisplayImageOptions;//图片显示的配置项。比如加载前、加载中、加载失败应该显示的占位图片,图片是否需要在磁盘缓存,是否需要在内存缓存等。
    downloader = builder.downloader;//图片下载器。
    decoder = builder.decoder;//图片解码器,内部可使用我们常用的BitmapFactory.decode(…)将图片资源解码成Bitmap对象。

    customExecutor = builder.customExecutor;//用户是否自定义了上面的 taskExecutor。
    customExecutorForCachedImages = builder.customExecutorForCachedImages;//用户是否自定义了上面的 taskExecutorForCachedImages。

    networkDeniedDownloader = new NetworkDeniedImageDownloader(downloader);//不允许访问网络的图片下载器。
    slowNetworkDownloader = new SlowNetworkImageDownloader(downloader);//慢网络情况下的图片下载器。

    L.writeDebugLogs(builder.writeLogs);
}
上面的代码有点多,但是很简单也很清晰,就是一些列初始化的代码。通过一些系列的调用,在initEmptyFieldsWithDefaultValues方法中对一些没有配置的进行的项进行配置,并通过ImageLoaderConfiguration给出默认的参数配置。对于其中的一些配置,在上面的注释中已经表明,ImageLoaderConfiguration中默认的配置,可以参考第48-73行。
至于initEmptyFieldsWithDefaultValues中的配置,在这里进行简单的介绍:
- taskExecutor 从源获取图片任务的线程池
- taskExecutorForCachedImages 用于执行从缓存获取图片任务的线程池
】】】】】】】
| 核心线程数 | 最大线程数 | 空闲线程等待时间 | 容器 |
|---|---|---|---|
| 3 | 3 | 0s | 2 |
前面两个线程池的参数如下:
| 核心线程数 | 最大线程数 | 空闲线程等待时间 | 容器 |
|---|---|---|---|
| 3 | 3 | 0s | 2 |
前面两个线程池如果用户自定义的相应的线程池来实现的话,就会将customExecutor置为true,或将customExecutorForCachedImages置为true。其实customExecutor存在的意义就在于判断用户有没有自定义从源获取图片任务的线程池,customExecutorForCachedImages存在的意义判断在于用户判断用户有没有重写从缓存获取图片的线程池。
- diskCacheFileNameGenerator 默认实现为
HashCodeFileNameGenerator,即用mageUri.hashCode()值当前图片名字。 - diskCache用于表示图片磁盘的缓存,默认实现为
createDiskCache,默认的算法为LruDiskCache算法,缓存的目录为SD卡下的/data/data/" + context.getPackageName() + "/cache/uil-images目录下。 - memoryCache用于表示图片内存的缓存,默认实现为
createMemoryCache,默认使用的算法为LruMemoryCache。 - denyCacheImageMultipleSizesInMemory 为
true时,表示内存缓存不允许缓存一张图片的多个尺寸。这个时候用通过FuzzyKeyMemoryCache来构建memoryCache - downloader表示图片下载器,默认实现为
createImageDownloader,最终通过BaseImageDownloader构建下载器,其下载器中重要的两个参数分别为:连接超时时间connectTimeout默认值为5分钟,读取超时时间readTimeout默认值为20分钟。 - decoder 表示图片解码器,默认实现为
createImageDecoder,最终通过BaseImageDecoder实现。 - defaultDisplayImageOptions 表示默认参数,最终回调到
DisplayImageOptions方法中,里面设计相关的参数初始化。这里就不展开了。
加载配置
我们首先看Application中imgaerLoader设置配置的方法。
ImageLoader.getInstance().init(configuration);
接下来我们继续分析上面的代码是如何将配置应用到ImageLoader中的。首先是ImageLoader.getInstance()实例化一个ImageLoader,通过代码来看实例化的过程:
public static ImageLoader getInstance() {
    if (instance == null) {
        synchronized (ImageLoader.class) {
            if (instance == null) {
                instance = new ImageLoader();
            }
        }
    }
    return instance;
}
可以看出来,getInstance就是获取一个ImageLoader实例,运用了一个双重锁的单利模式,很简单,就不做解释了。
重点看init方法。具体在ImageLoader类中的实现如下:
public synchronized void init(ImageLoaderConfiguration configuration) {
        if (configuration == null) {
            throw new IllegalArgumentException(ERROR_INIT_CONFIG_WITH_NULL);
        }
        if (this.configuration == null) {
            L.d(LOG_INIT_CONFIG);
            engine = new ImageLoaderEngine(configuration);
            this.configuration = configuration;
        } else {
            L.w(WARNING_RE_INIT_CONFIG);
        }
    }
可以看出来,init的实现也是非常简单的。首先判断传入的configuration参数是否为空,为空就直接抛出一个异常,不为空就判断当前类属性configuration是否为空,类中configuration属性为空时调用ImageLoaderEngine构建engine对象,否则就打印警告日志。所以整个方法中最重要的一个语句就是new ImageLoaderEngine(configuration);。这里首先介绍一个ImageLoaderEngine类的作用。简单描述就是ImageLoaderEngine是任务分发器,负责分发LoadAndDisplayImageTask和ProcessAndDisplayImageTask给具体的线程池去执行。具体实现后面会讲到。
加载图片
通过上面两个步骤,imgaeLoder的参数配置已经设置完毕,接下来我们就可以用imageLoader加载图片了。下面是三种加载图片的方式:
加载方式一,异步加载并显示图片到对应的imagerAware上
ImageLoader.getInstance().displayImage(imageUrl,imageView);
加载方式二,异步加载图片并执行回调接口
ImageLoader.getInstance().loadImage(imageUrl,new  ImageLoadingListener() {
    @Override
    public void onLoadingStarted(String imageUri, View view) {

    }

    @Override
    public void onLoadingFailed(String imageUri, View view, FailReason failReason) {

    }

    @Override
    public void onLoadingComplete(String imageUri, View view, Bitmap loadedImage) {

    }

    @Override
    public void onLoadingCancelled(String imageUri, View view) {

    }
});
加载方式三,同步加载图片
ImageLoader.getInstance().loadImageSync(imageUrl);
针对上面三种方法,我们先分析第一种加载图片的方法,其余的两种加载图片的分析也差不多,后面就不具体分析了,只是简单的体现其不同点。
我们来看displayImage方法在ImageLoader类中的实现
public void displayImage(String uri, ImageView imageView) {
    displayImage(uri, new ImageViewAware(imageView), null, null, null);
}

public void displayImage(String uri, ImageView imageView, ImageSize targetImageSize) {
    displayImage(uri, new ImageViewAware(imageView), null, targetImageSize, null, null);
}

public void displayImage(String uri, ImageView imageView, DisplayImageOptions options) {
    displayImage(uri, new ImageViewAware(imageView), options, null, null);
}

public void displayImage(String uri, ImageView imageView, ImageLoadingListener listener) {
    displayImage(uri, new ImageViewAware(imageView), null, listener, null);
}

public void displayImage(String uri, ImageView imageView, DisplayImageOptions options,
        ImageLoadingListener listener) {
    displayImage(uri, imageView, options, listener, null);
}
我们看到上面的displayImage有很多中重载的方法,最终他们都会调用到下面的这个displayImage方法中来。
public void displayImage(String uri, ImageAware imageAware, DisplayImageOptions options,
        ImageSize targetSize, ImageLoadingListener listener, ImageLoadingProgressListener progressListener) {
    //省略了部分判空代码

    ...
    if (targetSize == null) {
        targetSize = ImageSizeUtils.defineTargetSizeForView(imageAware, configuration.getMaxImageSize());
    }
    String memoryCacheKey = MemoryCacheUtils.generateKey(uri, targetSize);
    engine.prepareDisplayTaskFor(imageAware, memoryCacheKey);

    listener.onLoadingStarted(uri, imageAware.getWrappedView());

    Bitmap bmp = configuration.memoryCache.get(memoryCacheKey);
    if (bmp != null && !bmp.isRecycled()) {
        L.d(LOG_LOAD_IMAGE_FROM_MEMORY_CACHE, memoryCacheKey);

        if (options.shouldPostProcess()) {
            ImageLoadingInfo imageLoadingInfo = new ImageLoadingInfo(uri, imageAware, targetSize, memoryCacheKey,
                    options, listener, progressListener, engine.getLockForUri(uri));
            ProcessAndDisplayImageTask displayTask = new ProcessAndDisplayImageTask(engine, bmp, imageLoadingInfo,
                    defineHandler(options));
            if (options.isSyncLoading()) {
                displayTask.run();
            } else {
                engine.submit(displayTask);
            }
        } else {
            options.getDisplayer().display(bmp, imageAware, LoadedFrom.MEMORY_CACHE);
            listener.onLoadingComplete(uri, imageAware.getWrappedView(), bmp);
        }
    } else {
        if (options.shouldShowImageOnLoading()) {
            imageAware.setImageDrawable(options.getImageOnLoading(configuration.resources));
        } else if (options.isResetViewBeforeLoading()) {
            imageAware.setImageDrawable(null);
        }

        ImageLoadingInfo imageLoadingInfo = new ImageLoadingInfo(uri, imageAware, targetSize, memoryCacheKey,
                options, listener, progressListener, engine.getLockForUri(uri));
        LoadAndDisplayImageTask displayTask = new LoadAndDisplayImageTask(engine, imageLoadingInfo,
                defineHandler(options));
        if (options.isSyncLoading()) {
            displayTask.run();
        } else {
            engine.submit(displayTask);
        }
    }
}
从第6行开始看,当没有传入targetSize目标尺寸时,会通过第6行的代码产生一个合适的尺寸。具体逻辑为,当image没有尺寸时就采用测量出来的最大尺寸,当image有尺寸时就用image本身的尺寸。获取最大尺寸的逻辑为:
ImageSize getMaxImageSize() {
        //获取屏幕像素
        DisplayMetrics displayMetrics = resources.getDisplayMetrics();

        int width = maxImageWidthForMemoryCache;//最大的图片内存缓存宽度
        if (width <= 0) {
            width = displayMetrics.widthPixels;//屏幕宽度
        }
        int height = maxImageHeightForMemoryCache;//最大的图片内存缓存高度
        if (height <= 0) {
            height = displayMetrics.heightPixels;//屏幕高度
        }
        return new ImageSize(width, height);
    }
即最大的尺寸为:如设置了maxImageWidthForMemoryCache值且该值大于0,则最大尺寸为其设置的值,否则屏幕宽度。在高度上也一样,就不赘述了。综上,我们可以知道要显示图片的大小的逻辑,我们设置了图片显示的尺寸,则图片尺寸为我们设置的尺寸。否则图片的本身有尺寸的时候,显示的就是自己本身的尺寸,否则就显示最大的图片尺寸。当最大图片内存缓存尺寸大于0时,最大图片尺寸即为最大图片内存尺寸,否则为屏幕尺寸。
分析了那么久,其实还只是分析了displayImage方法的一个方法,下面我们继续看displayImage中的实现。在计算好目标图片的尺寸之后,利用generateKey方法生成一个memoryCacheKey,这里的memoryCacheKey的组成形式为URI + size,用于表示要加载到内存中的图片。通过第10行代码,将要加载的图片加入到cacheKeysForImageAwares队列中,他是一个Collections.synchronizedMap(new HashMap类型的队列,他用来记录正在加载的任务,加载图片的时候会将ImageView的id和图片的url加上尺寸加入到HashMap中,加载完成之后会将其移除。然后通过第12行的代码回调onLoadingStarted方法,这个方法就是我们在使用时的onLoadingStarted方法回调,具体参考上面的加载方式二,异步加载图片并执行回调接口的使用实例。
对于最终调用的displayImage方法代码很重要,所以我们继续往下分析其中的代码。以下的代码已经省略前面已经分析的代码,完整代码参考前面的代码。
Bitmap bmp = configuration.memoryCache.get(memoryCacheKey);
if (bmp != null && !bmp.isRecycled()) {//本地能获取到图片
    L.d(LOG_LOAD_IMAGE_FROM_MEMORY_CACHE, memoryCacheKey);

    if (options.shouldPostProcess()) {
        ---
        //缺失的代码片段1
        ---
    } else {
        options.getDisplayer().display(bmp, imageAware, LoadedFrom.MEMORY_CACHE);
        listener.onLoadingComplete(uri, imageAware.getWrappedView(), bmp);
    }
} else {
    ---
    这里实现从网络上获取图片的逻辑
     //缺失的代码片段2
    ---
}
首先从内存中拿出将要加载的图片(bitmap格式),然后在图片不为空且没被回收的基础上开始加载图片的逻辑。第5行中有一个判断,我们如果在DisplayImageOptions中设置了postProcessor就进入true逻辑,不过默认postProcessor是为null的,BitmapProcessor接口主要是对Bitmap进行处理,这个框架并没有给出相对应的实现,如果我们有自己的需求的时候可以自己实现BitmapProcessor接口(比如将图片设置成圆形的)。我们先分析默认情况,即shouldPostProcess为false的情况下执行的第16-17行代码。第16行代码就将Bitmap设置到ImageView上面,这里我们可以在DisplayImageOptions中配置显示需求displayer,默认使用的是SimpleBitmapDisplayer,直接将Bitmap设置到ImageView上面。代码如下:
public final class SimpleBitmapDisplayer implements BitmapDisplayer {
    @Override
    public void display(Bitmap bitmap, ImageAware imageAware, LoadedFrom loadedFrom) {
        imageAware.setImageBitmap(bitmap);
    }
}
当然,ImageLoader也为我们提供了其他显示的方式,如CircleBitmapDisplayer(),FadeInBitmapDisplayer,RoundeBitmapDisplayer三种显示方式。第17行代码很好理解,就是回调到onLoadingComplete方法,提供给用户的回调。
接下来我们来看当用于设置了postProcessor下情况的逻辑,即上面缺失的代码片段1:
ImageLoadingInfo imageLoadingInfo = new ImageLoadingInfo(uri, imageAware, targetSize, memoryCacheKey,
                    options, listener, progressListener, engine.getLockForUri(uri));
            ProcessAndDisplayImageTask displayTask = new ProcessAndDisplayImageTask(engine, bmp, imageLoadingInfo,
                    defineHandler(options));
            if (options.isSyncLoading()) {
                displayTask.run();
            } else {
                engine.submit(displayTask);
            }
        }
这里代码执行的情况就是用于需要回调图片记载的进度时执行,即用户指定了postProcessor对象,而postProcessor主要用于表示缓存在内存之后的处理程序。
其中的ImageLoadingInfo主要用来加载和显示图片任务需要的信息,ProcessAndDisplayImageTask主要用于处理并显示图片的任务,他实现了Runnable接口。然后通过isSyncLoading判断是同步还是异步,当isSyncLoading为ture时表示当前是同步执行。这里还有一个点需要特别说明以下:我们看第1行代码中的engine.getLockForUri(uri),这个方法主要是用来给图片的URl加锁的,那么给URL要传入这个一个参数给ImageLoadingInfo呢?其实主要是实现对图片的复用,考虑这样一种场景,在一个LitView中,某个Item正在获取图片的过程中,我们将这个item滚出界面后又将其滚进来,滚进来如果没有加锁,该item又会去加载一次图片,为了避免多次对同一个URL重复请求,有必要对正在加载的URL加锁,当图片加载完成之后,就将锁释放掉。
我们在来分析同步执行的情况,直接执行run(),通过displayTask任务来执行,我们来了解ProcessAndDisplayImageTask中run()方法里面的实现:
@Override
    public void run() {
        L.d(LOG_POSTPROCESS_IMAGE, imageLoadingInfo.memoryCacheKey);

        BitmapProcessor processor = imageLoadingInfo.options.getPostProcessor();
        //图片处理器,用于处理从磁盘缓存中读取到的图片。
        Bitmap processedBitmap = processor.process(bitmap);
        //处理图片
        DisplayBitmapTask displayBitmapTask = new DisplayBitmapTask(processedBitmap, imageLoadingInfo, engine,
                LoadedFrom.MEMORY_CACHE);
                //构建图片实现的任务
        LoadAndDisplayImageTask.runTask(displayBitmapTask, imageLoadingInfo.options.isSyncLoading(), handler, engine);
                //执行图片显示任务
    }
可以看到,在从本地读取到图片的显示逻辑还是很简单的,run方法核心只有四行代码,首先对图片进行相对应的处理,然后构建图片显示的任务,最后执行图片显示的任务就OK了。我们来看DisplayBitmapTask中具体做了什么:
final class DisplayBitmapTask implements Runnable {

    ...
    private final Bitmap bitmap;
    private final String imageUri;
    private final ImageAware imageAware;
    private final String memoryCacheKey;
    private final BitmapDisplayer displayer;
    private final ImageLoadingListener listener;
    private final ImageLoaderEngine engine;
    private final LoadedFrom loadedFrom;

    public DisplayBitmapTask(Bitmap bitmap, ImageLoadingInfo imageLoadingInfo, ImageLoaderEngine engine,
            LoadedFrom loadedFrom) {
        this.bitmap = bitmap;
        imageUri = imageLoadingInfo.uri;
        imageAware = imageLoadingInfo.imageAware;
        memoryCacheKey = imageLoadingInfo.memoryCacheKey;
        displayer = imageLoadingInfo.options.getDisplayer();
        listener = imageLoadingInfo.listener;
        this.engine = engine;
        this.loadedFrom = loadedFrom;
    }

    @Override
    public void run() {
        if (imageAware.isCollected()) {//如果要显示的图片已经被GC回收
            //回调onLoadingCancelled接口
            listener.onLoadingCancelled(imageUri, imageAware.getWrappedView());
        } else if (isViewWasReused()) {//如果
             //回调onLoadingCancelled接口
            listener.onLoadingCancelled(imageUri, imageAware.getWrappedView());
        } else {
             //正在显示图片的逻辑
            displayer.display(bitmap, imageAware, loadedFrom);
            engine.cancelDisplayTaskFor(imageAware);
            listener.onLoadingComplete(imageUri, imageAware.getWrappedView(), bitmap);
        }
    }

    /** Checks whether memory cache key (image URI) for current ImageAware is actual */
    //检查内存中当前图片的key是否是真实存在的
    private boolean isViewWasReused() {
        String currentCacheKey = engine.getLoadingUriForView(imageAware);
        return !memoryCacheKey.equals(currentCacheKey);
    }
}
上面run方法中的逻辑也比较清晰,首先对是否能进行图片显示的环境做一定的判断,在当前环境可以显示图片的前提下,利用BitmapDisplayer中的display方法显示图片,然后通过cancelDisplayTaskFor方法将当前显示的图片从cacheKeysForImageAwares队列中移除。这里的cacheKeysForImageAwares指的是ImageAware与内存缓存key对应的map,key 为ImageAware的id,value为内存缓存的key。完成之后就回调onLoadingComplete方法。
但是注意到,在ProcessAndDisplayImageTask中,并没有直接将displayBitmapTask通过start或者是run方法将其执行,而是通过一个LoadAndDisplayImageTask中的runTask方法,我们来看其实现:
    static void runTask(Runnable r, boolean sync, Handler handler, ImageLoaderEngine engine) {
        if (sync) {
            r.run();
        } else if (handler == null) {
            engine.fireCallback(r);
        } else {
            handler.post(r);
        }
    }
从实现上来说,还是比较简单的。如果是同步加载的话,就直接调用run方法,否则(异步执行)就调用handler调用post方法将其投递到主线程中去执行,这个handler的实现在ImageLoader中。如果handler为空的话,就取消图片显示,直接处理善后工作。这个handler在ImageLoader中的实现如下:
    private static Handler defineHandler(DisplayImageOptions options) {
        Handler handler = options.getHandler();
        if (options.isSyncLoading()) {
            handler = null;
        } else if (handler == null && Looper.myLooper() == Looper.getMainLooper()) {
            handler = new Handler();
        }
        return handler;
    }
可以看出来,handler的创建也只会在异步加载的时候才会创建,同步情况下不会创建handler。
从网络上加载图片
分析完本地加载图片后,我们来分析上面displayImage中缺失的代码片段2,即本地无法获取图片的图片加载逻辑,我们先来看其中的代码:
public void displayImage(String uri, ImageAware imageAware, DisplayImageOptions options,
            ImageSize targetSize, ImageLoadingListener listener, ImageLoadingProgressListener progressListener) {
    ...
        Bitmap bmp = configuration.memoryCache.get(memoryCacheKey);
        if (bmp != null && !bmp.isRecycled()) {
            ...
        } else {
            //这下面的代码就是在本地无法获取图片的情况下加载图片的逻辑
            if (options.shouldShowImageOnLoading()) {
                imageAware.setImageDrawable(options.getImageOnLoading(configuration.resources));
            } else if (options.isResetViewBeforeLoading()) {
                imageAware.setImageDrawable(null);
            }

            ImageLoadingInfo imageLoadingInfo = new ImageLoadingInfo(uri, imageAware, targetSize, memoryCacheKey,
                    options, listener, progressListener, engine.getLockForUri(uri));
            LoadAndDisplayImageTask displayTask = new LoadAndDisplayImageTask(engine, imageLoadingInfo,
                    defineHandler(options));
            if (options.isSyncLoading()) {
                displayTask.run();
            } else {
                engine.submit(displayTask);
            }
        }
    }
可以看到,在无法获取本地图片情况下加载图片的逻辑稍微比本地加载图片的逻辑稍微多一点,但实现上很多方法是相同的,我们一点一点来开始分析:
- 首先利用
shouldShowImageOnLoading方法判断在加载的过程中是否需要显示图片,当用户设置了imageResOnLoading占位图片资源id,或者设置了加载中占位图片drawable对象时其返回值为ture,即执行在图片加载过程中显示占位图片的逻辑。 - 在用户没有设置占位图片的情况下,会继续判断是否需要重设图片,若需要重设图片,就将图片设为null。
- 至于这里的
ImageLoadingInfo(加载和显示图片任务需要的信息)和前面的实现一样,这里就不重复介绍了。 - 这里的
LoadAndDisplayImageTask,为下载和显示图片任务,用于从网络、文件系统或者内存获取图片并解析,然后调用DisplayBitmapTask在ImageAware中显示图片。 - 在同步加载的情况下,直接运行
displayTask。 - 异步加载的情况下,将
displayTask提交到taskDistributor线程池中运行。
接下来,我们就具体分析LoadAndDisplayImageTask中的run方法。下面是LoadAndDisplayImageTask类中run的具体实现:
@Override
public void run() {
    if (waitIfPaused()) return;
    if (delayIfNeed()) return;

    ---
    暂时神略
}
可以看到,LoadAndDisplayImageTask中的run()方法里面的逻辑还是稍微有点复杂的。我们一点一点来分析;
首先看前面两个方法的实现,即3-4行的代码实现,他们在LoadAndDisplayImageTask类中的实现代码如下:
//主要用于判断当前线程是否被打断,被打断返回ture,否则返回isTaskNotActual()的返回值
private boolean waitIfPaused() {
    AtomicBoolean pause = engine.getPause();
    if (pause.get()) {
        synchronized (engine.getPauseLock()) {
            if (pause.get()) {
                L.d(LOG_WAITING_FOR_RESUME, memoryCacheKey);
                try {
                    engine.getPauseLock().wait();
                } catch (InterruptedException e) {
                    L.e(LOG_TASK_INTERRUPTED, memoryCacheKey);
                    return true;
                }
                L.d(LOG_RESUME_AFTER_PAUSE, memoryCacheKey);
            }
        }
    }
    return isTaskNotActual();
}

//主要用于判断是否需要预处理,不要要返回false,需要返回isTaskNotActual()的返回值
private boolean delayIfNeed() {
    if (options.shouldDelayBeforeLoading()) {
        L.d(LOG_DELAY_BEFORE_LOADING, options.getDelayBeforeLoading(), memoryCacheKey);
        try {
            Thread.sleep(options.getDelayBeforeLoading());
        } catch (InterruptedException e) {
            L.e(LOG_TASK_INTERRUPTED, memoryCacheKey);
            return true;
        }
        return isTaskNotActual();
    }
    return false;
}

//主要用于判断imageVire是否被回收和重用,满足其中一个条件返回ture,否则返回false
private boolean isTaskNotActual() {
    return isViewCollected() || isViewReused();
}

//主要用于判断ImageView是否被GC回收了,回收了返回ture,否者返回false
private boolean isViewCollected() {
    if (imageAware.isCollected()) {
        L.d(LOG_TASK_CANCELLED_IMAGEAWARE_COLLECTED, memoryCacheKey);
        return true;
    }
    return false;
}

//主要用于判断imageView是否被重用,被重用返回true,否则返回false
private boolean isViewReused() {
    String currentCacheKey = engine.getLoadingUriForView(imageAware);
    // Check whether memory cache key (image URI) for current ImageAware is actual.
    // If ImageAware is reused for another task then current task should be cancelled.
    boolean imageAwareWasReused = !memoryCacheKey.equals(currentCacheKey);
    if (imageAwareWasReused) {
        L.d(LOG_TASK_CANCELLED_IMAGEAWARE_REUSED, memoryCacheKey);
        return true;
    }
    return false;
}
看起来好像也有点复杂,但是并不难,我们直接一路看过去就好了。每个方法的作用我都已经在代码中添加了注释了,这里我们来整理一下思路:通过上面的源码,我们基本上可以确定他们的作用是什么了,但是为什么需要他们呢?我们试想这样一种场景,在使用ListView来显示图片时,在手指滑动的时候一般不会去加载图片,因为在这个过程中很多图片是没有必要加载的。这个时候我们就可以通过PauseOnScrollListener(ImageLoader imageLoader, boolean pauseOnScroll, boolean pauseOnFling)来控制在滑动过程中图片的加载。第一个参数用来控制手指按着滑动情况下的是否加载图片,第二个参数用来控制手指松开后时候加载图片。至于中间参数的参数和值的传递比较简单,这里就不全部给出来了,可以自行通过查看源码了解pauseOnScroll是如何改变waitIfPaused方法中pause的值的(默认为false)。
至于isViewReused的方法存在的意义就更好理解了,在ListView中存在一种复用的优化策略,即在ListView在滑动时,会复用Item,为了避免图片显示时的错位情况,在ImageLoader就通过isViewReused来解决这个问题。
接下来我们继续看LoadAndDisplayImageTask中的run()方法中剩下的代码:
@Override
public void run() {
    ...
    ReentrantLock loadFromUriLock = imageLoadingInfo.loadFromUriLock;//获取锁
    L.d(LOG_START_DISPLAY_IMAGE_TASK, memoryCacheKey);
    if (loadFromUriLock.isLocked()) {   //判断锁是否被持有
        L.d(LOG_WAITING_FOR_IMAGE_LOADED, memoryCacheKey);
    }

    loadFromUriLock.lock();/加锁
    Bitmap bmp;
    try {
        checkTaskNotActual();//判断当前请求是否是可实现的,(当imageView被GC回收或者此次请求的URL无法获取imageView时时为不可实现的请求)

        bmp = configuration.memoryCache.get(memoryCacheKey);//尝试从内存中加载图片
        if (bmp == null || bmp.isRecycled()) {
            bmp = tryLoadBitmap();//尝试从文件中加载图片,如果没有再去网络中获取,然后将bitmap保存在文件系统中。
            //这个方法是重点,后面会进行讲到
            if (bmp == null) return; // listener callback already was fired

            checkTaskNotActual();
            checkTaskInterrupted();//用于判断当前任务有没有被打断,被打断直接抛出异常

            if (options.shouldPreProcess()) {//默认为ture,表示缓存在内存之前没有要处理的程序
                L.d(LOG_PREPROCESS_IMAGE, memoryCacheKey);
                bmp = options.getPreProcessor().process(bmp);//对bitmap进行适当的剪裁
                if (bmp == null) {
                    L.e(ERROR_PRE_PROCESSOR_NULL, memoryCacheKey);
                }
            }

            if (bmp != null && options.isCacheInMemory()) {//如果有必要缓存到内存中的话
                L.d(LOG_CACHE_IMAGE_IN_MEMORY, memoryCacheKey);
                configuration.memoryCache.put(memoryCacheKey, bmp);//将图片保存到内存缓存中去
            }
        } else {
            loadedFrom = LoadedFrom.MEMORY_CACHE;
            L.d(LOG_GET_IMAGE_FROM_MEMORY_CACHE_AFTER_WAITING, memoryCacheKey);
        }

        if (bmp != null && options.shouldPostProcess()) {
            L.d(LOG_POSTPROCESS_IMAGE, memoryCacheKey);
            bmp = options.getPostProcessor().process(bmp);//自定义的bitmap操作会在这里进行
            if (bmp == null) {
                L.e(ERROR_POST_PROCESSOR_NULL, memoryCacheKey);
            }
        }
        checkTaskNotActual();
        checkTaskInterrupted();
    } catch (TaskCancelledException e) {
        fireCancelEvent(); //解移除的监听 上面很多方法会抛出异常都需要这个方法来移除监听
        return;
    } finally {
        loadFromUriLock.unlock();//释放锁
    }

    DisplayBitmapTask displayBitmapTask = new DisplayBitmapTask(bmp, imageLoadingInfo, engine, loadedFrom); //构建显示任务
    runTask(displayBitmapTask, syncLoading, handler, engine);//将图片显示到指定的imageView上
}
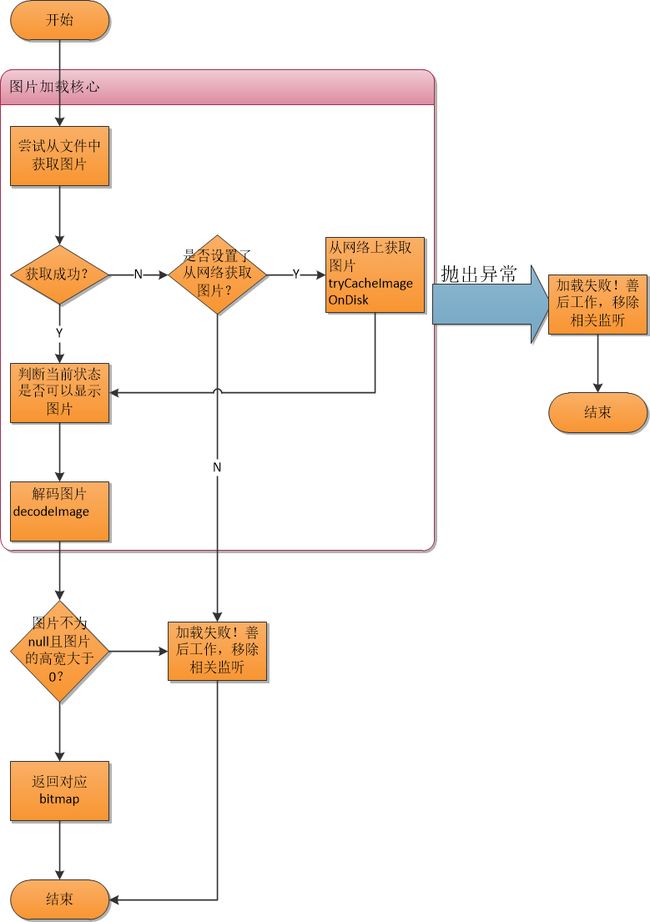
上面的代码也有点多,但是在添加了先关的注解之后,详细阅读起来还是比较简单的。这里在梳理一下整个LoadAndDisplayImageTask中的run方法的相关逻辑。首先会判断当前是否是可以加载图片的状态,不可以加载图片的话就直接返回,什么都不做。在可以加载图片的前提下,会给以下的核心逻辑代码添加一个锁:【首先尝试从内存中获取图片,没有对应的图片就会从磁盘中寻找,如果磁盘中也找不到,那么就只能从网络中去需找,在找到图片后将其存在文件系统中,如果用户定义了图片的预处理,就会执行用户定义的图片预处理,如果需要缓存到内存就会缓存到内存中,继而执行用户定义的图片后处理(提前是用户定义了图片后处理),最后判断一下当前状态是否还可以显示图片,若当前状态不能显示图片就会直接抛出异常,在catch语句中移除相关的监听。如果当前状态还可以显示图片,在finally语句中释放锁 】以此保障多线程的可靠性,然后执行图片显示任务将图片显示到图片上,到此完成了整个图片的加载。用流程图表示如下:

下面我们来分析上面run()方法中最重要的一个方法tryLoadBitmap(),他的实现也在LoadAndDisplayImageTask类中,实现代码如下:
private Bitmap tryLoadBitmap() throws TaskCancelledException {
    Bitmap bitmap = null;
    try {
        File imageFile = configuration.diskCache.get(uri);//先判断文件中有没有该文件
        if (imageFile != null && imageFile.exists() && imageFile.length() > 0) {//如果文件中有该文件,就直接调用decodeImage去解码图片
            L.d(LOG_LOAD_IMAGE_FROM_DISK_CACHE, memoryCacheKey);
            loadedFrom = LoadedFrom.DISC_CACHE;

            checkTaskNotActual();//判断当前是否具有加载图片的状态,这个方法在前面已经解析过了
            bitmap = decodeImage(Scheme.FILE.wrap(imageFile.getAbsolutePath()));//解码图片
        }
        if (bitmap == null || bitmap.getWidth() <= 0 || bitmap.getHeight() <= 0) {
        //表示文件中没有找到图片,就会指定到网络上获取bitmap,
            L.d(LOG_LOAD_IMAGE_FROM_NETWORK, memoryCacheKey);
            loadedFrom = LoadedFrom.NETWORK;

            String imageUriForDecoding = uri;
            if (options.isCacheOnDisk() && tryCacheImageOnDisk()) {
            //options.isCacheOnDisk()用来表是否需要将图片缓存到文件系统中,默认为fasle。
                imageFile = configuration.diskCache.get(uri);
                if (imageFile != null) {
                    imageUriForDecoding = Scheme.FILE.wrap(imageFile.getAbsolutePath());
                }
            }

            checkTaskNotActual();
            bitmap = decodeImage(imageUriForDecoding);

            if (bitmap == null || bitmap.getWidth() <= 0 || bitmap.getHeight() <= 0) {
                fireFailEvent(FailType.DECODING_ERROR, null);
            }
        }
    } catch (IllegalStateException e) {
        fireFailEvent(FailType.NETWORK_DENIED, null);
    } catch (TaskCancelledException e) {
        throw e;
    } catch (IOException e) {
        L.e(e);
        fireFailEvent(FailType.IO_ERROR, e);
    } catch (OutOfMemoryError e) {
        L.e(e);
        fireFailEvent(FailType.OUT_OF_MEMORY, e);
    } catch (Throwable e) {
        L.e(e);
        fireFailEvent(FailType.UNKNOWN, e);
    }
    return bitmap;
}
上面的代码虽然看起来有点多,但是逻辑还是很清晰的,我在关键的地方都添加了注释,相信阅读起来很简单。这里再次梳理一下tryLoadBitmap的逻辑吧。首先从尝试从文件中去获取图片,如果能从文件中获取图片的话,就判断当前状态是否可以加载图片,然后通过decodeImage方法将图片解码成可以显示的格式。如果文件中没有要显示的图片,在设置了从网络获取图片的前提下就会利用tryCacheImageOnDisk方法从网络上获取图片,然后将图片解码成要显示的格式,可以参考下面的流程图:
在上面的流程中,我们对其中两个重要的方法来进一步的探究其实现,一个方法是
decodeImage,另一个是
tryCacheImageOnDisk()。着两个方法的实现源码如下,他们都在
LoadAndDisplayImageTask类中。
//解码图片
private Bitmap decodeImage(String imageUri) throws IOException {
//获取图片的
    ViewScaleType viewScaleType = imageAware.getScaleType();
    ImageDecodingInfo decodingInfo = new ImageDecodingInfo(memoryCacheKey, imageUri, uri, targetSize, viewScaleType,
            getDownloader(), options);
    return decoder.decode(decodingInfo);
}

/** @return true - if image was downloaded successfully; false - otherwise */
private boolean tryCacheImageOnDisk() throws TaskCancelledException {
    L.d(LOG_CACHE_IMAGE_ON_DISK, memoryCacheKey);

    boolean loaded;
    try {
        loaded = downloadImage();
        if (loaded) {
            int width = configuration.maxImageWidthForDiskCache;
            int height = configuration.maxImageHeightForDiskCache;
            if (width > 0 || height > 0) {
                L.d(LOG_RESIZE_CACHED_IMAGE_FILE, memoryCacheKey);
                resizeAndSaveImage(width, height); // TODO : process boolean result
                //解码成bitmap图片,并保存他。关于这个方法就不在深入了。
            }
        }
    } catch (IOException e) {
        L.e(e);
        loaded = false;
    }
    return loaded;
}

//负责下载图片,并将其保存到文件缓存中
private boolean downloadImage() throws IOException {
    InputStream is = getDownloader().getStream(uri, options.getExtraForDownloader());
    if (is == null) {
        L.e(ERROR_NO_IMAGE_STREAM, memoryCacheKey);
        return false;
    } else {
        try {
            return configuration.diskCache.save(uri, is, this);
        } finally {
            IoUtils.closeSilently(is);
        }
    }
}
这里就不对上面的代码进行解释了,我们直接看decode方法在BaseImageDecoder中的具体实现,至于其他的方法,请参考注释。
@Override
public Bitmap decode(ImageDecodingInfo decodingInfo) throws IOException {
    Bitmap decodedBitmap;
    ImageFileInfo imageInfo;

    InputStream imageStream = getImageStream(decodingInfo);
    if (imageStream == null) {
        L.e(ERROR_NO_IMAGE_STREAM, decodingInfo.getImageKey());
        return null;
    }
    try {
        imageInfo = defineImageSizeAndRotation(imageStream, decodingInfo);
        imageStream = resetStream(imageStream, decodingInfo);
        Options decodingOptions = prepareDecodingOptions(imageInfo.imageSize, decodingInfo);
        decodedBitmap = BitmapFactory.decodeStream(imageStream, null, decodingOptions);
    } finally {
        IoUtils.closeSilently(imageStream);
    }

    if (decodedBitmap == null) {
        L.e(ERROR_CANT_DECODE_IMAGE, decodingInfo.getImageKey());
    } else {
        decodedBitmap = considerExactScaleAndOrientatiton(decodedBitmap, decodingInfo, imageInfo.exif.rotation,
                imageInfo.exif.flipHorizontal);
    }
    return decodedBitmap;
}
综上,我们暂时分析完了run()方法中逻辑和主要方法。接下来我们继续分析异步的情况,这里再次贴出之前displayImage的主要流程代码。因为之前的代码隔得有点远了。
public void displayImage(String uri, ImageAware imageAware, DisplayImageOptions options,
ImageSize targetSize, ImageLoadingListener listener, ImageLoadingProgressListener progressListener) {
      ---
Bitmap bmp = configuration.memoryCache.get(memoryCacheKey);
    if (bmp != null && !bmp.isRecycled()) {
        if (options.shouldPostProcess()) {
           ...
           if (options.isSyncLoading()) {
                displayTask.run();
            } else {
                engine.submit(displayTask);
            }
        }else {
            options.getDisplayer().display(bmp, imageAware, LoadedFrom.MEMORY_CACHE);
            listener.onLoadingComplete(uri, imageAware.getWrappedView(), bmp);
        }
    }else{
       ...
       缺失的代码片段2
    }
}
我们之前已经分析了displayTask.run();的主要流程,接下来我们分析异步的执行engine.submit(displayTask);的主要流程和方法,他的实现主要在ImageLoaderEngine中,submit的实现如下:
void submit(ProcessAndDisplayImageTask task) {
    initExecutorsIfNeed();
    taskExecutorForCachedImages.execute(task);
}
方法很简单,首先只有两个方法调用,第一行代码从名字分析就应该是用来初始化Executor的(有必要的话),然后执行将此次任务提交到线程池中运行。在线程池中的执行也会执行调用之前的run方法,这里就不再分析了。我们分析一下第一行代码,验证一下我们的猜想是不是正确的。
private void initExecutorsIfNeed() {
    if (!configuration.customExecutor && ((ExecutorService) taskExecutor).isShutdown()) {
        taskExecutor = createTaskExecutor();
    }
    if (!configuration.customExecutorForCachedImages && ((ExecutorService) taskExecutorForCachedImages)
            .isShutdown()) {
        taskExecutorForCachedImages = createTaskExecutor();
    }
}
从上面代码分析:首先判断当前的taskExecutor是不是关闭了,如果处于关闭状态就创建一个新的Executor,这里的taskExecutor指的是用与执行从源获取图片任务的线程池。然后判断taskExecutorForCachedImages是不是就绪,如果他被关闭的话就创建一个新的线程池taskExecutorForCachedImages,用于执行从缓存获取图片任务的线程池。综上,源码验证了我们之前的猜测,initExecutorsIfNeed方法的确是用来初始化相关线程池的。
displayImage方法总结
从上面的流程中,可以明显看出来,displayImage方法就是imageLoader加载图片的核心,我们在这里在来总结一下整个displayImage的逻辑,先将整个displayImage代码完整的贴上来:
public void displayImage(String uri, ImageAware imageAware, DisplayImageOptions options,
        ImageSize targetSize, ImageLoadingListener listener, ImageLoadingProgressListener progressListener) {
    checkConfiguration();
    if (imageAware == null) {
        throw new IllegalArgumentException(ERROR_WRONG_ARGUMENTS);
    }
    if (listener == null) {
        listener = defaultListener;
    }
    if (options == null) {
        options = configuration.defaultDisplayImageOptions;
    }

    if (TextUtils.isEmpty(uri)) {
        engine.cancelDisplayTaskFor(imageAware);
        listener.onLoadingStarted(uri, imageAware.getWrappedView());
        if (options.shouldShowImageForEmptyUri()) {
            imageAware.setImageDrawable(options.getImageForEmptyUri(configuration.resources));
        } else {
            imageAware.setImageDrawable(null);
        }
        listener.onLoadingComplete(uri, imageAware.getWrappedView(), null);
        return;
    }

    if (targetSize == null) {
        targetSize = ImageSizeUtils.defineTargetSizeForView(imageAware, configuration.getMaxImageSize());
    }
    String memoryCacheKey = MemoryCacheUtils.generateKey(uri, targetSize);
    engine.prepareDisplayTaskFor(imageAware, memoryCacheKey);

    listener.onLoadingStarted(uri, imageAware.getWrappedView());

    Bitmap bmp = configuration.memoryCache.get(memoryCacheKey);
    if (bmp != null && !bmp.isRecycled()) {
        L.d(LOG_LOAD_IMAGE_FROM_MEMORY_CACHE, memoryCacheKey);

        if (options.shouldPostProcess()) {
            ImageLoadingInfo imageLoadingInfo = new ImageLoadingInfo(uri, imageAware, targetSize, memoryCacheKey,
                    options, listener, progressListener, engine.getLockForUri(uri));
            ProcessAndDisplayImageTask displayTask = new ProcessAndDisplayImageTask(engine, bmp, imageLoadingInfo,
                    defineHandler(options));
            if (options.isSyncLoading()) {
                displayTask.run();
            } else {
                engine.submit(displayTask);
            }
        } else {
            options.getDisplayer().display(bmp, imageAware, LoadedFrom.MEMORY_CACHE);
            listener.onLoadingComplete(uri, imageAware.getWrappedView(), bmp);
        }
    } else {
        if (options.shouldShowImageOnLoading()) {
            imageAware.setImageDrawable(options.getImageOnLoading(configuration.resources));
        } else if (options.isResetViewBeforeLoading()) {
            imageAware.setImageDrawable(null);
        }

        ImageLoadingInfo imageLoadingInfo = new ImageLoadingInfo(uri, imageAware, targetSize, memoryCacheKey,
                options, listener, progressListener, engine.getLockForUri(uri));
        LoadAndDisplayImageTask displayTask = new LoadAndDisplayImageTask(engine, imageLoadingInfo,
                defineHandler(options));
        if (options.isSyncLoading()) {
            displayTask.run();
        } else {
            engine.submit(displayTask);
        }
    }
}
将上面代码用流程图可以表示为以下的表现形式。
(原创图,敬请批评指正)
可以看到,在上面流程图算比较复杂,但是逻辑很清晰,基本上所有的功能集中在displayImage中进行调度使用,所以给我们分析ImageLoader降低了不少的难度。
至于上面流程图中没有具体体现的任务可以参考前面的分析。
针对上面三种显示图片的方法,最终都会通过调用displayImage来实现,只是对其中的参数进行了一定的设置,这里就不在详细介绍了,有兴趣的可以自己查阅源码。
LRUCache和DisLruCacher分析
LRUCache
LruCache是android 3.1所提供的一个缓存类,他是一个泛型类,他内部采用一个LinkedHashMap以强引用的方式存储外界的缓存对象,其提供了get和put方法来完成缓存的获取和添加属性,当缓存满时,LruCache会移除较早使用的缓存对象,然后在添加新的缓存对象。
构造方法如下:
 public LruCache(int maxSize) {
        if (maxSize <= 0) {
            throw new IllegalArgumentException("maxSize <= 0");
        }
        this.maxSize = maxSize;
        this.map = new LinkedHashMap(0, 0.75f, true);
    }
可以看到,LruCache的构造方法非常简单,只需要传入一个maxSize设置最大的缓存对象即可,然后实例化map对象。
这里也附上get和put的源码:
public final V get(K key) {
    if (key == null) {
        throw new NullPointerException("key == null");
    }

    V mapValue;
    synchronized (this) {
        mapValue = map.get(key);
        if (mapValue != null) {
            hitCount++;
            return mapValue;
        }
        missCount++;
    }

  V createdValue = create(key);
    if (createdValue == null) {
        return null;
    }

    synchronized (this) {
        createCount++;
        mapValue = map.put(key, createdValue);

        if (mapValue != null) {
            // There was a conflict so undo that last put
            map.put(key, mapValue);
        } else {
            size += safeSizeOf(key, createdValue);
        }
    }

    if (mapValue != null) {
        entryRemoved(false, key, createdValue, mapValue);
        return mapValue;
    } else {
        trimToSize(maxSize);
        return createdValue;
    }
}


public final V put(K key, V value) {
    if (key == null || value == null) {
        throw new NullPointerException("key == null || value == null");
    }

    V previous;
    synchronized (this) {
        putCount++;
        size += safeSizeOf(key, value);
        previous = map.put(key, value);
        if (previous != null) {
            size -= safeSizeOf(key, previous);
        }
    }

    if (previous != null) {
        entryRemoved(false, key, previous, value);
    }

    trimToSize(maxSize);
    return previous;
}
更多的分析可以参考这里。
DisLruCache
DisLruCache用于实现存储设置缓存,即磁盘缓存,他通过将缓存对象写入文件系统从而实现缓存的效果。
我们在这里对其创建,缓存添加和移除缓存进行简单的分析。
创建过程:
  private DiskLruCache(File directory, int appVersion, int valueCount, long maxSize) {
   ...简单的赋值,就不贴出来了
  }
其中的四个参数分别是:
-
directory表示磁盘存在文件系统中的存储路径; -
appVersion表示应用的版本号,一般设置1就可; -
valueCount表示单个节点锁对应的数据的个数,一般设为1就可以了; -
maxSize表示缓存的总大小,比如50MB,当缓存大小超过这个设置值后,DisLruCache会清除一些缓存从而保证总大小不大于这个设定值。
当然,DiskLruCache提供了open方法来创建自身:
  public static DiskLruCache open(File directory, int appVersion, int valueCount, long maxSize)
      throws IOException {
    if (maxSize <= 0) {
      throw new IllegalArgumentException("maxSize <= 0");
    }
    if (valueCount <= 0) {
      throw new IllegalArgumentException("valueCount <= 0");
    }

    // If a bkp file exists, use it instead.
    File backupFile = new File(directory, JOURNAL_FILE_BACKUP);
    if (backupFile.exists()) {
      File journalFile = new File(directory, JOURNAL_FILE);
      // If journal file also exists just delete backup file.
      if (journalFile.exists()) {
        backupFile.delete();
      } else {
        renameTo(backupFile, journalFile, false);
      }
    }
DisLruCacher的缓存添加:
DisLruCache的缓存操作通过Editor完成的,Editor表示一个缓存对象的编辑对象。在ImageLoader的运用,首先需要获取图片的URL所对用的Key,然后根据Key就可以通过edit()方法来获取Editor对象,如果这个缓存正在被编辑,那么edit会返回null,即DisLrucache不允许同时编辑一个缓存对象。之所以要把url转换成key,是因为url中可能有特殊字符,这将影响url在Adnroid中的直接使用,一般采用url的md5值作为key。
DisLruCacher的缓存查找:
缓存查找过程也需要将url转换成key,然后通过DisLrache的get方法得到一个snapshot对象即可得到缓存的文件输入流,进而得到Bitmap对象。为了避免加载图片过程中导致的OOM问题,一般建议不直接加载原始图片,建议先对图片进行压缩之后在去加载。下面是get方法的实现逻辑:
 public synchronized Value get(String key) throws IOException {
    checkNotClosed();
    Entry entry = lruEntries.get(key);
    if (entry == null) {
      return null;
    }

    if (!entry.readable) {
      return null;
    }

    for (File file : entry.cleanFiles) {
        // A file must have been deleted manually!
        if (!file.exists()) {
            return null;
        }
    }

    redundantOpCount++;
    journalWriter.append(READ);
    journalWriter.append(' ');
    journalWriter.append(key);
    journalWriter.append('\n');
    if (journalRebuildRequired()) {
      executorService.submit(cleanupCallable);
    }

    return new Value(key, entry.sequenceNumber, entry.cleanFiles, entry.lengths);
  }
DisLruCacher的缓存删除:
DisLruCacher提供了remove,delete方法来进行磁盘的删除操作。删除通过需要将url转换成key,然后从lruEntries的LinkedHashMap对象中获取该对象,在对象存在的前提下,删除文件中对应的文件,然后移除lruEntries对应的key值。代码实现如下:
 public synchronized boolean remove(String key) throws IOException {
    checkNotClosed();
    Entry entry = lruEntries.get(key);
    if (entry == null || entry.currentEditor != null) {
      return false;
    }

    for (int i = 0; i < valueCount; i++) {
      File file = entry.getCleanFile(i);
      if (file.exists() && !file.delete()) {
        throw new IOException("failed to delete " + file);
      }
      size -= entry.lengths[i];
      entry.lengths[i] = 0;
    }

    redundantOpCount++;
    journalWriter.append(REMOVE);
    journalWriter.append(' ');
    journalWriter.append(key);
    journalWriter.append('\n');

    lruEntries.remove(key);

    if (journalRebuildRequired()) {
      executorService.submit(cleanupCallable);
    }

    return true;
  }
杂谈
下面是我对imageLoader源码分析之后的一些感悟和一些总结,有一些还是面试时被问到的问题,这里一并记录下来。
ImageLoader运用的设计模式
从源码分析上来看,最明显的就是建造者模式和单例模式,这两种模式在实际项目中也是运行最广的设计模式。还使用了工厂模式,装饰者模式,代理模式,策略模式等等。设计模式参考
当ListView显示图片,滚动时ImageLoader是如何避免OOM的?
首先是对缓存进行管理,具体管理内存的方法是LruCache,实现算法是LRU:通过优先淘汰最近最少使用的缓存对象,保证总缓存大小不高于限定值。
LRUCacher算法的具体实现
他内部采用一个LinkedhashMap以强引用的方式存储外界的缓存对象,其提供了get和put方法来完成缓存的获取和添加操作,当缓存满时,LRUcacher会移除较早使用的缓存对象,然后再添加新的缓存对象。
ImagerLoader的为什么会被淘汰
- 首先相对于Gilde来说,ImagerLoader的配置相对繁琐,需要对其中的参数有比较详细的了解才能比较好的驾驭ImageLoader,而Gilde简单易用,没有繁琐复杂的配置;
- Gilde中的内存管理比ImageLoader做的更好,虽然ImageLoader也说有三层缓存,但是实际上是两层,一个磁盘,一个内存缓存。而Gilde中的内存管理做到了两级内存缓存,更加可靠;
- 在网络请求方面,ImageLoader采用的是HttpConnection,而Gilde默认采用更加高效的okhttp,虽然两者都支持自定义下载器,但是明显Gilde的支持更好。
参考链接
- 官方github
- Android Universal Image Loader 源码分析
- universal-imager-Loader完全解析
- 《android开发艺术探索》