一,Google原生zXing包使用:
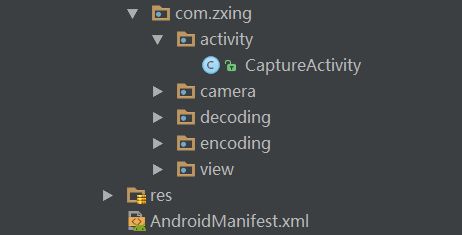
1.CaptureActivity就是扫描界面
//跳转到扫描界面
  public void btn(View view) {
        Intent intent = new Intent(this, CaptureActivity.class);
        startActivityForResult(intent, 0);
    }
2.扫描结束后回调
    @Override
    protected void onActivityResult(int requestCode, int resultCode, Intent data) {
        if (requestCode == 0) {
            if (resultCode == RESULT_OK) {
                Bundle bundle = data.getExtras();
                if (bundle != null) {
                    String result = bundle.getString("result");
                    Intent intent = new Intent();
                    intent.setAction("android.intent.action.VIEW");
                    intent.setData(Uri.parse(result.toString()));
                    startActivity(intent);
                }
            }
        }
    }
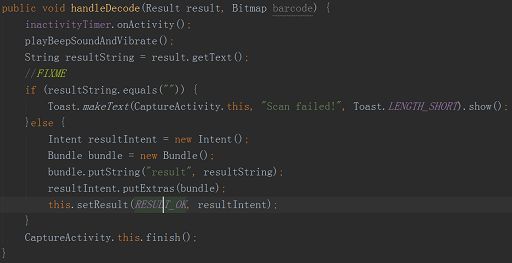
3.在CaptureActivity中handleDedcode()方法中“result”作为key,二维码解析结果作为值传入
常见问题:
-
取景框太小
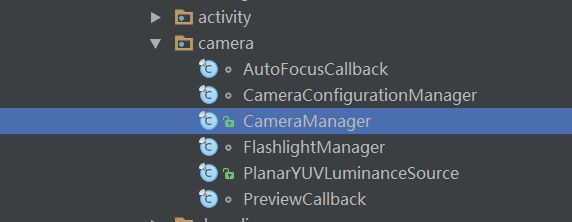
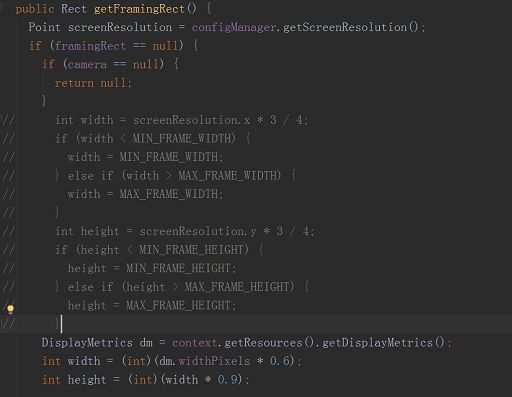
在camera包下的CameraManager类中修改取景框大小
这几值就是更改取景框大小的常量
如果效果不明显,则将原本计算height和width的代码注释,添加以下代码:
      DisplayMetrics dm = context.getResources().getDisplayMetrics();
      int width = (int)(dm.widthPixels * 0.6);
      int height = (int)(width * 0.9);
-
二维码拉伸变形
针对于扫描时,二维码拉伸变形的问题,是因为zxing默认是针对横屏扫描的;
此时我们需要找到CameraConfigurationManager类
修改 CameraConfigurationManager类的 initFromCameraParameters(Camera camera)方法
在Log.d(TAG, "Screen resolution: " + screenResolution);这句之后增加以下代码:
Point screenResolutionForCamera = new Point();
        screenResolutionForCamera.x = screenResolution.x;
        screenResolutionForCamera.y = screenResolution.y;
        // preview size is always something like 480*320, other 320*480
        if (screenResolution.x < screenResolution.y) {
        screenResolutionForCamera.x = screenResolution.y;
        screenResolutionForCamera.y = screenResolution.x;
        }
把cameraResolution = getCameraResolution(parameters, screenResolution);
中的screenResolution改为 screenResolutionForCamera如下:
cameraResolution = getCameraResolution(parameters, screenResolutionForCamera);
-
近距离扫描二维码扫描不出
找到CameraConfigurationManager类的setDesiredCameraParameters(Camera camera)方法,将其中的代码注释,然后添加如下代码:
Camera.Parameters parameters = camera.getParameters();
List supportedPreviewSizes = parameters.getSupportedPreviewSizes();
int position =0;
if(supportedPreviewSizes.size()>2){
  position=supportedPreviewSizes.size()/2+1;//supportedPreviewSizes.get();
}else {
  position=supportedPreviewSizes.size()/2;
}
int width = supportedPreviewSizes.get(position).width;
int height = supportedPreviewSizes.get(position).height;
Log.d(TAG, "Setting preview size: " + cameraResolution);
camera.setDisplayOrientation(90);
cameraResolution.x=width;
cameraResolution.y=height;
parameters.setPreviewSize(width,height);
setFlash(parameters);
感谢:http://m.blog.csdn.net/article/details?id=51683125
二,开源项目:
ZXing的项目是非常庞大的,功能也非常多,用于Android项目时需要抽取出核心的功能,并且可能会出现很多问题。
所以https://github.com/xuyisheng/ZXingLib的作者提供一个基于ZXing3.1封装好的最新的ZXing Lib:
优点:解决 横竖屏、扫描框扭曲变形问题,同时提供了编码、解码方法,并且将扫码界面抽取成XML,方便拓展。
1.然后在此基础上添加从相册选取二维码的功能 zXingDemo:
- 首先在CaptureActivity(扫描界面)添加一下代码:
  public void byAlbum(View view) {
        Intent intent = new Intent(Intent.ACTION_GET_CONTENT);
        intent.addCategory(Intent.CATEGORY_OPENABLE);
        intent.setType("image/*");
        startActivityForResult(intent, REQUEST_IMAGE);
    }

    @Override
    protected void onActivityResult(int requestCode, int resultCode, Intent data) {
        super.onActivityResult(requestCode, resultCode, data);
        if (requestCode == REQUEST_IMAGE) {
            if (data != null) {
                Uri uri = data.getData();
                ContentResolver cr = getContentResolver();
                try {
                    //根据uri得到bitmap
                    Bitmap mBitmap = MediaStore.Images.Media.getBitmap(cr, uri);
                    //对bitmap进行二次采样,压缩,避免OOM异常
                    Bitmap bitmap = getBitmap(mBitmap);
                    //解析图片
                    CodeUtils.analyzeBitmap(bitmap, new CodeUtils.AnalyzeCallback() {
                        @Override
                        public void onAnalyzeSuccess(Bitmap mBitmap, String result) {
//                            Toast.makeText(CaptureActivity.this, "解析二维码成功", Toast.LENGTH_LONG).show();
                            Intent intent = new Intent();
                            intent.putExtra(CodeUtils.RESULT_TYPE, CodeUtils.RESULT_SUCCESS);
                            intent.putExtra(CodeUtils.RESULT_STRING, result);
                            setResult(0, intent);
                            CaptureActivity.this.finish();
                        }

                        @Override
                        public void onAnalyzeFailed() {
                            Toast.makeText(CaptureActivity.this, "解析二维码失败", Toast.LENGTH_LONG).show();
                        }
                    });

                    if (mBitmap != null) {
                        mBitmap.recycle();
                    }
                    if (bitmap != null) {
                        bitmap.recycle();
                    }
                    if (mStream != null) {
                        mStream.close();
                    }
                } catch (Exception e) {
                    e.printStackTrace();
                }
            }
        }
    }

    /**
     * bitmap 二次采样,压缩
     */
    public Bitmap getBitmap(Bitmap bitmap) {
        mStream = new ByteArrayOutputStream();
        bitmap.compress(Bitmap.CompressFormat.PNG, 40, mStream);
        byte[] bytes = mStream.toByteArray();
        BitmapFactory.Options options = new BitmapFactory.Options();
        options.inJustDecodeBounds = true; // 先获取原大小

        Bitmap mBitmap = BitmapFactory.decodeByteArray(bytes, 0, bytes.length, options);
        int oldw = options.outWidth;
        int oldh = options.outHeight;

        int ratiow = oldw / 300;
        int ratioh = oldh / 300;
        options.inSampleSize = ratiow < ratioh ? ratiow : ratioh;
        options.inPreferredConfig = Bitmap.Config.RGB_565;
        options.inJustDecodeBounds = false; // 获取新的大小
        mBitmap = BitmapFactory.decodeByteArray(bytes, 0, bytes.length, options);
        return mBitmap;
    }
- 创建CodeUtils二维码扫描工具类
// 二维码扫描工具类
public class CodeUtils {
    public static final String RESULT_TYPE = "result_type";
    public static final String RESULT_STRING = "result_string";
    public static final int RESULT_SUCCESS = 1;
    public static final int RESULT_FAILED = 2;

    /**
     * 解析二维码图片
     * @param analyzeCallback
     */
    public static void analyzeBitmap(Bitmap mBitmap, AnalyzeCallback analyzeCallback) {

        MultiFormatReader multiFormatReader = new MultiFormatReader();

        // 解码的参数
        Hashtable hints = new Hashtable(2);
        // 可以解析的编码类型
        Vector decodeFormats = new Vector();
        if (decodeFormats == null || decodeFormats.isEmpty()) {
            decodeFormats = new Vector();

            // 这里设置可扫描的类型,我这里选择了都支持
            decodeFormats.addAll(DecodeFormatManager.ONE_D_FORMATS);
            decodeFormats.addAll(DecodeFormatManager.QR_CODE_FORMATS);
            decodeFormats.addAll(DecodeFormatManager.INDUSTRIAL_FORMATS);
        }
        hints.put(DecodeHintType.POSSIBLE_FORMATS, decodeFormats);
        // 设置继续的字符编码格式为UTF8
        // hints.put(DecodeHintType.CHARACTER_SET, "UTF8");
        // 设置解析配置参数
        multiFormatReader.setHints(hints);

        // 开始对图像资源解码
        Result rawResult = null;
        try {
            rawResult = multiFormatReader.decodeWithState(new BinaryBitmap(new HybridBinarizer(new BitmapLuminanceSource(mBitmap))));
        } catch (Exception e) {
            e.printStackTrace();
        }

        if (rawResult != null) {
            if (analyzeCallback != null) {
                analyzeCallback.onAnalyzeSuccess(mBitmap, rawResult.getText());
            }
        } else {
            if (analyzeCallback != null) {
                analyzeCallback.onAnalyzeFailed();
            }
        }
    }

    private static Bitmap getScaleLogo(Bitmap logo, int w, int h){
        if(logo == null)return null;
        Matrix matrix = new Matrix();
        float scaleFactor = Math.min(w * 1.0f / 5 / logo.getWidth(), h * 1.0f / 5 /logo.getHeight());
        matrix.postScale(scaleFactor,scaleFactor);
        Bitmap result = Bitmap.createBitmap(logo, 0, 0, logo.getWidth(),   logo.getHeight(), matrix, true);
        return result;
    }

    /**
     * 解析二维码结果
     */
    public interface AnalyzeCallback{
        public void onAnalyzeSuccess(Bitmap mBitmap, String result);
        public void onAnalyzeFailed();
    }
}
- 创建Bitmap解析类
//自定义解析Bitmap LuminanceSource
public class BitmapLuminanceSource extends LuminanceSource {
    private byte bitmapPixels[];
    public BitmapLuminanceSource(Bitmap bitmap) {
        super(bitmap.getWidth(), bitmap.getHeight());

        // 首先,要取得该图片的像素数组内容
        int[] data = new int[bitmap.getWidth() * bitmap.getHeight()];
        this.bitmapPixels = new byte[bitmap.getWidth() * bitmap.getHeight()];
        bitmap.getPixels(data, 0, getWidth(), 0, 0, getWidth(), getHeight());

        // 将int数组转换为byte数组,也就是取像素值中蓝色值部分作为辨析内容
        for (int i = 0; i < data.length; i++) {
            this.bitmapPixels[i] = (byte) data[i];
        }
    }

    @Override
    public byte[] getMatrix() {
        // 返回我们生成好的像素数据
        return bitmapPixels;
    }

    @Override
    public byte[] getRow(int y, byte[] row) {
        // 这里要得到指定行的像素数据
        System.arraycopy(bitmapPixels, y * getWidth(), row, 0, getWidth());
        return row;
    }
}
参考:https://github.com/yipianfengye/android-zxingLibrary


