需求:
- 基于 web 的 itervactive debug
- 公网访问的 Web Python解析脚本
- 支持更强大、可视化和可交互的文档
Brief of 解决方案
- 部署IPyhon/Jupyter Notebook到服务器
- 购买域名并绑定到服务器
- 和Markdown/Rmarkdown结合(未完成)
IPython 和 Jupyter
IPython 通常指的是一个 Python REPL(交互式解释器) shell。提供了远比 Python shell 强大的 shell 环境。IPython 是 Iteractive Python shell 的缩写。 Notebook 是一个基于 IPython 的 web 应用。
截止 IPython 3.0 ,IPython 变得越来越臃肿,因此, IPython 4.x 后,IPython被分离成为了IPython kernel's Jupyter(IPython shell combined with jupyter kernel) 和Jupyter subprojects ,Notebook 是 Jupyter 的一个 subproject 。官方将此称为The Big Split™。#reference-The Big Split™
IPython 把与语言无关(language-agnostic)的 components 和 Python 解释器剥离,独立为Jupyter发行。因此,Jupyter 可以和 Python 之外的解析器结合,提供新的、强大的服务。比如 Ruby REPL 环境 IRuby 和 Julia REPL 环境 IJulia。
因此,Jupyter 和 IPyhon 指代同一个项目, Jupyter 特指 Ipython4 后的, 非python kernel框架。

Jupyter的架构
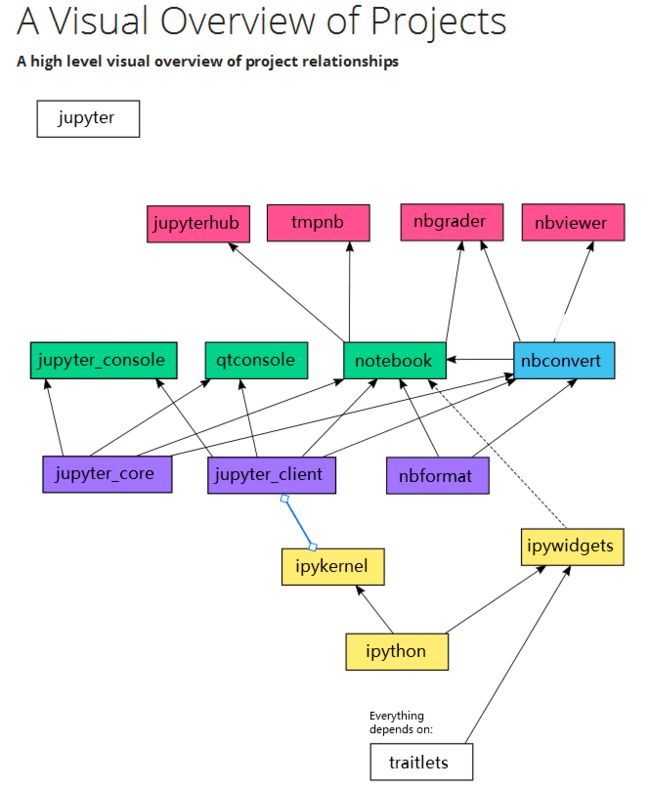
#reference-A Visual Overview of Projects
怎么选择Jupyter下的子项目
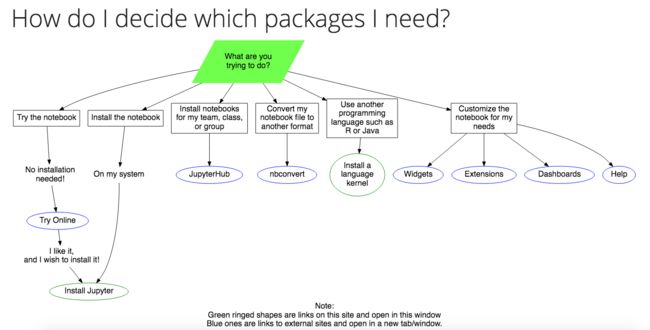
#reference-How do I decide which packages I need?
nbviewer
IPython 运行结果可以单独保存,格式为 .ipynb 。nbviewer是 Jupyter notebook viewer 的缩写,用于渲染 .ipynb 文件,并支持 HTML 和 PDF 输出。现 GitHub 已提供 Notebook 的在线预览。
环境配置
服务器&操作系统
bandwagonhost的VPS
配置:
1CPU
256 MB Memory
10 GB Disk(SSD)
Ubuntu 16.04 x86_64
500GB Transfer/Bandwidth
Jupyter / IPython
安装Notebook
本文通过安装Canopy的发行版本实现Jupyter / IPython安装。
Canopy是一个科学计算的python发行版本。包括了需要的依赖package,包括IPython、Jupyter、Tornado(web服务器)以及其他科学计算库,例如Numpy、Scipy、Matplotlib等。
因为在服务器端,这里有两种方案可用于下载并安装Canopy。
- 最简单直接方案,服务器下载并安装:
    Canopy ->> Server : wget
    Server ->> Server : install
由于服务器端wget命令出现是否支持SSL协议、403 forbidden、超时 等一系列问题,实际采用的方案是:
- 先下载到本地再上传到服务器安装:
    Canopy ->> Client : download
    Client ->> Server : scp
    Server ->> Server : install
Download
Canopy下载地址,选择合适版本即可。
SSH 协议上传到服务器
先在服务器mkdir目录。
$ mkdir path/to/save/server/canopy
再把本地文件通过 SSH 协议上传到服务器
$ scp -P <%服务端SSH端口> path/to/save/local/canopy/
.sh <%服务端user-name>@<%服务器IP>:path/to/save/server/canopy
#reference-利用ssh传输文件
安装Canopy
建议安装前先执行可能遇到的问题脚本,以防万一。
执行安装
$ bash path/to/save/server/canopy/
.sh
初始化&激活Canopy
安装完后,得到以下信息
You can run the Canopy graphical environment by running the script:
/root/Canopy/canopy
or by selecting 'Canopy' in your Applications menu.
On your first run, your Canopy User Python environment will be initialized, and you will have the opportunity to make Canopy be your default Python at the command line. Details at support.enthought.com/forums
Thank you for installing Canopy!
由于我不需要graphical environment,因此我们执行~/Canopy/canopy_cli --no-gui-setup setup ~/canopy配置EPD-like environment即可
reference-【译】安装Canopy
reference-Install Linux
Option
防火墙转发
由于Ubuntu默认未启动防火墙,需要的可以看一下这里:
To function correctly, the firewall on the computer running the ipython server must be configured to allow connections from client machines on the
c.NotebookApp.portport to allow connections to the web interface. The firewall must also allow connections from 127.0.0.1 (localhost) on ports from 49152 to 65535. These ports are used by the server to communicate with the notebook kernels. The kernel communication ports are chosen randomly by ZeroMQ, and may require multiple connections per kernel, so a large range of ports must be accessible.
#reference-Firewall Setup
存放文件目录
哪个目录启动(执行jupyter notebook --config=path/to/your/profile_root/profile_<%profile_name>/ipython_notebook_config.py的目录),进入后web后就显示哪个目录里面的文件,也会在该目录存放所有文件。可以自行设置更改,我mkdir了一个server_doc_to_save文件夹使用。
后台运行
至此,有一个问题是,客户端logout之后,服务器的进程会killed,需要保证服务器在logout之后依然运行。当然需要保留想办法保留这个进程的日志。
$ nohup <语句> &
原程序的的标准输出被自动改向到当前目录下的nohup.out文件,起到了log的作用。
#reference-linux的nohup命令的用法
Bookstore
By default, the notebook server stores the notebook documents that it saves as files in the working directory of the notebook server, also known as the
notebook_dir. This logic is implemented in the FileNotebookManager
class. However, the server can be configured to use a different notebook manager class, which can store the notebooks in a different format.
The bookstore package currently allows users to store notebooks on Rackspace CloudFiles or OpenStack Swift based object stores.
Writing a notebook manager is as simple as extending the base class NotebookManager.The simple_notebook_manager provides a great example of an in memory notebook manager, created solely for the purpose of illustrating the notebook manager API.
#reference-Using a different notebook store
启动 Notebook
#reference-Jupyter Notebook 配置
profile
IPython 4以前
通过新建 profile ,每个profile可以有独立的配置
$ ipython profile create
# 创建一个新的notebook profile,命名为
配置文件路径~/.ipython/profile_
Jupyter
Jupyter 没有 profile 概念了,只有默认配置,在~/.jupyter/jupyter_notebook_config.py。但个人认为 profile 概念非常好的,独立于默认配置,耦合性低。所以会自己按照IPython的处理方式模拟出profile。
$ mkdir path/to/your/profile_root/profile_<%profile_name> # 为profile创建目录
$ cp -i ~/.jupyter/jupyter_notebook_config.py path/to/your/profile_root/profile_<%profile_name> # 复制默认配置 到 profile 中作为初始配置
$ mv jupyter_notebook_config.py ipython_notebook_config.py# 重命名为ipython_notebook_config.py,方便自己记忆,这是模拟的ipython
至此,基于web,支持HTTP协议的Jupyter Notebook 服务完成部署了。执行jupyter notebook --config=path/to/your/profile_root/profile_<%profile_name>/ipython_notebook_config.py,然后访问你的IP:http://即可。
PS:
jupyter notebook --config=path/to/your/profile_root/profile_<%profile_name>/ipython_notebook_config.py和直接运行 jupyter notebook --port=9999 --ip='*' 效果完全一样。
#reference-Porfiles
#reference-Since Jupyter does not have profiles, how do I customize it?
#reference-IPython - ipython_notebook_config.py missing
#reference-Where should I place my settings and profiles for use with IPython/Jupyter 4.0?
#reference-How do I get IPython profile behavior from Jupyter 4.x?
#reference-jupyter配置ipython notebook not creating/ignoring settings in 'ipython_notebook_config.py' #8818
Option
设置登录密码
In [1]: from IPython.lib import passwd
In [2]: passwd()
Enter password:
Verify password:
Out[2]: 'sha1:'
输入两次密码后(用来登录Jupyter的密码),就会输出一个哈希密钥。profile应该知道这个密钥,因此编辑profile配置:
$ vi path/to/your/profile_root/profile_<%profile_name>/ipython_notebook_config.py
i(insert):
c.NotebookApp.password = u'sha1:'
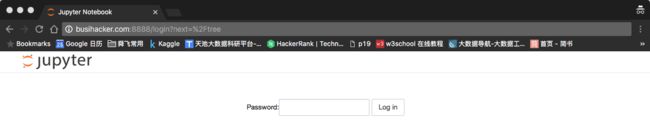
执行jupyter notebook --config=path/to/your/profile_root/profile_<%profile_name>/ipython_notebook_config.py,然后输入密码访问:
修改默认访问端口
# It's a good idea to put it on a known, fixed port
c.NotebookApp.port = 9999 # 默认端口8888
SSL协议访问
SSL协议访问需要证书,一般需要通过第三方颁发/认证。为求方便,这里自己为自己颁发/认证,这个证书为一个pem文件。
$ openssl req -x509 -nodes -days 365 -newkey rsa:1024 -keyout mycert.pem -out mycert.pem
执行后,在当前路径生成一个 mycert.pem 文件。
修改profile 的配置
# 证书地址,获取第三方认证证书后,修改即可
c.NotebookApp.certfile = u'/root/mycert.pem'
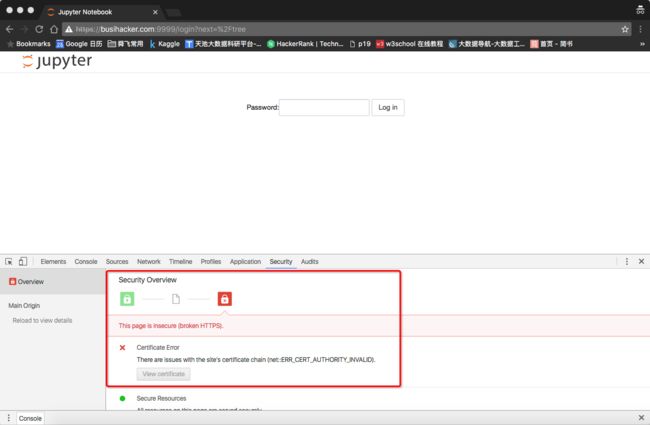
执行ipython notebook --profile=nbserver然后访问你的IP,记得要加https:https://
reference-SSL的原理,充当裁判的角色
这里的使用的是自签名证书(Self-Signed Certificate),由于未经过第三方认证。以下现象都是正常的,使用经过认证的证书即可。


#reference-Jupyter Notebook 配置
#reference-支持三方认证的SSL
#reference-三方机构Let's Encrypt
#reference-三方机构StartSSL
其他配置
# 谨慎出现中文
# c = get_config() # 这一行并非必须有

# Kernel config
c.IPKernelApp.pylab = 'inline'  # if you want plotting support always

# Notebook config
c.NotebookApp.certfile = u'/root/mycert.pem'
c.NotebookApp.password = u'sha1:'
# It's a good idea to put it on a known, fixed port
c.NotebookApp.port = 9999 # 默认端口8888

c.NotebookApp.ip = '*' # 接受访问的ip
c.NotebookApp.open_browser = False # 启动后默认打开浏览器

...
#reference-Config file and command line options
#reference-IPython Notebook: 交互计算新时代
校正:
这篇reference,有一个错误,以下用#标记了。
c.IPKernerlApp.pylab = 'inline'
c.NotebookApp.ip = '*'
c.NotebookApp.open_browser = False
c.NotebookApp.password = u'sha1:xxxx your hashed password'
c.NotebookApp.port = 9999 #可设为其他端口
#c.Notebook.App.port = 9999 #可设为其他端口
IPython 到 Jupyter 的兼容/迁移(migrate)
| 解析语言 | 默认目录 |
|---|---|
| IPython | ~/.ipython |
| Jupyter | ~/.jupyter |
通过执行jupyter migrate自动迁移配置
| 解析语言 | 默认目录 |
|---|---|
| IPython | ~/.ipython |
| Jupyter | ~/.jupyter |
| IPython location | Jupyter location |
|---|---|
| ~/.ipython/profile_default/static/custom | ~/.jupyter/custom |
| ~/.ipython/profile_default/ipython_notebook_config.py | ~/.jupyter/jupyter_notebook_config.py |
| ~/.ipython/profile_default/ipython_nbconvert_config.py | ~/.jupyter/jupyter_nbconvert_config.py |
| ~/.ipython/profile_default/ipython_qtconsole_config.py | ~/.jupyter/jupyter_qtconsole_config.py |
| ~/.ipython/profile_default/ipython_console_config.py | ~/.jupyter/jupyter_console_config.py |
这片reference阐述了从IPython 到 Jupyter的配置改变及如何兼容
Migrating from IPython Notebook
可能遇到的问题
升级apt-get
更新资源并升级:
$ sudo apt-get update && sudo apt-get upgrade
包依赖1
desktop-file-install:command not found
update-desktop-database command not found
解决
$ sudo apt-get install desktop-file-utils
#reference-desktop-file-install:command not found
包依赖2
update-mime-database: command not found
系统语言1
SSH连接上服务器,会传递部分变量,由于服务端和客户端变量(eg.LANG)冲突,可以选择注释掉locale setting(SSH服务端配置地址:/etc/ssh/sshd_config)
# AcceptEnv LANG LC_*
#reference-How can I fix a locale warning from perl
系统语言2
安装过程中,Ubuntu系统语言不支持en_US.UTF-8,需要支持:
$ sudo locale-gen en_US.UTF-8
#reference-将Ubuntu系统语言环境改为英文的en_US.UTF-8
设置 timezone
$ dpkg-reconfigure tzdata
could not connect to X server
当运行/root/Canopy/canopy企图使用graphical environment的时候,会显示could not connect to X server问题,可能是GUI或者权限问题
#reference-Ubuntu服务端GUI配置
End
如不特殊声明,本文大部分脚本在服务端执行。