1.静态路由的配置
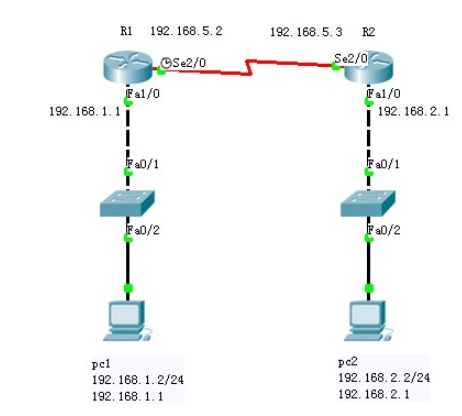
从图中来看,要配置这俩个的静态路由只需再R1 和R2的全局模式下配置一条命令就行
R1(config)#ip route 192.168.2.0 255.255.255.0 192.168.5.3
R2(config)#ip route 192.168.1.0 255.255.255.0 192.168.5.2
简单的说就是在R1上的配置的是要到达路由器左右俩边的地址,在R2上的配置的是要到达路由器左右俩边的地址
2.ACL的配置
ACL:访问控制列表简称为 ACL
ACL 的分类
1.标准ACL (根据数据包的源IP地址来允许或者拒绝数据包,表号是1~99)
2.扩展ACL (根据数据包的源IP地址,目的IP地址,指定协议,端口和标志来允许或拒绝,表号是100~199)
3.命名ACL (允许在标准和扩展ACL中使用名称来代替列表好)
一、 标准ACL配置
例题:验拒绝 PC2 所在网段访问路由器 R2,同时只允许主机 PC3 访问路由器 R2 的 Telnet 服务。整个网络配置 EIGRP 保证 IP 的连通性。
####(1)步骤 1:配置路由器 R1
R1(config)#router eigrp 1
R1(config-router)#network 10.1.1.0 0.0.0. 255
R1(config-router)#network 172.16.1.0 0.0.0.255
R1(config-router)#network 192.168.12.0
R1(config-router)#no auto-summary
(2)步骤 2:配置路由器 R2
R2(config)#router eigrp 1
R2(config-router)#network 2.2.2.0 0.0.0. 255
R2(config-router)#network 192.168.12.0
R2(config-router)#network 192.168.23.0
R2(config-router)#no auto-summary
R2(config)#access-list 1 deny 172.16.1.0 0.0.0.255  //定义 ACL
R2(config)#access-list 1 permit any R2(config)#interface Serial0/0/0
R2(config-if)#ip access-group 1 in   //在接口下应用 ACL
R2(config)#access-list 2 permit 172.16.3.1 R2(config-if)#line vty 0 4
R2(config-line)#access-class 2 in R2(config-line)#password cisco
R2(config-line)#login
(3)步骤 3:配置路由器 R3
R3(config)#router eigrp 1
R3(config-router)#network 172.16.3.0 0.0.0.255
R3(config-router)#network 192.168.23.0
R3(config-router)#no auto-summary
【技术要点】
① ACL 定义好后可以在很多地方应用,接口上应用只是其中之一,其他的常用应用包括在 route map 中的 match 应用 (第 21 章介绍)和在 vty 下用”access-class”命令调用,用来控制 Telnet 的访问;
② 访问控制列表表项的检查按自上而下的顺序进行,并且从第一个表项开始,所以必须考虑在访问控制列表中定义语 句的次序;
③ 路由器不对自身产生的 IP 数据包进行过滤;
④ 访问控制列表最后一条是隐含的拒绝所有;
⑤ 每一个路由器接口的每一个方向,每一种协议只能创建一个 ACL;
⑥ "access-class"命令只对标准 ACL 有效
实验调试
(1)show iop access-lists 该命令用来查看所定义的 IP 访问控制列表
R2#show ip access-lists
(2)show iop interface 表明在接口 x 的x方向应用了访问控制列表 x
R2#show ip interface s0/0/0
二、拓展ACL配置
例题: 只允许 PC2 所在网段的主机访问路由器 R2 的 WWW 和 Telnet 服务,并拒绝 PC3 所在网段 ping 路由器 R2. 删除实验 1 定义的 ACL
(1)步骤 1:配置路由器 R1
R1(config)#access-list 100 permit tcp 172.16.1.0 0.0.0.255 host 2.2.2.2 eq www
R1(config)#access-list 100 permit tcp 172.16.1.0 0.0.0.255 host 192.168.12.2 eq www
R1(config)#access-list 100 permit tcp 172.16.1.0 0.0.0.255 host 192.168.23.2 eq www
R1(config)#access-list 100 permit tcp 172.16.1.0 0.0.0.255 host 2.2.2.2 eq telnet
R1(config)#access-list 100 permit tcp 172.16.1.0 0.0.0.255 host 192.168.12.2 eq telnet
R1(config)#access-list 100 permit tcp 172.16.1.0 0.0.0.255 host 192.168.23.2 eq telnet
R1(config)#interface g0/0 R1(config-if)#ip access-group 100 in
步骤 2:(2)配置路由器 R2
R2(config)#no access-list 1   //删除 ACL R2(config)#no access-list 2
R2(config)#ip http server    //将路由器配置成 Web 服务器
R2(config)#line vty 0 4
R2(config-line)#password cisco
R2(config-line)#login
(3)步骤 3:配置路由器 R3
R3(config)#access-list 101 deny icmp 172.16.3.0 0.0.0.255 host 2.2.2.2 log
R3(config)#access-list 101 deny icmp 172.16.3.0 0.0.0.255 host 192.168.12.2 log
R3(config)#access-list 101 deny icmp 172.16.3.0 0.0.0.255 host 192.168.23.2 log
R3(config)#access-list 101 permit ip any any
R3(config)#interface g0/0
R3(config-if)#ip access-group 101 in
实验调试
*
注意 in方向是在进的方向就用acl规则做匹配   而out则是在出方向做匹配
(有一说是out进路由后先看路由表再匹配acl,这样可能加重设备负担)

出:已经经路由器的处理,正离开路由器接口的数据包
入:已经到达路由器接口的数据包,将被路由器处理
3. DHCP的配置
DHCP(Dynamic Host Configuration Protocol,动态主机配置协议)
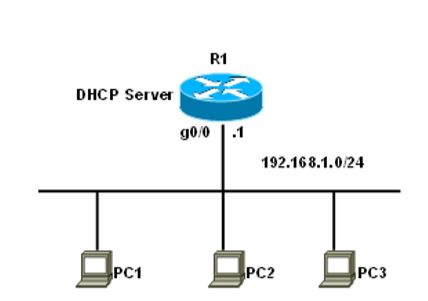
(1)步骤 1:配置路由器 R1 提供 DHCP 服务
R1(config)#service dhcp                   //DHCP 服务
R1(config)#no ip dhcp conflict logging       //关闭 DHCP 冲突日志
R1(config)#ip dhcp pool ccie               //定义地址池
R1(dhcp-config)#network 192.168.1.0 /24    //DHCP 服务器要分配的网络和掩码
R1(dhcp-config)#domain-name cisco.com   //域名
R1(dhcp-config)#default-router 192.168.1.1 //默认网关,这个地址要和相应网络所连接的路由器的以太口地址相同
R1(dhcp-config)#netbios-name-server 192.168.1.2    //WINS 服务器
R1(dhcp-config)#dns-server 192.168.1.4            //DNS 服务器
R1(dhcp-config)#option 150 ip 192.168.1.3          //TFTP 服务器
R1(dhcp-config)#lease infinite                     //定义租期
R1(dhcp-config)#ip dhcp excluded-address 192.168.1.1 192.168.1.5 //排除的地址段
实验调试
(2)show ip dhcp pool 该命令用来查看 DHCP 地址池的信息。
R1#show ip dhcp pool
(3)show ip dhcp binding 该命令用来查看 DHCP 的地址绑定情况。
R1#show ip dhcp binding
4.NAT的配置
(Network Address Translation,网络地址翻译)
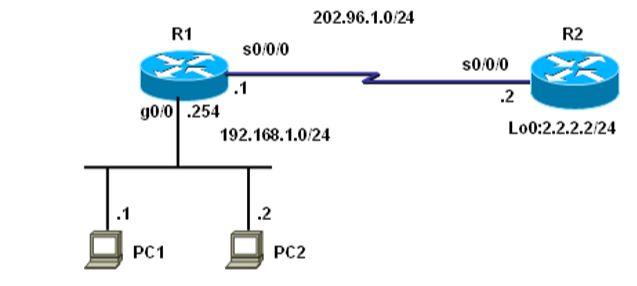
(1)步骤 1:配置路由器 R1 提供 NAT 服务
R1(config)#ip nat inside source static 192.168.1.1 202.96.1.3 //配置静态 NAT 映射
R1(config)#ip nat inside source static 192.168.1.2 202.96.1.4
R1(config)#interface g0/0 R1(config)#ip nat inside //配置 NAT 内部接口
R1(config)#interface s0/0/0 R1(config)#ip nat outside //配置 NAT 外部接口
R1(config)#router rip R1(config-router)#version 2
R1(config-router)#no auto-summary R1(config-router)#network 202.96.1.0
(2)配置 2:配置路由器 R2 R2(config)#router rip
R2(config-router)#version 2
R2(config-router)#no auto-summary
R2(config-router)#network 202.96.1.0
R2(config-router)#network 2.0.0.0
实验调试
(1) debug ip nat 该命令可以查看地址翻译的过程。
(2) show ip nat translations


