之前一篇介绍了《Activity 启动流程分析》,本篇继续学习 Android中Service的启动流程。
Service的启动方式
有两种,分别是startService(),bindService(),经历的生命周期也不太一样。
通过
startService()
onCreate()->onStartCommand()->onDestroy()
建议不要在onStartCommand()做耗时操作通过
bindService()
onCreate()->onbind()->onUnbind()->onDestroy()
Service的所有生命周期方法都是在主线程进行的,即ActivityThread启动的线程
onStartCommand()返回值种类:
- START_NOT_STICKY
- START_STRCKY
- START_REDELIVER_INTENT
Service以及四大组件多进程?
android的四大组件都可以开启多进程,通过manifest文件设置process属性
可以同时startService()和bindService()时?如何退出?
答案是可以的,参考 https://blog.csdn.net/qq_22804827/article/details/78609636
- service的onCreate只会执行一次,onBind也只会执行一次,onStartCommand可以执行多次
- 无论多少个Activity绑定了Service,onBind()和onUnBind()只会执行一次
- 多个Activity绑定Service,只有所有的Activity与Service绑定的Contxet失效后,Service才会执行onUnbind(),最后onDestory()进行销毁
- 多个Activity绑定Service,只有所有的Activity调用stopService(),或者在Service内部调用stopSelf(),最后才会停止服务。
- 同时startService()和bindService(),只有stopService() 加上unBindService()让context失效,最后才会停止服务。
涉及的类
- ContextImpl:Context的具体实现
- ActivityManagerService:四大组件的服务管理,负责分发任务
- ActiveServices:实际负责Service启动绑定等事情
- ApplicationThread:表示APP的主线程,有main函数
- ActivityThread:ActivityThread的内部类,是一个binder对象,是ActivityManagerService向ActivityThread通信的桥梁
- LoadedApk:
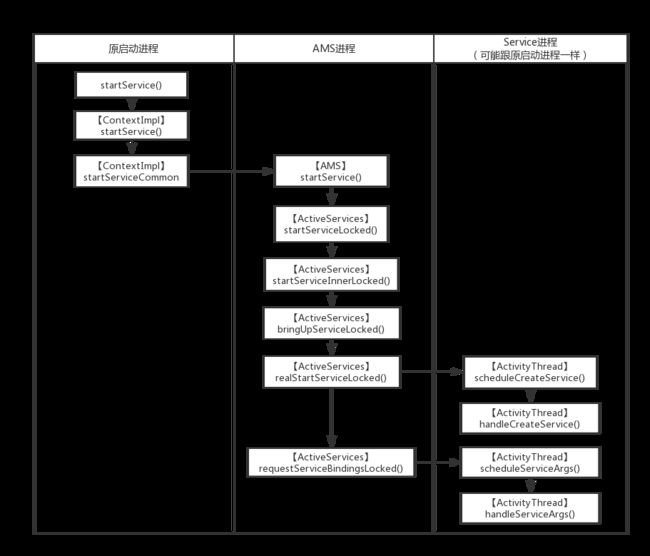
StartService()
//ContextWrapper
public ComponentName startService(Intent service) {
    return mBase.startService(service);
}
我们通过Context.startService(),走到ContextWrapper,mBase是一个Context,具体实现在ContextImpl
// ContextImpl
public ComponentName startService(Intent service) {
   warnIfCallingFromSystemProcess();
   return startServiceCommon(service, false, mUser);
}

private ComponentName startServiceCommon(Intent service, boolean requireForeground,
            UserHandle user) {
    try {
        validateServiceIntent(service);
        service.prepareToLeaveProcess(this);
        ComponentName cn = ActivityManager.getService().startService(
            mMainThread.getApplicationThread(), service, service.resolveTypeIfNeeded(
                        getContentResolver()), requireForeground,
                        getOpPackageName(), user.getIdentifier());
        ...
        return cn;
    }
}
-
validateServiceIntent()是验证Intent是否合法 - AMS运行在单独的进程,是一个binder,ActivityManager.getService() 获取得到是IActivityManager,它是binder引用,供外部跨进程调用。
// ContextImpl
private void validateServiceIntent(Intent service) {
    if (service.getComponent() == null && service.getPackage() == null) {
        if (getApplicationInfo().targetSdkVersion >= Build.VERSION_CODES.LOLLIPOP) {
            IllegalArgumentException ex = new IllegalArgumentException(
                    "Service Intent must be explicit: " + service);
            throw ex;
        } else {
            Log.w(TAG, "Implicit intents with startService are not safe: " + service
                    + " " + Debug.getCallers(2, 3));
        }
    }
}
从上面可以看出,service.getComponent() == null && service.getPackage() == null 说明是隐式启动,5.0以后不支持隐式启动。
接着看AMS如何启动service
// ActivityManagerService
public ComponentName startService(IApplicationThread caller, Intent service,
        String resolvedType, boolean requireForeground, String callingPackage, int userId)
        throws TransactionTooLargeException {
   ...
   synchronized(this) {
        final int callingPid = Binder.getCallingPid();
        final int callingUid = Binder.getCallingUid();
        final long origId = Binder.clearCallingIdentity();
        ComponentName res;
        try {
            res = mServices.startServiceLocked(caller, service,
                    resolvedType, callingPid, callingUid,
                    requireForeground, callingPackage, userId);
        } finally {
            Binder.restoreCallingIdentity(origId);
        }
        return res;
    }
}
其中 mServices 是 ActiveServices,他负责管理Service的活动,其实AMS就像一个桥梁,由他接收消息,分派任务给指定的类负责,比如Activity启动就分发给ActivityStarter,Service的启动就分发ActiveServices。
// ActiveServices
 ComponentName startServiceLocked(IApplicationThread caller, Intent service, String resolvedType,
        int callingPid, int callingUid, boolean fgRequired, String callingPackage, final int userId)
        throws TransactionTooLargeException {
     ServiceLookupResult res =
     retrieveServiceLocked(service, resolvedType, callingPackage,
                    callingPid, callingUid, userId, true, callerFg, false, false);
    // retrieveServiceLocked()获取或者新建一个ServiceRecord
     final boolean bgLaunch = !mAm.isUidActiveLocked(r.appInfo.uid);
    // 调用了startServiceInnerLocked
    ComponentName cmp = startServiceInnerLocked(smap, service, r, callerFg, addToStarting);
}

ComponentName startServiceInnerLocked(ServiceMap smap, Intent service, ServiceRecord r,
        boolean callerFg, boolean addToStarting) throws TransactionTooLargeException {
    ServiceState stracker = r.getTracker();
    if (stracker != null) {
        stracker.setStarted(true, mAm.mProcessStats.getMemFactorLocked(), r.lastActivity);
    }
    r.callStart = false;
    synchronized (r.stats.getBatteryStats()) {
        r.stats.startRunningLocked();
    }
    String error = bringUpServiceLocked(r, service.getFlags(), callerFg, false, false);
    return r.name;
}
bringUpServiceLocked()是一个很重要的方法,startService()、bindService()都会走到。
// ActiveServices
private String bringUpServiceLocked(ServiceRecord r, int intentFlags, boolean execInFg,
        boolean whileRestarting, boolean permissionsReviewRequired)
        throws TransactionTooLargeException {

    if (r.app != null && r.app.thread != null) {
        // Service在运行
        sendServiceArgsLocked(r, execInFg, false);
        return null;
    }
    ProcessRecord app;// 获取对应的进程ProcessRecord
    if (!isolated) {
       app = mAm.getProcessRecordLocked(procName, r.appInfo.uid, false);
       if (app != null && app.thread != null) {
               // 将其加入到mPendingServices队列
               app.addPackage(r.appInfo.packageName, r.appInfo.longVersionCode, mAm.mProcessStats);
               // 真正启动Service
               realStartServiceLocked(r, app, execInFg);
       }
     }
     // 如果app进程不存在,则会AMS startProcessLocked()
     if (app == null && !permissionsReviewRequired) {
         if ((app=mAm.startProcessLocked(procName, r.appInfo, true, intentFlags,
                    hostingType, r.name, false, isolated, false)) == null) {
             bringDownServiceLocked(r);
             return msg;
         }
         if (isolated) {
             r.isolatedProc = app;
         }
     }
}
如果Service目标进程不存在会走AMS startProcessLocked(),跟Activity开启进程一样,Process.start创建一个新的进程,走到ActivityThread的main函数,创建Application等。
// AcitveServices
private final void realStartServiceLocked(ServiceRecord r,
        ProcessRecord app, boolean execInFg) throws RemoteException {
    app.thread.scheduleCreateService(r, r.serviceInfo,
        mAm.compatibilityInfoForPackageLocked(r.serviceInfo.applicationInfo),
        app.repProcState);

    requestServiceBindingsLocked(r, execInFg);
    sendServiceArgsLocked(r, execInFg, true);
}
app.thread其实就是IApplicationThread,它是一个binder,对应的服务端就是ApplicationThread,它是ActivityThread的内部类,对外提供跟ActivityThread通信的接口。
最后会走到ActivityThread.scheduleCreateService()
requestServiceBindingsLocked()跟bindService()有关,这里先不管
sendServiceArgsLocked()最后会走到onStartCommand()
// ActivityThread
public final void scheduleCreateService(IBinder token,
        ServiceInfo info, CompatibilityInfo compatInfo, int processState) {
    updateProcessState(processState, false);
    CreateServiceData s = new CreateServiceData();
    s.token = token;
    s.info = info;
    s.compatInfo = compatInfo;
    sendMessage(H.CREATE_SERVICE, s);
}
sendMessage(H.CREATE_SERVICE, s); 就是切换到主线程,因为scheduleCreateService运行在binder线程池中,最后通过H handler处理
// ActivityThread
private void handleCreateService(CreateServiceData data) {
        unscheduleGcIdler();
    LoadedApk packageInfo = getPackageInfoNoCheck(
                data.info.applicationInfo, data.compatInfo);
    Service service = null;
    try {
        // 通过classLoader加载初始化Service
        java.lang.ClassLoader cl = packageInfo.getClassLoader();
        service = packageInfo.getAppFactory()
                .instantiateService(cl, data.info.name, data.intent);
    }
    try {
        // 创建context
        ContextImpl context = ContextImpl.createAppContext(this, packageInfo);
        context.setOuterContext(service);
        // 如果Application不存在,会创建Application
        Application app = packageInfo.makeApplication(false, mInstrumentation);
        service.attach(context, this, data.info.name, data.token, app,
                ActivityManager.getService());
        // 调用service的onCreate()
        service.onCreate();
        mServices.put(data.token, service);
        try {
            ActivityManager.getService().serviceDoneExecuting(
                    data.token, SERVICE_DONE_EXECUTING_ANON, 0, 0);
        }
    }
}
handleCreateService()负责实例化service,创建Context、Application等,跟Activity的hanleLaunchActivity()很相似。最后调用Service的onCreate()
再看下onStartCommand()再哪里被调用?
// ActiveService
private final void sendServiceArgsLocked(ServiceRecord r, boolean execInFg,
    boolean oomAdjusted) throws TransactionTooLargeException {
    r.app.thread.scheduleServiceArgs(r, slice);
}
同样利用ApplicationThread到达AcitivityThread所在的进程。
//ActivityThread
 public final void scheduleServiceArgs(IBinder token, ParceledListSlice args) {
    List list = args.getList();
    for (int i = 0; i < list.size(); i++) {
        ServiceStartArgs ssa = list.get(i);
        ServiceArgsData s = new ServiceArgsData();
        s.token = token;
        s.taskRemoved = ssa.taskRemoved;
        s.startId = ssa.startId;
        s.flags = ssa.flags;
        s.args = ssa.args;
        sendMessage(H.SERVICE_ARGS, s);
    }
 }

 private void handleServiceArgs(ServiceArgsData data) {
    Service s = mServices.get(data.token);
    if (s != null) {
        try {
            ...
            int res;
            if (!data.taskRemoved) {
                res = s.onStartCommand(data.args, data.flags, data.startId);
            } else {
                s.onTaskRemoved(data.args);
                res = Service.START_TASK_REMOVED_COMPLETE;
            }
        }
    }
}
最后切换到ActivityThread的主线程,调用onStartCommand()
bindService()
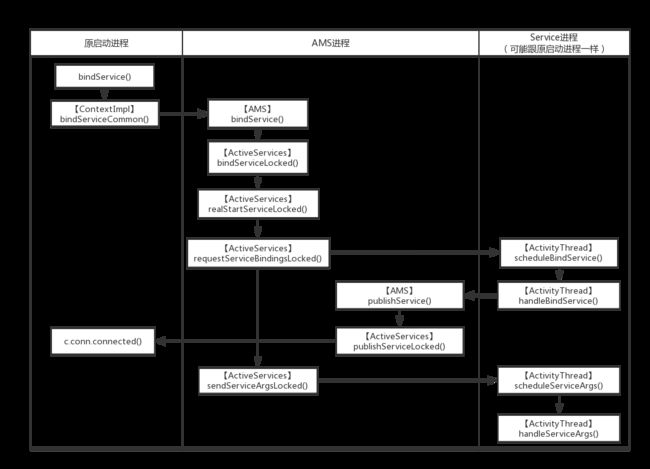
Service的bindService()跟startService()的流程很类似,但是他涉及到ServiceConnection的传输,还要通过ServiceConnection返回binder的代理给客户端,通知已经绑定成功
public boolean bindService(Intent service, ServiceConnection conn, int flags) {
    return mBase.bindService(service, conn, flags);
    }

// ContextImpl
public boolean bindService(Intent service, ServiceConnection conn, int flags) {
    warnIfCallingFromSystemProcess();
    return bindServiceCommon(service, conn, flags, mMainThread.getHandler(), getUser());
}

private boolean bindServiceCommon(Intent service, ServiceConnection conn, int flags, Handler
           handler, UserHandle user) {
    // 转化成IServiceConnection
    if (mPackageInfo != null) {
        sd = mPackageInfo.getServiceDispatcher(conn, getOuterContext(), handler, flags);
    }
    validateServiceIntent(service);
    try {
         IBinder token = getActivityToken();
          ...
          int res = ActivityManager.getService().bindService(
                mMainThread.getApplicationThread(), getActivityToken(), service,
                service.resolveTypeIfNeeded(getContentResolver()),
                sd, flags, getOpPackageName(), user.getIdentifier());

        return res != 0;
    }
}
bindServiceCommon有两个主要的任务,
- 生成一个ServiceConnection的binder服务,这样当Service绑定成功后就可以通过binder引用的接口调用ServiceConnection的onServiceConnected()。
- 将ServiceConnection的对应binder的引用传给AMS,并bindService()
其中binder服务就是LoadApk.ServiceDispatcher,所以mPackageInfo.getServiceDispatcher()负责创建LoadApk.ServiceDispatcher,并提供binder引用。
其实在同一进程内提供的binder实体,跨进程之后会通过binder驱动转化为binder引用,这里通通叫binder,具体可以看Android的binder知识点
// LoadedApk
public final IServiceConnection getServiceDispatcher(ServiceConnection c,
            Context context, Handler handler, int flags) {
    synchronized (mServices) {
        LoadedApk.ServiceDispatcher sd = null;
        ArrayMap map = mServices.get(context);
        if (map != null) {
                sd = map.get(c);
        }
        if (sd == null) {
                sd = new ServiceDispatcher(c, context, handler, flags);
                if (map == null) {
                    map = new ArrayMap<>();
                    mServices.put(context, map);
                }
                map.put(c, sd);
            } else {
                sd.validate(context, handler);
            }
            return sd.getIServiceConnection();
        }
    }
getServiceDispatcher()先查询是否已经存在已有的ServiceConnection对应的LoadedApk.ServiceDispatcher,如果有就直接复用,不需要再建立LoadedApk.ServiceDispatcher,增加多一个binder了。否则就创建ServiceDispatcher。
//AMS
public int bindService(IApplicationThread caller, IBinder token, Intent service,
        String resolvedType, IServiceConnection connection, int flags, String callingPackage,
        int userId) throws TransactionTooLargeException {
    synchronized(this) {
        return mServices.bindServiceLocked(caller, token, service,
                resolvedType, connection, flags, callingPackage, userId);
    }
}
终于来到了AMS的bindService(),他还是分发给了ActiveServices负责bindServiceLocked()
// ActiveServices
 int bindServiceLocked(IApplicationThread caller, IBinder token, Intent service,
        String resolvedType, final IServiceConnection connection, int flags,
        String callingPackage, final int userId) throws TransactionTooLargeException {
    // 获取或创建一个ServiceRecord
    ServiceLookupResult res =
        retrieveServiceLocked(service, resolvedType, callingPackage, Binder.getCallingPid(),
            Binder.getCallingUid(), userId, true, callerFg, isBindExternal, allowInstant);
    if ((flags&Context.BIND_AUTO_CREATE) != 0) {
         s.lastActivity = SystemClock.uptimeMillis();
         if (bringUpServiceLocked(s, service.getFlags(), callerFg, false,
                permissionsReviewRequired) != null) {
           return 0;
         }
    }
}

// ActiveServices
 private String bringUpServiceLocked(ServiceRecord r, int intentFlags, boolean execInFg,
       boolean whileRestarting, boolean permissionsReviewRequired)
       throws TransactionTooLargeException {

    if (r.app != null && r.app.thread != null) {
       sendServiceArgsLocked(r, execInFg, false);
       return null;
   }
   app = mAm.getProcessRecordLocked(procName, r.appInfo.uid, false);
   if (app != null && app.thread != null) {
       try {
           app.addPackage(r.appInfo.packageName, r.appInfo.longVersionCode, mAm.mProcessStats);
           realStartServiceLocked(r, app, execInFg);
           return null;
       }
   }
}
在ActiveServices的部分流程上跟startService()没有什么大的不同,同样走到realStartServiceLocked()
// AcitveServices
private final void realStartServiceLocked(ServiceRecord r,
        ProcessRecord app, boolean execInFg) throws RemoteException {
    app.thread.scheduleCreateService(r, r.serviceInfo,
        mAm.compatibilityInfoForPackageLocked(r.serviceInfo.applicationInfo),
        app.repProcState);

    requestServiceBindingsLocked(r, execInFg);
    sendServiceArgsLocked(r, execInFg, true);
}
app.thread.scheduleCreateService()负责创建service,不在分析,这里讲上面没说到的requestServiceBindingsLocked()方法,最后怎么调用到了ServiceConnection的onServiceConnected()
// AcitveServices
 private final void requestServiceBindingsLocked(ServiceRecord r, boolean execInFg)
        throws TransactionTooLargeException {
    for (int i=r.bindings.size()-1; i>=0; i--) {
        IntentBindRecord ibr = r.bindings.valueAt(i);
        if (!requestServiceBindingLocked(r, ibr, execInFg, false)) {
            break;
        }
    }
}

private final boolean requestServiceBindingLocked(ServiceRecord r, IntentBindRecord i,
        boolean execInFg, boolean rebind) throws TransactionTooLargeException {
    r.app.thread.scheduleBindService(r, i.intent.getIntent(), rebind,
        r.app.repProcState);
}
利用IApplicationThread切换到ActivityThread,最后切换到主线程,调用handleBindService()。这部分基本上是一样的。
// ActivityThread
private void handleBindService(BindServiceData data) {
    Service s = mServices.get(data.token);
    if (s != null) {
    try {
        data.intent.setExtrasClassLoader(s.getClassLoader());
        data.intent.prepareToEnterProcess();
        try {
            if (!data.rebind) {
                // 调用了onBind(),返回一个IBinder对象
                IBinder binder = s.onBind(data.intent);
                ActivityManager.getService().publishService(
                    data.token, data.intent, binder);
            } else {
                s.onRebind(data.intent);
                ActivityManager.getService().serviceDoneExecuting(
                data.token, SERVICE_DONE_EXECUTING_ANON, 0, 0);
                }
                ensureJitEnabled();
            }
        }
    }
}
IBinder binder = s.onBind(data.intent);
调用了Service的生命周期onBind(),还返回了一个binder(这里应该是binder实体,因为同一个进程内),本来开始以为这里会利用LoadedApk.ServiceDispatcher的binder引用调用ServiceConnection的onServiceConnected(),实际上并没有,而是又跨进程调用AMS的pubishService,由AMS回调ServiceConnection的onServiceConnected()
// AMS
public void publishService(IBinder token, Intent intent, IBinder service) {
    synchronized(this) {
        mServices.publishServiceLocked((ServiceRecord)token, intent, service);
    }
}
这里老规矩,AMS分发任务给ActiveServices
// ActiveServices
void publishServiceLocked(ServiceRecord r, Intent intent, IBinder service) {
    final long origId = Binder.clearCallingIdentity();
    if (r != null) {
        Intent.FilterComparison filter = new Intent.FilterComparison(intent);
        IntentBindRecord b = r.bindings.get(filter);
        if (b != null && !b.received) {
            b.binder = service;
            b.requested = true;
            b.received = true;
            for (int conni=r.connections.size()-1; conni>=0; conni--) {
                ArrayList clist = r.connections.valueAt(conni);
                for (int i=0; i
这里知道为什么了ActivityThread没有直接跨进程调用ServiceConnection的onServiceConnected(),原来只有AMS保存了LoadedApk.ServiceDispatcher的binder引用,最后调用 c.conn.connected(r.name, service, false);
// LoadApk.InnerConnection
private static class InnerConnection extends IServiceConnection.Stub {
    final WeakReference mDispatcher;
    InnerConnection(LoadedApk.ServiceDispatcher sd) {
        mDispatcher = new WeakReference(sd);
    }
    public void connected(ComponentName name, IBinder service, boolean dead)
          throws RemoteException {
          LoadedApk.ServiceDispatcher sd = mDispatcher.get();
          if (sd != null) {
              sd.connected(name, service, dead);
          }
    }
}
这里可以看出InnerConnection就是一个binder,他的作用就是让其他进程可以跨进程调用到connected()。
最后在 LoadApk.InnerConnection利用ServiceDispatcher 调用了onServiceConnected()方法。
流程图
总结
(没想好,待补上)


