前言
对于3DTouch很多人都已经并不陌生了,因为iPhone 6s想必大家都已经体验过了,深度按压带来的体验仁者见仁,智者见智,有说好用的,也有说卵用的。在我看来,其实就是增加了一个menu入口,快速浏览,相比Mac上的深度按压还是逊色一点的。好了废话不多说,我来介绍一下iOS下如何和给自己的App增加3DTouch功能。
检测是否支持3DTouch
在iOS9中提供如下的接口用于检查设备是否支持3D Touch:
@property(nonatomic, readonly) UIForceTouchCapability forceTouchCapability;
其中 UIForceTouchCapability 是一个枚举类型,具体的描述情况如下:
UIForceTouchCapability
- UIForceTouchCapabilityUnknown //3D Touch检测失败
- UIForceTouchCapabilityUnavailable //3D Touch不可用
- UIForceTouchCapabilityAvailable //3D Touch可用
这3个枚举值就是我们来判断设备是否开启3D Touch功能,可以在UIViewController生命周期的viewWillAppear中做如下判断:
    if (self.traitCollection.forceTouchCapability == UIForceTouchCapabilityAvailable) {
        NSLog(@"3DTouch 可以使用");
    }else if (self.traitCollection.forceTouchCapability == UIForceTouchCapabilityUnavailable){
        NSLog(@"3DTouch 不可使用");
    }else if (self.traitCollection.forceTouchCapability == UIForceTouchCapabilityUnknown){
        NSLog(@"3DTouch 未知");
    }
当然在生命周期内,如果用户有意修改了设备的3D Touch功能,我们还有一个地方来重新检测:
- (void)traitCollectionDidChange:(UITraitCollection *)previousTraitCollection {
  //do something
}
或者写成一个函数,调用起来方便
- (void)check3DTouch
{
    // 如果开启了3D touch
    if (self.traitCollection.forceTouchCapability == UIForceTouchCapabilityAvailable)
    {
        [self registerForPreviewingWithDelegate:(id)self sourceView:self.tableView];
    }
}
桌面上的3DTouch--Quick Action
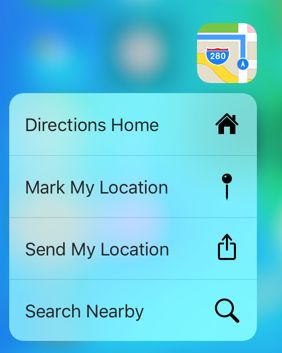
顾名思义,就是你的App在桌面的时候,用力按你的App图标的时候就会出现一些菜单,这就是桌面上的3DTouch。
创建方式
上面的示例图中有四个Action Item,其中每个Action是使用UIApplicationShortcutItem这个对象进行描述的,下面列出每一个UIApplicationShortcutItem中能够包含的信息:
| 名称 | 说明 | 是否必须 |
|---|---|---|
| UIApplicationShortcutItemType | 事件的唯一标识,可以通过这个来识别你具体点击了哪个事件 | 是 |
| UIApplicationShortcutItemTitle | 标题,在没有子标题的情况下如果标题太长能自动换行 | 是 |
| UIApplicationShortcutItemSubtitle | 子标题,在标题的下方 | 否 |
| UIApplicationShortcutItemIconType | 枚举选取系统中的一个图标类型 | 否 |
| UIApplicationShortcutItemIconFile | 自定义一个图标,单一颜色35x35的大小展示,如果设置了这个,UIApplicationShortcutItemIconType将不起作用 |
否 |
| UIApplicationShortcutItemUserInfo | 字典,里面可以添加各种key、value键值对 | 否 |
创建Quick Action有两种方式:静态和动态
①以静态方式创建
静态创建的方式是在Info.plist文件中进行声明的
UIApplicationShortcutItems


            UIApplicationShortcutItemIconFile
            R3.png
            UIApplicationShortcutItemType
            标示符
            UIApplicationShortcutItemTitle
            第一个标题
            UIApplicationShortcutItemIconType
            UIApplicationShortcutIconTypeShare
②以动态方式创建
动态创建是在程序初始化的时候用代码动态添加。 UIApplication 对象多了一个支持快捷方式的数组(shortcutItems), 如果需要增加快捷方式,可以赋值给shortcutItems属性。
UIApplicationShortcutItem * item = [[UIApplicationShortcutItem alloc]initWithType:@"Boundle identifier" localizedTitle:@"第二个标签" localizedSubtitle:@"subtitle" icon:[UIApplicationShortcutIcon iconWithType:UIApplicationShortcutIconTypeFavorite] userInfo:nil];
UIApplicationShortcutItem * item2 = [[UIApplicationShortcutItem alloc]initWithType:@"Custom Icon" localizedTitle:@"第三个标签" localizedSubtitle:@"详细标题" icon:[UIApplicationShortcutIcon iconWithTemplateImageName:@"R2"] userInfo:nil];
[UIApplication sharedApplication].shortcutItems = @[item,item2];
说明:
1)系统限制每个App最多能够显示4个Action Item,其中包括静态方式和动态方式进行创建的;
2)如果静态和动态方式同时使用的时候,给UIApplication的shortcutItems赋值的时候不会覆盖
回调
当app在后台的时候UIApplication提供了一个回调方法
我们依据这个回调中的shortcutItem的type和userinfo来做出不同的事件处理,而最后的completionHandler在API的说明中我们看到当应用并非在后台,而是直接重新开进程的时候,直接返回No,那么这个时候,我们的回调会放在
- (BOOL)application:(UIApplication *)application didFinishLaunchingWithOptions:(NSDictionary *)launchOptions
UIApplication又给我们一个从launchOptions中获取这个shortcutItem的key(UIApplicationLaunchOptionsShortcutItemKey)
UIApplicationShortcutItem *item = [launchOptions valueForKey:UIApplicationLaunchOptionsShortcutItemKey];```
//根据不同的Action响应不同的事件


/**
 *  3DTouch - Method回调函数
 */
- (void)application:(UIApplication *)application performActionForShortcutItem:(UIApplicationShortcutItem *)shortcutItem                                                                                                                                                          completionHandler:(void(^)(BOOL succeeded))completionHandler{
    if([shortcutItem.type isEqualToString:@"标示符"]){
        [self showActibityVC];
    }else if ([shortcutItem.type isEqualToString:@"Boundle identifier"]){
        NSLog(@"你点击了第二个快捷键");
    }

}
- (void)showActibityVC{
    NSArray *arr = @[@"hello 3D Touch"];
    UIActivityViewController *vc = [[UIActivityViewController alloc]initWithActivityItems:arr applicationActivities:nil];
    //设置当前的VC 为rootVC
    [self.window.rootViewController presentViewController:vc animated:YES completion:^{
    }];
}
App内部的3DTouch
如果你有iPhone 6S或者iPhone 6S plus 你可以打开微博,然后在屏幕上尝试3DTouch,你就会发现苹果的设计简直美妙。接下来我们就来实现App内部的3DTouch。
在iOS9之后UITouch添加了一个叫做force的属性,pop和peek就和这个属性有关,关于这个类中的force
属性以及他的最大值maximumPossibleForce,我们在UIView上做一个简单的实验,创建一个UIView子类,然后添加如下代码
- (void)touchesMoved:(NSSet *)touches withEvent:(UIEvent *)event{
    UITouch * touch = [touches anyObject];
    NSLog(@"%f",touch.force);
    self.backgroundColor = [UIColor colorWithRed:(touch.force / touch.maximumPossibleForce )green:0 blue:1 alpha:1];
    if (touch.force == touch.maximumPossibleForce){
        NSLog(@"最大值:%f",touch.maximumPossibleForce);
    }
}

- (void)touchesEnded:(NSSet *)touches withEvent:(UIEvent *)event{
    self.backgroundColor = [UIColor yellowColor];
}
这是部分效果图
输出发现当3D touch开的时候这个值为20/3,所以得到结论force是从0~20/3 从Peek到Pop也正是根据这个值大于某个指定的值时触发。
Peek & Pop
刚刚说了Peek和Pop的触发和UITouch的force有关,在切入正题之前我们还要将触发这2个事件的另一个东西:previewActionItems我们创建一个PeekViewController,在这个利用到了UIPreviewAction 和 UIPreviewActionGroup 2个iOS9新加的类型和他们的初始化方法我们重写
- (NSArray > *)previewActionItems```

从而来定义previewActionItems,这里没什么难度直接上代码

#pragma mark - Preview Actions
- (NSArray> *)previewActionItems{

    // 生成UIPreviewAction
    UIPreviewAction *action1 = [UIPreviewAction actionWithTitle:@"Action 1" style:UIPreviewActionStyleDefault handler:^(UIPreviewAction * _Nonnull action, UIViewController * _Nonnull previewViewController) {
        NSLog(@"Action 1 selected");
    }];

    UIPreviewAction *action2 = [UIPreviewAction actionWithTitle:@"Action 2" style:UIPreviewActionStyleDestructive handler:^(UIPreviewAction * _Nonnull action, UIViewController * _Nonnull previewViewController) {
        NSLog(@"Action 2 selected");
    }];

    UIPreviewAction *action3 = [UIPreviewAction actionWithTitle:@"Action 3" style:UIPreviewActionStyleSelected handler:^(UIPreviewAction * _Nonnull action, UIViewController * _Nonnull previewViewController) {
        NSLog(@"Action 3 selected");
    }];

    UIPreviewAction *tap1 = [UIPreviewAction actionWithTitle:@"tap 1" style:UIPreviewActionStyleDefault handler:^(UIPreviewAction * _Nonnull action, UIViewController * _Nonnull previewViewController) {
        NSLog(@"tap 1 selected");
    }];

    UIPreviewAction *tap2 = [UIPreviewAction actionWithTitle:@"tap 2" style:UIPreviewActionStyleDestructive handler:^(UIPreviewAction * _Nonnull action, UIViewController * _Nonnull previewViewController) {
        NSLog(@"tap 2 selected");
    }];

    UIPreviewAction *tap3 = [UIPreviewAction actionWithTitle:@"tap 3" style:UIPreviewActionStyleSelected handler:^(UIPreviewAction * _Nonnull action, UIViewController * _Nonnull previewViewController) {
        NSLog(@"tap 3 selected");
    }];
    // 塞到UIPreviewActionGroup中
    NSArray *actions = @[action1, action2, action3];
    NSArray *taps = @[tap1, tap2, tap3];
    UIPreviewActionGroup *group1 = [UIPreviewActionGroup actionGroupWithTitle:@"Action Group" style:UIPreviewActionStyleDefault actions:actions];
    UIPreviewActionGroup *group2 = [UIPreviewActionGroup actionGroupWithTitle:@"Tips Group" style:UIPreviewActionStyleDestructive actions:taps];
    NSArray *group = @[group1,group2];

    return group;

}
我们发现他是一个二维结构,所以能展示的东西还是非常多的。
好了准备工作到此结束,我们切入正题 在ViewController中,创建tableView作为接收事件的View
然后检测是否可以使用3DTouch,如果可以就注册:
- (void)check3DTouch
{
    // 如果开启了3D touch
    if (self.traitCollection.forceTouchCapability == UIForceTouchCapabilityAvailable)
    {
        [self registerForPreviewingWithDelegate:(id)self sourceView:self.tableView];
    }
}
最后我们来写Peek和Pop的代理方法
- peek
这个代理在按的过程中会进来多次,但是我们并不需要多个peek对象,所以如果触发的self.presentedViewController和我们想要的peekViewController已经是同一个了,那就return nil,我们按cell
在出现peekViewController的时候向上移动我们能看到刚刚创建的previewActionItems的2个group
- (UIViewController *)previewingContext:(id)previewingContext viewControllerForLocation:(CGPoint)location
{
    previewingContext.sourceRect = _label.frame;
    //防止重复加入
    if ([self.presentedViewController isKindOfClass:[PeekViewController class]])
    {
        return nil;
    }
    else
    {
        /** 转换坐标 */
        CGPoint p = [_tableView convertPoint:CGPointMake(location.x, location.y ) fromView:self.view];
        NSLog(@"PPPPPX:%f, PPPPPY:%f",p.x,p.y);
        /** 通过坐标活的当前cell indexPath */
        NSIndexPath *indexPath = [_tableView indexPathForRowAtPoint:CGPointMake(p.x, p.y + 64)];
//        NSIndexPath *indexPath = [_tableView indexPathForRowAtPoint:location];
        NSLog(@"%ld",(long)indexPath.row);
        /** 获得当前cell */
        UITableViewCell *cell = [_tableView cellForRowAtIndexPath:indexPath];

        PeekViewController *peekViewController = [[PeekViewController alloc] init];
        //    detail.preferredContentSize = CGSizeMake(0, 120);
//        peekViewController.view.frame = self.view.frame;
        peekViewController.preferredContentSize = CGSizeMake(0.0, 300);
//        CGRect rect = CGRectMake(20 , 20, SCREEN_WIDTH - 40 , cell.frame.size.height + 10);
        CGRect rect = cell.frame;
        NSLog(@"frame : %@",NSStringFromCGRect(cell.frame));
        previewingContext.sourceRect = rect;


        return peekViewController;

    }
}
- pop
这里也可以单独创建一个UIViewController来显示深度按压之后的画面,如果是自定义的可以给它添加一个手势,点击之后dismiss掉。这里就不过多赘述了。
- (void)previewingContext:(id)previewingContext commitViewController:(UIViewController *)viewControllerToCommit
{
    [self showViewController:viewControllerToCommit sender:self];
}
本文的Demo地址
相关链接
《Adopting 3D Touch on iPhone》
《浅谈3D Touch(1) — Home screen quick action》
《浅谈3D Touch(2) — UITouch && Peek && Pop》
《适配3d-touch》
《Add iOS 9’s Quick Actions shortcut support in 15 minutes right now !》
《15分钟搞定iOS9 Quick Actions》
《3D Touch之我见》


