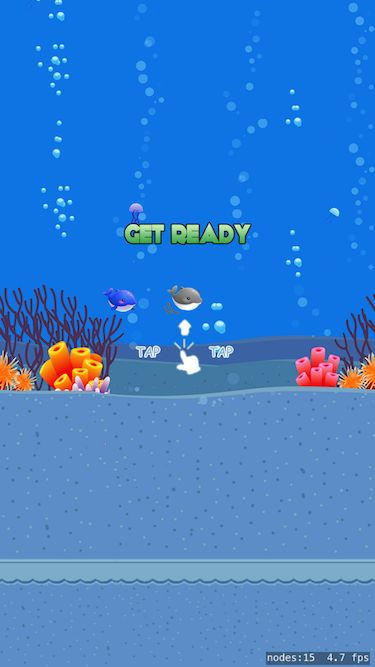
在完成了上篇 “飞翔的小鸟”简易款 之后,就试着在网上找了一套UI做了一套升级款“游曳的小蓝”。
先关闭音效,看一下运行效果图吧,哈哈~
在原来的基础简易修改后,大概增加了三个功能点~
1.音效播放
对于音效的播放,主要采用两种方式:AVAudioPlayer 和 SKAction.playSoundFileNamed。
首先我们新建一个Swift类用于AVAudioPlayer 播放音效的封装,再类中导入 AVFoundation 库 ,在声明的MusicPlayer Class 类中实现音效的初始化、播放和停止。
enum MusicPlayerError : Error {
    case resourceNotFound
}

class MusicPlayer {
    /// 单例
    fileprivate var player: AVAudioPlayer? = nil

    /// 初始化
    init(fileName:String,type:String) throws {
        if let resource = Bundle.main.path(forResource: fileName, ofType: type) {
            let url = URL(fileURLWithPath: resource)
            player = try AVAudioPlayer(contentsOf: url)
            player?.numberOfLoops = -1
            player?.prepareToPlay()
        }else{
            throw MusicPlayerError.resourceNotFound
        }
    }

    /// 播放
    func play(){
        player?.play()
    }
    /// 停止
    func stop() {
        player?.stop()
    }
}
然后,在 GameViewController 类中,添加上背景音效:
do {
        player = try MusicPlayer(fileName: "Pamgaea", type: "mp3")
        player?.play()
    } catch _ {
        print("Error Play")
    }
在 GameScene 类中,小鸟受到向上的力时、通过管道时和碰撞时,利用SkAction 分别播放不同的音效
self.run(SKAction.playSoundFileNamed("xxx.mp3", waitForCompletion: false))
2.计分板
计分板主要功能点:最新得分、历史最高分、确认键、动画展示
首先我们要利用静态化存储,来储存和获得分数,写定两个方法如下
func setBestScore(score:Int) {
    UserDefaults.standard.set(score, forKey: "bestScore")
    UserDefaults.standard.synchronize()
}
func bestScore()->Int{
    return UserDefaults.standard.integer(forKey: "bestScore")
}
接着, 我们声明一个SKNode变量scoreCards,用来存储计分板视图
/// 储存计分板视图
var scoreCards:SKNode!
然后,设置计分板UI图:
func setupScoreCard() {
    if score > bestScore() {
        setBestScore(score: score)
    }

    let whiteNode = SKSpriteNode(color: SKColor.white, size: size)
    whiteNode.alpha = 0
    whiteNode.zPosition = 100
    whiteNode.position = CGPoint(x: size.width/2, y: size.height/2)
    scoreCards.addChild(whiteNode)

    // 1 得分面板背景
    let scorecard = SKSpriteNode(imageNamed: "scoreCard")
    scorecard.position = CGPoint(x: size.width * 0.5, y: size.height * 0.5)
    scorecard.name = "scorecard"
    scorecard.zPosition = 101
    scoreCards.addChild(scorecard)

    // 2 本次得分
    let lastScore = SKLabelNode(fontNamed: "MarkerFelt-Wide")
    lastScore.fontColor = SKColor.white
    lastScore.position = CGPoint(x: scorecard.size.width * 0.30, y:0)
    lastScore.text = String(score)
    lastScore.zPosition = 102
    scorecard.addChild(lastScore)

    // 3 最好成绩
    let bestScoreLabel = SKLabelNode(fontNamed: "MarkerFelt-Wide")
    bestScoreLabel.fontColor = SKColor.white
    bestScoreLabel.position = CGPoint(x: scorecard.size.width * 0.30, y: -scorecard.size.height * 0.32)
    bestScoreLabel.zPosition = 102
    bestScoreLabel.text = String(bestScore())
    scorecard.addChild(bestScoreLabel)

    // 4 游戏结束
    let gameOver = SKSpriteNode(imageNamed: "game_over")
    gameOver.position = CGPoint(x: size.width/2, y: size.height/2 + scorecard.size.height/2 + 50 + gameOver.size.height/2)
    gameOver.zPosition = 101
    scoreCards.addChild(gameOver)

    // 5 ok按钮背景以及ok标签
    let okButton = SKSpriteNode(imageNamed: "confirm")
    okButton.position = CGPoint(x: size.width * 0.5, y: size.height/2 - scorecard.size.height/2 - 50 - okButton.size.height/2)
    okButton.zPosition = 101
    // 作用于按钮事件
    okButton.name = "ok"
    scoreCards.addChild(okButton)
}
在已结束状态,调用 setupScoreCard 方法,运行效果图如下:
最后动画展示,在 setupScoreCard()最下面,添加以下动作:
 //添加一个常量 用于定义动画时间
    let animDelay = 0.3

    let whiteNodeIn = SKAction.sequence([SKAction.wait(forDuration: 1.0),SKAction.fadeAlpha(to: 0.3, duration: 0.3)])
    whiteNode.run(whiteNodeIn)

    gameOver.setScale(0)
    let group = SKAction.scale(to: 1.0, duration: animDelay)
    group.timingMode = .linear
    gameOver.run(SKAction.sequence([SKAction.wait(forDuration: 1),group]))

    scorecard.position = CGPoint(x: size.width * 0.5, y: -scorecard.size.height/2)
    let moveTo = SKAction.moveTo(y: size.height/2, duration: animDelay)
    moveTo.timingMode = .linear
    scorecard.run(SKAction.sequence([SKAction.wait(forDuration: 1),moveTo]))

    okButton.position = CGPoint(x: size.width * 0.5, y: -scorecard.size.height - 50 - okButton.size.height/2)
    let moveTo2 = SKAction.moveTo(y:  size.height/2 - scorecard.size.height/2 - 50 - okButton.size.height/2, duration: animDelay)
    moveTo2.timingMode = .linear
    okButton.run(SKAction.sequence([SKAction.wait(forDuration: 1),moveTo2]))
在初始化状态调用移除计分板方法:
/// 移除计分板
 func removeScoreCard() {
     scoreCards.removeAllChildren()
 }
根据计分板的确认键,仿写一个按钮。在点击屏幕的时候,我们判断点击的位置是否是确认键的位置。
因为上面我们UI视图中,已经给“ okButton”的“ name”属性赋值,所以我们在点击屏幕时,在当前已经是已结束状态下,书写以下代码:
/// 防按钮事件
        for touch in touches{
            let location = touch.location(in: self)
            for node in nodes(at:location){
                if node.name == "ok"{

                    idleStatus()
                }
            }
        }
3.引导提示图
类比计分板,先声明一个SKNode变量tutorials,用来存储计分板视图,然后书写创建计分板和移除计分板方法:
/// 创建引导提示图
func setupTutorial() {

    let tutorial = SKSpriteNode(imageNamed: "taptap")
    tutorial.position = CGPoint(x: size.width * 0.5, y: size.height * 0.5)
    tutorial.name = "Tutorial"
    tutorial.zPosition = 100
    tutorials.addChild(tutorial)

    let ready = SKSpriteNode(imageNamed: "get_ready")
    ready.position = CGPoint(x: size.width * 0.5, y: size.height * 0.5 + 100)
    ready.name = "Tutorial"
    ready.zPosition = 100
    tutorials.addChild(ready)
}

/// 移除引导提示图
func removeTutorial() {
    tutorials.removeAllChildren()
}
在初始化状态,创建引导提示图;
在运行中状态,移除引导提示图。
效果如下:
OK,现在“飞翔的小鸟”升级款->“游曳的小蓝”,就已经做好了,可以好好地玩耍了~
Demo地址
资料参考:
Show Me 得分面板
致命的音效


