一、UILabel
1.UILabel(标签):
UILable是显示文本的控件,UIView子类,作为子类一般是为了扩充父类的功能UILabel扩展了文字显示的功能,UILabel是能显示文字的视图。
2.如何使用UILabel
创建UILabel与创建UIView的步骤很相似。1、开辟空间并初始化(如果本类有初始化方法,则使用自己的初始化方法;否则使用父类的)。2、设置文本控制相关的属性3、添加到父视图上,用以显示4、释放所有权(只是做了引用计数-1)
UILabel *userNameLabel = [[UILabel alloc] initWithFrame:CGRectMake(30, 100, 100, 30)];
//要显示的文本内容
userNameLabel.text = @“用户名”;
//文本内容的颜色
userNameLabel.textColor = [UIColor redColor];
//设置字体样式和大小 ,黑体加粗,20号字。
userNameLabel.font = [UIFont fontWithName:@“Helvetica-Bold” size:20];
//行数
userNameLabel.numberOfLines = 3;//显示3行,注意label的高度要能容纳3行。如果3行没能显示完信息,没显示的信息以省略号代替。
//断行模式
userNameLabel.lineBreakMode = NSLineBreakByWordWrapping;//以单词为单位换行
//阴影颜色
userNameLabel.shadowColor = [UIColor yellowColor];
//阴影大小
userNameLabel.shadowOffset = CGSizeMake(2,1);//阴影向x正方向偏移2,向y正方向偏移1。
//将userNameLabel添加添加到父视图上
[self.view addSubview:userNameLabel];
[userNameLabel release];
二、UITextField(输入框)
UITextField(输入框):是控制文本输入和显示的控件。在App中UITextField出现频率也比较高。
iOS系统借助虚拟键盘实现输入,当点击输入框,系统会自动调出键盘,方便你进一步操作。在你不需要输入的时候,可以使用收回键盘的方法,收回弹出的键盘。
UITextField和UILabel相比,UILabel主要用于文字显示,不能编辑,UITextField允许用户编辑文字(输入)
1.如何使用UITextField
创建UITextField与创建UILabel的步骤很相似。1、开辟空间并初始化(如果本类有初始化方法,则使用自己的初始化方法;否则使用父类的)。2、设置文本显示、输入等相关的属性3、添加到父视图上,用以显示4、释放对象所有权.
// 使用初始化方法创建对象
UITextField *userNameTextField = [[UITextField alloc] initWithFrame:CGRectMake(100, 100, 190, 30)];
// 设置边框风格
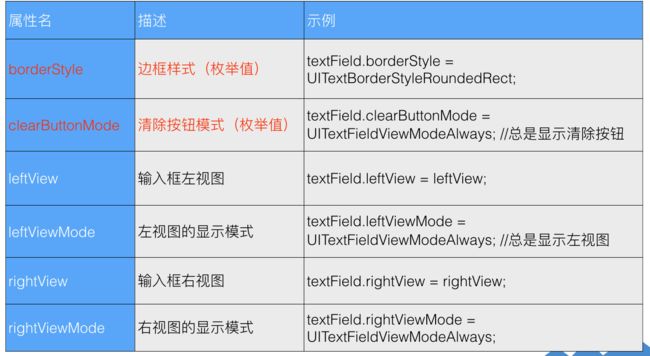
userNameTextField.borderStyle = UITextBorderStyleRoundedRect;
// 设置占位符
textField.placeholder = @“手机号/邮箱";
//1.UITextField 文本显示属性
//要显示的文本内容
textField.text = @“你好”;
//文本内容的颜色
textField.textColor = [UIColor redColor];
//文本的对齐方式(水平方向)
textField.textAlignment = NSTextAlignmentLeft;
//文本字体
textField.font = [UIFont fontWithName:@“Helvetica-Bold” size:20];//黑体加粗,20号字。
//占位字符串(没有任何输入时,给出的提示字符串)
textField.placeholder = @“请输入用户名”;
//2.UITextField 输入控制属性
//是否允许输入
textField.enabled =NO;//不允许输入,不弹出键盘textField.enabled =YES;//默认是YES。允许输入
//是否开始输入的时候清空输入框内容
textField.clearsOnBeginEditing = YES;//清空textField.clearsOnBeginEditing = NO;//不清空
//是否文字以圆点格式显示
textField.secureTextEntry = YES;//密码模式textField.secureTextEntry = NO;//普通模式
//键盘右下角return按钮类型(枚举值)
textField.returnKeyType = UIReturnKeyNext;
//自定义输入视图(默认是键盘)
textField.inputView = myInputView;
//输入视图上方的辅助视图(默认nil)
textField.inputAccessoryView = myAccessoryView;
[self.view addSubview:textField];
[textField release];//释放内存管理
UITextField 外观控制属性
UITextField 常用代理方法

三、UIButton使用示例
// 便利构造器方法创建对象
UIButton *loginButton = [UIButton buttonWithType:UIButtonTypeSystem];
loginButton.frame = CGRectMake(30, 200, 60, 30);
// 设置button的标题
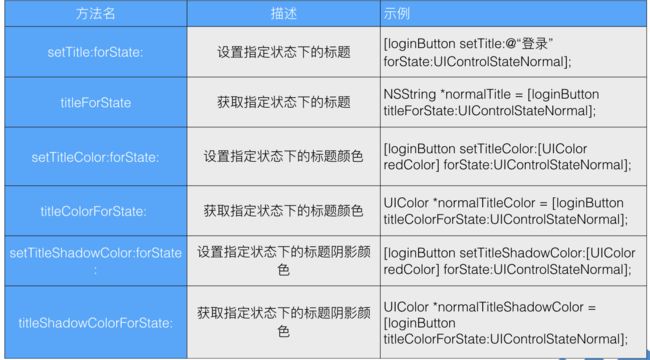
[loginButton setTitle:@"登录" forState:UIControlStateNormal];
// 添加点击事件
[loginButton addTarget:self action:@selector(login:) forControlEvents:UIControlEventTouchUpInside];
[containerView addSubview:loginButton];
UIButtonc 外观控制属性

UIButton 添加事件

四、UIImageView(于显示图片的类)
UIImageView *imageView =[[UIImageView alloc]initWithImage:[UIImage imageNamed:@"BackGround"]];
imageView.frame = CGRectMake(0, 0, self.view.frame.size.width, self.view.frame.size.height);
    [self.view addSubview: imageView];
实现僵尸行走动画
#import "ViewController.h"

@interface ViewController ()

@end

@implementation ViewController

- (void)viewDidLoad {
    [super viewDidLoad];
    UIImageView *imageView =[[UIImageView alloc]initWithImage:[UIImage imageNamed:@"BackGround"]];
    imageView.frame = CGRectMake(0, 0, self.view.frame.size.width, self.view.frame.size.height);
    [self.view addSubview: imageView];
       //[self.view addSubview:imageView];

    NSMutableArray * imageArray = [NSMutableArray array];
    for (int i = 0; i<=21; i++) {
        NSString * imageName = [NSString stringWithFormat:@"Zombie%d.tiff",i];
        UIImage * image = [UIImage imageNamed:imageName];
        [imageArray addObject: image];

    }
   // NSLog(@"%@",imageArray[1]);
    UIImageView *ZombieImageView = [[UIImageView alloc]initWithImage:[imageArray firstObject]];
    ZombieImageView.frame = CGRectMake(100, 200, 200, 150);

    [self.view addSubview:ZombieImageView];
    //设置要播放的一组图片
    ZombieImageView.animationImages = imageArray;
    //设置播放一组图片的总时长
    ZombieImageView.animationDuration = 3;
    //设置播放一组图片的循环次数(0位无限循环)
    ZombieImageView.animationRepeatCount =0;
    [ZombieImageView startAnimating];

    NSMutableArray * imageArray1 = [NSMutableArray array];
    for (int j = 1; j<=18; j++) {
        NSString * imageName = [NSString stringWithFormat:@"flower%d.tiff",j];
        UIImage * image = [UIImage imageNamed:imageName];
        [imageArray1 addObject: image];

    }

    UIImageView * flowerView = [[UIImageView alloc]initWithImage:[imageArray1 firstObject]];
    flowerView.frame = CGRectMake(400, 300, 100, 100);
    [self.view addSubview:flowerView];
    flowerView.animationImages = imageArray1;
    flowerView.animationDuration = 2;
    flowerView .animationRepeatCount = 0;
    [flowerView startAnimating];
   [self animation:flowerView duration:5.0f frame:CGRectMake(-100, 400, 100, 100)];


 //平移动画
//    [UIView animateWithDuration:5.f animations:^{
//        ZombieImageView.frame = CGRectMake(-200, 100, 200, 200);
//    } completion:^(BOOL finished) {
//        [UIView animateWithDuration:5.0f animations:^{
//             ZombieImageView.frame = CGRectMake(100, 200, 200, 150);
//        }];
//    }];
    [self animation:ZombieImageView duration:5.0f frame:CGRectMake(-200, 200, 200, 150)];
}
- (void)animation:(UIView *)animationView duration:(NSTimeInterval)duration frame:(CGRect)frame {
    [UIView animateWithDuration:duration animations:^{
        animationView.frame = frame;
    }];
}
- (void)didReceiveMemoryWarning {
    [super didReceiveMemoryWarning];
    // Dispose of any resources that can be recreated.
}

@end