一、概述
在学习完Lifecycle之后,我们如何通过Lifecycle让除了Activity/Fragment之外的其它对象都可以很方便地收到当前页面生命周期的回调。
今天我们来学习ViewModel+LiveData,它们共同的特点就是绑定到了UI组件(Activity/Fragment)上,可以收到生命周期的回调,简单地来说,这两个组件的作用分别为:
-
LiveData:在Lifecycle范围内 监听数据 的变化。 -
ViewModel:在Lifecycle范围内 存储和共享数据。
今天,我们就一起来学习一下LiveData的使用场景。
二、LiveData+ViewModel
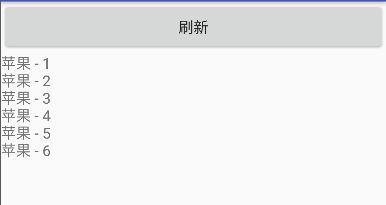
这个Demo的功能很简单,在界面上有一个Btn,点击Btn后异步加载数据,数据回来以后通知UI来更新。
2.1 创建 ViewModel 和 LiveData
/**
 * 继承于 ViewModel。
 *
 * @author lizejun
 */
public class DataViewModel extends ViewModel {

    private static final String TAG = DataViewModel.class.getSimpleName();

    //这里创建一个 MutableLiveData, 为要提供的数据类型,这里我们声明为 List。
    private MutableLiveData> mWatcher;
    private Handler mWorkHandler;

    /**
     * 加载数据,在实际当中,加载数据的操作要放在 Repository 中进行,而不要放在 Model 中,
     * 它只是负责数据和 UI 的交互过程。
     *
     */
    public void load() {
        if (mWorkHandler == null) {
            HandlerThread thread = new HandlerThread("DataViewModel");
            thread.start();
            mWorkHandler = new Handler(thread.getLooper());
        }
        mWorkHandler.post(new Runnable() {

            @Override
            public void run() {
                //模拟加载数据的过程。
                try {
                    Thread.sleep(1000);
                } catch (Exception e) {
                    e.printStackTrace();
                }
                List result = makeResult();
                setResults(result);
            }

        });
    }

    /**
     * 获取数据的监控者。
     *
     * @return 监控者。
     */
    public MutableLiveData> getWatcher() {
        Log.d(TAG, "Call getWatcher");
        if (mWatcher == null) {
            mWatcher = new MutableLiveData<>();
        }
        return mWatcher;
    }

    /**
     * 设置数据。
     *
     * @param results 设置数据。
     */
    private void setResults(List results) {
        Log.d(TAG, "Call setResults");
        //当数据加载完以后,调用 setValue/postValue 方法设置数据。
        if (Looper.getMainLooper() == Looper.myLooper()) {
            getWatcher().setValue(results);
        } else {
            getWatcher().postValue(results);
        }
    }

    private List makeResult() {
        List result = new ArrayList<>();
        result.add("苹果 - 1");
        result.add("苹果 - 2");
        result.add("苹果 - 3");
        result.add("苹果 - 4");
        result.add("苹果 - 5");
        result.add("苹果 - 6");
        return result;
    }
}
我们创建一个继承 于ViewModel的DataViewModel,前面我们也提到过,ViewModel作用是存储和共享数据,这里的作用就是 存储。
我们所需要的真实数据则是被保存在MutableLiveData当中,?就是真实数据的类型,而MutableLiveData就是我们所说的LiveData,它除了负责保存数据外,还负责在数据变化的时候,通知它的观察者。
往LiveData中插入数据的方式有两种:
-
setValue:只允许在主线程中调用。 -
postValue:主线程/子线程中均可调用。
在上面的Demo中,我们在load()中模拟了异步获取数据的操作的逻辑,并最终向LiveData中插入数据。
2.2 使用方式
下面,让我们来看一下完整的使用过程,以及一些特殊的场景。
/**
 * LiveData 学习 Demo。
 */
public class LiveDataActivity extends AppCompatActivity {

    private Button mBtnRefresh;
    private TextView mTvResult;
    private DataViewModel mViewModel;

    @Override
    protected void onCreate(Bundle savedInstanceState) {
        super.onCreate(savedInstanceState);
        setContentView(R.layout.activity_live_data);
        mTvResult = findViewById(R.id.tv_result);
        //1.创建 ViewModel。
        mViewModel = ViewModelProviders.of(this).get(DataViewModel.class);
        //2.添加观察者。
        mViewModel.getWatcher().observe(this, new Observer>() {

            @Override
            public void onChanged(@Nullable List strings) {
                Log.d("DataViewModel", "onChanged");
                String tvDisplay = "";
                for (String result : strings) {
                    tvDisplay += (result + "\n");
                }
                //4.数据发生了改变后会回调到这里。
                mTvResult.setText(tvDisplay);
            }
        });
        mBtnRefresh = findViewById(R.id.btn_refresh);
        mBtnRefresh.setOnClickListener(new View.OnClickListener() {

            @Override
            public void onClick(View v) {
                //3.触发加载。
                Log.d("DataViewModel", "mViewModel.load()");
                mViewModel.load();
            }
        });
    }

    @Override
    protected void onResume() {
        super.onResume();
        Log.d("DataViewModel", "onResume()");
    }

    @Override
    protected void onPause() {
        super.onPause();
        Log.d("DataViewModel", "onPause()");
    }
}
首先,我们通过ViewModelProviders.of(this).get(DataViewModel.class)创建了DataViewModel的实例,而不是通过直接new的方式,这么做的原因有两个:
- 通过
of传入的Activity,其在内部实现了与Activity的绑定。 - 为了数据的共享,这点我们暂时还没有体会到,后面会讲。
接着,获取到DataViewModel当中的MutableLiveData对象,调用其observe方法,该方法接受两个参数,分别对应于其要绑定到的组件以及一个监听者,当我们改变了MutableLiveData内部持有的数据后,将会回调该监听者,我们就可以在里面做更新数据的操作。
当我们点击 加载 按钮后,log输出如下所示:
现在,让我们模拟一种特殊的场景,在点击加载按钮后,迅速按下HOME键让页面处于inactive的状态,此时的输出为:
可以发现, 没有回调 onChanged() 方法,之后重新进入界面:
在重新进入界面之后,才回调了
onChanged()方法,也就是说,在界面
inactive的状态下发生了数据的改变,不会立即通知观察者,而是要等到界面重新
active之后,才会调用
observer的
onChanged()方法。
除了observe方法外,还有一个observeForever,它只接受一个观察者参数,也就是说,它并不关注当前界面是否active,都会回调数据。
        //不与组件的生命周期绑定。
        mViewModel.getWatcher().observeForever(new Observer>() {

            @Override
            public void onChanged(@Nullable List strings) {
                Log.d("DataViewModel", "onChanged");
                String tvDisplay = "";
                for (String result : strings) {
                    tvDisplay += (result + "\n");
                }
                //4.数据发生了改变后会回调到这里。
                mTvResult.setText(tvDisplay);
            }
        });
用相同的操作验证的结果如下,即使界面处于inactive状态,也会回调onChanged()方法:
因此,为了避免内存泄漏,我们应当在界面销毁的时候,调用
MutableLiveData的
removeObserver方法。
2.3 小结
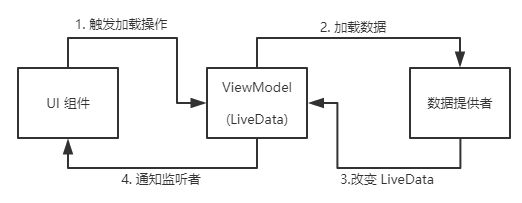
整个数据的流向如下所示:
通过
LiveData作为中介者,实现了
UI组件和数据组件的隔离,对于
UI组件来说,它只负责
发起请求操作 和
在数据变化的时候更新界面,而对于数据组件来说,它负责
接受请求和
改变LiveData,而通知
UI组件的操作则是由
LiveData来完成的,因此它可以根据当前
UI组件的状态
active/inative进行控制。
三、继承 LiveData
继承LiveData的时候,我们一般会重写它的下面两个方法,它们的含义为:
-
onActive():当LiveData有一个活跃的观察者时调用。 -
onInactive():当LiveData没有任何一个活跃的观察者时调用。
而我们继承LiveData的场景主要有两种:
- 通过
onActive/onInactive回调,我们可以知道 是否有观察者正在活动,这有利于我们注册和反注册类似于传感器或者广播的监听。 - 通过将
LiveData设置为单例的,让其在多个Activity内共享数据,只要数据发生了变化,那么任何一个处于active状态的观察者就会收到通知。
以下就是一个通过继承LiveData,并重写onActive/onInactive方法实现监听网络变化的例子。
public class NetLiveData extends LiveData {

    private BroadcastReceiver mBroadcastReceiver;
    private static Context sAppContext;
    private static volatile NetLiveData sInstance;
    private AtomicBoolean mNotice = new AtomicBoolean(false);

    public static NetLiveData getInstance(Context context) {
        if (sInstance == null) {
            synchronized (NetLiveData.class) {
                if (sInstance == null) {
                    sInstance = new NetLiveData(context);
                }
            }
        }
        return sInstance;
    }

    private NetLiveData(Context context) {
        sAppContext = context.getApplicationContext();
    }

    @Override
    public void observe(@NonNull LifecycleOwner owner, @NonNull final Observer observer) {
        super.observe(owner, new Observer() {

            @Override
            public void onChanged(@Nullable Boolean aBoolean) {
                if (mNotice.compareAndSet(true, false)) {
                    observer.onChanged(aBoolean);
                }
            }
        });

    }

    @Override
    protected void onActive() {
        super.onActive();
        registerBroadcast(sAppContext);
    }

    @Override
    protected void onInactive() {
        super.onInactive();
        unRegisterReceiver(sAppContext);
    }

    @Override
    protected void setValue(Boolean value) {
        super.setValue(value);
        mNotice.set(true);
    }

    /**
     * 注册网络连接监听。
     */
    private void registerBroadcast(Context context) {
        if (mBroadcastReceiver == null) {
            mBroadcastReceiver = new BroadcastReceiver() {

                @Override
                public void onReceive(Context context, Intent intent) {
                    setValue(isNetworkAvailable(context));
                }

            };
            IntentFilter filter = new IntentFilter(ConnectivityManager.CONNECTIVITY_ACTION);
            context.registerReceiver(mBroadcastReceiver, filter);
        }
    }

    /**
     * 取消网络连接监听。
     */
    private void unRegisterReceiver(Context context) {
        if (mBroadcastReceiver != null) {
            context.unregisterReceiver(mBroadcastReceiver);
            mBroadcastReceiver = null;
        }
    }

    /**
     * 获取当前网络是否连接,连接返回 true,未连接返回 false。
     *
     * @param context 上下文。
     * @return 网络连接连接返回 true,否则返回 false。
     */
    private static boolean isNetworkAvailable(Context context) {
        ConnectivityManager connectivityManager = (ConnectivityManager) context
                .getSystemService(Context.CONNECTIVITY_SERVICE);
        NetworkInfo[] networkInfo = connectivityManager.getAllNetworkInfo();
        if (networkInfo != null && networkInfo.length > 0) {
            for (int i = 0; i < networkInfo.length; i++) {
                if (networkInfo[i].getState() == NetworkInfo.State.CONNECTED) {
                    return true;
                }
            }
        }
        return false;
    }
}
四、参考文献
(1) Android架构组件 (二) - LiveData
(2) 关于使用 Android MVVM + LiveData 模式的一些建议


