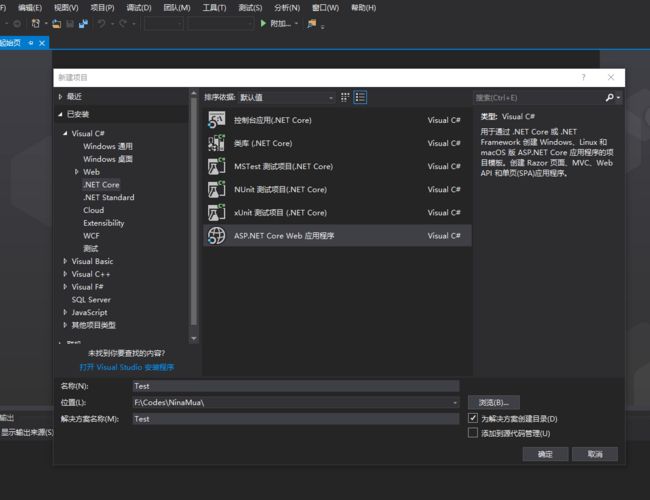
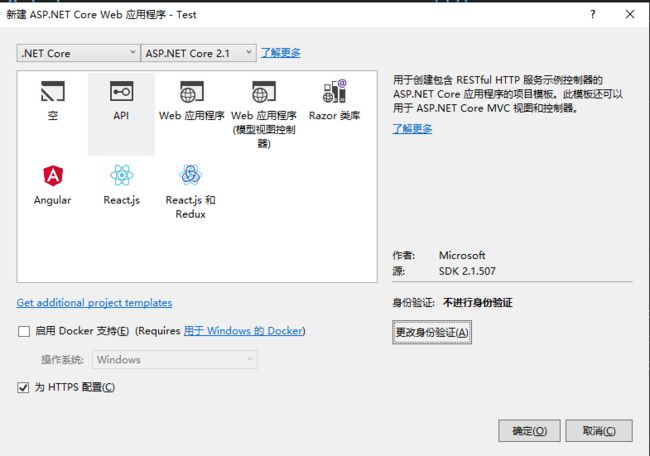
1、先创建 .net core Web 应用程序,选择API
2、安装 Nuget 包:Nlog.Web.AspNetCore
install-package Nlog
install-package Nlog.Web.AspNetCore
或者打开Nuget管理界面搜索Nlog.Web.AspNetCore(我安装的版本是V4.9.0)
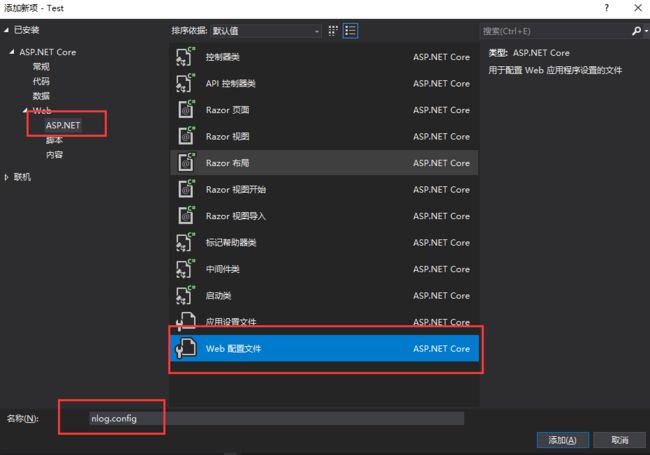
3、添加配置文件: nlog.config
注意,此处nlog.config最好是小写的,需修改属性使其始终复制
"1.0" encoding="utf-8" ?>"http://www.nlog-project.org/schemas/NLog.xsd" xmlns:xsi="http://www.w3.org/2001/XMLSchema-instance" autoReload="true" internalLogLevel="Info" internalLogFile="c:\temp\internal-nlog.txt"> "NLog.Web.AspNetCore"/> "File" name="allfile" fileName="c:\temp\nlog-all-${shortdate}.log" layout="${longdate}|${event-properties:item=EventId_Id}|${uppercase:${level}}|${logger}|${message} ${exception:format=tostring}" /> "File" name="ownFile-web" fileName="c:\temp\nlog-own-${shortdate}.log" layout="${longdate}|${event-properties:item=EventId_Id}|${uppercase:${level}}|${logger}|${message} ${exception:format=tostring}|url: ${aspnet-request-url}|action: ${aspnet-mvc-action}" /> "*" minlevel="Trace" writeTo="allfile" /> "Microsoft.*" maxlevel="Info" final="true" /> "*" minlevel="Trace" writeTo="ownFile-web" />
配置appsettings.json
 "Logging": {
    "LogLevel": {
      "Default": "Trace",
      "Microsoft": "Information"
    }
  }
4、注册日志依赖
方法一:通过修改Program.cs
//需引用
//using Microsoft.Extensions.Logging;
//using NLog.Web;

public class Program
    {
        public static void Main(string[] args)
        {
            NLog.Web.NLogBuilder.ConfigureNLog("nlog.config");
            CreateWebHostBuilder(args).Build().Run();
        }

        public static IWebHostBuilder CreateWebHostBuilder(string[] args) =>
            WebHost.CreateDefaultBuilder(args)
                .UseStartup()
                .ConfigureLogging(logging =>
                 {
                     logging.ClearProviders(); //移除已经注册的其他日志处理程序
                     logging.SetMinimumLevel(Microsoft.Extensions.Logging.LogLevel.Trace); //设置最小的日志级别
                 })
                 .UseNLog();
    }
方法二:通过修改Startup.cs里的Configure函数
//需引用
//using NLog.Extensions.Logging;
//using NLog.Web;

public void Configure(IApplicationBuilder app, IHostingEnvironment env, ILoggerFactory loggerFactory)
        {
            if (env.IsDevelopment())
            {
                app.UseDeveloperExceptionPage();
            }
            else
            {
                app.UseHsts();
            }

            app.UseHttpsRedirection();

            loggerFactory.AddNLog();//添加NLog
            env.ConfigureNLog("nlog.config");//读取Nlog配置文件


            app.UseMvc();
        }
5、修改 Controller, 输出日志:
[Route("api/")] public class LoginController : Controller { private ILoggerlogger; public LoginController(ILogger _logger) { logger = _logger; } [Route("Login")] [HttpGet] public stringLogin() { logger.LogInformation("Info日志"); logger.LogError("Error日志"); logger.LogWarning("Warning日志"); logger.LogCritical("Critical日志"); logger.LogWarning("Warning日志"); logger.LogTrace("Trace日志"); logger.Log(LogLevel.Warning, "LogWarn日志"); logger.Log(LogLevel.Debug, "LogDebug日志"); logger.Log(LogLevel.Error, "LogError日志"); return ""; } }
打印日志的时候有两种方式
logger.Log(LogLevel.Warning, "LogWarning日志:"); //标红的地方可以选择日志的级别
logger.LogWarning("Warning日志");//直接调内置的级别函数
6、结果
程序跑起来之后会出现前两个文件~访问完接口后会出现最后那个文件
internal-nlog 记录了NLog的启动及加载config的信息。
nlog-all 记录了所有日志
nlog-own 记录了我们自定义的日志
7、修改配置
打开官方提供的nlog.config 配置参考 https://github.com/NLog/NLog/wiki/Configuration-file
子节点
属性Layout表示输出文本格式 配置参考 https://nlog-project.org/config/?tab=layouts
子节点
日志级别:Trace >Debug> Information >Warn> Error> Fatal属性:
name - 日志源/记录者的名字 (允许使用通配符*) minlevel : 匹配日志范围的最低级别 maxlevel : 匹配日志范围的最高级别 level : 单一日志级别 levels : 一系列日志级别,由逗号分隔 writeTo : 日志应该被写入的目标,由逗号分隔,与target的你name对应 final : 为true标记当前规则为最后一个规则。其后的logger不会运行
附最后的配置文档
"1.0" encoding="utf-8" ?>"http://www.nlog-project.org/schemas/NLog.xsd" xmlns:xsi="http://www.w3.org/2001/XMLSchema-instance" > "File" name="allfile" fileName="log\${shortdate}-All.log" layout="${longdate} | ${event-properties:item=EventId_Id:whenEmpty=0} | ${uppercase:${level}}|${logger} |${message} ${exception:format=tostring}" /> "File" name="errorfile" fileName="log\${shortdate}-Error.log" layout="${longdate} | ${event-properties:item=EventId_Id:whenEmpty=0} | ${uppercase:${level}} | ${logger} | ${message} ${exception:format=tostring} | url: ${aspnet-request-url} | action: ${aspnet-mvc-action} | ${callsite}" /> "File" name="taskfile" fileName="log\${shortdate}-Warn.log" layout="${longdate} | ${event-properties:item=EventId_Id:whenEmpty=0} | ${uppercase:${level}} | ${logger} | ${message} ${exception:format=tostring} | url: ${aspnet-request-url} | action: ${aspnet-mvc-action} | ${callsite}" /> "File" name="runfile" fileName="log\${shortdate}-Info.log" layout="${longdate} | ${event-properties:item=EventId_Id:whenEmpty=0} | ${uppercase:${level}} | ${logger} | ${message} ${exception:format=tostring} | url: ${aspnet-request-url} | action: ${aspnet-mvc-action} | ${callsite}" /> "*" minlevel="Trace" writeTo="allfile" /> "*" levels="Error,Warn,Critical" writeTo="errorfile" /> "*" level="Info" writeTo="taskfile" /> "*" level="Warn" writeTo="runfile" final="true"/>
参考github: https://github.com/nlog/nlog/wiki


