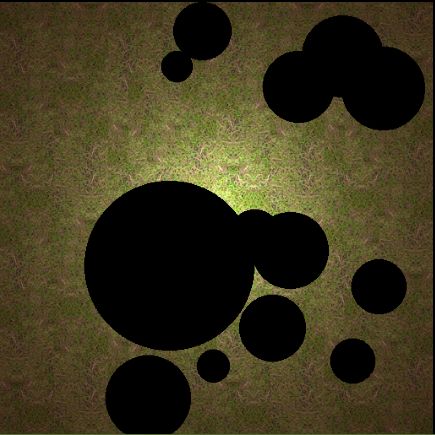
先看看效果
完成上图这样实时擦除的效果主要是下面这段代码:
public void eraseCircle(int x, int y, int radius) {
    y = (int) (getHeight()-y);
    if (pixmap != null) {
        Blending blending = Pixmap.getBlending();
        pixmap.setColor(0,0,0,0);
        //利用Pixmap的Blending.None实现擦除
        Pixmap.setBlending(Blending.None);
        //这里只是填充圆,还可以填充三角形 矩形等
        pixmap.fillCircle(x, y, radius);
        //把blending设置回来
        Pixmap.setBlending(blending);
        //绑定Texture
        Gdx.gl.glBindTexture(GL20.GL_TEXTURE_2D,         texture.getTextureObjectHandle());
        Gdx.gl.glPixelStorei(GL20.GL_UNPACK_ALIGNMENT, 1);
    //把pixmap的像素重新送到opengl es绑定的Texture
        Gdx.gl.glTexImage2D(GL20.GL_TEXTURE_2D, 0,   pixmap.getGLInternalFormat(), pixmap.getWidth(), pixmap.getHeight(),   0,pixmap.getGLFormat(), pixmap.getGLType(), pixmap.getPixels());
    }
}
这里只是做了实时擦除效果,pixmap还可以fillRectangle fillTriangle等等
接下来看看我封装的完整PixmapActor代码:
package com.isaigu.chaser.desktop.actor;
import com.badlogic.gdx.Gdx;
import com.badlogic.gdx.graphics.Color;
import com.badlogic.gdx.graphics.GL20;
import com.badlogic.gdx.graphics.Pixmap;
import com.badlogic.gdx.graphics.Pixmap.Blending;
import com.badlogic.gdx.graphics.Texture;
import com.badlogic.gdx.graphics.Texture.TextureFilter;
import com.badlogic.gdx.graphics.g2d.Batch;
import com.badlogic.gdx.graphics.g2d.TextureRegion;
import com.badlogic.gdx.math.Vector2;
import com.badlogic.gdx.scenes.scene2d.Actor;
import com.badlogic.gdx.scenes.scene2d.Group;
public class PixmapActor extends Actor{
private Pixmap pixmap;
private Texture texture;
private TextureRegion region;
public final Color color = new Color();
public float radiusFactor = 1f;
private boolean flipX,flipY;
public PixmapActor(Pixmap pixmap)
{
    this.pixmap = pixmap;
    texture = new Texture(pixmap);
    this.texture.setFilter(TextureFilter.Linear, TextureFilter.Linear);
    region = new TextureRegion(texture);
    setSize(region.getRegionWidth(), region.getRegionHeight());
}
public int getPixel(Vector2 position) {
    return getPixel(position.x, position.y);
}
public int getPixel(float x, float y) {
    return pixmap.getPixel((int) x, (int) y);
}
public void setPixel(float x, float y, int value) {
    Color.rgba8888ToColor(color, value);
    pixmap.setColor(color);
}
public void eraseCircle(int x, int y, int radius) {
    y = (int) (getHeight()-y);
    if (pixmap != null) {
        Blending blending = Pixmap.getBlending();
        pixmap.setColor(0,0,0,0);
        Pixmap.setBlending(Blending.None);
        pixmap.fillCircle(x, y, radius);
        Pixmap.setBlending(blending);
        Gdx.gl.glBindTexture(GL20.GL_TEXTURE_2D,       texture.getTextureObjectHandle());
        Gdx.gl.glPixelStorei(GL20.GL_UNPACK_ALIGNMENT, 1);
        Gdx.gl.glTexImage2D(GL20.GL_TEXTURE_2D, 0,     pixmap.getGLInternalFormat(), pixmap.getWidth(), pixmap.getHeight(), 0,
        pixmap.getGLFormat(), pixmap.getGLType(), pixmap.getPixels());
    }
}
public void setFlipX(boolean flipX) {
    this.flipX = flipX;
}
public void setFlipY(boolean flipY) {
    this.flipY = flipY;
}
public boolean isFlipX() {
    return flipX;
}
public boolean isFlipY() {
      return flipY;
}
@Override
protected void setParent(Group parent) {
    super.setParent(parent);
    if (parent == null) {
        this.pixmap.dispose();
        this.pixmap = null;
        this.texture.dispose();
        this.texture = null;
    }
}
@Override
public void draw(Batch batch, float parentAlpha) {
    Color color = batch.getColor();
    batch.setColor(getColor());
    batch.draw(texture, getX(), getY(),
    getOriginX(), getOriginY(),
    getWidth(), getHeight(),
    getScaleX(), getScaleY(),
    getRotation(),
    0, 0,
    texture.getWidth(),
    texture.getHeight(),
    flipX, flipY);
    batch.setColor(color);
  }
}
以下是测试类代码:
package com.isaigu.chaser.desktop.test;
import com.badlogic.gdx.ApplicationAdapter;
import com.badlogic.gdx.Gdx;
import com.badlogic.gdx.backends.lwjgl.LwjglApplication;
import com.badlogic.gdx.backends.lwjgl.LwjglApplicationConfiguration;
import com.badlogic.gdx.graphics.GL20;
import com.badlogic.gdx.graphics.Pixmap;
import com.badlogic.gdx.math.MathUtils;
import com.badlogic.gdx.scenes.scene2d.Stage;
import com.badlogic.gdx.utils.viewport.FitViewport;
import com.isaigu.chaser.desktop.actor.PixmapActor;
public class PixmapTest extends ApplicationAdapter{
public static void main(String[] args) {
    LwjglApplicationConfiguration configuration = new     LwjglApplicationConfiguration();
    configuration.width = 960;
    configuration.height = 540;
    new LwjglApplication(new PixmapTest(),configuration);
}
Stage stage;
@Override
public void create() {
    stage = new Stage(new FitViewport(1136, 640));
    Gdx.input.setInputProcessor(stage);
    pixmapActor = new PixmapActor(new     Pixmap(Gdx.files.internal("pp/ground.png")));
    stage.addActor(pixmapActor);
    pixmapActor.eraseCircle(200, 200, 100);
}
PixmapActor pixmapActor;
int count;
@Override
public void render() {
    Gdx.gl.glClear(GL20.GL_COLOR_BUFFER_BIT);
    stage.act();
    stage.draw();
    count ++;
    if (count == 30) {
    count = 0;
    pixmapActor.eraseCircle(MathUtils.random(10, 500), MathUtils.random(10, 500), MathUtils.random(10, 50));
}
}
}
好了,总体就是这样子,原理还是比较简单的,有什么不明白欢迎交流。
