上一篇中讲了如何通过父组件给子组件传值: 传送门
这一篇的内容会讲述如何实现:
1. 父子组件之间的传值方法
2. 兄弟组件之间的传值方法 —— eventbus
实现后的效果如下图,
有一些朋友在使用的过程中,可能没有找到比较好的方法,那么我们就一起来撸一个demo吧。
这个demo我们重头开始,先flutter create demo (你的项目名称), 我们就在官方的demo上面进行修改。
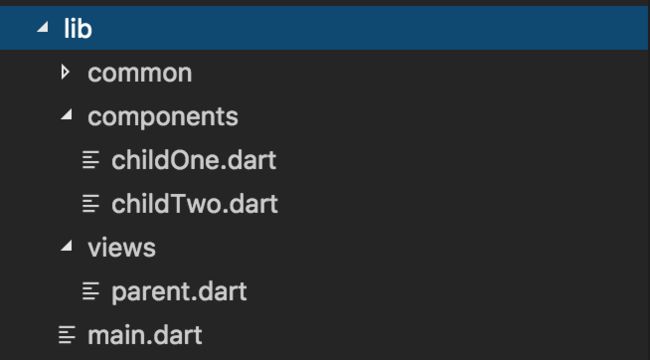
首先我们整体的目录结构是这样的
然后mian.dart中我们放入parent父组件
class _MyHomePageState extends State {
  @override
  Widget build(BuildContext context) {
    return new Scaffold(
      appBar: new AppBar(
        title: new Text(widget.title),
      ),
      body: new Center(
        child: new Column(
          mainAxisAlignment: MainAxisAlignment.center,
          children: [
            new Parent()
          ],
        ),
      ),
    );
  }
}
父组件中加入childOne, childTwo 两个子组件
接下来我们来实现父子组件的相互传值:
void onDataChange(val) {
  setState(() {
    data = val;
  });
}
@override
  Widget build(BuildContext context) {
    return new Center(
      child: new Column(
        mainAxisAlignment: MainAxisAlignment.center,
        children: [
          new ChildOne(),
          new ChildTwo(data4Two: data4Two, callback: (val) => onDataChange(val)),
          new Container(
            width: 400.0,
            margin: const EdgeInsets.all(10.0),
            padding: const EdgeInsets.only(top:30.0, bottom: 50.0),
            decoration: BoxDecoration(
            color: Colors.blue[100]),
            child: new Column(
              children: [
                new Container(
                  padding: new EdgeInsets.only(bottom: 15.0),
                  child:  new Text('父组件'),
                ),
                new Text('子组件2, 传过来的值: ' + '$data'),
              ]
            ),
          )
        ],
      ),
    );
  }
通过给childTwo传入
传值:data4Two和callback方法
callback方法被调用parent中的callback方法,对data进行赋值
接下来我们就只需要在childTwo子组件中触发callback方法就可以实现传值了,其实这个和vue的方式很相似u,看代码
class ChildTwo extends StatefulWidget {

  ChildTwo({Key key, this.data4Two, this.callback})
    :super(key: key);
  final callback;
  String data4Two;

  @override
  ChildTwoState createState() => new ChildTwoState();
}
在childTwo组件中,在firedA() 中触发callback, 就搞定了
void firedA() {
  widget.callback('$inputTxt');
}
new Container(
  child: new RaisedButton(
    onPressed: firedA,
    child: new Text('to父组件')
  )
)
接下来我们来实现兄弟组件的传值。
这里我们使用eventBus来实现兄弟组件的传值
eventBus使用流程:
- 引入
import 'package:event_bus/event_bus.dart';
- 创建实例
EventBus eventBus = new EventBus();
- 定义event, 任意一个Dart class都可以作为一个event
class UserLoggedInEvent {
  User user;
  UserLoggedInEvent(this.user);
}
- 注册监听
监听特定的event
eventBus.on().listen((event) {
  print(event.user);
});
监听所有的event
eventBus.on().listen((event) {
  print(event. runtimeType);
});
- 发送一个event
eventBus.fire(new UserLoggedInEvent(myUser));
好的那我们根据上面的步骤,在我们的代码中进行实现
1. 首先在pubspec.yaml中加入event_bus, 然后flutter会自动下载的
dependencies:
  flutter:
    sdk: flutter

  # The following adds the Cupertino Icons font to your application.
  # Use with the CupertinoIcons class for iOS style icons.
  cupertino_icons: ^0.1.2
  event_bus: ^1.0.1
dev_dependencies:
  flutter_test:
    sdk: flutter
2. 然后我们在common中新建eventBus.dart文件
加入以下代码:
import 'package:event_bus/event_bus.dart';

EventBus eventBus = new EventBus();

class MyEvent {
  String text;

  MyEvent(this.text);
}
我们new了一个eventbus对象,然后新建一个叫myEvent的类, 我们就使用myEvent这个类,来实现。
先在childTwo这个组件里引入eventbus, 并且通过firedB() 方法,调用eventBus.fire(), 发送了一个myEvent()
import '../common/eventBus.dart';
void firedB() {
  eventBus.fire(new MyEvent('$inputTxt'));
}
new Container(
  child: new RaisedButton(
    onPressed: firedB,
    child: new Text('to兄弟组件')
  )
)
下面的方法是eventBus的监听事件,
eventBus.on().listen() //监听eventBus中所有的事件。
eventBus.on().listen() //只监听MyEvent。
我们在childOne这个组件里同样引入eventBus, 在initState() 初始化方法中,
void initState() {
  eventBus.on().listen((MyEvent data) =>
    show(data.text)
  );
}

void show(String val) {
  setState(() {
    data= val;
  });
}
在initState中我们激活了eventBus对MyEvent的监听,这样eventBus.fire()方法调用一次,我们便可以获取fire发送过来的值了。
eventBus是通过Dart Streams来实现的,那么我们可以通过对Dart Stream的控制,来实现对eventBus的控制
StreamSubscription subscription = eventBus.on().listen((event) {
  print(event.user);
});

subscription.resume();  //  开
subscription.pause();    //  暂停
subscription.cancel();   //  取消
这里我就不一一实现了,有需要的朋友可以根据业务进行使用。
git地址:https://gitlab.com/carter0624/flutter-eventBus.git

