This article will show you how to mount cifs、nfs、iso、cdrom on IBM AIX.
1.Mount Windows Share:
Before you do,ensure that the cifs_fs has been installed:
- [root@dbserv1 /]# lslpp -l |grep bos.cifs_fs
- bos.cifs_fs.rte 7.1.0.0 COMMITTED Runtime for SMBFS
- bos.cifs_fs.smit 7.1.0.0 COMMITTED SMIT Interface for SMBFS
- bos.cifs_fs.rte 7.1.0.0 COMMITTED Runtime for SMBFS
- bos.cifs_fs.smit 7.1.0.0 COMMITTED SMIT Interface for SMBFS
If the cifs_fs package doesn't install,please insert AIX first dvd into cdrom and run following command:
- [root@dbserv1 /]# install -a -d /dev/cd0 bos.cifs_fs
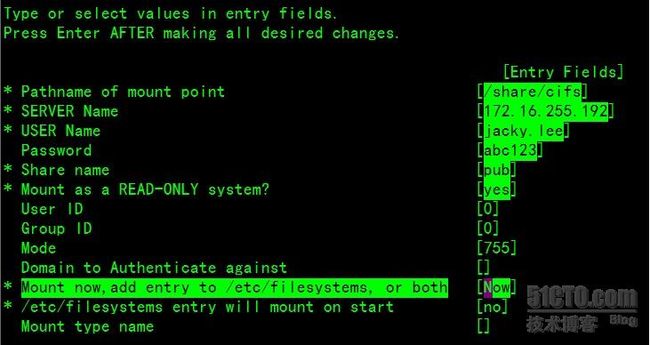
Now,you can use smit tools to mount:
- [root@dbserv1 /]# smitty cifs_fs
Or,you can use following command to mount:
- [root@dbserv1 /]# mkcifsmnt -f /share/cifs -d pub -h 172.16.255.192 -c 'jacky.lee' -p 'abc123/321' -t ro -N
- -f:MountPoint
- -d:RemoteShare
- -h:RemoteHost
- -c:user
- -p:password
- -t:Specifies whether file system should be mounted as read-only.
- -N:Mounts the CIFS share with the options specified, but does not modify the /etc/filesystems file.
- [root@dbserv1 /]# df /share/cifs
- Filesystem GB blocks Free %Used Iused %Iused Mounted on
- 172.16.255.192:pub 135.68 81.07 41% 0 0% /share/cifs
- [root@dbserv1 /]# ls /share/cifs/
- 70296C3F.BIN IBM.AIX.v7.1-DVD1.iso IBM.AIX.v7.1-DVD2.iso
- [root@dbserv1 /]# mount
- node mounted mounted over vfs date options
- -------- --------------- --------------- ------ ------------ ---------------
- /dev/hd4 / jfs2 Apr 14 12:52 rw,log=/dev/hd8
- /dev/hd2 /usr jfs2 Apr 14 12:52 rw,log=/dev/hd8
- /dev/hd9var /var jfs2 Apr 14 12:52 rw,log=/dev/hd8
- /dev/hd3 /tmp jfs2 Apr 14 12:52 rw,log=/dev/hd8
- /dev/hd1 /home jfs2 Apr 14 12:53 rw,log=/dev/hd8
- /dev/hd11admin /admin jfs2 Apr 14 12:53 rw,log=/dev/hd8
- /proc /proc procfs Apr 14 12:53 rw
- /dev/hd10opt /opt jfs2 Apr 14 12:53 rw,log=/dev/hd8
- /dev/livedump /var/adm/ras/livedump jfs2 Apr 14 12:53 rw,log=/dev/hd8
- /dev/fslv00 /software jfs2 Apr 14 12:53 rw,log=/dev/hd8
- 172.16.255.192 pub /share/cifs cifs Apr 14 13:44 ro
Or,excute following command:
- [root@dbserv1 share]#mount -v cifs -n candon123/'jacky.lee'/'abc123/321' -o wrkgrp=workgroup,fmode=755 /pub /share/cifs
- [root@dbserv1 share]# df
- Filesystem GB blocks Free %Used Iused %Iused Mounted on
- /dev/hd4 1.12 0.95 16% 10071 5% /
- /dev/hd2 3.88 1.81 54% 46585 10% /usr
- /dev/hd9var 0.75 0.54 28% 3631 3% /var
- /dev/hd3 0.12 0.12 1% 62 1% /tmp
- /dev/hd1 0.06 0.06 1% 7 1% /home
- /dev/hd11admin 0.12 0.12 1% 5 1% /admin
- /proc - - - - - /proc
- /dev/hd10opt 1.75 1.54 13% 4352 2% /opt
- /dev/livedump 0.25 0.25 1% 4 1% /var/adm/ras/livedump
- /dev/fslv00 5.00 3.01 40% 5 1% /software
- /dev/cd0 3.13 0.00 100% 1640871 100% /share/cd
- candon123:/pub 135.68 81.07 41% 0 0% /share/cifs
2.Mount A ISO file:
- [root@dbserv1 /]# mklv -y dvd1 -t jfs2 rootvg 53
- dvd1
- [root@dbserv1 /]# lslv -l dvd1
- dvd1:N/A
- PV COPIES IN BAND DISTRIBUTION
- hdisk0 053:000:000 0% 000:000:000:053:000
- [root@dbserv1 /]# cd share/cifs/
- [root@dbserv1 cifs]# dd if=IBM.AIX.v7.1-DVD1.iso of=/dev/dvd1 bs=10M
- 257+0 records in.
- 257+0 records out.
- [root@dbserv1 cifs]# mount -v cdrfs -o ro /dev/dvd1 /share/iso1
- [root@dbserv1 cifs]# df /share/iso1
- Filesystem GB blocks Free %Used Iused %Iused Mounted on
- /dev/dvd1 3.13 0.00 100% 1640871 100% /share/iso1
- [root@dbserv1 cifs]# ls /share/iso1/
- .Version OSLEVEL RPMS p_w_picpath.data ppc usr
- 7100-00 README.aix bosinst.data installp root
- [root@dbserv1 cifs]#
3.Mount NFS:
- [root@dbserv1 share]# showmount -e 172.16.255.5
- export list for 172.16.255.5:
- /u02 *.*
- [root@dbserv1 share]# mount 172.16.255.5:/u02 /share/nfs
- [root@dbserv1 share]# ls /share/nfs/netbackup/
- NetBackup_7.5_LinuxR_x86_64
- [root@dbserv1 share]#
If you get 'vmount: Operation not permitted' error,you must do this:
- [root@dbserv1 share]# nfso -a
- client_delegation = 1
- nfs_max_read_size = 65536
- nfs_max_write_size = 65536
- nfs_rfc1323 = 1
- nfs_securenfs_authtimeout = 0
- nfs_server_base_priority = 0
- nfs_server_clread = 1
- nfs_use_reserved_ports = 0
- nfs_v3_server_readdirplus = 1
- nfs_v4_fail_over_timeout = 0
- portcheck = 0
- server_delegation = 1
- utf8_validation = 1
- [root@dbserv1 share]# nfso -o nfs_use_reserved_ports=1
- Setting nfs_use_reserved_ports to 1
4.Mount CDROM:
- [root@dbserv1 /]# mount -v cdrfs -o ro /dev/cd0 /mnt
- [root@dbserv1 /]# df /mnt
- Filesystem GB blocks Free %Used Iused %Iused Mounted on
- /dev/cd0 3.13 0.00 100% 1640871 100% /mnt
- [root@dbserv1 /]# ls /mnt/
- .Version OSLEVEL RPMS p_w_picpath.data ppc usr
- 7100-00 README.aix bosinst.data installp root
- [root@dbserv1 /]#
Maybe you can configure cdromd to automatic mount cdrom like this:
- Edit /etc/cdromd.conf and append following line:
- [root@dbserv1 /]# grep -v '#' /etc/cdromd.conf|sed '1d'
- device cd0 /share/cd
- [root@dbserv1 /]# refresh -s cdromd
- [root@dbserv1 /]# df /share/cd
- Filesystem GB blocks Free %Used Iused %Iused Mounted on
- /dev/cd0 3.13 0.00 100% 1640871 100% /share/cd
- [root@dbserv1 /]#

