LVS-NAT架构图
VMWare Station不支持多NAT, 只能简化网络结构,Director路由器由双网卡虚机实现,三机同处于一个LAN中,网卡都使用桥接模式。
Client使用宿主真机,CIP:192.168.1.100/24.
Director使用虚机
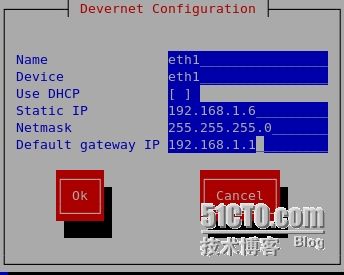
CeSever5701,DIP:eth0:10.0.0.1/24, VIP:eth1:192.168.1.6/24
RealServer端用虚机
CeServer5707, RIP1: eth0: 10.0.0.7/24,
CeServer5708, RIP1: eth0: 10.0.0.8/24,
1.关闭iptables, iptables与ipvs不能共存。
[root@station3 ~]# service iptables stop
[root@station3 ~]# hostname director.example.com
注销后重新登录,临时性改主机名,重启后失效
2.1、 Director设置IP地址
[root@director ~]# setup
network configuration -> edit device -> DIPeth0不设网关,VIPeth1设置网关
[root@director ~]# service network restart
[root@director ~]# ifconfig
eth0 Link encap:EthernetHWaddr00:0C:29:BB:02:FD
inet addr:10.0.0.1Bcast:10.0.0.255Mask:255.255.255.0
eth1 Link encap:EthernetHWaddr00:50:56:24:82:CB
inet addr:192.168.1.6Bcast:192.168.1.255Mask:255.255.255.0
2.2、开启director数据包转发能力
[root@director ~]# grep "ip_forward" /etc/sysctl.conf
net.ipv4.ip_forward = 0
运行态生效
[root@director ~]# echo "1" > /proc/sys/net/ipv4/ip_forward 或者
[root@director ~]# sysctl -w net.ipv4.ip_forward=1
net.ipv4.ip_forward = 1
[root@director ~]# sysctl -p
net.ipv4.ip_forward = 0 但可以看到,只是修改了内存中的值,重启后无效。
因此永久生效必须修改系统配置文件。
[root@director ~]# vim /etc/sysctl.conf
net.ipv4.ip_forward = 1
[root@director ~]#sysctl -p
net.ipv4.ip_forward=1
2.3、为direrctor配置本地yum服务器:
[root@director cdrom]# ls /mnt/cdrom/CentOS/ | grep ipvs
ipvsadm-1.24-13.el5.i386.rpm
在redhat必须添加
[root@director cdrom]# vim /etc/yum.repos.d/server.repo
[Cluster]
name=Instructor Cluster Repository
baseurl=ftp://instructor.example.com/pub/Cluster
gpgcheck=0
[ClusterStorage]
name=Instructor Cluster Repository
baseurl=ftp://instructor.example.com/pub/ClusterStorage
gpgcheck=0
[root@director ~]# yum -y install ipvsadm
ipvsadm.i386 0:1.24-13.el5
2.4 配置director ipvs
[root@director ~]# ipvsadm -L –n 或者(-ln)
IP Virtual Server version 1.2.1 (size=4096)
Prot LocalAddress:Port Scheduler Flags
-> RemoteAddress:Port Forward Weight ActiveConn InActConn
2.4.1 –A 添加ipvs虚拟服务器记录,-t tcp VIP(ip address) -s sechduler rr 轮调
[root@director ~]# ipvsadm -A -t 192.168.1.6:80 -s rr
[root@director ~]# ipvsadm -ln
IP Virtual Server version 1.2.1 (size=4096)
Prot LocalAddress:Port Scheduler Flags
-> RemoteAddress:Port Forward Weight ActiveConn InActConn
TCP 192.168.1.6:80 rr
2.4.2 -a 添加ipvs真是服务器记录, -t tcp VIP (ip address) –m --masquerading 指定LVS 的工作模式为NAT 模式, -g --gateway 指定LVS 的工作模式为直接路由模式(也是LVS 默认的模式), -w --weight 真实服务器的权值
[root@director ~]# ipvsadm -a -t 192.168.1.6:80 -r 10.0.0.7 -m -w 1
[root@director ~]# ipvsadm -a -t 192.168.1.6:80 -r 10.0.0.8 -m -w 2
[root@director ~]# ipvsadm -ln
IP Virtual Server version 1.2.1 (size=4096)
Prot LocalAddress:Port Scheduler Flags
-> RemoteAddress:Port Forward Weight ActiveConn InActConn
TCP 192.168.1.6:80 rr
-> 10.0.0.8:80 Masq 2 0 0
-> 10.0.0.7:80 Masq 1 0 0
2.5 配置完成一定要保存。
[root@director ~]# service ipvsadm save
ipvsadm: Saving IPVS table to /etc/sysconfig/ipvsadm: [ OK ]
[root@director ~]# service ipvsadm start
ipvsadm: Clearing the current IPVS table: [ OK ]
ipvsadm: Applying IPVS configuration: [ OK ]
3.配置Realserver1
[root@r1 ~]# vim /etc/sysconfig/network-scripts/ifcfg-eth0
# Advanced Micro Devices [AMD] 79c970 [PCnet32 LANCE]
DEVICE=eth0
TYPE=Ethernet
BOOTPROTO=none
BROADCAST=10.0.0.255
HWADDR=00:0c:29:bb:02:f1
IPADDR=10.0.0.7
NETMASK=255.255.255.0
NETWORK=10.0.0.0
ONBOOT=yes
GATEWAY=10.0.0.1 网关设好,内外网才能互访。
[root@r1 ~]# vim /etc/hosts
10.0.0.7 r1.example.com r1
[root@r1 ~]# service network restart
3.2安装Web服务
[root@r1 ~]# rpm -qa | grep httpd
httpd-2.2.3-53.el5.centos
[root@r1 ~]# echo "web1" > /var/www/html/index.html
[root@r1 ~]# service httpd restart
4.配置Realserver2
[root@r2 ~]# vim /etc/sysconfig/network-scripts/ifcfg-eth0
DEVICE=eth0
TYPE=Ethernet
BOOTPROTO=none
BROADCAST=10.0.0.255
HWADDR=00:0C:29:BB:02:F2
IPADDR=10.0.0.8
NETMASK=255.255.255.0
NETWORK=10.0.0.0
ONBOOT=yes
GATEWAY=10.0.0.1
[root@r2 ~]# vim /etc/hosts
10.0.0.8 r2.example.com r2
[root@r2 ~]# service network restart
4.2安装Web服务
[root@r2 ~]# rpm -qa | grep httpd
httpd-2.2.3-53.el5.centos
[root@r2 ~]# echo "web2" > /var/www/html/index.html
[root@r2 ~]# service httpd restart
5. Director端已经打开转发,直接访问VIP:192.168.1.6能转发后台RIP:10.0.0.7和 10.0.0.8
[root@director~]# sysctl -a | grep net.ipv4.ip_forward
net.ipv4.ip_forward = 1
多按几次,调度到web2
[root@director ~]# ipvsadm -ln
IP Virtual Server version 1.2.1 (size=4096)
Prot LocalAddress:Port Scheduler Flags
-> RemoteAddress:PortForward Weight ActiveConn InActConn
TCP192.168.1.6:80 rr
-> 10.0.0.7:80 Masq 109
-> 10.0.0.8:80 Masq 209
因为采用rr的轮调算法,权重即使不同,2台web 被均匀调用
[root@director ~]# ipvsadm -E -t 192.168.1.6:80 -s wrr采用加权轮调,性能越好,权重越高,调用机会越多。
[root@director ~]# ipvsadm -ln
IP Virtual Server version 1.2.1 (size=4096)
Prot LocalAddress:Port Scheduler Flags
-> RemoteAddress:PortForward Weight ActiveConn InActConn
TCP192.168.1.6:80 wrr
-> 10.0.0.7:80 Masq 107
-> 10.0.0.8:80 Masq 2014
[root@station250 ~]# ab -c 100 -n 1000 http://192.168.1.6/index.html
Server Hostname:192.168.1.6
Server Port:80
Document Path:/index.html
Document Length:5 bytes
Concurrency Level:100
Time taken for tests:0.491295 seconds
[root@director ~]# ipvsadm -ln
IP Virtual Server version 1.2.1 (size=4096)
Prot LocalAddress:Port Scheduler Flags
-> RemoteAddress:PortForward Weight ActiveConn InActConn
TCP192.168.1.6:80 wrr
-> 10.0.0.7:80Masq10327
-> 10.0.0.8:80Masq20677
保存配置
[root@director ~]# service ipvsadm save
ipvsadm: Saving IPVS table to/etc/sysconfig/ipvsadm:[OK]


