其实很久以前就想自己实现一个下拉刷新上拉加载控件,之前一直用的是开源的控件,从一开始的PullToRefreshView到后来的SwipeRefreshLayout。虽然功能上都能实现,但用别人的总感觉不得劲。看到别的app上用的炫酷的刷新加载控件就是心痒痒。
1.美团的是这样的
2.京东的是这样的
3.新浪微博的是这样的
看着都挺炫酷的,那咱们是不是也可以搞一个。既然要搞当然是先选一个简单的来搞,毕竟谁都喜欢捡软柿子捏。那哪个最简单呐,不管你们认为是哪个反正我觉得微博的看起来简单一点。昨天下午趁着有点时间简单的实现了一下微博的刷新加载效果。先别急,咱一步一步慢慢来。首先观察一下整体结构,界面分成三部分。
- 头部刷新布局
- 可滚动控件(ListView,RecycleView)
- 尾部加载布局
可以看成刚开始的时候头部刷新布局和尾部都藏在可滚动布局的下面,当滚动到上下边界的时候才一点点显示出来,很容易想到通过继承FrameLayout实现。为了提高扩展性我们在真正的头部布局和尾部布局外面再套一层布局,看下面的具体代码就能明白。在onAttachedToWindow方法中创建外层头部尾部布局最为合适,这时候自定义的控件已经附着到根布局上。
@Override
protected void onAttachedToWindow() {
super.onAttachedToWindow();//添加头部 if (mHeadLayout == null) { FrameLayout headViewLayout = new FrameLayout(getContext()); LayoutParams layoutParams = new LayoutParams(ViewGroup.LayoutParams.MATCH_PARENT, 0); layoutParams.gravity = Gravity.TOP; headViewLayout.setLayoutParams(layoutParams); headViewLayout.setBackgroundColor(Color.parseColor("#F2F2F2")); mHeadLayout = headViewLayout; this.addView(mHeadLayout); } //添加底部 if (mBottomLayout == null) { FrameLayout bottomViewLayout = new FrameLayout(getContext()); LayoutParams layoutParams2 = new LayoutParams(ViewGroup.LayoutParams.MATCH_PARENT, 0); layoutParams2.gravity = Gravity.BOTTOM; bottomViewLayout.setLayoutParams(layoutParams2); bottomViewLayout.setBackgroundColor(Color.parseColor("#F2F2F2")); mBottomLayout = bottomViewLayout; this.addView(mBottomLayout); } mChildView = getChildAt(0); if (mChildView == null) return; }
加上mHeadLayout == null和mBottomLayout == null的判断是因为执行onResume会重新触发onAttachedToWindow()重复创建HeadLayout和BottomLayout,接下就要分析刷新和加载的状态
刷新状态:
- 下拉刷新
- 释放刷新 (箭头旋转)
- 正在刷新(隐藏箭头,显示刷新动画)
加载状态:
- 加载中
- 加载结束
对应的头部刷新控件如下
public class SinaRefreshView extends FrameLayout implements IHeaderView{
private ImageView refreshArrow;
private ImageView loadingView;
private TextView refreshTextView;public SinaRefreshView(Context context) { this(context, null); } public SinaRefreshView(Context context, AttributeSet attrs) { this(context, attrs, 0); } public SinaRefreshView(Context context, AttributeSet attrs, int defStyleAttr) { super(context, attrs, defStyleAttr); init(); } private void init(){ View rootView = View.inflate(getContext(), R.layout.layout_sinaheader, null); refreshArrow = (ImageView) rootView.findViewById(R.id.iv_arrow); refreshTextView = (TextView) rootView.findViewById(R.id.tv); loadingView = (ImageView) rootView.findViewById(R.id.iv_loading); addView(rootView); } private String pullDownStr = "下拉刷新"; private String releaseRefreshStr = "释放刷新"; private String refreshingStr = "正在刷新"; @Override public void onPullingDown(float fraction, float headHeight) { if (fraction < 1f) refreshTextView.setText(pullDownStr); if (fraction > 1f) refreshTextView.setText(releaseRefreshStr); refreshArrow.setRotation(fraction * 180); } @Override public void onPullReleasing(float fraction, float headHeight) { if (fraction < 1f) { refreshTextView.setText(pullDownStr); refreshArrow.setRotation(fraction * 180); if (refreshArrow.getVisibility() == GONE) { refreshArrow.setVisibility(VISIBLE); loadingView.setVisibility(GONE); } } } @Override public void startAnim() { refreshTextView.setText(refreshingStr); refreshArrow.setVisibility(GONE); loadingView.setVisibility(VISIBLE); ((AnimationDrawable)loadingView.getDrawable()).start(); }}
对应的布局
  android:layout_width="match_parent"
 android:layout_height="match_parent"
 android:gravity="center"
 android:orientation="horizontal"
 >
对应的尾部加载控件
public class LoadingView extends ImageView implements IBottomView{
public LoadingView(Context context) {
this(context, null);
}public LoadingView(Context context, AttributeSet attrs) { this(context, attrs, 0); } public LoadingView(Context context, AttributeSet attrs, int defStyleAttr) { super(context, attrs, defStyleAttr); int size = SettingUtil.dip2px(context,48); FrameLayout.LayoutParams params = new FrameLayout.LayoutParams(size,size); params.gravity = Gravity.CENTER; setLayoutParams(params); setImageResource(R.drawable.anim_loading_view); } @Override public void startAnim() { ((AnimationDrawable)getDrawable()).start(); } @Override public void onFinish() { ((AnimationDrawable)getDrawable()).stop(); }}
接下来设置头部布局和尾部布局,布局这一块算是彻底搞定了
public void setHeaderView(final IHeaderView headerView) {
if (headerView != null) {
mHeadLayout.removeAllViewsInLayout();
mHeadLayout.addView(headerView.getView());
mHeadView = headerView;
}
}public void setBottomView(final IBottomView bottomView) { if (bottomView != null) { mBottomLayout.removeAllViewsInLayout(); mBottomLayout.addView(bottomView.getView()); mBottomView = bottomView; } }
然后就是重点了,分析触摸事件,这里用到两个方法onInterceptTouchEvent和onTouchEvent,什么时候打断触摸事件的传递,自己消耗
- 滚动到上边界,滚动的view无法再滚动
- 滚动到下边界,滚动的view无法再滚动
/**
* 拦截触摸事件
*/
@Override
public boolean onInterceptTouchEvent(MotionEvent event) {
switch (event.getAction()){
case MotionEvent.ACTION_DOWN:
mTouchY = event.getY();
break;
case MotionEvent.ACTION_MOVE:
float dy = event.getY() - mTouchY;
if (dy > 0 && !ScrollingUtil.canChildScrollUp(mChildView)){
state = PULL_DOWN_REFRESH;
return true;
}else if (dy < 0 && !ScrollingUtil.canChildScrollDown(mChildView)){
state = PULL_UP_LOAD;
return true;
}
break;
case MotionEvent.ACTION_UP:break; } return super.onInterceptTouchEvent(event); }
这里可以通过ViewCompat.canScrollVertically(mChildView, 1);来判断滚动的view是否可以再滚动。接下来就是消耗触摸事件。
处于下拉刷新状态的情况下:
- 随着手指的下拉,同步刷新头部布局的高度,以及通过setTranslationY()使得滚动控件在Y方向上偏移,同时设置头部控件的状态。
- 手指释放时判断头部布局的高度是否达到了刷新要求,若没有达到刷新要求直接回滚。若达到了刷新要求先回到刷新高度,然后执行刷新动画以及刷新回调。
处于上拉加载的情况的:
- 随着手指的下拉,当下拉距离小于设置的尾部高度时,同步刷新尾部布局的高度,以及通过setTranslationY()使得滚动控件在Y方向上偏移,同时设置尾部控件的状态。
- 手指释放时判断尾部布局的高度是否达到了加载要求,若没有达到加载要求直接回滚。若达到了加载要求,然后执行加载动画以及加载回调。
/**-
触摸事件
*/
@Override
public boolean onTouchEvent(MotionEvent event) {
if (isRefreshing || isLoadingmore) return super.onTouchEvent(event);switch (event.getAction()){
case MotionEvent.ACTION_MOVE:
float dy = event.getY() - mTouchY;
float offsetY = dy/2;
if (state == PULL_DOWN_REFRESH) {
dy = Math.max(0, offsetY);
mChildView.setTranslationY(dy);
mHeadLayout.getLayoutParams().height = (int) dy;
mHeadLayout.requestLayout();
if(dy/refreshHeadHeight<1.02)
mHeadView.onPullingDown(dy/refreshHeadHeight,refreshHeadHeight);
}else if (state == PULL_UP_LOAD) {
if(offsetY>0){
break;
}
dy = Math.min(bottomHeight, Math.abs(offsetY));
dy = Math.max(0, dy);
mChildView.setTranslationY(-dy);
mBottomLayout.getLayoutParams().height = (int)dy;
mBottomLayout.requestLayout();
}
break;
case MotionEvent.ACTION_UP:
if (state == PULL_DOWN_REFRESH) {
if(mChildView.getTranslationY() >= refreshHeadHeight){
animChildView(refreshHeadHeight);
isRefreshing = true;
mHeadView.startAnim();
if(mOnRefreshListener!=null)
mOnRefreshListener.onRefresh(LXSRefreshLayout.this);
}else{
animChildView(0);
}
} else if (state == PULL_UP_LOAD) {
if(Math.abs(mChildView.getTranslationY()) >= bottomHeight){
isLoadingmore = true;
mBottomView.startAnim();
animChildView(-bottomHeight);
if(mOnRefreshListener!=null)
mOnRefreshListener.onLoadMore(LXSRefreshLayout.this);
}else{
animChildView(0);
}
}
break;
}
return super.onTouchEvent(event);
}
-
这里有两个注意点:
- 当处于刷新和加载状态下时消耗掉触摸事件
- move过程需要判断一下是否滑动到了边缘,不然会有问题
当没有达到刷新或则加载要求的时候需要回滚,直接通过mChildView.setTranslationY(0)太过于生硬,这边通过属性动画过度
 private void animChildView(float endValue, long duration) {
 ObjectAnimator oa = ObjectAnimator.ofFloat(mChildView, "translationY", mChildView.getTranslationY(), endValue);
 oa.setDuration(duration);
 oa.setInterpolator(new DecelerateInterpolator());//设置速率为递减
 oa.addUpdateListener(new ValueAnimator.AnimatorUpdateListener() {
 @Override
 public void onAnimationUpdate(ValueAnimator animation) {
 int height = (int) mChildView.getTranslationY();
 if (state == PULL_DOWN_REFRESH) {
 mHeadLayout.getLayoutParams().height = height;
 mHeadLayout.requestLayout();
 mHeadView.onPullReleasing(height/refreshHeadHeight,refreshHeadHeight,refreshHeadHeight);
 }else if (state == PULL_UP_LOAD) {
 mBottomLayout.getLayoutParams().height = -height;
 mBottomLayout.requestLayout();
 }
 }
 });
 oa.start();
 }
最后是设置回调接口以及刷险加载结束的处理方法
/**
* 刷新结束
*/
public void finishRefreshing() {
isRefreshing = false;
if (mChildView != null) {
animChildView(0f);
}
}/** * 加载更多结束 */ public void finishLoadmore() { isLoadingmore = false; if (mChildView != null) { animChildView(0f); mBottomView.onFinish(); } } public void setOnRefreshListener(OnRefreshListener onRefreshListener) { mOnRefreshListener = onRefreshListener; } public interface OnRefreshListener{ void onRefresh(LXSRefreshLayout refreshLayout); void onLoadMore(LXSRefreshLayout refreshLayout); }
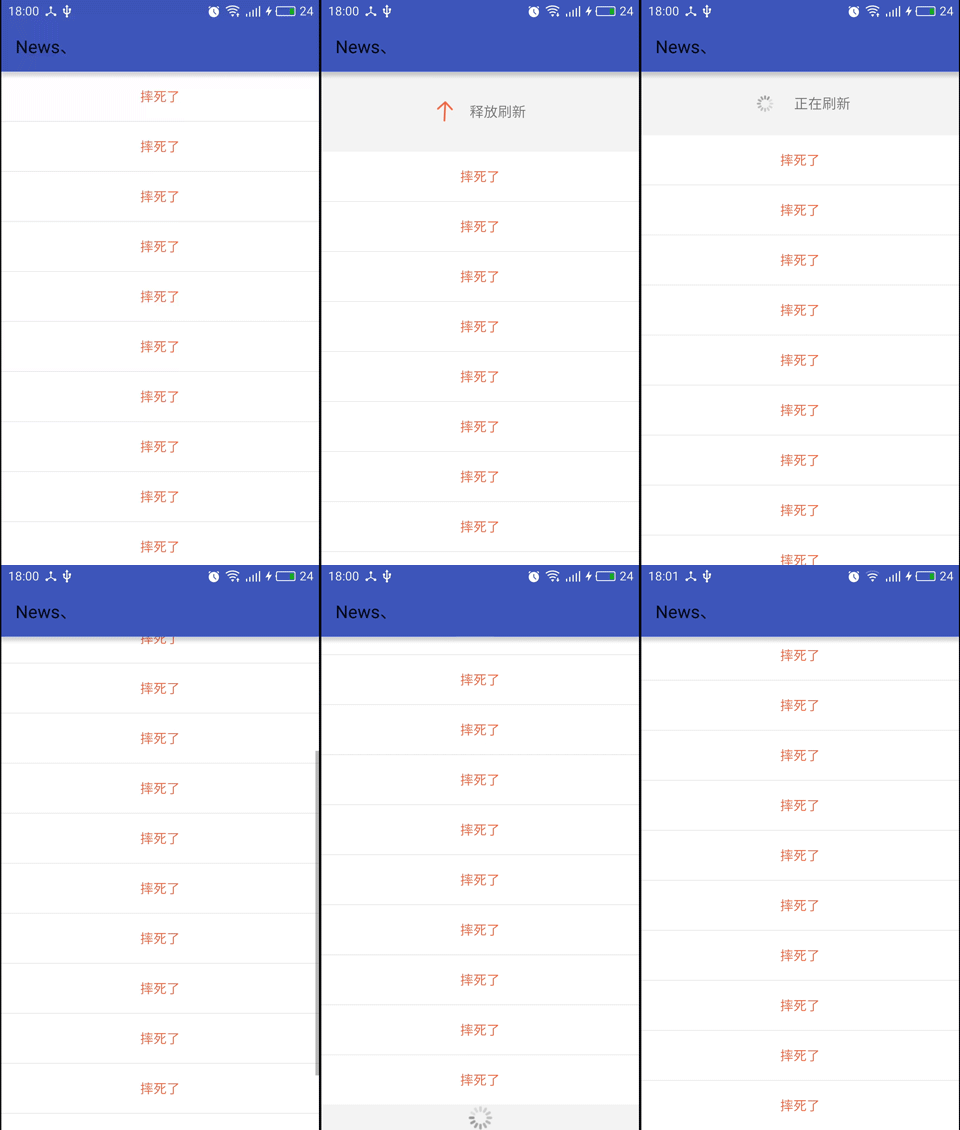
使用方法跟SwipeRefreshLayout一模一样,运行起来的效果大概是这样的:


