一.Jekyll本地环境搭建
本人使用的是Window7 64位系统,所以搭建的环境是以Window系统为准,Mac系统可自行百度。
1.安装Ruby
Window安装Ruby需要使用RubyInstaller来进行安装,下载地址在这里。我这里安装的是Ruby2.3.1。
下载好RubyInstaller点击安装,在安装界面记得勾选"Add Ruby executables to your PATH",将ruby自动加入到系统的环境变量中,省去我们自己去手动设置,然后点击安装即可。
在cmd中输入:
ruby -v
如果显示版本号则表示安装成功。
2.安装RubyDevKit
DevKit是windows平台下编译和使用本地C/C++扩展包的工具。它就是用来模拟Linux平台下的make,gcc,sh来进行编译。但是这个方法目前仅支持通过RubyInstaller安装的Ruby
点击这里下载最新的DevKit,双击运行解压到D:\MyBlog\RubyDevKit(路径可自行定义)。
打开终端cmd,输入如下命令进行安装:
cd D:\MyBlog\RubyDevKit
ruby dk.rb init
接下来需要在D:\MyBlog\RubyDevKit\config.yml 这个文件里面配置Ruby的路径,如下:
- D:/Ruby23-x64
在cmd中执行如下命令进行安装:
ruby dk.rb install
3.替换rubyGem库地址
在国内使用默认的gem源会有问题,需要重新配置gem源。这里推荐Ruby China。
gem sources --remove https://rubygems.org/
gem sources -a https://gems.ruby-china.org/
gem sources -l
如果遇到 SSL 证书问题,你又无法解决,请直接用 http://gems.ruby-china.org 避免 SSL 的问题。
D:\MyBlog\RubyDevKit>gem sources -l
*** CURRENT SOURCES ***

http://gems.ruby-china.org/
4.安装rails
cmd运行gem install rails.
cmd运行rails -v显示rails版本号说明安装成功.
5.安装Jekyll
在cmd中输入如下命令进行jekyll:
gem install jekyll
cmd运行jekyll -v验证,显示版本号说明安装成功.
二.Jekyll创建博客
当我们安装配置好jekyll后就可以进行博客的创建了,我们使用如下命令来创建一个博客:
D:\GarryBlog>jekyll new .
或者你还可以用如下命令:
D:\jekyll new GarryBlog
我们看到在GarryBlog目录下面新建了各种相关文件,但是命令行中报了一个错误,信息如下:
  Dependency Error: Yikes! It looks like you don't have bundler or one of its de
pendencies installed. In order to use Jekyll as currently configured, you'll nee
d to install this gem. The full error message from Ruby is: 'cannot load such fi
le -- bundler' If you run into trouble, you can find helpful resources at http:/
/jekyllrb.com/help/!
jekyll 3.3.0 | Error:  bundler
这个提示告诉我们没有安装bundler,很简单,我们在命令行中输入gem install bundler进行安装即可。
创建完成后,我们就可以启动服务了,输入如下命令启动服务:
jekyll server
这时候又报另外一个错误(尼玛),信息如下:
D:\GarryBlog>jekyll server
Configuration file: D:/GarryBlog/_config.yml
Configuration file: D:/GarryBlog/_config.yml
            Source: D:/GarryBlog
       Destination: D:/GarryBlog/_site
 Incremental build: disabled. Enable with --incremental
      Generating...
                    done in 0.252 seconds.
  Please add the following to your Gemfile to avoid polling for changes:
    gem 'wdm', '>= 0.1.0' if Gem.win_platform?
 Auto-regeneration: enabled for 'D:/GarryBlog'
Configuration file: D:/GarryBlog/_config.yml
jekyll 3.3.1 | Error:  Permission denied - bind(2) for 127.0.0.1:4000
这个错误是告诉我们4000端口被占用,解决方法是:
在_config.yml文件的末尾加上port: 5000,改为5000端口即可。
这样在浏览器中输入http://127.0.0.1:5000/ 就可以看到我们的博客了。(不容易啊~~)
三.注册Github帐号
到Github网站上注册帐号,如果有则可以跳过这一步。
四.安装Git环境
点这里下载安装。
安装完成后运行Git Bash。在打开的窗口中输入如下命令设置你的git用户名和邮箱:
$ git config --global user.name "{username}"          // 用你的用户名替换{username}
$ git config --global user.email "{[email protected]}"    // 用你的邮箱替换{[email protected]}
SSH配置:
为了和Github的远程仓库进行传输,需要进行SSH加密设置。
$ ssh-keygen -t rsa -C"{[email protected]}" // 用你的邮箱替换{[email protected]}
一路敲回车即可,在C:\Users\admin.ssh 目录下会生成id_rsa 和 id_rsa.pub 两个文件,其中 id_rsa 是私钥,需要保密, id_rsa.pub 是公钥,无需保密。
在浏览器中登录你的github帐号,点击右上角的Setting-SSH and GPG keys,在SSH Key中添加 id_rsa.pub里的内容,然后点击addkey即可,这样SSH配置就完成了。
五.建立个人GitHub 博客
建议基于jekyll的个人博客有两种路线:
- 自己学习Jekyll教程和网页设计,设计绝对自我基因的网页。
- Fork已有的开源博客仓库,在巨人的肩膀上进行符合自我的创作。
这里介绍第二种路线,第一种路线请自行百度各种教程。
- 在网上搜索jekyll 网站模版,挑选一个你看上的,我们这里以 https://github.com/mzlogin/mzlogin.github.io 为例。
-
点击链接进入后,点击左上角的fork:
- 在你的主页中点击刚fork的分支,点击进入后:
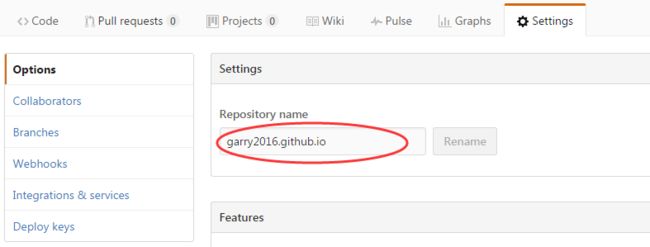
点击“Settings”,将“Repository name”改为 {你的Github用户名}.github.io,点击“Rename”。
此时你会发现已经可以通过 http://{你的Github用户名}.github.io 访问你fork下来的网站啦!
六.写博客
- 同步仓库
在Git Bash中切换到你想存放blog文件的目录下:
cd D:\GarryBlog
输入如下命令,将远程仓库克隆到本地:
git clone https://github.com/Garry2016/garry2016.github.io.git
撰写博文
打开本地仓库的 _posts 文件夹,你的所有博文都将放在这里,写新博文只需要新建一个标准文件名的文件,在文件中编写文章内容。 比如我们fork的模版中 _posts 文件夹里有一篇 2016-03-23-hello-world.markdown,你的文件命名也要严格遵循 年-月-日-文章标题.文档格式 这样的格式,尤其要注意月份和日期一定是两位数。
推荐使用Markdown语言写文章,windows下推荐MarkdownPad这个软件编写Markdown文本。
最开始写可以直接模仿别人的博文语法,更多Markdown语法可参考 认识与入门Markdown。提交修改
当你使用Git Bash对你的本地仓库进行操作时,先用 cd 命令将你的工作目录设置到你要操作的本地仓库
$ cd {你刚才clone下来的项目文件夹路径}
每当你对本地仓库里的文件进行了修改,只需在Bash中依次执行以下三个命令即可将修改同步到Github,刷新网站页面就能看到修改后的网页:
$ git add .
$ git commit -m "statement"   //此处statement填写此次提交修改的内容,作为日后查阅
$ git push origin master
- 实时查看本地修改的内容
我们本地已经安装好了jekyll环境,我们可以输入 jekyll server启动服务,然后在浏览器中查看本地修改内容,方便快捷!
七.常见问题及解决方法(持续更新)
- 运行jekyll server后报如下错误"You have already activated addressable 2.5.0, but your Gemfile requires addressable 2.4.0. ":
D:\GarryBlog\garry2016.github.io>jekyll server
WARN: Unresolved specs during Gem::Specification.reset:
      listen (< 3.1, ~> 3.0)
WARN: Clearing out unresolved specs.
Please report a bug if this causes problems.
D:/Ruby23-x64/lib/ruby/gems/2.3.0/gems/bundler-1.13.6/lib/bundler/runtime.rb:40:in `block in setup': You have already activated addressable 2.5.0, but your Gemfile r
equires addressable 2.4.0. Prepending `bundle exec` to your command may solve this. (Gem::LoadError)
        from D:/Ruby23-x64/lib/ruby/gems/2.3.0/gems/bundler-1.13.6/lib/bundler/runtime.rb:25:in `map'
        from D:/Ruby23-x64/lib/ruby/gems/2.3.0/gems/bundler-1.13.6/lib/bundler/runtime.rb:25:in `setup'
        from D:/Ruby23-x64/lib/ruby/gems/2.3.0/gems/bundler-1.13.6/lib/bundler.rb:99:in `setup'
        from D:/Ruby23-x64/lib/ruby/gems/2.3.0/gems/jekyll-3.3.1/lib/jekyll/plugin_manager.rb:36:in `require_from_bundler'
        from D:/Ruby23-x64/lib/ruby/gems/2.3.0/gems/jekyll-3.3.1/exe/jekyll:9:in `'
        from D:/Ruby23-x64/bin/jekyll:23:in `load'
        from D:/Ruby23-x64/bin/jekyll:23:in `'
这个问题说明本地的版本比博客需要的版本要高,只需要实行如下命令即可:
D:\GarryBlog\garry2016.github.io>gem uninstall addressable
Select gem to uninstall:
 1. addressable-2.4.0
 2. addressable-2.5.0
 3. All versions
> 2
Successfully uninstalled addressable-2.5.0
这样问题就解决了,类似问题也可以这样解决。
- 解决上面的问题后,再次输入jekyll server,报如下错误 "SSL_connect returned=1 errno=0 state=SSLv3 read server certificate B: certificate verify failed":
D:\GarryBlog\garry2016.github.io>jekyll server
WARN: Unresolved specs during Gem::Specification.reset:
      listen (< 3.1, ~> 3.0)
WARN: Clearing out unresolved specs.
Please report a bug if this causes problems.
Configuration file: D:/GarryBlog/garry2016.github.io/_config.yml
Configuration file: D:/GarryBlog/garry2016.github.io/_config.yml
            Source: D:/GarryBlog/garry2016.github.io
       Destination: D:/GarryBlog/garry2016.github.io/_site
 Incremental build: disabled. Enable with --incremental
      Generating...
   GitHub Metadata: No GitHub API authentication could be found. Some fields may be missing or have incorrect data.
  Liquid Exception: SSL_connect returned=1 errno=0 state=SSLv3 read server certificate B: certificate verify failed in /_layouts/page.html
jekyll 3.3.0 | Error:  SSL_connect returned=1 errno=0 state=SSLv3 read server certificate B: certificate verify failed
SSL链接问题,解决方法是点击[这里](D:\GarryBlog\garry2016.github.io>set SSL_CERT_FILE=d:\myblog\cacert.pem)下载一个cacert.pem文件保存到指定目录。然后在命令行中执行设置SSL文件的路径就可以了。
D:\GarryBlog\garry2016.github.io>set SSL_CERT_FILE=d:\myblog\cacert.pem
好了,使用jekyll搭建个人博客就写完了,还涉及一些内容这里没讲,比如评论,分享等功能。我们fork的博客里面已经实现了这些功能,大家去看源码应该就可以知道了。
有问题可以在下面留言,欢迎一起交流!
七.扩展阅读
[1]Github Pages
[2]Git教程 - 廖雪峰
[3]Jekyll中文文档
[4]认识与入门Markdown
[5]Ruby和Gem
[6]使用Github Pages建独立博客
[7]搭建一个免费的,无限流量的Blog—-github Pages和Jekyll入门


