前言:
在上篇文章中已经对普通Activity的setContentView()是如何将xml文件解析成view加载到App内存中进行了分析,但是从Android 5.0后提出的新概念Material Design(需要科学上网)以及后面的各个版本的变动,就导致google需要对各个版本进行适配 包括这篇的要说的setContentView() 这篇主要分析google工程师是如何对5.0以上的setContentView()进行适配的
分析:
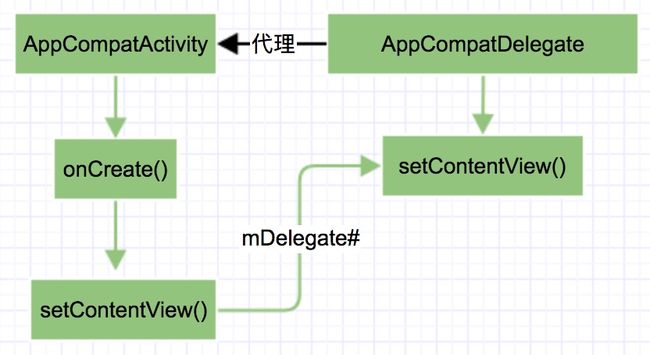
老规矩先来一张代码执行流程图
阅读源码:
//首先需要继承AppCompatActivity
public class MainActivity extends AppCompatActivity{
     @Override
    protected void onCreate(Bundle savedInstanceState) {
        super.onCreate(savedInstanceState);
        setContentView(R.layout.activity_main);
    }
}
public class AppCompatActivity extends FragmentActivity {
  //代理类AppCompatDelegate
  private AppCompatDelegate mDelegate;
  @Override
  public void setContentView(@LayoutRes int  layoutResID) {
        getDelegate().setContentView(layoutResID);
    }
  //根据不同的SDK获取对应的 AppCompatDelegate实现类
  @NonNull
  public AppCompatDelegate getDelegate() {
        if (mDelegate == null) {
            mDelegate = AppCompatDelegate.create(this, this);
        }
        return mDelegate;
    }
}
所谓代理类 顾名思义代理执行 比如:
    @Override
    protected void onPostResume() {
        super.onPostResume();
        getDelegate().onPostResume();
    }

    @Override
    protected void onStart() {
        super.onStart();
        getDelegate().onStart();
    }

    @Override
    protected void onStop() {
        super.onStop();
        getDelegate().onStop();
    }

    @Override
    public View findViewById(@IdRes int id) {
        return getDelegate().findViewById(id);
    }
AppCompatDelegate代理实现类的创建:
public abstract class AppCompatDelegate {
    public static AppCompatDelegate create(Activity activity, AppCompatCallback callback) {
        return create(activity, activity.getWindow(), callback);
    }
    //根据不同SDK 创建不同的AppCompatDelegate 实现类 (类似于简单工厂方法)
   private static AppCompatDelegate create(Context context, Window window,
            AppCompatCallback callback) {
        final int sdk = Build.VERSION.SDK_INT;
        if (BuildCompat.isAtLeastN()) {
            return new AppCompatDelegateImplN(context, window, callback);
        } else if (sdk >= 23) {
            return new AppCompatDelegateImplV23(context, window, callback);
        } else if (sdk >= 14) {
            return new AppCompatDelegateImplV14(context, window, callback);
        } else if (sdk >= 11) {
            return new AppCompatDelegateImplV11(context, window, callback);
        } else {
            return new AppCompatDelegateImplV9(context, window, callback);
        }
    }
}
AppCompatActivity的代理类AppCompatDelegate 是由SDK版本来决定的 不过各个版本有一定的继承关系 如图:
不过
setContentView(layoutResID)是直接在AppCompatDelegateImplV9中实现的 其他版本也没重写 所以直接进入AppCompatDelegateImplV9
class AppCompatDelegateImplV9{
    @Override
    public void setContentView(int resId) {
        ensureSubDecor();
        ViewGroup contentParent = (ViewGroup) mSubDecor.findViewById(android.R.id.content);
        contentParent.removeAllViews();
        LayoutInflater.from(mContext).inflate(resId, contentParent);
        mOriginalWindowCallback.onContentChanged();
    }
}
有一个 ensureSubDecor()函数 :
private ViewGroup mSubDecor;

private void ensureSubDecor() {
        if (!mSubDecorInstalled) {
          //获取根部布局视图
            mSubDecor = createSubDecor();
            // If a title was set before we installed the decor, propagate it now
            CharSequence title = getTitle();
            if (!TextUtils.isEmpty(title)) {
                onTitleChanged(title);
            }
     }
接着进入createSubDecor()函数:
private ViewGroup createSubDecor() {
        //获取Activity主题
        TypedArray a = mContext.obtainStyledAttributes(R.styleable.AppCompatTheme);
        //如果使用的主题不是AppCompatTheme的子类就会抛异常 这也解释了 为什么在使用AppCompatActivity的时候 必须使用AppCompatTheme主题
        if (!a.hasValue(R.styleable.AppCompatTheme_windowActionBar)) {
            a.recycle();
            throw new IllegalStateException(
                    "You need to use a Theme.AppCompat theme (or descendant) with this activity.");
        }

        if (a.getBoolean(R.styleable.AppCompatTheme_windowNoTitle, false)) {
 //设置主题样式Window.FEATURE_NO_TITLE           requestWindowFeature(Window.FEATURE_NO_TITLE);
        } else if (a.getBoolean(R.styleable.AppCompatTheme_windowActionBar, false)) {
         //设置主题样式 WindowCompat.FEATURE_ACTION_BAR
  requestWindowFeature(FEATURE_SUPPORT_ACTION_BAR);
        }
        if (a.getBoolean(R.styleable.AppCompatTheme_windowActionBarOverlay, false)) {
         //设置主题样式  WindowCompat.FEATURE_ACTION_BAR_OVERLAY   requestWindowFeature(FEATURE_SUPPORT_ACTION_BAR_OVERLAY);
        }
        if (a.getBoolean(R.styleable.AppCompatTheme_windowActionModeOverlay, false)) {
            //设置主题样式WindowCompat.FEATURE_ACTION_MODE_OVERLAYrequestWindowFeature(FEATURE_ACTION_MODE_OVERLAY);
        }
        mIsFloating = a.getBoolean(R.styleable.AppCompatTheme_android_windowIsFloating, false);
        a.recycle();

        //这句代码很重要 执行了PhoneWindow中的installDecor()函数 这个函数初始化了DecorView 而且还将根布局解析 并且添加到了DecorView中 比如常用的`R.layout.screen_simple`
        mWindow.getDecorView();

        //创建LayoutInflater实例
        final LayoutInflater inflater = LayoutInflater.from(mContext);
        ViewGroup subDecor = null;

        //根据不同的主题样式 为subDecor赋值不通不根布局
        if (!mWindowNoTitle) {
            if (mIsFloating) {
                // If we're floating, inflate the dialog title decor
                subDecor = (ViewGroup) inflater.inflate(
                        R.layout.abc_dialog_title_material, null);

                // Floating windows can never have an action bar, reset the flags
                mHasActionBar = mOverlayActionBar = false;
            } else if (mHasActionBar) {
                /**
                 * This needs some explanation. As we can not use the android:theme attribute
                 * pre-L, we emulate it by manually creating a LayoutInflater using a
                 * ContextThemeWrapper pointing to actionBarTheme.
                 */
                TypedValue outValue = new TypedValue();
                mContext.getTheme().resolveAttribute(R.attr.actionBarTheme, outValue, true);

                Context themedContext;
                if (outValue.resourceId != 0) {
                    themedContext = new ContextThemeWrapper(mContext, outValue.resourceId);
                } else {
                    themedContext = mContext;
                }

                // Now inflate the view using the themed context and set it as the content view
                subDecor = (ViewGroup) LayoutInflater.from(themedContext)
                        .inflate(R.layout.abc_screen_toolbar, null);

                mDecorContentParent = (DecorContentParent) subDecor
                        .findViewById(R.id.decor_content_parent);
                mDecorContentParent.setWindowCallback(getWindowCallback());

                /**
                 * Propagate features to DecorContentParent
                 */
                if (mOverlayActionBar) {
                    mDecorContentParent.initFeature(FEATURE_SUPPORT_ACTION_BAR_OVERLAY);
                }
                if (mFeatureProgress) {
                    mDecorContentParent.initFeature(Window.FEATURE_PROGRESS);
                }
                if (mFeatureIndeterminateProgress) {
                    mDecorContentParent.initFeature(Window.FEATURE_INDETERMINATE_PROGRESS);
                }
            }
        } else {
            if (mOverlayActionMode) {
                subDecor = (ViewGroup) inflater.inflate(
                        R.layout.abc_screen_simple_overlay_action_mode, null);
            } else {
                //这里为了好理解 还是以常用的布局文件来讲解
                subDecor = (ViewGroup) inflater.inflate(R.layout.abc_screen_simple, null);
            }
        if (mDecorContentParent == null) {
            mTitleView = (TextView) subDecor.findViewById(R.id.title);
        }
      //反射调用View的makeOptionalFitsSystemWindows()函数
      ViewUtils.makeOptionalFitsSystemWindows(subDecor);

          /*...............关键代码从这里看.......................................*/

        //根据R.id.action_bar_activity_content获取到布局中的ContentFrameLayout View
        final ContentFrameLayout contentView = (ContentFrameLayout) subDecor.findViewById(R.id.action_bar_activity_content);

        //获取mWindow(PhoneView对象 在attach()时创建的)DecorView中的 android.R.id.content 也就是Activity默认提供的根布局视图中的FrameLayout
        final ViewGroup windowContentView = (ViewGroup) mWindow.findViewById(android.R.id.content);

        //因为上面执行了 mWindow.getDecorView()这句代码 此时 windowContentView肯定不为空
        if (windowContentView != null) {
             //可能已经在窗口的内容视图中添加了视图,所以我们需要
            //将它们迁移到我们的内容视图
            while (windowContentView.getChildCount() > 0) {
                //将第0个内容视图删除
                final View child = windowContentView.getChildAt(0);
                windowContentView.removeViewAt(0);
                //将删除的视图添加AppCompatActivity 提供的根布局视图contentView中
                contentView.addView(child);
            }
            //这里将的windowContentView的id设置为-1 就是将R.layout.screen_simple中的FrameLayout id设置为-1
            //然后将contentView的id设置为android.R.id.content. 偷梁换柱
            windowContentView.setId(View.NO_ID);
            contentView.setId(android.R.id.content);

            //去掉windowContentView的前景 由我们自己处理
            if (windowContentView instanceof FrameLayout) {
                ((FrameLayout) windowContentView).setForeground(null);
            }
        }
        // 调用PhoneWindow的setContentView(View view)
        mWindow.setContentView(subDecor);

        //将AppCompatActivity 提供的根视图返回
        return subDecor;
    }
google 将根布局中的View为了达到Material Design效果都做了兼容性处理 R.layout.abc_screen_simple
android.support.v7.widget.FitWindowsLinearLayout
xmlns:android="http://schemas.android.com/apk/res/android"
android:id="@+id/action_bar_root"
android:layout_width="match_parent"
android:layout_height="match_parent"
android:orientation="vertical"
android:fitsSystemWindows="true">
到这里再继续进入PhoneWindow的setContentView(View view)继续分析
class PhoneWindow{
 @Override
    public void setContentView(View view) {
        setContentView(view, new ViewGroup.LayoutParams(MATCH_PARENT, MATCH_PARENT));
    }

    @Override
    public void setContentView(View view, ViewGroup.LayoutParams params) {
        //因为在AppCompatDelegateImplV9已经调用过installDecor()函数 所以mContentParent不会为null
        if (mContentParent == null) {
            installDecor();
        } else if (!hasFeature(FEATURE_CONTENT_TRANSITIONS)) {
            mContentParent.removeAllViews();
        }

        if (hasFeature(FEATURE_CONTENT_TRANSITIONS)) {
            view.setLayoutParams(params);
            final Scene newScene = new Scene(mContentParent, view);
            transitionTo(newScene);
        } else {
            //这里几直接将AppCompatDelegateImplV9 中获取的根视图添加到mContentParent中 上文已经分析过这个mContentParent 是一个FrameLayout
            mContentParent.addView(view, params);
        }
        mContentParent.requestApplyInsets();
        final Callback cb = getCallback();
        if (cb != null && !isDestroyed()) {
            cb.onContentChanged();
        }
    }
}
到这里视图已经添加到DecorView中 在回去看AppCompatDelegateImplV9 sheContentView()
@Override
public void setContentView(int resId) {
        //这个函数已经分析过
        ensureSubDecor();
        //这里获取android.R.id.content 是经过id替换的FrameLayout 也就是AppCompatActivity提供的根视图中的FrameLayout
        ViewGroup contentParent = (ViewGroup) mSubDecor.findViewById(android.R.id.content);
        //删除所有子控件
        contentParent.removeAllViews();
        //将内容视图添加到contentParent(FrameLayout)中
        LayoutInflater.from(mContext).inflate(resId, contentParent);
        //窗口改变完成 回调监听
        mOriginalWindowCallback.onContentChanged();
}
说了那么说 不如来的一张图爽快:
在Activity提供的默认根视图中 google工程师又向FrameLayout中添加AppCompatActivity提供做了兼容处理的根视图并且把id给替换了 同时可以看到内容视图中的TextView 已经被替换为可兼容的AppCompatTextView


