明确爬取的网站
http://web.jobbole.com/all-posts/
选择伯乐在线网站,爬取网站中的所有文章。
安装scrapy
进入基础篇安装的环境:workon py3scrapy
pip install -i https://pypi.douban.com/simple/ scrapy
提示,twisted无法安装。
进入python非官方库:https://www.lfd.uci.edu/~gohlke/pythonlibs/
下载Twisted,注意Python版本号(火狐浏览器可以触发下载)
pip install twisted本地路径
pip install -i https://pypi.douban.com/simple/ scrapy 此时 scrapy安装成功
Scrapy搭建第一个爬虫
scrapy startproject jobbole // 创建爬虫框架
scrapy genspider bole blog.jobbole.com // 创建爬虫模板
为了能在Pycharm中调试Scrapy,在爬虫的根目录(scrapy.cfg同级目录)中创建一个main.py作为命令行入口文件。
from scrapy.cmdline import execute
import sys
import os

sys.path.append(os.path.dirname(os.path.abspath(__file__)))
execute(["scrapy", "crawl", "bole"])
Windows环境下,运行该文件发现缺少win32api模块
安装win32api:
pip install pypiwin32
此时,运行main.py可以进行调试。
运行之前检查settings.py文件,设置
ROBOTSTXT_OBEY = False
Scrapy Shell调试
workon py3scrapy
进入scrapy.cfg同级目录
srapy shell http://blog.jobbole.com/114159/
CSS选择器
Scrapy支持CSS选择器,在不支持的爬虫中只能使用xpath
response.css('.entry-header h1::text').extract_first()
CSS选择器对比Xpath更加简短,学前端的同学使用起来更加顺手,推荐优先考虑
# -*- coding: utf-8 -*-
import scrapy
import re


class BoleSpider(scrapy.Spider):
    name = 'bole'
    allowed_domains = ['blog.jobbole.com']
    start_urls = ['http://blog.jobbole.com/114159/']

    def parse(self, response):
        title = response.css('.entry-header h1::text').extract_first()
        create_date =  response.css('.entry-meta-hide-on-mobile::text').extract_first().strip().replace('·', '').strip()
        praise_num = response.css('h10::text').extract_first()
        fav_num = response.css('.bookmark-btn::text').extract_first()
        comment_num = response.css('a[href="#article-comment"] span::text').extract_first()
        math_re = re.match(".*?(\d+).*", fav_num)
        if math_re:
            fav_num = math_re.group(1)
        else:
            fav_num = 0
        math_re = re.match(".*?(\d+).*", comment_num)
        if math_re:
            comment_num = math_re.group(1)
        else:
            comment_num = 0
        content = response.css('.entry').extract_first()
        tag_list = response.css('.entry-meta-hide-on-mobile a::text').extract()
        tag_list =  [element for element in tag_list if not element.strip().endswith("评论")]
        tag_list = ",".join(tag_list)
        pass
从列表页进入内容页
# -*- coding: utf-8 -*-
import scrapy
import re
from scrapy.http import Request
from urllib import parse


class BoleSpider(scrapy.Spider):
    name = 'bole'
    allowed_domains = ['blog.jobbole.com']
    start_urls = ['http://blog.jobbole.com/all-posts/']

    def parse(self, response):
        # 循环列表页
        post_nodes = response.css('.post.floated-thumb')
        for post_node in post_nodes:
            image_url = post_node.css('img::attr(src)').extract_first()
            post_url = post_node.css('.archive-title::attr(href)').extract_first()
            yield Request(url=parse.urljoin(response.url, post_url), callback=self.parse_detail, meta={"front_image_url": image_url})
        # 获取下一页数据
        next_url = response.css('.next.page-numbers::attr("href")').extract_first()
        if next_url:
            yield Request(url=parse.urljoin(response.url, next_url), callback=self.parse)

    def parse_detail(self, response):
        title = response.css('.entry-header h1::text').extract_first()
        create_date =  response.css('.entry-meta-hide-on-mobile::text').extract_first().strip().replace('·', '').strip()
        praise_num = response.css('h10::text').extract_first()
        fav_num = response.css('.bookmark-btn::text').extract_first()
        comment_num = response.css('a[href="#article-comment"] span::text').extract_first()
        math_re = re.match(".*?(\d+).*", fav_num)
        if math_re:
            fav_num = math_re.group(1)
        else:
            fav_num = 0
        math_re = re.match(".*?(\d+).*", comment_num)
        if math_re:
            comment_num = math_re.group(1)
        else:
            comment_num = 0
        content = response.css('.entry').extract_first()
        tag_list = response.css('.entry-meta-hide-on-mobile a::text').extract()
        tag_list =  [element for element in tag_list if not element.strip().endswith("评论")]
        tag_list = ",".join(tag_list)
        front_image_url = response.meta.get('front_image_url')
        pass
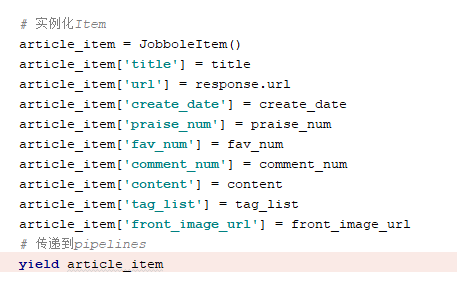
数据保存为Field格式
items.py
bole.py
Field格式数据传递到Pipelines中
settings.py
pipelines.py打断点可以发现,数据传递到pipeline中
下载图片
配置settings文件的scrapy pipelines images
ITEM_PIPELINES = {
    'jobbole.pipelines.JobbolePipeline': 300,
    'scrapy.pipelines.images.ImagesPipeline': 1,
}
IMAGES_URLS_FIELD = "front_image_url"
project_dir = os.path.abspath(os.path.dirname(__file__))
IMAGES_STORE = os.path.join(project_dir, 'images')
pip 安装pillow
pip install -i https://pypi.douban.com/simple/ pillow
图片字段修改为数组的形式
至此,爬虫可以下载网络图片了。
获取保存文件路径
自定义一个pipeline,继承scrapy.pipelines.images ImagesPipeline
重新定义item_contpleted方法来保存图片保存地址
数据保存到数据库中
安装mysql驱动
pip install mysqlclient
这里可能安装失败,我们到https://www.lfd.uci.edu/~gohlke/pythonlibs/中下载
mysqlPipline(异步方法)
# twisted异步插入mysql
class MysqlTwistedPipeline(object):
    def __init__(self, dbpool):
        self.dbpool = dbpool

    @classmethod
    def from_settings(cls, settings):
        dbparms = dict(
            host=settings['MYSQL_HOST'],
            db=settings['MYSQL_DBNAME'],
            user=settings['MYSQL_USER'],
            passwd=settings['MYSQL_PASSWD'],
            charset='utf8',
            cursorclass=MySQLdb.cursors.DictCursor,
            use_unicode=True
        )

        dbpool = adbapi.ConnectionPool('MySQLdb', **dbparms)
        return cls(dbpool)

    def process_item(self, item, spider):
        # 使用twisted将musql插入变成异步操作
        query = self.dbpool.runInteraction(self.do_insert, item)
        # 处理异常
        query.addErrback(self.handle_error)

    def handle_error(self, failure):
        # 处理异步插入的异常
        print(failure)

    def do_insert(self, cursor, item):
        insert_sql = """
                      INSERT INTO article_spider(title,time,url,url_object_id,content,vote_number,collect_number,comment_number,tags,front_image_url,front_image_path)
                      VALUES (%s,%s,%s,%s,%s,%s,%s,%s,%s,%s,%s)
                  """
        cursor.execute(insert_sql, (
        item['title'], item['create_date'], item['url'], item['url_objet_id'], item['content'], item['praise_num'],
        item['fav_num'], item['comment_num'], item['tag_list'], item['front_image_url'], item['front_image_path']))
ItemLoader
引入:from scrapy.loader from ItemLoader
实例化:itemloader = ItemLoader(item=JobboleItem(), response=response)
重要方法:
itemloader.add_css()
itemloader.add_xpath()
itemloader.add_value()
例子:
item_loader.add_css('title', '.entry-header h1::text')
调用load_item生成格式:
item_loader = item_loader.load_item()
打开调模式,发现Itemloader中的参数都是list类型,并且尚未处理:
引入scrapy提供的Itemloader处理库:
from scrapy.loader.processors import MapCompose, TakeFirst
这样需要在每个Field中添加output_processor = TakeFirst()
自定义一个Itemloader继承Itemloader:
这样,Itemloader就开发完毕了


