本文将记录在iOS开发过程中所遇到的小知识点,以及一些技巧,会保持更新。倒序排序以方便查看。
30、显示 mac 上的隐藏文件。
命令行执行
defaults write com.apple.Finder AppleShowAllFiles YES
然后重启finder即可(重启方法:按住option,右键点击dock上的finder)
29、创建自定义代码段 - code snippet
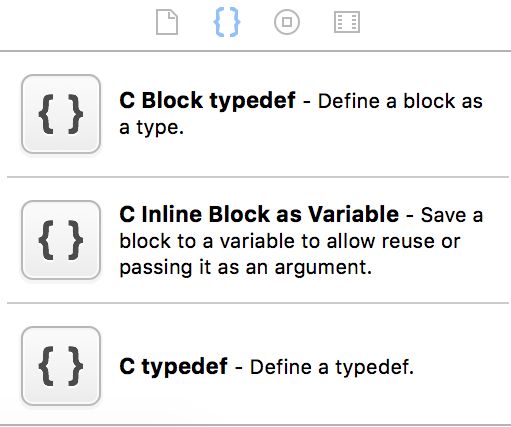
Xcode默认提供了非常丰富的代码片段可供选择,我们写代码是很多的提示就是一个代码片段,具体可以参加 Xcode 的右侧工具栏下方:
那如何创建自定义的代码段呢?很简单,首先在 Xcode 中写出你想创建的代码,然后选中拖动至上面图片的 code snippet library 中,这里有个技巧就是如果代码中有可变参数的话,可以用 <#parammeter#> 这样的形式包起来,比如我们经常创建的属性 property,首先在 Xcode 中写上:
@property (nonatomic, strong) <#UIView#> *<#myView#>;
然后选中这行代码,拖动到 code snippet library 中,然后你就会发现在代码段库的最底部生成了一个自定义的代码段,再进行编辑其 title,completion shortcut,如下:
点击右下角 Done 之后,再回到 Xcode 中键入 @property 你就回惊奇的发现刚才创建的代码段出现在代码自动提示列表中:
选中回车,你就发现以后再也不用每次创建属性都把整个属性定义的代码一个个敲出来了,强烈建议类似的多创建几个常用的代码段
28、让 view 从屏幕顶部开始而不是导航栏下方开始
iOS7 以后,有导航的话,controller 的 view 默认是会以导航栏的下方为起点开始,如果需要让它从屏幕顶部开始的话,只需要一句话就可以搞定了:
self.extendedLayoutIncludesOpaqueBars = YES;
同样的,设置为 NO 就不会从顶部开始了
27、屏幕旋转控制
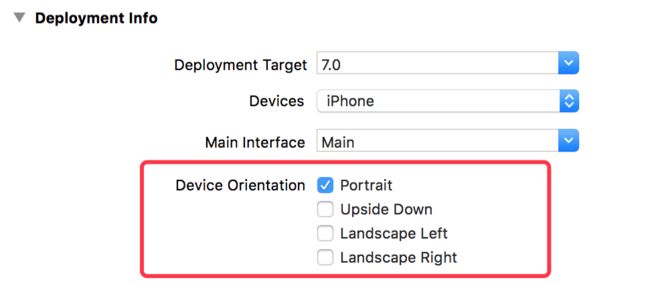
假如应用中只有少数几个界面需要支持横屏时,其实我们不必要打开工程的支持横屏开关,让工程支持竖屏也可以实现:
(1) 首先在 appDelegate.h 中创建一个 BOOL 属性,比如:
@property (nonatomic,assign)BOOL allowRotation; //是否支持横屏
然后到 appDelegate.m 中实现:
- (UIInterfaceOrientationMask)application:(UIApplication *)application supportedInterfaceOrientationsForWindow:(nullable UIWindow *)window{

    if (self.allowRotation) {
        return UIInterfaceOrientationMaskLandscapeLeft | UIInterfaceOrientationMaskLandscapeRight | UIInterfaceOrientationMaskPortrait ;
    }
    return UIInterfaceOrientationMaskPortrait;
}
这样,当 allowRotation 为 YES 时,就支持横屏了,反之就不支持。
(2) 在需要支持的页面中,修改 allowRotation 的值为 YES,即可支持横竖屏旋转了:
- (void)viewWillAppear:(BOOL)animated{
    [super viewWillAppear:animated];
    // 出现时可旋转
    ((AppDelegate *)[UIApplication sharedApplication].delegate).allowRotation = YES;
}
同样重要的记得在页面将要消失时修改为只支持竖屏:
- (void)viewWillDisappear:(BOOL)animated {
    [super viewWillDisappear:animated];
    // 消失时恢复竖屏
    ((AppDelegate *)[UIApplication sharedApplication].delegate).allowRotation = NO;
    // 立即变为竖屏
    [[UIDevice currentDevice] setValue:[NSNumber numberWithInteger:UIDeviceOrientationPortrait] forKey:@"orientation"];
(3) 上述代码实现的是自动旋转、如果需要强制旋转的的话,在上述把横屏打开的前提下,使用下面的代码即可进行强制的横屏或者竖屏了:
    // 竖屏
    [[UIDevice currentDevice] setValue:[NSNumber numberWithInteger:UIDeviceOrientationPortrait] forKey:@"orientation"];
    // 横屏
    [[UIDevice currentDevice] setValue:[NSNumber numberWithInt:UIInterfaceOrientationLandscapeRight] forKey:@"orientation"];
(4) 对于有导航栏的,有一个坑要记得填,那就是横屏后,使用侧滑返回时可能会出现问题,于是需要在将要进入横屏时禁用侧滑返回手势,退出横屏时再开启即可:
// 屏幕即将旋转
- (void)viewWillTransitionToSize:(CGSize)size withTransitionCoordinator:(id)coordinator{
    [super viewWillTransitionToSize:size withTransitionCoordinator:coordinator];
//    NSLog(@"here: %@  %@", NSStringFromCGSize(size), coordinator);

    if (size.width > size.height) {
        // 横屏,禁用侧滑返回手势
    } else {
        //竖屏,开启侧滑返回手势
    }
}
关于侧滑返回手势的开启与禁用见下面第 26 点。
26、禁用 iOS7 以后的侧滑返回手势
iOS7 以后默认 push 到下个界面后支持侧滑返回,在某些界面我们可能不需要这个自带的功能,于是我们可以通过下面的一句代码禁用它:
// 禁用侧滑返回手势
    if ([self.navigationController respondsToSelector:@selector(interactivePopGestureRecognizer)]) {
        self.navigationController.interactivePopGestureRecognizer.enabled = NO;
    }
如果需要开启,同样的,把 NO 改为 YES 就可以了,如下:
// 开启侧滑返回手势
    if ([self.navigationController respondsToSelector:@selector(interactivePopGestureRecognizer)]) {
        self.navigationController.interactivePopGestureRecognizer.enabled = YES;
    }
25、添加备注
写代码过程中,写到某个位置时,当时会想到以后需要在这儿添加什么样的功能代码、或继续做点什么的,为了以防后面忘记,这时候我们可以使用 // FIXME:、// TODO:、// MARK:来备注说明。
备注后,我们在当前文件点击源文件上方的一个下拉框,你就能查看到自己标注的内容了,非常方便
24、设置 App 名称
一般 App名称默认就是工程名、开发 App 过程中假如想到更合适的名字,这时候除了修改工程名这个办法外,其实更优雅的操作是在 info.plist 中添加一个key(Bundle display name),Value 就是你需要的新名字
23、收起键盘
当输入完成,想要收起键盘最果断的办法就是,
[self.view endEditing:YES];
当然也可以通过 resignFirstResponder 来收起,但是上面的 endEditing:在有多个输入框的时候更方便。
22、播放音效
应用中添加适当的音效,可以提高用户体验。如果要实现播放一小段的音效功能,代码如下:
    // 比如添加一个:截图音效
    // 1. 定义要播放的音频文件的URL
    NSURL *screenshotURL = [[NSBundle mainBundle] URLForResource:@"captureVoice" withExtension:@"wav"];
    // 2. 注册音频文件(第一个参数是音频文件的URL 第二个参数是音频文件的SystemSoundID)
    AudioServicesCreateSystemSoundID((__bridge CFURLRef)screenshotURL,&screenshotSound);
    // 3. 为crash播放完成绑定回调函数、可不绑定
    // AudioServicesAddSystemSoundCompletion(screenshot, NULL, NULL, (void*)completionCallback, NULL);
    // 4. 播放 ditaVoice 注册的音频 并控制手机震动
    // AudioServicesPlaySystemSound(screenshotSound); // 只播放声音
    // AudioServicesPlayAlertSound(screenshotSound); // 同时手机会震动
    // AudioServicesPlaySystemSound(kSystemSoundID_Vibrate); // 控制手机振动
21、UITableView 分割线左对齐
对于 tableView 的 cell 间的分割线,一般情况下可以通过设置 separatorInset 来改变分割线长度,但是不能设置距离左端为0,此时如果需要设置 separator 左端对齐,可通过下面的方法设置:
/**
*  设置分割线左对齐
*/
-(void)viewDidLayoutSubviews {
    if ([self.myTableView respondsToSelector: @selector(setSeparatorInset: )]) {
        [self.myTableView setSeparatorInset:UIEdgeInsetsZero];
    }
    if ([self.myTableView respondsToSelector: @selector(setLayoutMargins: )])  {
        [self.myTableView setLayoutMargins:UIEdgeInsetsZero];
    }

}
#pragma mark -- tableviewdelegate
/**
*  设置分割线左对齐
*/
-(void)tableView: (UITableView *)tableView willDisplayCell: (UITableViewCell *)cell forRowAtIndexPath:(NSIndexPath *)indexPath{
    if ([cell respondsToSelector: @selector(setLayoutMargins: )]) {
        [cell setLayoutMargins:UIEdgeInsetsZero];
    }
    if ([cell respondsToSelector: @selector(setSeparatorInset: )]){
        [cell setSeparatorInset:UIEdgeInsetsZero];
    }
}
20、旋转某个 ViewController
让某个 Controller 旋转到某个方向的利器,
 // 进入横屏
NSNumber *value = [NSNumber numberWithInt:UIInterfaceOrientationLandscapeRight];
[[UIDevice currentDevice] setValue:value forKey:@"orientation"];
 // 进入竖屏
NSNumber *value = [NSNumber numberWithInt:UIInterfaceOrientationPortrait];
[[UIDevice currentDevice] setValue:value forKey:@"orientation"];
19、 让UITableView的 section header view 不悬停
当 UITableView 的 style 属性设置为 Plain 时,这个tableview的section header在滚动时会默认悬停在界面顶端
解决办法是重载scrollview的delegate方法
- (void)scrollViewDidScroll:(UIScrollView *)scrollView {
    CGFloat sectionHeaderHeight = 40;
    if (scrollView.contentOffset.y<=sectionHeaderHeight&&scrollView.contentOffset.y>=0) {
        scrollView.contentInset = UIEdgeInsetsMake(-scrollView.contentOffset.y, 0, 0, 0);
    } else if (scrollView.contentOffset.y>=sectionHeaderHeight) {
        scrollView.contentInset = UIEdgeInsetsMake(-sectionHeaderHeight, 0, 0, 0);
    }
}
18、全局设置导航栏的样式
我们都知道原生的导航栏,push 到下一个界面后,导航栏左上角会显示蓝色的返回箭头和上个界面的 title,假如我现在需要所有页面 push 后下一个界面都不显示 title,并且箭头得使用自己的图片,这怎么实现呢?
在 Appdelegate 里面设置根视图控制器为UINavigationController时(navc),加入下面的代码:
    HomeViewController *vc = [[HomeViewController alloc] init];
    UINavigationController *navc = [[UINavigationController alloc] initWithRootViewController:vc];

    // 设置 UINavigationBar 背景色, #333333,有两种方法:
    // 1.
    [navc.navigationBar setBarTintColor: [UIColor colorWithHexString:@"0x333333"]];
    [navc.navigationBar setTranslucent:NO];
    // 2. 此方法还可以去除导航栏下方的横线
    //[navc.navigationBar setBackgroundImage:[self imageFromColor:[UIColor colorWithRed: 51/255.0 green:51/255.0 blue:51/255.0 alpha:1.0]] forBarPosition:UIBarPositionAny barMetrics:UIBarMetricsDefault];
    //[navc.navigationBar setShadowImage:[UIImage new]];
    // 自定义navigation上面的标题样式
    [navc.navigationBar setTitleTextAttributes: [NSDictionary dictionaryWithObjectsAndKeys:
                                                 [UIColor whiteColor], NSForegroundColorAttributeName,
                                                 [UIFont fontWithName:fontName size:17.0], NSFontAttributeName, nil]];
    // navigationBar样式为黑色时,状态栏StatusBar为白色
    navc.navigationBar.barStyle = UIBarStyleBlack;
    // 隐藏导航栏返回按钮的文字
    [[UIBarButtonItem appearance] setBackButtonTitlePositionAdjustment:UIOffsetMake(NSIntegerMin, NSIntegerMin) forBarMetrics:UIBarMetricsDefault];
    // 自定义返回图标
    UIImage *image = [UIImage imageNamed:@"back_indicator_56"];
    navc.navigationBar.backIndicatorImage = image;
    navc.navigationBar.backIndicatorTransitionMaskImage = image;

    self.window.rootViewController = navc;
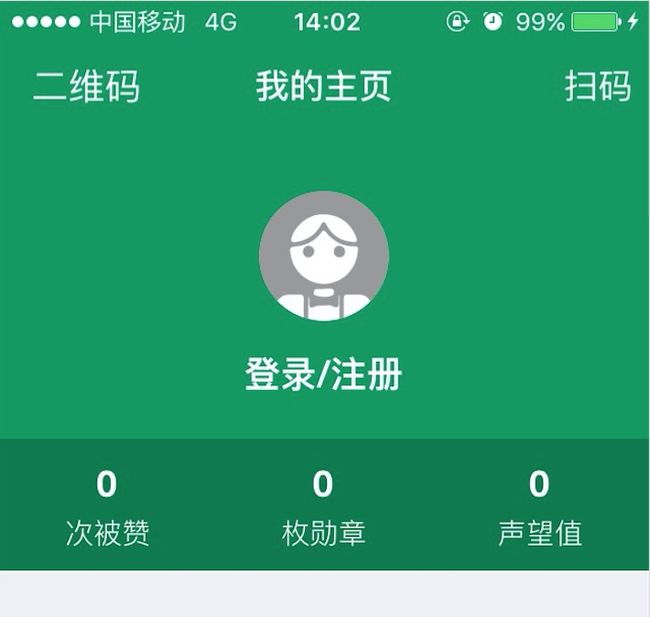
于是就有了下面的效果:
17、在自定义控件中进行跳转
一般情况下我们都是从一个 ViewController 中跳到另外一个ViewController,但是如果在某个自定义的控件中,需要进行跳转时,怎么办呢?
办法是有的,通过下面的几行代码即可进行 push:
ViewController *vc = [[ViewController alloc] init];
    vc.view.backgroundColor = [UIColor purpleColor];
    UINavigationController *navc = (UINavigationController *)[UIApplication sharedApplication].keyWindow.rootViewController;
    [navc pushViewController:vc animated:YES];
当然,这里的根视图控制器我在 Appdelegate 里面设置为了UINavigationController。
16、模糊效果
详见我的另一篇文章:iOS实现模糊效果的几种方法
或我的博文地址:iOS实现模糊效果的几种方法
15、屏幕截图并保存
//snapshotImage 这个方法效率比较低,
- (UIImage *)snapshotImage {
    UIGraphicsBeginImageContextWithOptions(self.view.bounds.size, self.view.opaque, 0);
    [self.view.layer renderInContext:UIGraphicsGetCurrentContext()];
    UIImage *snap = UIGraphicsGetImageFromCurrentImageContext();
    UIGraphicsEndImageContext();
    return snap;
}
//iOS 7上UIView上提供了drawViewHierarchyInRect:afterScreenUpdates:来截图,速度比renderInContext:快15倍。
- (UIImage *)snapshotImageAfterScreenUpdates:(BOOL)afterUpdates {
    if ([self respondsToSelector:@selector(drawViewHierarchyInRect:afterScreenUpdates:)]) {
        return [self snapshotImage];
    }
    UIGraphicsBeginImageContextWithOptions(self.view.bounds.size, self.view.opaque, 0);
    [self.view drawViewHierarchyInRect:self.view.bounds afterScreenUpdates:afterUpdates];
    UIImage *snap = UIGraphicsGetImageFromCurrentImageContext();
    UIGraphicsEndImageContext();
    return snap;
}
//保存截图到相册
- (void)saveImageToPhotos:(UIImage *)image{
    UIImageWriteToSavedPhotosAlbum(image, self, @selector(image:didFinishSavingWithError:contextInfo:), nil);
}
//状态回调
- (void)image:(UIImage *)image didFinishSavingWithError:(NSError *)error contextInfo:(void *)contextInfo{
    if (!error) {
        NSLog(@"\n\n保存成功\n\n");
    } else {
        NSLog(@"\n\n保存失败\n\n");
    }
}
14、Xcode 查看谁改动的代码
如果我们源代码有版本控制,那么当程序出了问题或bug,找到问题代码所在行后,可以通过右键 - Show Blame for Line 查看是谁改动的代码。
13、获得一款 APP 的所有图片资源
当我们想模仿一款app的时候,通过ipa包,可以拿到基本的图片,但是有一些个别的图片还是不能拿到的,可以通过一些工具插件来完成,推荐使用下面这款, github代码地址:iOS-Images-Extractor
12、随机生成一种颜色
我们可以使用标准库中的drand48()函数,它会随机生成一个0.0-1.0之间的double,因此我们只需要随机生成R, G, B三个值最后用UIColor的colorWithRed:green:blue:alpha方法创建UIColor,即可。
需要注意的是,drand48函数需要使用srand48来初始化随机数种子,示例代码如下:
- (UIColor *)randomColor{
    static BOOL seeded = NO;
    if (!seeded) {
        seeded = YES;
        srand48(time(0));
    }
    CGFloat r = (CGFloat)drand48();
    CGFloat g = (CGFloat)drand48();
    CGFloat b = (CGFloat)drand48();
    return [UIColor colorWithRed:r green:g blue:b alpha:1.0];
}
demo的github地址:随机生成一个UIColor
11、设置 UINavigationBar 背景色,背景图片,
下面的代码,可以设置 UINavigationBar 背景色和背景图片
    //背景色
    [[UINavigationBar appearance] setBarTintColor:[UIColor colorWithRed:16/255.0 green:126/255.0 blue:219/255.0 alpha:1.0]];
    //背景图
    [[UINavigationBar appearance] setBackgroundImage:[self imageFromColor:[UIColor colorWithRed:16/255.0 green:126/255.0 blue:219/255.0 alpha:1.0]] forBarMetrics:UIBarMetricsDefault];
如果你发现实际的颜色比设置的颜色淡一点,那是因为导航栏默认带了半透明效果,我们可以通过代码或在storyboard中取消半透明效果。
[[UINavigationBar appearance] setTranslucent:NO];
但是如果导航栏下方刚好有一个颜色和导航栏背景色一样的View时,比如 SegmentFalut,
此时会在导航栏下方出现一根黑线,比较难看,使用下面的代码可以去除导航栏下方的横线,
    //#107cdb
    [[UINavigationBar appearance] setBackgroundImage:[self imageFromColor:[UIColor colorWithRed:16/255.0 green:126/255.0 blue:219/255.0 alpha:1.0]] forBarMetrics:UIBarMetricsDefault];
    [[UINavigationBar appearance] setShadowImage:[UIImage new]];
    //
    //如果设置了导航栏背景色,不想要 backgroundImage,则 backgroundImage 可以设置为 `[UIImage new]`,如下
    //[[UINavigationBar appearance] setBackgroundImage: [UIImage new] forBarMetrics:UIBarMetricsDefault];
10、通过颜色来生成一个纯色图片
- (UIImage *)imageFromColor:(UIColor *)color{
    CGRect rect = CGRectMake(0, 0, 100, 100);
    UIGraphicsBeginImageContext(rect.size);
    CGContextRef context = UIGraphicsGetCurrentContext();
    CGContextSetFillColorWithColor(context, [color CGColor]);
    CGContextFillRect(context, rect);
    UIImage *img = UIGraphicsGetImageFromCurrentImageContext();
    UIGraphicsEndImageContext();
    return img;
}
9、获得任意 view 相对于屏幕的 frame
    CGRect frame = [[UIApplication sharedApplication].keyWindow convertRect:CGRectMake(0, 0, targetView.frame.size.width, targetView.frame.size.height) fromView:targetView];
    NSLog(@"\n\n targetView frame: x: %f   y: %f  \n\n width: %f   height: %f", frame.origin.x, frame.origin.y, frame.size.width, frame.size.height);
8、调整导航栏自定义的 BarButtonItem 到屏幕边侧的间距
比如我们导航栏右侧有两个自定义的按钮,那就可以通过以下代码调整他们之间的间隔
    UIButton *rightbutton1;
    UIButton *rightbutton2;
    UIBarButtonItem *backButton1 = [[UIBarButtonItem alloc] initWithCustomView:rightbutton1];
    UIBarButtonItem *backButton2 = [[UIBarButtonItem alloc] initWithCustomView:rightbutton2];
    //
    //调整 rightBarButtonItems 到屏幕右侧的间距
    UIBarButtonItem *rightNegativeSpacer = [[UIBarButtonItem alloc]
                                       initWithBarButtonSystemItem:UIBarButtonSystemItemFixedSpace
                                       target:nil action:nil];
    rightNegativeSpacer.width = -1;
    /**
     *  width为负数时,相当于 btn 向右移动 width 数值个像素,
     *  由于按钮本身和边界间距为 16 px,所以width设为 -1 时,间距正好调整为 15
     *  width为正数时,正好相反,相当于往左移动width数值个像素
     */
    UIBarButtonItem *rightNegativeSpacer2 = [[UIBarButtonItem alloc] initWithBarButtonSystemItem:UIBarButtonSystemItemFixedSpace
                                            target:nil action:nil];
    rightNegativeSpacer2.width = 18; // rightButton1 和 rightButton2 的间隔默认为0
    //
    [self.navigationItem setRightBarButtonItems:[NSArray arrayWithObjects:rightNegativeSpacer, backButton1, rightNegativeSpacer2, backButton2, nil]];
7. 根据汉字字符串 获取该字符串的拼音 然后取得首字母
//第一种方法:先将汉字转换为 拼音 再获取首字母
//获取拼音首字母(传入汉字字符串, 返回大写拼音首字母)
/*
- (NSString *)firstCharactor:(NSString *)aString
{
    //转成了可变字符串
    NSMutableString *str = [NSMutableString stringWithString:aString];
    //先转换为带声调的拼音
    CFStringTransform((CFMutableStringRef)str,NULL, kCFStringTransformMandarinLatin,NO);
    //再转换为不带声调的拼音
    CFStringTransform((CFMutableStringRef)str,NULL, kCFStringTransformStripDiacritics,NO);
    //转化为大写拼音
    NSString *pinYin = [str capitalizedString];
    //获取并返回首字母
    return [pinYin substringToIndex:1];
}
//
//第二种方法:
NSString *string = @"" ;
if ([string length])
{
    NSMutableString *mutableString = [NSMutableString stringWithString:string] ;
    /**
     *  由于此方法是在coreFoundation框架下,
     *  而我们平时所使用的类型都是Foundation框架下的,所以需要转换类型.
     *
     *  @param string#>    string 所需要转换的原字符#>
     *  @param range#>     range 所需要转换字符的范围.
     *      如果为0或者是NULL意思是所有字符都转换#>
     *  @param transform#> transform 转换方式#>
     *  @param reverse#>   reverse 如果为YES,返回原字符串;
     *      如果为NO,返回转换之后的字符串#>
     *
     *  @return return value description
     */
    // 将所有非英文的字符转换为拉丁字母,并且带声调和重音标识
    // __bridge :只改变当前对象的类型,但是不改变对象内存的管理权限
    CFStringTransform((__bridge CFMutableStringRef)mutableString , 0,kCFStringTransformToLatin , NO) ;
    // 去掉声调
    CFStringTransform((__bridge CFMutableStringRef)mutableString , 0,kCFStringTransformStripDiacritics , NO) ;
    // 每个单词的首字母大写 后再截取字符串
    NSString *str = [[mutableString capitalizedString] substringToIndex:1];
}
若需要得到汉字字符串的首字母缩写,只需对上述方法稍作修改即可。
6. UIImage与字符串互转
//图片转字符串
-(NSString *)UIImageToBase64Str:(UIImage *) image
{
    NSData *data = UIImageJPEGRepresentation(image, 1.0f);
    NSString *encodedImageStr = [data base64EncodedStringWithOptions:NSDataBase64Encoding64CharacterLineLength];
    return encodedImageStr;
}
//
//字符串转图片
-(UIImage *)Base64StrToUIImage:(NSString *)_encodedImageStr
{
    NSData *_decodedImageData   = [[NSData alloc] initWithBase64Encoding:_encodedImageStr];
    UIImage *_decodedImage      = [UIImage imageWithData:_decodedImageData];
    return _decodedImage;
}
5. Objective-C语法简写
(1). @
- @() 代表NSNumber类型
@1; 等价于 [NSNumber numberWithInt:1];
@('c'); 等价于 [NSNumber numberWithChar:'c'];
- @[] 代表数组NSArray类型
@[@"1",@"2",@"3"]; //等价于
[NSArray arrayWithObjects:@"1",@"2",@"3", nil];
- @{}代表字典NSDictionary类型
@{@"456":@"123"}; //等价于
[NSDictionary dictionaryWithObject:@"123" forKey:@"456"];
(2).方法声明
- 返回值如果不写括号,编译器默认是id类型:
-sendMessage;  //等价于
-(id)sendMessage;
- 参数如果不写类型默认也是id类型
-(void)sendMessage:msg; //等价于
-(void)sendMessage:(id)msg;
- 有多参数时方法名和参数提示语可以为空
-(void):msg1 :msg2; // 不建议这样简写,代码可读性降低
-(void)sendMessage:(id)msg1 message2:(id)msg2;
(3).结构体
CGRect rect = {1, 2};  //等价于
CGRect rect = {1, 2, 0, 0};
(4).三元条件表达式(针对字符串)
NSString *string = inputString ?: @"default"; // 等价于
NSString *string = inputString ? inputString : @"default";
(5).小括号内联复合表达式
RETURN_VALUE_RECEIVER = {(
// Do whatever you want
 RETURN_VALUE;  // 返回值
)};
//
//so 我们可以引申为以下这种写法:
UIView *view = ({
        UIView *view = [[UIView alloc] initWithFrame:self.view.bounds];
        view.backgroundColor = [UIColor redColor];
        view.alpha = 0.8f;
        view;
    });
    [self.view addSubview:view];
//这样使得代码量增大时层次仍然能比较明确。
4. 当有多个导航控制器时,一次设置多个导航控制器
UINavigationBar *navBar = [UINavigationBar appearance] ;
// 所有导航条颜色都会改变 -- 一键设置
//navBar.barTintColor = [UIColor yellowColor] ;
[navBar setBackgroundImage:[UIImage imageNamed:@"bg_nav.png"] forBarMetrics:UIBarMetricsDefault] ;
3. 隐藏状态栏 修改状态栏风格
-(UIStatusBarStyle)preferredStatusBarStyle {
    return UIStatusBarStyleLightContent;  // 暗背景色时使用
}
// 是否隐藏状态栏
- (BOOL)prefersStatusBarHidden {
    return YES;
}
2. 根据内容计算高度,宽度
-
内容的自适应高度方法
- @param CGSize 规定文本显示的最大范围, 动态高度就设置为高度不限并固定宽度,若是动态宽度则设置宽度不限,高度固定
- @param options 按照何种设置来计算范围
- @param attributes 文本内容的一些属性,例如字体大小,字体类型等 (字体不一样,高度也不一样)
- @parma context 上下文 可以规定一些其他的设置 但是一般都是nil
*/
// 枚举值中的 " | " 意思是要满足所有的枚举值设置.
//例子
NSString *contentString = @"String! String!" ; //目标字符串
CGRect rect = [contentString boundingRectWithSize:CGSizeMake(tableView.bounds.size.width, MAXFLOAT) options:NSStringDrawingUsesLineFragmentOrigin | NSStringDrawingUsesFontLeading attributes:@{NSFontAttributeName :[UIFont systemFontOfSize:15]} context:nil] ;
1. 将图片设置为圆形,或给button,label等设置圆角
UIImageView *testImageView = [[UIImageView alloc] initWithFrame:CGRectMake(10, 10, 40, 40)] ;
// 设置圆角半径,一般要求图片是正方形,
// 若不是则需要将半径设置为宽和高比较大的值的一半即可
testImageView.layer.cornerRadius = self.testImageView.frame.size.width / 2 ;
testImageView.layer.masksToBounds = YES ; // 边界是否允许截取
//
// button label等设置圆角都是同样的方法
UIButton *testButton = [UIButton buttonWithType:UIButtonTypeRoundedRect];
testButton.frame = CGRectMake(50, 80, 80, 40);
testButton.layer.cornerRadius = 5;
testButton.layer.masksToBounds = YES;
如果控件是在 stroyBoard 中,可以 User Defined Runtime Attributes中按照下面一样设置即可


