前言
像我这样迷茫的人,像我这样寻找的人,像我这样碌碌无为的人,你还见过多少人 ...
诠释了我的内心真实想法
PathMeasure之直播间送爱心
Path(路径),在绘制自定义控件中占着举足轻重的地位。稍微复杂点的控件都会有着它的身影。是不是有时候还在为求控件某点的坐标而犯愁呢?反正当时我还在傻傻的计算控件路径的公式去求坐标。那么,如何来定位任意一个给定Path的任意一个点的坐标呢?
Android SDK提供了一个非常有用的API来帮助开发者解决以上的难题,这个类就是 PathMeasure ,它的中文意思路径测量,英文学得不好,只能翻译这个浅显的含义。
先来揪一揪最终实现的效果图:
简单控制了爱心的缩放,速率以及透明度。源码也非常的简单易懂,若有什么疑问请留言。
文章结尾会附上源码,如果对你有所帮助,还望动手点一点star
那下面重点来看一看 PathMeasure
PathMeasure的那些事
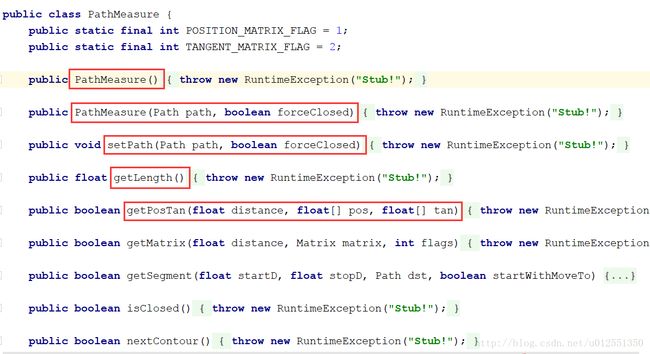
首先来看下 PathMeasure 的 API:
PathMeasure 的 API 非常简单,基本都是望文生义,红框圈住是比较常用的方法。接着我们挨着来揪一揪各个方法的用法以及含义。
初始化
PathMeasure 的初始化可以直接 new 一个 PathMeasure
pathMeasure = new PathMeasure();
初始化 PathMeasure 后,可以通过以下的方式将 Path 和 PathMeasure 进行绑定:
pathMeasure.setPath(path, false);
当然还可以将上面两步结合在一起完成有参的构造方法来进行初始化:
PathMeasure(Path path, boolean forceClosed)
参数 path 就是需要计算,测量的路径;那么 forceClosed 又代表什么含义呢,字面上强制关闭,接下来通过一个案例来加深对它的理解。
forceClosed参数
先看下面一段代码,绘制了两条线段,分别改变 forceClosed 的值来获取 PathMeasure.getLength() 的值:
        mPathMeasure = new PathMeasure();
        mPath = new Path();

        //水平绘制长为600的线段
        mPath.moveTo(800, 200);
        mPath.lineTo(200, 200);
        //绘制长为800的字段
        mPath.lineTo(200, 1000);

        mPathMeasure.setPath(mPath, false);
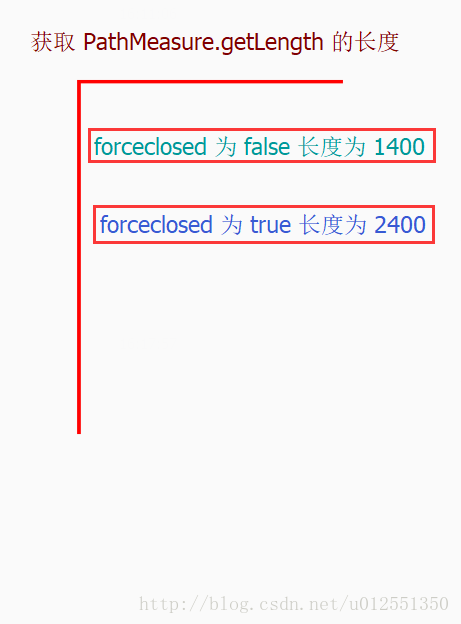
forceClosed 为 false,true 的效果图如下:
可以得出以下的结论,forceClosed 为 false 为两条线段的长度(600+800),forceClosed 为 ture 为路径闭合的总长度(600+800+1000)。简单的说,forceClosed 就是 Path 最终是否需要闭合,如果为 ture 的话,则不管关联的 Path 是否是闭合的,计算的时候都会按闭合来计算。
但是这个参数对 Path 和 PathMeasure 的影响是需要解释下的:
forceClosed 参数对绑定的 Path 不会产生任何影响,例如一个折线段的 Path,本身是没有闭合的,forceClosed 设置为 ture 的时候, PathMeasure 计算的 Path 是闭合的,但 Path 本身绘制出来是不会闭合的。
forceClosed 参数对 PathMeasure 的测量结果有影响,还是例如前面说的一个折线段的 Path,本身没有闭合,forceClosed 设置为 ture , PathMeasure 的计算就会包含最后一段闭合的路径,与原来的 Path 不同。
还有一点需要注意一下,如果你绘制的路径是直线路径,则设置 forceClosed 失效。
getLength
PathMeasure.getLength() 的使用非常广泛,其作用就是获取计算的路径长度。
getSegment
getSegment 用于获取 Path 的一个片段,方法如下:
getSegment(float startD, float stopD, Path dst, boolean startWithMoveTo)
| 参数 | 作用 | 备注 |
|---|---|---|
| 返回值(boolean) | 判断截取是否成功 | true 表示截取成功,结果存入dst中,false 截取失败,不会改变dst中内容 |
| startD | 开始截取位置距离 Path 起点的长度 | 取值范围: 0~getLength |
| stopD | 结束截取位置距离 Path 起点的长度 | 取值范围: 0~getLength |
| dst | 截取的 Path 将会添加到 dst 中 | 注意: 是添加,而不是替换 |
| startWithMoveTo | 起始点是否使用 moveTo | 用于保证截取的 Path 第一个点位置不变 |
-
4.4或者之前的版本,在默认开启硬件加速的情况下,更改 dst 的内容后可能绘制会出现问题,请关闭硬件加速或者给 dst 添加一个单个操作,例如:
dst.lineTo(0, 0)
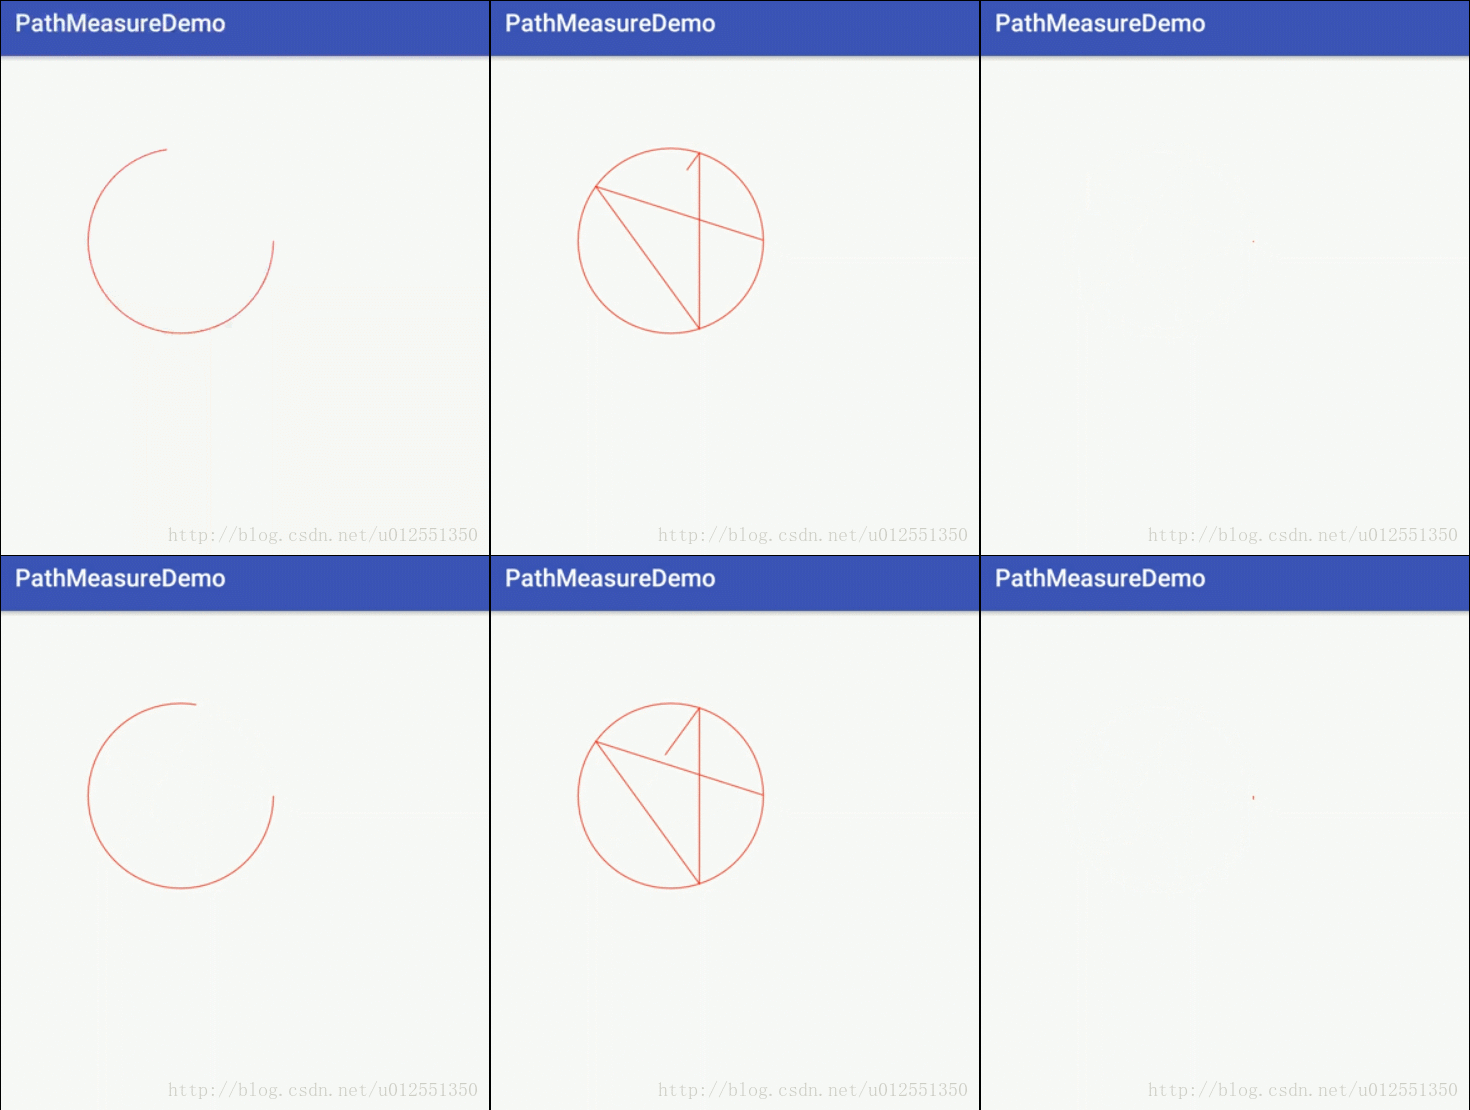
通过以下案例来加深对 getSegment 的理解,效果图如下:
其原理就是通过 getSegment 来不断截取 Path 片段,从而不断绘制完整的路径,代码如下:
public class CircleView extends View {

    Paint mPaint;

    Path mPath;

    Path mDstPath;

    PathMeasure mPathMeasure;

    float mPathLength;

    float mAnimatedValue;

    public CircleView(Context context) {
        this(context, null);
    }

    public CircleView(Context context, @Nullable AttributeSet attrs) {
        this(context, attrs, 0);
    }

    public CircleView(Context context, @Nullable AttributeSet attrs, int defStyleAttr) {
        super(context, attrs, defStyleAttr);
        init();
    }

    private void init() {
        mPaint = new Paint();
        mPaint.setAntiAlias(true);
        mPaint.setStyle(Paint.Style.STROKE);
        mPaint.setStrokeWidth(2);
        mPaint.setColor(Color.RED);

        mPathMeasure = new PathMeasure();
        mPath = new Path();
        mDstPath = new Path();

        //圆弧路径
        mPath.addArc(new RectF(200, 200, 600, 600), 0, 359.6f);

        //绘制五角星
        for (int i = 1; i < 6; i++) {
            Point p = getPoint(200, -144 * i);
            mPath.lineTo(400 + p.x, 400 + p.y);
        }

        mPath.close();

        mPathMeasure.setPath(mPath, false);

        mPathLength = mPathMeasure.getLength();

        ValueAnimator animator = ValueAnimator.ofFloat(0f, 1.0f);
        animator.setInterpolator(new AccelerateDecelerateInterpolator());
        animator.setDuration(3000);
        animator.setRepeatCount(-1);
        animator.addUpdateListener(new ValueAnimator.AnimatorUpdateListener() {
            @Override
            public void onAnimationUpdate(ValueAnimator valueAnimator) {
                mAnimatedValue = (float) valueAnimator.getAnimatedValue();
                invalidate();
            }
        });
        animator.start();
    }


    @Override
    protected void onDraw(Canvas canvas) {
        super.onDraw(canvas);
        mDstPath.reset();
        // 硬件加速的BUG
        mDstPath.lineTo(0, 0);

        //获取到路径片段
        mPathMeasure.getSegment(0, mAnimatedValue * mPathLength, mDstPath, true); //注意startWithMoveTo一般使用true,如果使用false所有的轨迹会连接上原点。
        canvas.drawPath(mDstPath, mPaint);
    }

    private Point getPoint(float radius, float angle) {
        float x = (float) ((radius) * Math.cos(angle * Math.PI / 180f));
        float y = (float) ((radius) * Math.sin(angle * Math.PI / 180f));
        Point p = new Point(x, y);
        return p;
    }

    private class Point {
        private float x;
        private float y;

        private Point(float x, float y) {
            this.x = x;
            this.y = y;
        }
    }
}
代码中有相应的注释加以说明
nextContour
nextContour() 方法用的比较少,比较大部分情况下都只会有一个 Path 而不是多个,毕竟这样会增加 Path 的复杂度,但是如果真有一个 Path,包含了多个 Path,那么通过 nextContour 这个方法,就可以进行切换,同时,默认的 API,例如 getLength,获取的也是当前的这段 Path 所对应的长度,而不是所有的 Path 的长度,同时,nextContou r获取 Path 的顺序,与 Path 的添加顺序是相同的,这里就不再举例说明了。
getPosTan
getPosTan(float distance, float[] pos, float[] tan)
这个 API 非常强大,直播爱心的实现就用到了该方法。意思就是获取路径上某点的坐标及其切线的坐标
各个参数的含义如下表:
| 参数 | 作用 | 备注 |
|---|---|---|
| 返回值(boolean) | 判断截取是否成功 | 数据会存入 pos 和 tan 中,false 表示失败,pos 和 tan 不会改变 |
| distance | 距离 Path 起点的长度 | 取值范围: 0~getLength |
| pos | 保存该点的坐标值 | 坐标值: (x, y) |
| tan | 保存该点的正切值 | 正切值: (x, y) |
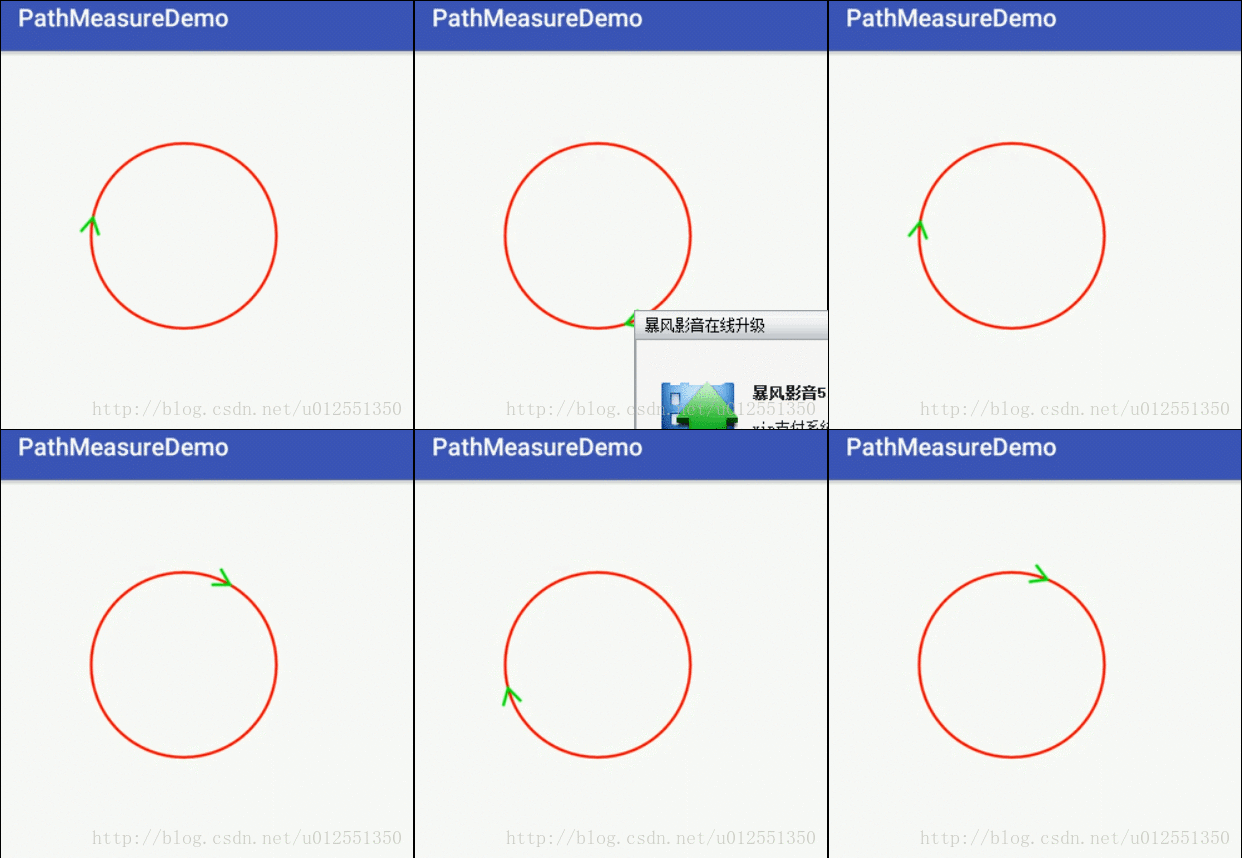
接着来看以下案例,效果图如下:
通常我们按照以下的方式来转换切线的角度:
float degrees = (float) (Math.atan2(tan[1], tan[0]) * 180.0 / Math.PI);
以下是模拟圆上箭头围绕圆的运动趋势代码:
public class ArrowView extends View {

    Paint mPaint;

    Path mPath;

    PathMeasure mPathMeasure;

    float mPathLength;

    float mAnimatedValue;

    float[] pos = new float[2];

    float[] tan = new float[2];

    public ArrowView(Context context) {
        this(context, null);
    }

    public ArrowView(Context context, @Nullable AttributeSet attrs) {
        this(context, attrs, 0);
    }

    public ArrowView(Context context, @Nullable AttributeSet attrs, int defStyleAttr) {
        super(context, attrs, defStyleAttr);
        init();
    }

    private void init() {
        mPaint = new Paint();
        mPaint.setAntiAlias(true);
        mPaint.setStyle(Paint.Style.STROKE);
        mPaint.setStrokeWidth(6);
        mPaint.setColor(Color.RED);

        mPathMeasure = new PathMeasure();
        mPath = new Path();
        mPath.addCircle(0, 0, 200, Path.Direction.CW);

        mPathMeasure.setPath(mPath, false);

        mPathLength = mPathMeasure.getLength();

        ValueAnimator animator = ValueAnimator.ofFloat(0f, 1.0f);
        animator.setInterpolator(new AccelerateDecelerateInterpolator());
        animator.setDuration(3000);
        animator.setRepeatCount(-1);
        animator.addUpdateListener(new ValueAnimator.AnimatorUpdateListener() {
            @Override
            public void onAnimationUpdate(ValueAnimator valueAnimator) {
                mAnimatedValue = (float) valueAnimator.getAnimatedValue();
                invalidate();
            }
        });
        animator.start();
    }

    @Override
    protected void onDraw(Canvas canvas) {
        super.onDraw(canvas);

        mPathMeasure.getPosTan(mAnimatedValue * mPathLength, pos, tan);
        float degrees = (float) (Math.atan2(tan[1], tan[0]) * 180.0 / Math.PI);

        canvas.save();
        canvas.translate(400, 400);
        mPaint.setColor(Color.RED);
        canvas.drawPath(mPath, mPaint);

        //绘制箭头
        Path path = new Path(); //不建议在onDraw中直接new一个对象
        path.moveTo(40 * (float) Math.cos(-30 * Math.PI / 180f), 200 + 40 * (float) Math.sin(-30 * Math.PI / 180f));
        path.lineTo(0, 200);
        path.lineTo(40 * (float) Math.cos(30 * Math.PI / 180f), 200 + 40 * (float) Math.sin(30 * Math.PI / 180f));

        canvas.rotate(degrees);
        mPaint.setColor(Color.GREEN);
        canvas.drawPath(path, mPaint);

        canvas.restore();
    }
}
接着我们来看一看后一个 API
getMatrix
getMatrix 方法用于获取路径上某一长度的位置以及位置的正切值的矩阵,方法体如下:
getMatrix(float distance, Matrix matrix, int flags)
| 参数 | 作用 | 备注 |
|---|---|---|
| 返回值(boolean) | 判断获取是否成功 true表示成功 | 数据会存入matrix中,false 失败,matrix内容不会改变 |
| distance | 距离 Path 起点的长度 | 取值范围: 0~getLength |
| matrix | 根据 falgs 标记转换成matrix | 会根据 flags 的设置而存入不同的矩阵 |
| flags | 规定哪些内容会存入到matrix中 | POSITION_MATRIX_FLAG(位置) TANGENT_MATRIX_FLAG(正切) |
参数的含义:
| 参数 | 作用 | 备注 |
|---|---|---|
| 返回值(boolean) | 判断获取是否成功 true表示成功 | 数据会存入matrix中,false 失败,matrix内容不会改变 |
| distance | 距离 Path 起点的长度 | 取值范围: 0~getLength |
| matrix | 根据 falgs 标记转换成matrix | 会根据 flags 的设置而存入不同的矩阵 |
| flags | 规定哪些内容会存入到matrix中 | POSITION_MATRIX_FLAG(位置) TANGENT_MATRIX_FLAG(正切) |
flags 选项可以选择 位置 或者 正切 ,如果我们两个选项都想选择怎么办?
可以将两个选项之间用 | 连接起来,如下:
pathMeasure.getMatrix(distance, matrix, PathMeasure.TANGENT_MATRIX_FLAG| PathMeasure.POSITION_MATRIX_FLAG);
以下是内切圆的案例,效果图如下:
代码如下:
public class MatrixView extends View {

    Paint mPaint;

    Path mPath;

    PathMeasure mPathMeasure;

    Matrix mMatrix;

    float mPathLength;

    float mAnimatedValue;

    Bitmap mBitmap;

    public MatrixView(Context context) {
        this(context, null);
    }

    public MatrixView(Context context, @Nullable AttributeSet attrs) {
        this(context, attrs, 0);
    }

    public MatrixView(Context context, @Nullable AttributeSet attrs, int defStyleAttr) {
        super(context, attrs, defStyleAttr);
        init();
    }

    private void init() {
        mPaint = new Paint();
        mPaint.setAntiAlias(true);
        mPaint.setStyle(Paint.Style.STROKE);
        mPaint.setStrokeWidth(2);
        mPaint.setColor(Color.RED);

        mPathMeasure = new PathMeasure();
        mPath = new Path();
        mMatrix = new Matrix();
        mBitmap = BitmapFactory.decodeResource(getResources(), R.mipmap.ic_matrix);

        mPath.addCircle(0, 0, 200, Path.Direction.CW);

        mPathMeasure.setPath(mPath, false);

        mPathLength = mPathMeasure.getLength();

        ValueAnimator animator = ValueAnimator.ofFloat(0f, 1.0f);
        animator.setInterpolator(new AccelerateDecelerateInterpolator());
        animator.setDuration(3000);
        animator.setRepeatCount(-1);
        animator.addUpdateListener(new ValueAnimator.AnimatorUpdateListener() {
            @Override
            public void onAnimationUpdate(ValueAnimator valueAnimator) {
                mAnimatedValue = (float) valueAnimator.getAnimatedValue();
                invalidate();
            }
        });
        animator.start();
    }

    @Override
    protected void onDraw(Canvas canvas) {
        super.onDraw(canvas);

        mMatrix.reset();
        mPathMeasure.getMatrix(mAnimatedValue * mPathLength, mMatrix,
                PathMeasure.POSITION_MATRIX_FLAG | PathMeasure.TANGENT_MATRIX_FLAG);
        canvas.translate(400, 400);
        canvas.drawBitmap(mBitmap, mMatrix, mPaint);
        canvas.drawPath(mPath, mPaint);
    }
}
相信 PathMeasure 的强大会让你爱不释手。
PathMeasure送爱心
熟悉了 PathMeasure 相关的 API ,那么理解以下的代码就非常容易了。原理非常简单绘制三阶贝塞尔曲线根据 getPosTan 获取曲线上坐标,最后根据坐标绘制爱心 Bitmap,具体代码如下:
public class HeartView extends View {

    private SparseArray mBitmapSparseArray = new SparseArray<>();

    private SparseArray mHeartSparseArray;

    private Paint mPaint;

    private int mWidth;

    private int mHeight;

    private Matrix mMatrix;

    //动画时长
    private int mDuration;

    //最大速率
    private int mMaxRate;

    //是否控制速率
    private boolean mRateEnable;

    //是否控制透明度速率
    private boolean mAlphaEnable;

    //是否控制缩放
    private boolean mScaleEnable;

    //动画时长
    private final static int DURATION_TIME = 3000;

    //最大速率
    private final static int MAX_RATE = 2000;

    public HeartView(Context context) {
        this(context, null);
    }

    public HeartView(Context context, @Nullable AttributeSet attrs) {
        this(context, attrs, 0);
    }

    public HeartView(Context context, @Nullable AttributeSet attrs, int defStyleAttr) {
        super(context, attrs, defStyleAttr);

        init(context);
    }

    private void init(Context context) {
        mPaint = new Paint();
        mPaint.setAntiAlias(true);
        mHeartSparseArray = new SparseArray<>();
        mMatrix = new Matrix();

        mDuration = DURATION_TIME;
        mMaxRate = MAX_RATE;
        mRateEnable = true;
        mAlphaEnable = true;
        mScaleEnable = true;

        initBitmap(context);
    }

    private void initBitmap(Context context) {
        Bitmap bitmap1 = BitmapFactory.decodeResource(context.getResources(), R.mipmap.live_heart1);
        Bitmap bitmap2 = BitmapFactory.decodeResource(context.getResources(), R.mipmap.live_heart2);
        Bitmap bitmap3 = BitmapFactory.decodeResource(context.getResources(), R.mipmap.live_heart3);
        Bitmap bitmap4 = BitmapFactory.decodeResource(context.getResources(), R.mipmap.live_heart4);
        Bitmap bitmap5 = BitmapFactory.decodeResource(context.getResources(), R.mipmap.live_heart5);
        Bitmap bitmap6 = BitmapFactory.decodeResource(context.getResources(), R.mipmap.live_heart6);
        Bitmap bitmap7 = BitmapFactory.decodeResource(context.getResources(), R.mipmap.live_heart7);
        mBitmapSparseArray.put(HeartType.BLUE, bitmap1);
        mBitmapSparseArray.put(HeartType.GREEN, bitmap2);
        mBitmapSparseArray.put(HeartType.YELLOW, bitmap3);
        mBitmapSparseArray.put(HeartType.PINK, bitmap4);
        mBitmapSparseArray.put(HeartType.BROWN, bitmap5);
        mBitmapSparseArray.put(HeartType.PURPLE, bitmap6);
        mBitmapSparseArray.put(HeartType.RED, bitmap7);
    }

    @Override
    protected void onMeasure(int widthMeasureSpec, int heightMeasureSpec) {
        super.onMeasure(widthMeasureSpec, heightMeasureSpec);

        int widthSpecMode = MeasureSpec.getMode(widthMeasureSpec);
        int heightSpecMode = MeasureSpec.getMode(heightMeasureSpec);

        int widthSpecSize = MeasureSpec.getSize(widthMeasureSpec);
        int heightSpecSize = MeasureSpec.getSize(heightMeasureSpec);

        //wrap_content情况-默认高度为200宽度100
        int defaultWidth = (int) dp2px(100);

        if (widthSpecMode == MeasureSpec.AT_MOST && heightSpecMode == MeasureSpec.AT_MOST) {
            setMeasuredDimension(defaultWidth, defaultWidth * 3);
        } else if (widthSpecMode == MeasureSpec.AT_MOST) {
            setMeasuredDimension(defaultWidth, heightSpecSize);
        } else if (heightSpecMode == MeasureSpec.AT_MOST) {
            setMeasuredDimension(widthSpecSize, defaultWidth * 3);
        } else {
            setMeasuredDimension(widthSpecSize, heightSpecSize);
        }
    }

    public void addHeart(int arrayIndex) {
        if (arrayIndex < 0 || arrayIndex > (mBitmapSparseArray.size() - 1)) return;
        Path path = new Path();
        final PathMeasure pathMeasure = new PathMeasure();
        final float pathLength;
        final Heart heart = new Heart();
        final int bitmapIndex = arrayIndex;

        //绘制三阶贝塞尔曲线
        PointF start = new PointF();//起点位置
        PointF control1 = new PointF(); //贝塞尔控制点
        PointF control2 = new PointF(); //贝塞尔控制点
        PointF end = new PointF(); //贝塞尔结束点

        initStartAndEnd(start, end);
        initControl(control1, control2);

        path.moveTo(start.x, start.y);
        path.cubicTo(control1.x, control1.y, control2.x, control2.y, end.x, end.y);

        pathMeasure.setPath(path, false);

        pathLength = pathMeasure.getLength();

        ValueAnimator animator = ValueAnimator.ofFloat(0f, 1.0f);
        //先加速后减速
        animator.setInterpolator(new AccelerateDecelerateInterpolator());
        //动画的长短来控制速率
        animator.setDuration(mDuration + (mRateEnable ? (int) (Math.random() * mMaxRate) : 0));
        animator.addUpdateListener(new ValueAnimator.AnimatorUpdateListener() {
            @Override
            public void onAnimationUpdate(ValueAnimator valueAnimator) {
                float fraction = valueAnimator.getAnimatedFraction();

                float[] pos = new float[2];
                pathMeasure.getPosTan(fraction * pathLength, pos, new float[2]);
                heart.setX(pos[0]);
                heart.setY(pos[1]);
                heart.setProgress(fraction);

                invalidate();
            }
        });
        animator.addListener(new AnimatorListenerAdapter() {
            @Override
            public void onAnimationEnd(Animator animation) {
                super.onAnimationEnd(animation);
                mHeartSparseArray.remove(heart.hashCode());
            }

            @Override
            public void onAnimationStart(Animator animation) {
                super.onAnimationStart(animation);
                mHeartSparseArray.put(heart.hashCode(), heart);
                heart.setIndex(bitmapIndex);
            }
        });
        animator.start();
    }

    public void addHeart() {
        addHeart(new Random().nextInt(mBitmapSparseArray.size() - 1));
    }

    @Override
    protected void onDraw(Canvas canvas) {
        super.onDraw(canvas);
        if (mHeartSparseArray == null || mHeartSparseArray.size() == 0) return;

        canvasHeart(canvas);
    }

    private void canvasHeart(Canvas canvas) {
        for (int i = 0; i < mHeartSparseArray.size(); i++) {

            Heart heart = mHeartSparseArray.valueAt(i);

            //设置画笔透明度
            mPaint.setAlpha(mAlphaEnable ? (int) (255 * (1.0f - heart.getProgress())) : 255);

            //会覆盖掉之前的x,y数值
            mMatrix.setTranslate(0, 0);
            //位移到x,y
            mMatrix.postTranslate(heart.getX(), heart.getY());

            mMatrix.postScale(dealToScale(heart.getProgress()), dealToScale(heart.getProgress()),
                    mWidth / 2, mHeight);

            if (heart != null) {
                canvas.drawBitmap(mBitmapSparseArray.get(heart.getIndex()), mMatrix, mPaint);
            }

        }
    }

    private float dealToScale(float fraction) {
        if (fraction < 0.1f && mScaleEnable) {
            return 0.5f + fraction / 0.1f * 0.5f;
        }
        return 1.0f;
    }

    public void initControl(PointF control1, PointF control2) {
        control1.x = (float) (Math.random() * mWidth);
        control1.y = (float) (Math.random() * mHeight);

        control2.x = (float) (Math.random() * mWidth);
        control2.y = (float) (Math.random() * mHeight);

        if (control1.x == control2.x && control1.y == control2.y) {
            initControl(control1, control2);
        }
    }

    public void initStartAndEnd(PointF start, PointF end) {
        start.x = mWidth / 2;
        start.y = mHeight;

        end.x = mWidth / 2;
        end.y = 0;
    }

    @Override
    protected void onSizeChanged(int w, int h, int oldw, int oldh) {
        super.onSizeChanged(w, h, oldw, oldh);
        mWidth = w;
        mHeight = h;
    }

    @Override
    protected void onDetachedFromWindow() {
        cancel();
        super.onDetachedFromWindow();
    }


    /**
     * 取消已有动画,释放资源
     */
    public void cancel() {
        //回收bitmap
        for (int i = 0; i < mBitmapSparseArray.size(); i++) {
            if (mBitmapSparseArray.valueAt(i) != null) {
                mBitmapSparseArray.valueAt(i).recycle();
            }
        }
    }

    public int getDuration() {
        return mDuration;
    }

    public void setDuration(int duration) {
        mDuration = duration;
    }

    public int getMaxRate() {
        return mMaxRate;
    }

    public void setMaxRate(int maxRate) {
        mMaxRate = maxRate;
    }

    public boolean getRateEnable() {
        return mRateEnable;
    }

    public void setRateEnable(boolean rateEnable) {
        mRateEnable = rateEnable;
    }

    public boolean getAlphaEnable() {
        return mAlphaEnable;
    }

    public void setAlphaEnable(boolean alphaEnable) {
        mAlphaEnable = alphaEnable;
    }

    public boolean getScaleEnable() {
        return mScaleEnable;
    }

    public void setScaleEnable(boolean scaleEnable) {
        mScaleEnable = scaleEnable;
    }

    private float dp2px(float dp) {
        return TypedValue.applyDimension(TypedValue.COMPLEX_UNIT_DIP, dp, getResources().getDisplayMetrics());
    }

}
源代码
源码已上传到Github
https://github.com/HpWens/HeartViewDemo


