一、前言
Core Animation 主要依赖于CALayer的对象layer来进行一切与动画有关的操作。在view中,layer包含了view的页面信息,几何信息(宽高,圆角等)还有一些视觉属性。layer无法单独显示内容,一个layer仅仅只是管理了一个bitmap的状态信息,而bitmap可以作为用户定义的一个view或者多个view混合形成的image的返回结果。layer主要是管理数据,因此在app中使用layer,可以将它当中和model一样的对象使用。
通过CALayer可以实现以下功能:
移动、缩放、旋转、变形、圆角、透明度、阴影,带颜色的边框、不规则图形实现、透明遮罩、多级非线性动画。
二、CALayer
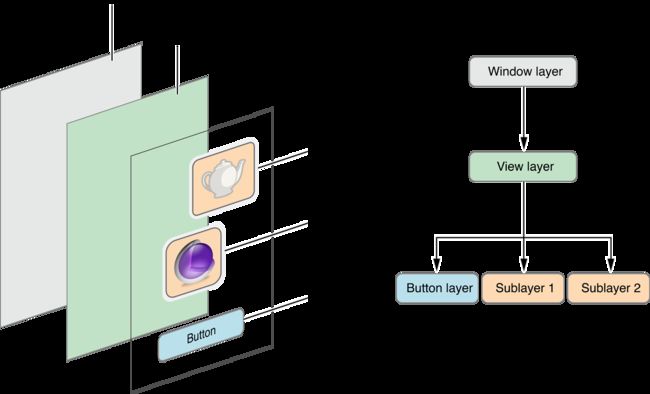
CALayer和UIView有些相似,是一些被层级关系树管理着的矩形块,同时也可以添加subLayer,唯一的区别是CALayer不处理交互事件。
2.1CALayer tree
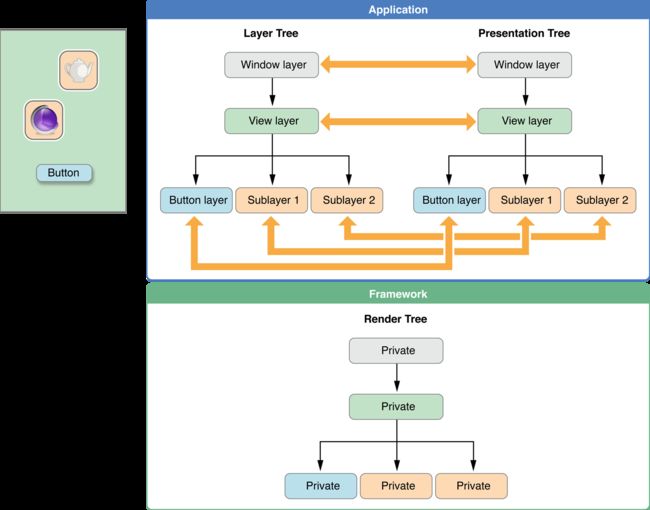
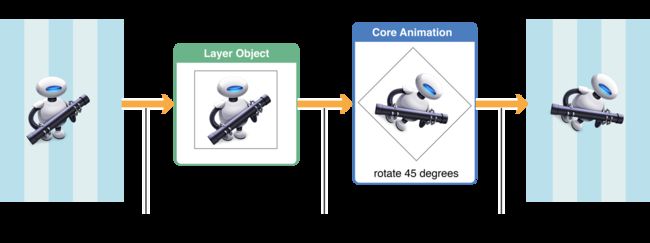
Core Animation 使用三种类型的layer tree对象来实现动画:
- model layer tree(模型层树)
Objects in the model layer tree (or simply “layer tree”) are the ones your app interacts with the most. The objects in this tree are the model objects that store the target values for any animations. Whenever you change the property of a layer, you use one of these objects.
模型层树是于app管理最密切的,这个层树里面的model对象存储了所有与动画有关所有值信息,改变layer的值的时候就是改变这些对象的值。
- presentation tree(表示层树)
Objects in the presentation tree contain the in-flight values for any running animations. Whereas the layer tree objects contain the target values for an animation, the objects in the presentation tree reflect the current values as they appear onscreen. You should never modify the objects in this tree. Instead, you use these objects to read current animation values, perhaps to create a new animation starting at those values.
表示层树的对象包含了任何正在进行的动画的值,是当前值在屏幕上的映射。在使用动画时,最好不要更改这些对象,而是使用这些对象读取当前动画相关值,在这些值的基础上创建一个新的动画。
- refer tree(渲染层树)
Objects in the render tree perform the actual animations and are private to Core Animation.
渲染树是动画的真实执行者,但是它是私有的,开发者不能调用。
执行动画时,app主要与layer tree对象通信,偶尔会获取通过presentationLayer属性获取presentation tree中与之响应的对象。通过presentationLayer,开发者可以在动画过程中读取到presentation layer的属性值。
当改变layer的值的时候,layer-tree的值会马上改变,通过render-tree渲染,presentation-tree以动画的形式展现layer的某个属性值的渐变过程。
Important: You should access objects in the presentation tree only while an animation is in flight. While an animation is in progress, the presentation tree contains the layer values as they appear onscreen at that instant. This behavior differs from the layer tree, which always reflects the last value set by your code and is equivalent to the final state of the animation.
如果在动画中的任意时刻,查看 layer 的 opacity值,你是得不到与屏幕内容对应的透明度的。取而代之,你需要查看 presentationLayer的opacity 以获得正确的结果。
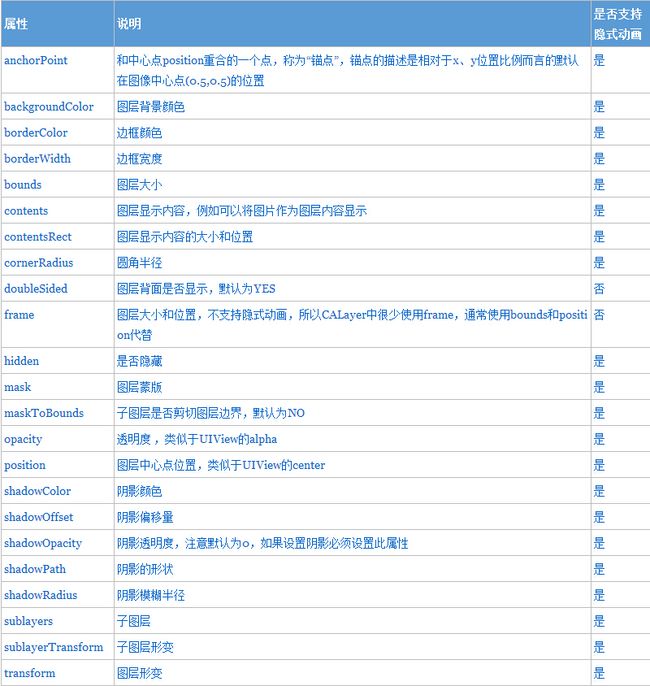
2.2CALayer的属性
- layer中动画很少使用frame,用的是bounds和position
- 设置透明度不是alpha,而是opacity
anchorPoint:
Geometry related manipulations of a layer occur relative to that layer’s anchor point,The impact of the anchor point is most noticeable when manipulating the position or transform properties of the layer.
layer的几何操作都与锚点有关,当操作position和transform属性的时候最为明显。
表示的是该点相对于x,y的比例,默认值为(0.5,0.5)。
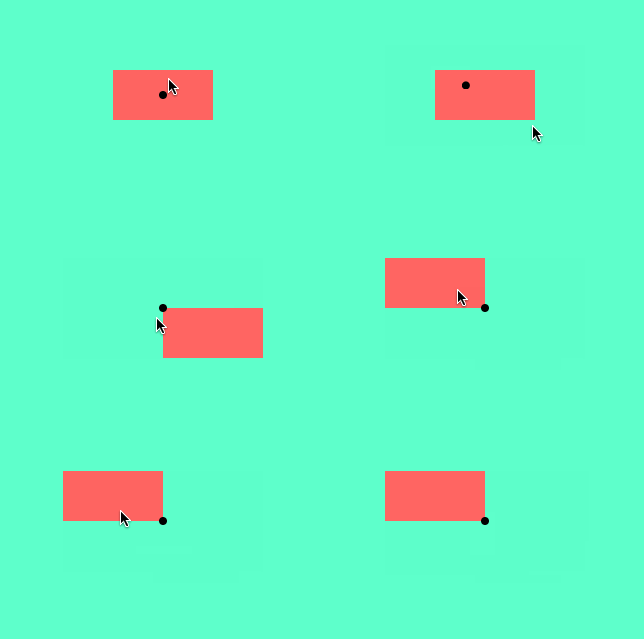
改变锚点相当于改变了参照点,图形沿着锚点改变的反方向移动。
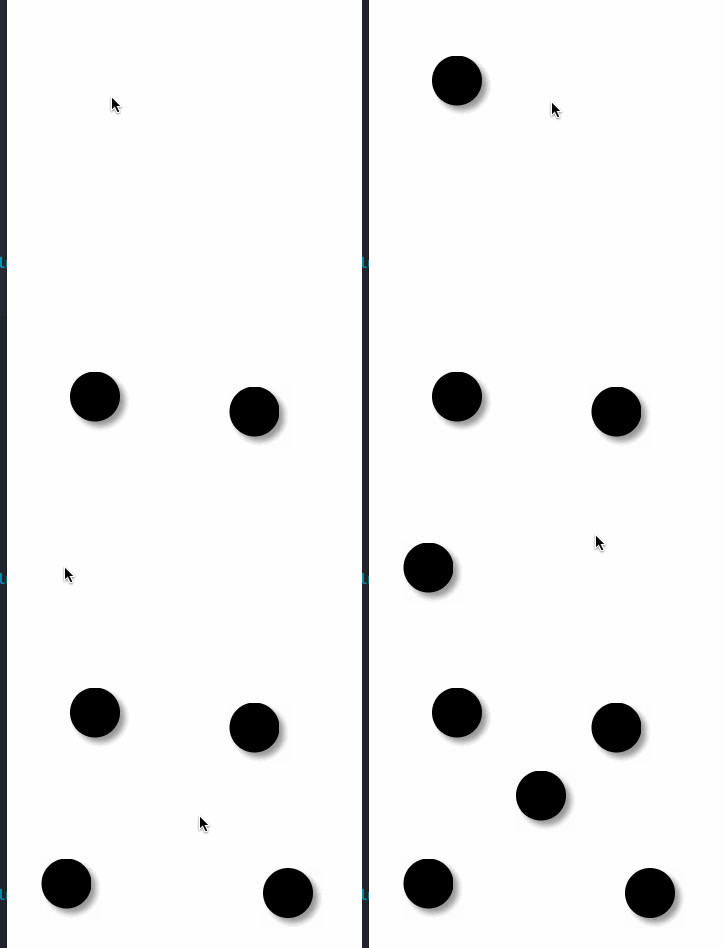
尝试用一个黑点表示锚点,改变锚点的位置,看看图形的移动情况:
int i = 1;
-(void)touchesBegan:(NSSet *)touches withEvent:(UIEvent *)event{
    NSLog(@"bbb");

    UIView *v = self.subviews[0];
    v.layer.cornerRadius = 4;
    v.layer.masksToBounds = YES;

    CGPoint p;
    switch (i) {
        case 1:
            p = CGPointMake(0,0);
            break;
        case 2:
            p = CGPointMake(0.5,0.5);
            break;
        case 3:
            p = CGPointMake(1,1);
            break;
        default:
            break;
    }

    i++;
    if (i > 3) {
        i = 1;
    }

    self.layer.anchorPoint = p;
    [UIView animateWithDuration:0.3 animations:^{
        //红色view的宽高分别为100,50
        v.center = CGPointMake(p.x * 100, p.x * 50);
    }];
    NSLog(@"%@",NSStringFromCGPoint(p));
    NSLog(@"%@",NSStringFromCGPoint(self.layer.position));
}
其他几个属性的改变演示:
-(void)touchesBegan:(NSSet *)touches withEvent:(UIEvent *)event{
    UITouch *touch = [touches anyObject];
    CGPoint p = [touch locationInView:self];

    CGFloat raidus = 25;
    CGSize size = CGSizeMake(2*raidus, 2*raidus);

    CALayer *layer = [[CALayer alloc] init];
    //中心点位置
    layer.position = p;
    //layer大小
    layer.bounds = CGRectMake(0, 0, size.width,size.height);
    //圆角
    layer.cornerRadius = raidus;
    //背景颜色,
    layer.backgroundColor = [UIColor colorWithRed:50/255 green:200/255 blue:120/255 alpha:1].CGColor;
    //阴影颜色
    layer.shadowColor = [UIColor grayColor].CGColor;
    //阴影偏移量
    layer.shadowOffset = CGSizeMake(5, 5);
    //阴影透明度
    layer.shadowOpacity = 0.8;

    [self.layer addSublayer:layer];
}
2.3 layer与view的关系
虽然可以在layer上不断添加子layer,但是layer不能取代view,layer只是让动画和绘制view的内容更高效。
Layers do not handle events, draw content, participate in the responder chain, or do many other things.
layer不会响应事件,也不会参与事件的传递,因此view是必不可少的,否则就不能响应各类的事件了()。
NOTE:可以通过hitTest:方法判断是否点击了layer
下面代码利用presentedLayer和hitTest:实现点击屏幕任意位置,layer会移动到该处,点击layer随机改变layer背景:
@interface ViewController ()
@property (strong, nonatomic) CALayer *layer;
@end

@implementation ViewController
- (void)viewDidLoad {
    [super viewDidLoad];
    UIImage *image = [UIImage imageNamed:@"icon1"];
    CALayer *layer = [CALayer layer];
    layer.position = CGPointMake(50, 50);
    layer.bounds   = CGRectMake(0, 0, 50, 50);
    layer.contents = (__bridge id)(image.CGImage);
    layer.contentsGravity = kCAGravityResizeAspect;
    layer.contentsScale = [UIScreen mainScreen].scale;
    [self.view.layer addSublayer:layer];
    self.point = self.leftBottomView.layer.position;
    self.layer = layer;
}

-(void)touchesBegan:(NSSet *)touches withEvent:(UIEvent *)event{
    CGPoint p = [[touches anyObject] locationInView:self.view];
    if ([self.layer.presentationLayer hitTest:p]) {
        self.layer.backgroundColor = [UIColor colorWithRed:arc4random()/INT_MAX green:arc4random()/INT_MAX blue:arc4random()/INT_MAX alpha:1].CGColor;
    }else{
        [CATransaction begin];
        [CATransaction setAnimationDuration:4];
        self.layer.position = p;
        [CATransaction commit];
    }
}
@end
三、基于CALayer的绘图模型
layer在app中不具有实际的绘图能力,它只是获取了app的页面并将它缓存到一个被称作 后备缓存器 的bitmap中。用户改变了layer的属性时只是改变了layer的状态信息,当与动画结合时,Core Animation将layer的bitmap传递给graphics hardware,graphics hardware会将新的变化以动画的形式表现出来,
在view层会调用drawRect:方法从新绘制新的视图,但是这个方法是用CPU在主线程重新绘制了视图,会导致内存消耗过大。Core Animation通过在任何可以的情况下调度bitmap的缓存来达到同样或者相似的效果。
3.1 CALayer conent属性
CALayer有一个与你所要展现的效果的bitmap相结合的contents属性,
@property(nullable, strong) id contents;
有三种方式创建content:
1.当layer的content基本不变时可以直接把image对象直接赋值给content
2.当layer的content可能周期改变或者通过外部提供时,可以把layer的delegate赋值给外部对象,让delegate来绘制content
3.当你想创建一个sublayer或者改变layer的绘制行为的时候,通过重写sublayer的绘制方法来给layer的content赋值。
-
直接赋值image给content
layer只是管理bitmap图片的一个容器,所有可以直接把image(必须是CGImageRef)直接赋值给content。layer不会将你的image复制,而是直接使用你提供的image。在多处使用同一张图片的时候可以节省内存。
The image you assign to a layer must be a CGImageRef type.
这里要注意的是,contents虽然是id类型,但是如果你赋值的不是CGImageRef类型的值,会得到空白的图层。更头疼的是UIImage有一个CGImage属性,它返回的是一个CGImageRef类型值,但是你
aLayer.contents = [UIImage imageWithName(@"pic")].CGImage
的时候发现,编译器报错了,因为CGImageRef并不是一个真正的Cocoa对象,而是一个Core Foundation类型,要通过bridged关键之转换(编译器会提示你这样做):
aLayer.contents = (__bride id)[UIImage imageWithName(@"pic")].CGImage
示例代码如下:
-(void)viewDidLoad {
    [super viewDidLoad];
    UIImage *img = [UIImage imageNamed:@"icon1"];
    self.view.layer.contents = (__bridge id)(img.CGImage);
}
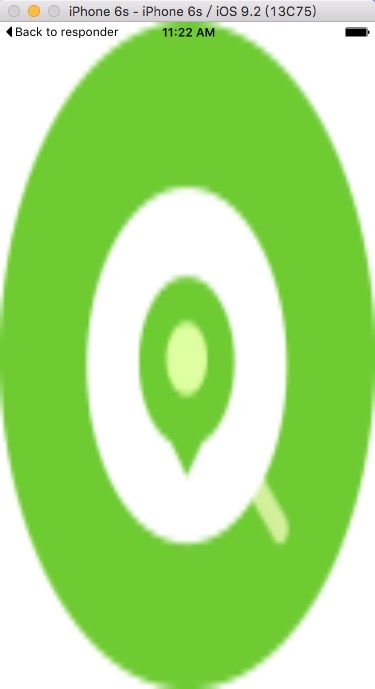
得到的效果
contentGravity
可以看出本来圆形的icon被拉长了,UIImageView显示图片的时候也遇到过这种情况,解决方法是设置合适的contentMode值。layer中控制这中属性的叫contentsGravity,它是一个NSString类型:
kCAGravityCenter
kCAGravityTop
kCAGravityBottom
kCAGravityLeft
kCAGravityRight
kCAGravityTopLeft
kCAGravityTopRight
kCAGravityBottomLeft
kCAGravityBottomRight
kCAGravityResize
kCAGravityResizeAspect
kCAGravityResizeAspectFill
contentsScale
contentsScale定义了图片的像素尺寸和试图大小的比例,默认值是1.0(相当于自定义@2x、@3x图片,例如,如果要以每个点一个像素绘制图片,就,设置值为1.0,如果要以每个点2个像素绘制图片,设置值为2.0)。
NOTE:记得手动设置contentsScale属性的值,否则图片在retina屏幕上显示就不正确了。
layer.contentsScale = [UIScreen mainScreen].bounds;
** contentRect**
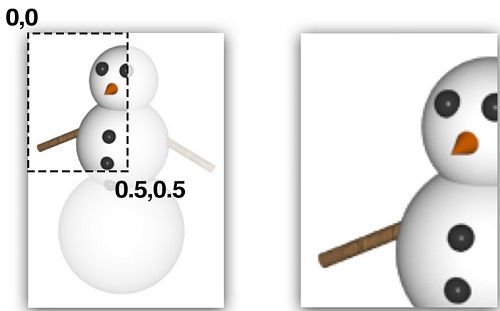
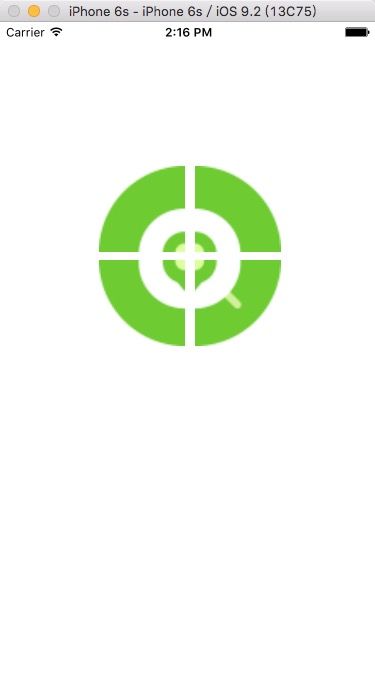
contentRect允许开发者在图层的边框里显示图片的一个子区域,它使用了单位坐标来计算,默认的值为(0,0,1,1),如果知道一个小一点的矩形,图片就会被裁剪。
利用这一点可以用来做图片拼合。先将需要拼合的图片打包整合到一张大图上一次性载入,相比多次载入不同的图片,可以优化内存使用,缩短载入时间等。
@interface ViewController ()
@property (weak, nonatomic) IBOutlet UIView *leftTopView;
@property (weak, nonatomic) IBOutlet UIView *rightTop;
@property (weak, nonatomic) IBOutlet UIView *leftBottomView;
@property (weak, nonatomic) IBOutlet UIView *rightBottomView;

@end

@implementation ViewController

- (void)viewDidLoad {
    [super viewDidLoad];
    UIImage *image = [UIImage imageNamed:@"icon1"];
    [self addSpriteImage:image withContentRect:CGRectMake(0, 0, 0.5, 0.5) toLayer:self.leftTopView.layer];

    [self addSpriteImage:image withContentRect:CGRectMake(0.5, 0, 0.5, 0.5) toLayer:self.rightTop.layer];

    [self addSpriteImage:image withContentRect:CGRectMake(0, 0.5, 0.5, 0.5) toLayer:self.leftBottomView.layer];

    [self addSpriteImage:image withContentRect:CGRectMake(0.5, 0.5, 0.5, 0.5) toLayer:self.rightBottomView.layer];
}

- (void)addSpriteImage:(UIImage *)image withContentRect:(CGRect)rect toLayer:(CALayer *)layer //set image
{
    layer.contents = (__bridge id)image.CGImage;
    //scale contents to fit
    layer.contentsGravity = kCAGravityResizeAspect;
    //set contentsRect
    layer.contentsRect = rect;
}
contentsCenter
contentsCenter是CGRect类型的值,它与contentGravity配合使用,表示的是可被拉伸的区域,也就是说,在这个区域内的才会被contentGravity(kCAGravityResize
、kCAGravityResizeAspect、
kCAGravityResizeAspectFill才有效)影响到。
    UIImage *image = [UIImage imageNamed:@"icon1"];
    CALayer *layer = self.view.layer;
    layer.contents = (__bridge id)(image.CGImage);
    layer.contentsGravity = kCAGravityResizeAspect;
    layer.contentsScale = [UIScreen mainScreen].scale;
    layer.contentsCenter = CGRectMake(0.45, 0.45, 0.1, 0.1);
-
通过layer的代理赋值image
如果layer的content属性会动态改变时,需要用到CALayerDelegate的代理方法在需要的时候给content赋值。layer有一个可选的代理属性,实现了CALayerDelegate协议,它是一个非正式协议,你只需要调用想调用的方法,剩下的CALayer会帮你实现,代理方法:
//当已经有image对象时可以直接调用这个代理方法给content赋值
-(void)displayLayer:(CALayer *)layer;
//如果想通过自定义显示内容的话用这个方法
-(void)drawLayer:(CALayer *)layer inContext:(CGContextRef)cox;
NOTE:两个代理方法调用一个即可,如果两个方法都实现了,系统只会调用displayLayer:方法。
apple官方文档给的实例代码如下:
- (void)displayLayer:(CALayer *)theLayer {
  // Check the value of some state property
  if (self.displayYesImage) {
      // Display the Yes image
      theLayer.contents = [someHelperObject loadStateYesImage];
  }else {
      // Display the No image
      theLayer.contents = [someHelperObject loadStateNoImage];
  }
}
必须是新建的layer的delegate方法,而且必须调用layer(注意是layer不是view)的setNeedsDisplay方法,否则两个代理方法都不会实现。
-(void)viewDidLoad {
  [super viewDidLoad];
  CALayer *layer = [[CALayer alloc] init];
  layer.position = CGPointMake(100, 200);
  layer.bounds = CGRectMake(0, 0, 100, 100);
  layer.delegate = self;
  [self.view.layer addSublayer:layer];
  //必须手动调用setNeedsDisplay方法,否则代理方法无法实现
  [layer setNeedsDisplay];
}
-(void)drawLayer:(CALayer *)theLayer inContext:(CGContextRef)theContext {
  CGMutablePathRef thePath = CGPathCreateMutable();

  CGPathMoveToPoint(thePath,NULL,15.0f,15.f);
  CGPathAddCurveToPoint(thePath,
                        NULL,
                        15.f,250.0f,
                        295.0f,250.0f,
                        295.0f,15.0f);

  CGContextBeginPath(theContext);
  CGContextAddPath(theContext, thePath);

  CGContextSetLineWidth(theContext, 5);
  CGContextStrokePath(theContext);

  // Release the path
  CFRelease(thePath);
}
阅读原文
