一、前言
不得不说,Glide真的是十分难啃,来来回回看了很多的文章,并对照着源码分析了一遍,才理清了大概的思路,希望这篇文章能对大家有一定的帮助。
为什么要阅读 Glide 的源码
在进入正题之前让我们先谈一些题外话,就是 为什么我们要去看 Glide 的源码。
如果大家有阅读过之前的五篇关于Glide使用的教程:
Glide 知识梳理(1) - 基本用法
Glide 知识梳理(2) - 自定义 Target
Glide 知识梳理(3) - 自定义 transform
Glide 知识梳理(4) - 自定义 animate
Glide 知识梳理(5) - 自定义 GlideModule
可以发现其实Glide的功能已经很完备了,无论是占位符、错误图片还是请求完后对于返回图片的变换,都提供了解决的方案,完全可以满足日常的需求。
那么,我们为什么要花费大量的时间去看Glide的源码呢,我自己的观点是以下几点:
- 理解
API的原理。在之前介绍使用的几篇文章中,我们谈到了许多的方法,例如placeholder/error/...,还讲到了自定义transform/target/animate。但是由于Glide将其封装的很好,仅仅通过简单使用你根本无法了解这些用法最后是如何生效的,只有通过阅读源码才能明白。 - 学习图片加载框架的核心思想。无论是古老的
ImageLoader,还是后来的Picasso、fresco,对于一个图片加载框架来说,都离不开三点:请求管理、工作线程管理和图片缓存管理。阅读源码将有助于我们学习到图片请求框架对于这三个核心问题的解决方案,这也是我认为 最关键的一点。 - 学习
Glide的架构设计,对于Glide来说,这一点可能适合于高水平的程序员,因为实在是太复杂了。
怎么阅读 Glide 的源码
在阅读源码之前,还是要做一些准备性的工作的,不然你会发现没过多久你就想放弃了,我的准备工作分为以下几步:
- 掌握
Glide的高级用法。千万不要满足于调用load方法加载出图片就满足了,要学会去了解它的一些高级用法,例如在 Glide 知识梳理(5) - 自定义GlideModule 一文中介绍如何自定义ModelLoader,你就会对ModelLoader有个大概的印象,知道它是用来做什么的,不然在源码中看到这个类的时候肯定会一脸懵逼,没多久就放弃了。 - 看几篇网上写的不错的文章,例如郭神的 Android图片加载框架最全解析(二),从源码的角度理解Glide的执行流程 ,不必过于关注实现的细节,而是注意看他们对每段代码的描述,先有个大概的印象。
- 从一个最简单的
Demo入手,通过 断点的方式,一步步地走,观察每个变量的类型和值。 - 最后,无论现在记得如何清楚,一定自己亲自写文档,最重要的是 画图,把整个调用的流程通过图片的形式整理出来,不然真的是会忘的。
源码分析流程
我们从最简单的例子入手,加载一个网络的图片地址,并在ImageView上展示。
Glide.with(this).load("http://i.imgur.com/DvpvklR.png").into(mImageView);
这上面的链式调用分为三步,其中前两步是进行一些准备工作,真正进行处理的逻辑是在第三步当中:
二、with(Activity activity)
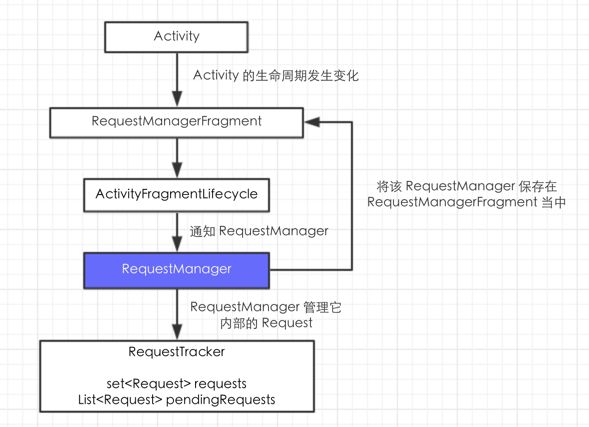
with(Activity activity)是Glide的一个静态方法,当调用该方法之后会在Activity中添加一个Glide内部自定义的RequestManagerFragment,当Activity的状态发生变化时,该Fragment的状态也会发生相应的变化。经过一系列的调用,这些变化将会通知到RequestManager。RequestManager则通过RequestTracker来管理所有的Request,这样RequestManager在处理请求的时候,就可以根据Activity当前的状态进行处理。
三、load(String string)
with方法会返回一个RequestManager对象,接下来第二步。
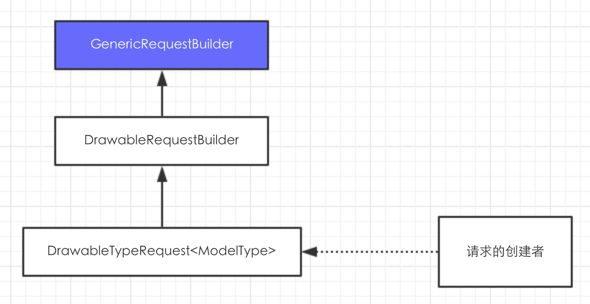
在 Glide 知识梳理(1) - 基本用法 中,我们学习了许多load的重载方法,可以从url、SDCard和byte[]数组中来加载。这一步的目的是根据load传入的类型,创建对应的DrawableTypeRequest对象,DrawableTypeRequest的继承关系如下所示,它是Request请求的创建者,真正创建的逻辑是在第三步中创建的。
所有的
load方法最终都会通过
loadGeneric(Class class) 方法来创建一个
DrawableTypeRequest对象,在
DrawableTypeRequest创建时需要传入两个关键的变量:
streamModelLoaderfileDescriptorModelLoader
这两个变量的类型均为ModelLoader,看到这个是不是有似曾相识的感觉,没错,在 Glide 知识梳理(5) - 自定义GlideModule 中我们介绍了如果通过OkHttpClient来替换HttpURLConnection时就已经介绍了它,这 两个变量决定了获取图片资源的方式。
现在,只要明白上面这点就可以了,后面在用到它其中的成员变量时,我们再进行详细的分析。
四、into(ImageView imageView)
下面,我们来看真正的重头戏,即into方法执行过程,该方法中包含了加载资源,设置资源到对应目标的一整套逻辑。
4.1 GenericRequestBuilder
public class GenericRequestBuilder implements Cloneable {

    public Target into(ImageView view) {
        Util.assertMainThread();
        if (view == null) {
            throw new IllegalArgumentException("You must pass in a non null View");
        }
        if (!isTransformationSet && view.getScaleType() != null) {
            switch (view.getScaleType()) {
                case CENTER_CROP:
                    applyCenterCrop();
                    break;
                case FIT_CENTER:
                case FIT_START:
                case FIT_END:
                    applyFitCenter();
                    break;
                //$CASES-OMITTED$
                default:
                    // Do nothing.
            }
        }
        //如果是 ImageView,那么返回的是 GlideDrawableImageViewTarget。
        return into(glide.buildImageViewTarget(view, transcodeClass));
    }

}
由于DrawableTypeRequest并没有重写into方法,因此会调用到它的父类DrawableRequestBuilder的into(ImageView)方法中,DrawableRequestBuilder又会调用它的父类GenericRequestBuilder的into(ImageView)方法。
这里首先会根据view的scaleType进行变换,然后再通过Glide.buildImageViewTarget方法创建Target,Target的含义是 资源加载完毕后所要传递的对象,也就是整个加载过程的终点,对于ImageView来说,该方法创建的是GlideDrawableImageViewTarget。
public class GenericRequestBuilder implements Cloneable {

    public > Y into(Y target) {
        Util.assertMainThread();
        if (target == null) {
            throw new IllegalArgumentException("You must pass in a non null Target");
        }
        if (!isModelSet) {
            throw new IllegalArgumentException("You must first set a model (try #load())");
        }

        //如果该 Target 之前已经有关联的请求,那么要先将之前的请求取消。
        Request previous = target.getRequest();
        if (previous != null) {
            previous.clear();
            requestTracker.removeRequest(previous);
            previous.recycle();
        }

        //创建 Request,并将 Request 和 Target 关联起来。
        Request request = buildRequest(target);
        target.setRequest(request);
        lifecycle.addListener(target);

        //这一步会触发任务的执行。
        requestTracker.runRequest(request);
        return target;
    }

}
接下来,看GenericRequestBuilder中的into(Target)方法,在into方法中会通过buildRequest方法创建Request,并将它和Target进行 双向关联,Request的实现类为GenericRequest。
在创建完Request之后,通过RequestTracker的runRequest尝试去执行任务。
4.2 RequestTracker
public class RequestTracker {

    public void runRequest(Request request) {
        requests.add(request);
        if (!isPaused) {
            request.begin();
        } else {
            pendingRequests.add(request);
        }
    }

}
RequestTracker会判断当前界面是否处于可见状态,如果是可见的,那么就调用Request的begin方法发起请求,否则就先将请求放入到等待队列当中,Request的实现类为GenericRequest。
4.3 GenericRequest
public final class GenericRequest implements Request, SizeReadyCallback,
        ResourceCallback {

    @Override
    public void begin() {
        startTime = LogTime.getLogTime();
        if (model == null) {
            onException(null);
            return;
        }

        status = Status.WAITING_FOR_SIZE;
        //首先判断宽高是否有效,如果有效那么就调用 onSizeReady。
        if (Util.isValidDimensions(overrideWidth, overrideHeight)) {
            onSizeReady(overrideWidth, overrideHeight);
        } else {
            //先获取宽高,最终也会调用到 onSizeReady 方法。
            target.getSize(this);
        }

        if (!isComplete() && !isFailed() && canNotifyStatusChanged()) {
            //通知目标回调。
            target.onLoadStarted(getPlaceholderDrawable());
        }
        if (Log.isLoggable(TAG, Log.VERBOSE)) {
            logV("finished run method in " + LogTime.getElapsedMillis(startTime));
        }
    }

    @Override
    public void onSizeReady(int width, int height) {
        if (Log.isLoggable(TAG, Log.VERBOSE)) {
            logV("Got onSizeReady in " + LogTime.getElapsedMillis(startTime));
        }
        if (status != Status.WAITING_FOR_SIZE) {
            return;
        }
        status = Status.RUNNING;

        width = Math.round(sizeMultiplier * width);
        height = Math.round(sizeMultiplier * height);

        ModelLoader modelLoader = loadProvider.getModelLoader();
        final DataFetcher dataFetcher = modelLoader.getResourceFetcher(model, width, height);

        if (dataFetcher == null) {
            onException(new Exception("Failed to load model: \'" + model + "\'"));
            return;
        }
        ResourceTranscoder transcoder = loadProvider.getTranscoder();
        if (Log.isLoggable(TAG, Log.VERBOSE)) {
            logV("finished setup for calling load in " + LogTime.getElapsedMillis(startTime));
        }
        loadedFromMemoryCache = true;
        //调用 Engine 的 load 方法进行加载。
        loadStatus = engine.load(signature, width, height, dataFetcher, loadProvider, transformation, transcoder,
                priority, isMemoryCacheable, diskCacheStrategy, this);
        loadedFromMemoryCache = resource != null;
        if (Log.isLoggable(TAG, Log.VERBOSE)) {
            logV("finished onSizeReady in " + LogTime.getElapsedMillis(startTime));
        }
    }

}
在GenericRequest的begin()方法中,首先判断宽高是否有效,如果有效那么就调用onSizeReady方法,假如宽高无效,那么会先计算宽高,计算完之后也会调用onSizeReady,这里面会调用Engine的load方法去加载。
4.4 Engine
public class Engine implements EngineJobListener,
        MemoryCache.ResourceRemovedListener,
        EngineResource.ResourceListener {

    public  LoadStatus load(Key signature, int width, int height, DataFetcher fetcher,
            DataLoadProvider loadProvider, Transformation transformation, ResourceTranscoder transcoder,
            Priority priority, boolean isMemoryCacheable, DiskCacheStrategy diskCacheStrategy, ResourceCallback cb) {
        Util.assertMainThread();
        long startTime = LogTime.getLogTime();

        final String id = fetcher.getId();

        //创建缓存的`key`。
        EngineKey key = keyFactory.buildKey(id, signature, width, height, loadProvider.getCacheDecoder(),
                loadProvider.getSourceDecoder(), transformation, loadProvider.getEncoder(),
                transcoder, loadProvider.getSourceEncoder());

        //一级内存缓存,表示缓存在内存当中,并且目前没有被使用的资源。
        EngineResource cached = loadFromCache(key, isMemoryCacheable);
        if (cached != null) {
            cb.onResourceReady(cached);
            if (Log.isLoggable(TAG, Log.VERBOSE)) {
                logWithTimeAndKey("Loaded resource from cache", startTime, key);
            }
            return null;
        }

        //二级内存缓存,表示缓存在内存当中,并且目前正在被使用的资源。
        EngineResource active = loadFromActiveResources(key, isMemoryCacheable);
        if (active != null) {
            cb.onResourceReady(active);
            if (Log.isLoggable(TAG, Log.VERBOSE)) {
                logWithTimeAndKey("Loaded resource from active resources", startTime, key);
            }
            return null;
        }

        //如果当前任务已经在执行,那么添加回调后返回。
        EngineJob current = jobs.get(key);
        if (current != null) {
            current.addCallback(cb);
            if (Log.isLoggable(TAG, Log.VERBOSE)) {
                logWithTimeAndKey("Added to existing load", startTime, key);
            }
            return new LoadStatus(cb, current);
        }

        //EngineJob 对应于一个任务。
        EngineJob engineJob = engineJobFactory.build(key, isMemoryCacheable);

        //DecodeJob 对应于任务的处理者。
        DecodeJob decodeJob = new DecodeJob(key, width, height, fetcher, loadProvider, transformation,
                transcoder, diskCacheProvider, diskCacheStrategy, priority);

        //包含了任务以及任务的处理。
        EngineRunnable runnable = new EngineRunnable(engineJob, decodeJob, priority);
        jobs.put(key, engineJob);
        engineJob.addCallback(cb);
        //将该 Runnable 放入到线程池当中,执行时会调用 run() 方法。
        engineJob.start(runnable);

        if (Log.isLoggable(TAG, Log.VERBOSE)) {
            logWithTimeAndKey("Started new load", startTime, key);
        }
        return new LoadStatus(cb, engineJob);
    }

}
在Engine的begin方法中,会在内存中查找是否有缓存,如果在内存当中找不到缓存,那么就会创建EngineJob、DecodeJob和EngineRunnable这三个类,尝试从数据源中加载资源,触发的语句为engineJob.start(runnable)。
4.5 EngineRunnable
class EngineRunnable implements Runnable, Prioritized {

    @Override
    public void run() {
        if (isCancelled) {
            return;
        }

        Exception exception = null;
        Resource resource = null;
        try {
            //decode 方法返回 Resource 对象。
            resource = decode();
        } catch (Exception e) {
            if (Log.isLoggable(TAG, Log.VERBOSE)) {
                Log.v(TAG, "Exception decoding", e);
            }
            exception = e;
        }

        if (isCancelled) {
            if (resource != null) {
                resource.recycle();
            }
            return;
        }
        //如果成功加载资源,那么就会回调onLoadComplete方法。
        if (resource == null) {
            onLoadFailed(exception);
        } else {
            onLoadComplete(resource);
        }
    }

    private Resource decode() throws Exception {
        if (isDecodingFromCache()) {
            //从本地缓存中获取。
            return decodeFromCache();
        } else {
            //从源地址中获取。
            return decodeFromSource();
        }
    }

    private void onLoadComplete(Resource resource) {
        manager.onResourceReady(resource);
    }

    private Resource decodeFromCache() throws Exception {
        Resource result = null;
        try {
            result = decodeJob.decodeResultFromCache();
        } catch (Exception e) {
            if (Log.isLoggable(TAG, Log.DEBUG)) {
                Log.d(TAG, "Exception decoding result from cache: " + e);
            }
        }

        if (result == null) {
            result = decodeJob.decodeSourceFromCache();
        }
        return result;
    }

    private Resource decodeFromSource() throws Exception {
        return decodeJob.decodeFromSource();
    }

}
EngineJob的start方法会通过内部线程池的submit方法提交任务,当任务被调度执行时,会调用到EngineRunnable的run()方法。
在run()方法中,会根据任务的类型来判断是从磁盘缓存还是从原始数据源中获取资源,即分别调用DecodeJob的decodeFromCache或者decodeFromSource,最终会将资源封装为Resource对象。
假如成功获取到了资源,那么会通过manager.onResourceReady返回,manager的类型为EngineRunnableManager,其实现类为之前我们看到的EngineJob。
4.6 EngineJob
class EngineJob implements EngineRunnable.EngineRunnableManager {

    @Override
    public void onResourceReady(final Resource resource) {
        this.resource = resource;
        MAIN_THREAD_HANDLER.obtainMessage(MSG_COMPLETE, this).sendToTarget();
    }

    private void handleResultOnMainThread() {
        if (isCancelled) {
            resource.recycle();
            return;
        } else if (cbs.isEmpty()) {
            throw new IllegalStateException("Received a resource without any callbacks to notify");
        }
        engineResource = engineResourceFactory.build(resource, isCacheable);
        hasResource = true;

        // Hold on to resource for duration of request so we don't recycle it in the middle of notifying if it
        // synchronously released by one of the callbacks.
        engineResource.acquire();
        listener.onEngineJobComplete(key, engineResource);

        for (ResourceCallback cb : cbs) {
            if (!isInIgnoredCallbacks(cb)) {
                engineResource.acquire();
                //ResourceCallback 的实现类为 GenericRequest
                cb.onResourceReady(engineResource);
            }
        }
        // Our request is complete, so we can release the resource.
        engineResource.release();
    }

}
在EngineJob的onResourceReady方法中,会将Resource通过Handler的方法传递到主线程,并调用handleResultOnMainThread,注意该方法中带有注释的部分,这里的ResourceCallback就是我们之前看到GenericRequest。
4.7 GenericRequest
public final class GenericRequest implements Request, SizeReadyCallback,
        ResourceCallback {

    @SuppressWarnings("unchecked")
    @Override
    public void onResourceReady(Resource resource) {
        if (resource == null) {
            onException(new Exception("Expected to receive a Resource with an object of " + transcodeClass
                    + " inside, but instead got null."));
            return;
        }

        Object received = resource.get();
        if (received == null || !transcodeClass.isAssignableFrom(received.getClass())) {
            releaseResource(resource);
            onException(new Exception("Expected to receive an object of " + transcodeClass
                    + " but instead got " + (received != null ? received.getClass() : "") + "{" + received + "}"
                    + " inside Resource{" + resource + "}."
                    + (received != null ? "" : " "
                        + "To indicate failure return a null Resource object, "
                        + "rather than a Resource object containing null data.")
            ));
            return;
        }

        if (!canSetResource()) {
            releaseResource(resource);
            // We can't set the status to complete before asking canSetResource().
            status = Status.COMPLETE;
            return;
        }

        onResourceReady(resource, (R) received);
    }

    private void onResourceReady(Resource resource, R result) {
        // We must call isFirstReadyResource before setting status.
        boolean isFirstResource = isFirstReadyResource();
        status = Status.COMPLETE;
        this.resource = resource;

        if (requestListener == null || !requestListener.onResourceReady(result, model, target, loadedFromMemoryCache,
                isFirstResource)) {
            GlideAnimation animation = animationFactory.build(loadedFromMemoryCache, isFirstResource);
            //通知目标资源已经获取到了。
            target.onResourceReady(result, animation);
        }

        notifyLoadSuccess();

        if (Log.isLoggable(TAG, Log.VERBOSE)) {
            logV("Resource ready in " + LogTime.getElapsedMillis(startTime) + " size: "
                    + (resource.getSize() * TO_MEGABYTE) + " fromCache: " + loadedFromMemoryCache);
        }
    }

}
在GenericRequest的onResourceReady方法中,会调用Target的onResourceReady方法,也就是我们最开始讲到的GlideDrawableImageViewTarget。
4.8 GlideDrawableImageViewTarget
public class GlideDrawableImageViewTarget extends ImageViewTarget {

    @Override
    public void onResourceReady(GlideDrawable resource, GlideAnimation animation) {
        if (!resource.isAnimated()) {
            //TODO: Try to generalize this to other sizes/shapes.
            // This is a dirty hack that tries to make loading square thumbnails and then square full images less costly
            // by forcing both the smaller thumb and the larger version to have exactly the same intrinsic dimensions.
            // If a drawable is replaced in an ImageView by another drawable with different intrinsic dimensions,
            // the ImageView requests a layout. Scrolling rapidly while replacing thumbs with larger images triggers
            // lots of these calls and causes significant amounts of jank.
            float viewRatio = view.getWidth() / (float) view.getHeight();
            float drawableRatio = resource.getIntrinsicWidth() / (float) resource.getIntrinsicHeight();
            if (Math.abs(viewRatio - 1f) <= SQUARE_RATIO_MARGIN
                    && Math.abs(drawableRatio - 1f) <= SQUARE_RATIO_MARGIN) {
                resource = new SquaringDrawable(resource, view.getWidth());
            }
        }
        super.onResourceReady(resource, animation);
        this.resource = resource;
        resource.setLoopCount(maxLoopCount);
        resource.start();
    }

    /**
     * Sets the drawable on the view using
     * {@link android.widget.ImageView#setImageDrawable(android.graphics.drawable.Drawable)}.
     *
     * @param resource The {@link android.graphics.drawable.Drawable} to display in the view.
     */
    @Override
    protected void setResource(GlideDrawable resource) {
        view.setImageDrawable(resource);
    }
}
在GlideDrawableImageViewTarget的onResourceReady方法中,会首先回调父类的super.onResourceReady,父类的该方法又会回调setResource方法,而GlideDrawableImageViewTarget的setResource就会通过setResource将加载好的图片资源设置进去。
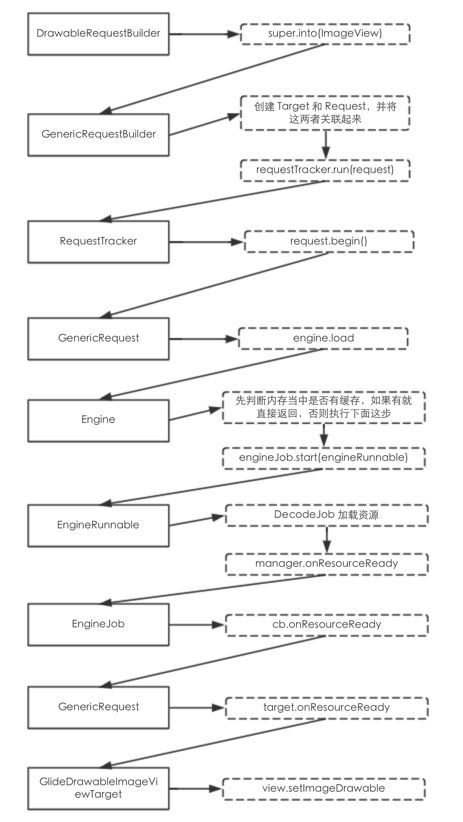
由于夹杂着代码和文字看着比较乱,整个的流程图如下所示,并在有道云笔记上整理了一下关键的类和函数调用语句,直达链接。
五、小结
这篇文章目的是让大家对整个流程有一个大致的了解,所以对于很多细节问题没有深究,例如:
- 在
Engine的load()方法中,会执行两次内存缓存的判断,这里面实现的机制是怎么样的? - 在
EngineRunnable的decode()方法中,采用DecodeJob去数据源加载资源,资源加载以及解码的过程是怎么样的? -
EngineRunnable中回调给Engine的Resource是一个什么样的对象?
对于以上的这些问题,会在后面单独的一个个章节进行分析。
更多文章,欢迎访问我的 Android 知识梳理系列:
- Android 知识梳理目录:http://www.jianshu.com/p/fd82d18994ce
- Android 面试文档分享:http://www.jianshu.com/p/8456fe6b27c4


