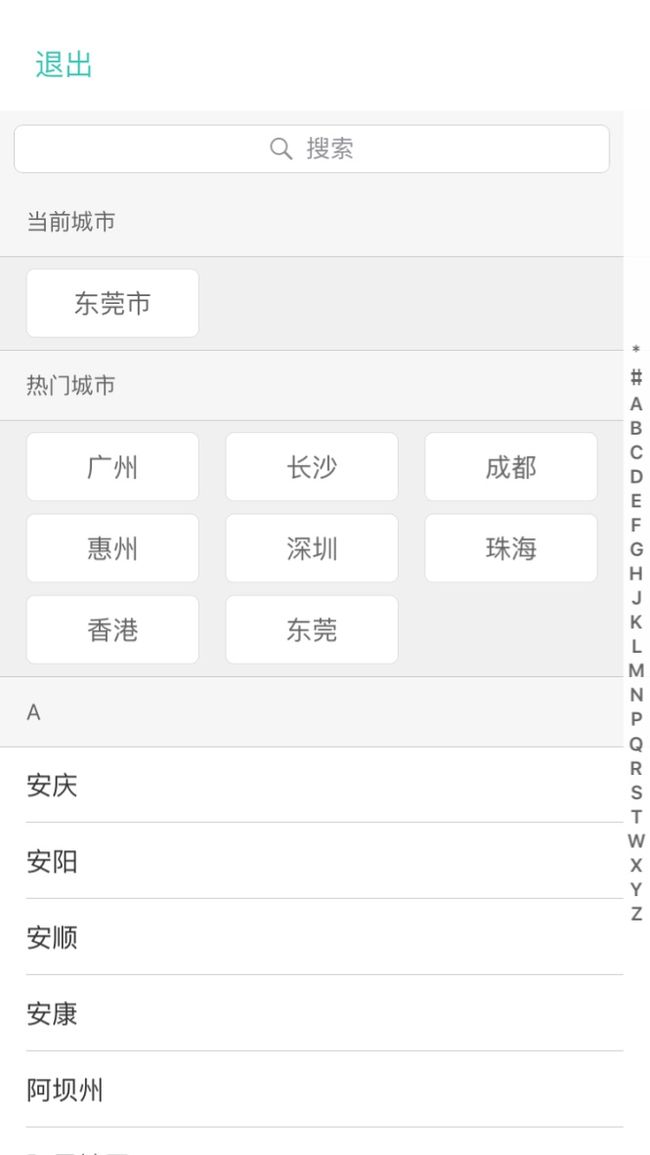
界面效果:
因为本人并没有分离这个界面,所以暂时没办法将demo公布出来,只能将将重点的代码贴出来
-
- 首先是自定义热门城市这种样式的Cell,因为我用的是model,所以请大家看到明白
-(void)setLocationFirstViewCellWithModel:(NSArray *)modeles {
    self.backgroundColor = COLOR(240, 240, 240, 1);
    self.contentView.backgroundColor = [UIColor clearColor];
    self.dataSource = [NSMutableArray arrayWithArray:modeles];

    CGFloat screenWigth = [UIScreen mainScreen].bounds.size.width;
    //首先,每一行要有3个Button,最左边和最右边的间隔都为15,中间的间隔为15,可以算出每个Button个宽度
    CGFloat buttonWigth = (screenWigth - (15+ 30 ) - 15*2) / 3.0;
    //临时变量 - 确定循环次数
    NSInteger temp_i = 0;
    //临时变量 - 确定当前列
    NSInteger temp_k = 0;
    //临时变量 - 确定共有多少列
    NSInteger temp_count_k = ceil([modeles count] / 3.0) - 1;
    self.contentView.userInteractionEnabled = YES;
    //根据得到的数据确定有多少个button
    for (LocationModel *model in modeles) {
        UIButton *button = [self viewWithTag:100 + temp_i];
        //创建button
        if (![self.contentView viewWithTag:(100 + temp_i ) ]) {
            button = [UIButton buttonWithType:UIButtonTypeSystem];
            button.layer.cornerRadius = 5;
            [button setTitleColor:COLOR(100, 100, 100, 1) forState:UIControlStateNormal];
            button.backgroundColor = [UIColor whiteColor];
            button.layer.borderColor = [COLOR(220, 220, 220, 1) CGColor];
            button.layer.borderWidth =  0.5;
            button.tag = temp_i +100;
            [button addTarget:self action:@selector(clickLocationButton:) forControlEvents:UIControlEventTouchUpInside];
            self.contentView.userInteractionEnabled = YES;
            [self addSubview:button];

            //button到父视图Left的距离
            CGFloat buttonToViewLeft = 15 + temp_i%3 *(buttonWigth + 15);
            //button到父视图Top的距离
            CGFloat buttonToViewTop = 7 + temp_k *(40 + 7);
            button.frame = ({
                CGRect frame = CGRectMake(buttonToViewLeft,buttonToViewTop, buttonWigth, 40);
                frame;
            });
        }
        temp_i = temp_i+1; temp_k =  floor(temp_i/ 3.0);
        [button setTitle:model.addressName  forState:UIControlStateNormal];
    }
    //判断是否最后一个button
    if (temp_k == temp_count_k) {
        CGRect frame = [self viewWithTag:100 + temp_i - 1].frame;
        CGFloat height = CGRectGetMaxY(frame);
        [self.contentView mas_updateConstraints:^(MASConstraintMaker *make) {
         //固定contentView的高度高度
            make.height.equalTo(@(height + 7));
        }];
    }
}
因为我用的FDTemplateLayoutCell ,在这里我的cell只要在内部将contenview撑起来就可以实现自适应高度了
- 2.关于如何实现排序功能,我在这里使用的是第三方ZYPinYinSearch和ChineseString其他的我没用过,反正这2个用起来挺方便的
使用ZYPinYinSearch的时候 要注意必须使用模型来保存这些地址 地址里必须设置红色圈中的标志
模型要全部保存到一个数组里,就可以进行排序了
    //获取索引的首字母
    self.sectionArr = [ChineseString IndexArray:self.dataCahce];
    //对原数据进行排序重新分组
    self.dataSource = [ChineseString LetterSortArray:self.dataCahce];//datacache全部保存的是自定义模型
因为我这里是固定了热门城市和当前位置,故我在索引数组前增加了2个标记
    [self.sectionArr insertObject:@"#" atIndex:0];
    [self.sectionArr insertObject:@"*" atIndex:0];
- 3.关于如何实现searchBar,这步其实非常简单,在ZYPinYinSearch里有个代理方法
-(BOOL)searchDisplayController:(UISearchDisplayController *)controller shouldReloadTableForSearchString:(NSString *)searchString{
    if (controller.searchBar.text.length != 0) {
        dispatch_queue_t queue = dispatch_queue_create("com.mmfishing.locationcontroller.searchbar", DISPATCH_QUEUE_CONCURRENT);
        dispatch_async(queue, ^{
            [self.dataSearch removeAllObjects];
            NSArray *ary = [NSArray new];
            ary = [ZYPinYinSearch searchWithOriginalArray:self.dataCahce
                                            andSearchText:controller.searchBar.text
                                  andSearchByPropertyName:@"addressName"];
            [self.dataSearch addObjectsFromArray:ary];
            dispatch_async(dispatch_get_main_queue(), ^{
                [controller.searchResultsTableView reloadData];
                for (UIView* v in self.displayController.searchResultsTableView.subviews) {
                    if ([v isKindOfClass: [UILabel class]] &&
                        [[(UILabel*)v text] isEqualToString:@"No Results"]) {
                        UILabel *label = (UILabel *)v;
                        label.text = @"没有结果";
                        break;
                    }
                }
            });
        });
    }
    return NO;
}
在这里 我使用异步是因为这库在搜索时会照成页面卡顿,加上后的确是不这么卡了

