Appium简介
Appium是一个开源测试自动化框架,可用于原生,混合和移动Web应用程序测试。 它使用WebDriver协议驱动iOS,Android和Windows应用程序。
Appium优势
• 可以跨平台同时支持android、ios
• 支持多种语言,java、python、php、Ruby等等
• 不用为复杂的环境发愁
• 如果你有selenium经验,直接上手。
运行原理
我们的电脑(client)上运行自动化测试脚本,调用的是webdriver的接口,appium server接收到我们client上发送过来的命令后他会将这些命令转换为UIautomator认识的命令,然后由UIautomator来在设备上执行自动化。
Appium组件
Appium Server
Appium Server就是Appium的服务端——一个web接口服务,使用Node.js实现。
npm install -g appium
appium
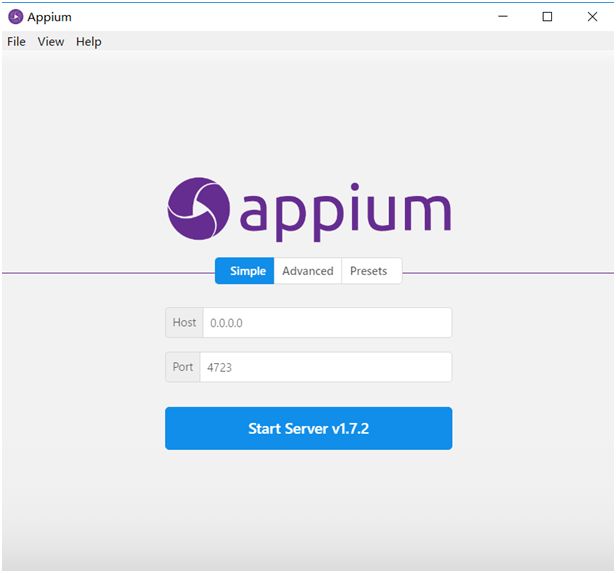
Appium Desktop
Appium Desktop是一款适用于Mac,Windows和Linux的开源应用程序,它以美观而灵活的用户界面为您提供Appium自动化服务器的强大功能。什么是Capability
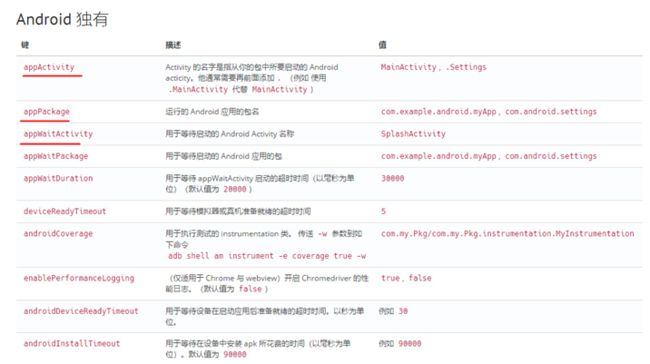
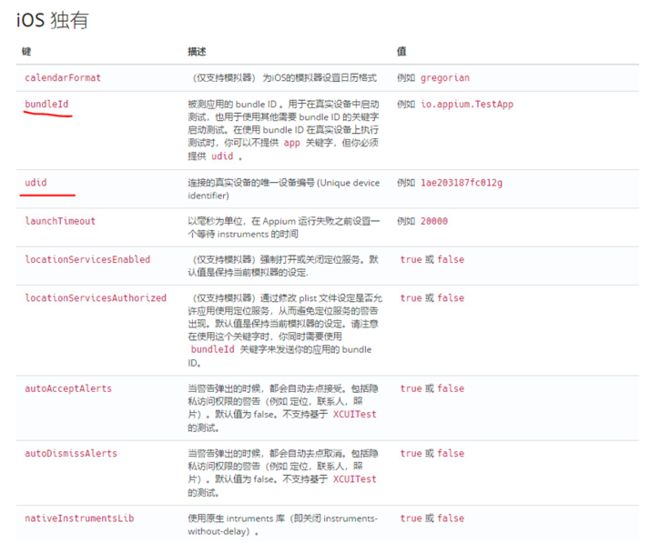
desired capability的功能是配置Appium会话。他们告诉Appium服务器您想要自动化的平台和应用程序。
公用Capability
Android独有Capability
ios独有Capability
appium环境搭建
• Node.js
• Appium
安装:npm install -g appium
安装路径:where appium
版本:appium -v
启动:appium
• Appium-desktop
• Appium-doctor
appium-doctor可以检测Appium整体依赖环境配置情况。
安装:npm install appium-doctor
• Appium-Python-Client
安装:pip install Appium-Python-Client
输入命令“from appium import webdriver” 回车,如果控制台没有报错,则说明安装成功。
• Python
• JDK
• Andriod SDK
一个小例子
测试场景:自动安装考研帮App(kaoyan3.1.0.apk),然后启动App
from appium import webdriver

desired_caps={}
desired_caps['platformName']='Android'

#模拟器设备
desired_caps['platformVersion']='5.1.1'
desired_caps['deviceName']='127.0.0.1:62025'

desired_caps['app']=r'C:\Users\Shuqing\Desktop\kaoyan3.1.0.apk'

desired_caps['appPackage']='com.tal.kaoyan'
desired_caps['appActivity']='com.tal.kaoyan.ui.activity.SplashActivity'

driver = webdriver.Remote('http://localhost:4723/wd/hub', desired_caps)
元素定位
id定位
find_element_by_id()
name定位
find_element_by_name()
classname定位
find_element_by_class_name()
相对定位
相对定位是先找到该元素的有对应属性的父元素节点,然后基于父元素进行元素定位。
from find_element.capability import driver

driver.find_element_by_id('com.tal.kaoyan:id/login_register_text').click()

root_element=driver.find_element_by_id('com.tal.kaoyan:id/activity_register_parentlayout')
root_element.find_element_by_class_name('android.widget.ImageView').click()
xpath定位
| 表达式 | 描述 |
|---|---|
| / | 从根节点选取。 |
| // | 从匹配选择的当前节点选择文档中的节点,而不考虑它们的位置。 |
| nodename | 选取此节点的所有子节点。 |
| . | 选取当前节点。 |
| .. | 选取当前节点的父节点。 |
| @ | 选取属性。 |
| 通配符 | 描述 |
|---|---|
| * | 匹配任何元素节点。 |
| @* | 匹配任何属性节点。 |
| node() | 匹配任何类型的节点。 |
List定位
find_elements_by_XX()
from find_element.capability import driver

driver.find_element_by_id('com.tal.kaoyan:id/login_register_text').click()

driver.find_element_by_id('com.tal.kaoyan:id/activity_register_userheader').click()

images=driver.find_elements_by_id('com.tal.kaoyan:id/item_image')

images[10].click()

driver.find_element_by_id('com.tal.kaoyan:id/save').click()
if判断
if skipBtn:
    skipBtn.click()
else:
    print('no skipBtn')
异常捕获
from selenium.common.exceptions import NoSuchElementException
 try:
        cancelBtn = driver.find_element_by_id('android:id/button2')
except NoSuchElementException:
        print('no CancelBtn')
else:
        cancelBtn.click()
UIAutomator定位
UIAutomator元素定位是 Android 系统原生支持的定位方式,虽然与 xpath 类似,但比它更加好用,且支持元素全部属性定位.定位原理是通过android 自带的android uiautomator的类库去查找元素。 Appium元素定位方法其实也是基于Uiautomator来进行封装的。
find_element_by_android_uiautomator()
id定位
id定位是根据元素的resource-id属性来进行定位,使用 UiSelector().resourceId()方法即可。
from find_element.capability import driver

driver.find_element_by_android_uiautomator\
    ('new UiSelector().resourceId("com.tal.kaoyan:id/login_email_edittext")').send_keys('zxw1234')

driver.find_element_by_android_uiautomator\
    ('new UiSelector().resourceId("com.tal.kaoyan:id/login_password_edittext")').send_keys('zxw123456')

driver.find_element_by_android_uiautomator\
    ('new UiSelector().resourceId("com.tal.kaoyan:id/login_login_btn")').click()
text定位
driver.find_element_by_android_uiautomator\
    ('new UiSelector().text("请输入用户名")').send_keys('zxw1234')
class name定位
driver.find_element_by_android_uiautomator\
    ('new UiSelector().className("android.widget.EditText")').send_keys('zxw1234')
元素等待
设置元素等待可以更加灵活的制定等待定位元素的时间,从而增强脚本的健壮性,提高执行效率。
强制等待
设置固定的等待时间,使用sleep()方法即可实现
from time import sleep
#强制等待5秒
sleep(5)
隐式等待
隐式等待是针对全部元素设置的等待时间
driver.implicitly_wait(20)
显式等待
显式等待是针对某个元素来设置的等待时间。
from selenium.webdriver.support.ui import WebDriverWait

WebDriverWait(driver, timeout, poll_frequency=0.5, ignored_exceptions=None)
driver : WebDriver
timeout : 最长超时时间,默认以秒为单位
poll_frequency : 休眠时间的间隔时间,默认为0.5秒
ignored_exceptions : 超时后的异常信息,默认情况下抛NoSuchElementException异常。
from selenium.webdriver.support.ui import WebDriverWait
WebDriverWait(driver,10).until(lambda x:x.find_element_by_id("elementID"))
toast元素识别
Appium 1.6.3开始支持识别Toast内容,主要是基于UiAutomator2,因此需要在Capablity配置如下参数:
desired_caps['automationName']='uiautomator2'
安装appium-uiautomator2-driver: 安装命令如下:
cnpm install appium-uiautomator2-driver
# coding=utf-8
from find_element.capability import driver
from selenium.webdriver.support.ui import WebDriverWait

driver.find_element_by_id('com.tal.kaoyan:id/login_email_edittext').clear()
driver.find_element_by_id('com.tal.kaoyan:id/login_email_edittext').send_keys('zxss018')

driver.find_element_by_id('com.tal.kaoyan:id/login_password_edittext').send_keys('zxw2018')
driver.find_element_by_id('com.tal.kaoyan:id/login_login_btn').click()


error_message="用户名或密码错误,你还可以尝试4次"
limit_message="验证失败次数过多,请15分钟后再试"

message='//*[@text=\'{}\']'.format(error_message)
# message='//*[@text=\'{}\']'.format(limit_message)

toast_element=WebDriverWait(driver,5).until(lambda x:x.find_element_by_xpath(message))
print(toast_element.text)
屏幕截图
方法1
save_screenshot() 该方法直接保存当前屏幕截图到当前脚本所在文件位置。
driver.save_screenshot('login.png')
方法2
get_screenshot_as_file(self, filename)
将截图保留到指定文件路径
driver.get_screenshot_as_file('./images/login.png')
from find_element.capability import driver

driver.find_element_by_id('com.tal.kaoyan:id/login_email_edittext').clear()
driver.find_element_by_id('com.tal.kaoyan:id/login_email_edittext').send_keys('55555')

driver.find_element_by_id('com.tal.kaoyan:id/login_password_edittext').send_keys('zxw2018')

driver.save_screenshot('login.png')
driver.get_screenshot_as_file('./images/login.png')

driver.find_element_by_id('com.tal.kaoyan:id/login_login_btn').click()
滑动操作
在Appium中模拟用户滑动操作需要使用swipe方法,该方法定义如下:
    def swipe(self, start_x, start_y, end_x, end_y, duration=None):
        """Swipe from one point to another point, for an optional duration.

        :Args:
         - start_x - x-coordinate at which to start
         - start_y - y-coordinate at which to start
         - end_x - x-coordinate at which to stop
         - end_y - y-coordinate at which to stop
         - duration - (optional) time to take the swipe, in ms.

        :Usage:
            driver.swipe(100, 100, 100, 400)
from time import sleep
from find_element.capability import driver

#获取屏幕尺寸
def get_size():
    x=driver.get_window_size()['width']
    y=driver.get_window_size()['height']
    return x,y

#显示屏幕尺寸(width,height)
l=get_size()
print(l)

#向左滑动
def swipeLeft():
    l=get_size()
    x1=int(l[0]*0.9)
    y1=int(l[1]*0.5)
    x2=int(l[0]*0.1)
    driver.swipe(x1,y1,x2,y1,1000)

#向左滑动2次
for i in range(2):
    swipeLeft()
    sleep(0.5)

driver.find_element_by_id('com.tal.kaoyan:id/activity_splash_guidfinish').click()
def swipeUp():
    l = get_size()
    x1 = int(l[0] * 0.5)
    y1 = int(l[1] * 0.95)
    y2 = int(l[1] * 0.35)
    driver.swipe(x1, y1, x1, y2, 1000)

def swipeDown():
    l=get_size()
    x1 = int(l[0] * 0.5)
    y1 = int(l[1] * 0.35)
    y2 = int(l[1] * 0.85)
    driver.swipe(x1, y1, x1, y2, 1000)

def swipeRight():
    l=get_size()
    y1 = int(l[1] * 0.5)
    x1 = int(l[0] * 0.25)
    x2 = int(l[0] * 0.95)
    driver.swipe(x1, y1, x2, y1, 1000)
连续滑动
如设置九宫格密码
Touch Action包含一些列操作,比如按压、长按、点击、移动、暂停。由着些不同操作可以组成一套动作。使用TochAction需要先导入对应的模块
from appium.webdriver.common.touch_action import TouchAction
按压
方法:press() 开始按压一个元素或坐标点(x,y)。通过手指按压手机屏幕的某个位置。 press也可以接收屏幕的坐标(x,y)。
press(self, el=None, x=None, y=None)
TouchAction(driver).press(x=0,y=308)
长按
方法:longPress() 开始按压一个元素或坐标点(x,y)。 相比press()方法,longPress()多了一个入参,既然长按,得有按的时间吧。duration以毫秒为单位。1000表示按一秒钟。其用法与press()方法相同。
long_press(self, el=None, x=None, y=None, duration=1000)
点击
方法:tap() 对一个元素或控件执行点击操作。用法参考press()。
tap(self, element=None, x=None, y=None, count=1)
移动
方法:move_to() 将指针从上一个点移动到指定的元素或点。
move_to(self, el=None, x=None, y=None)
注意:
移动到目位置有时是算绝对坐标点,有时是基于前面一个坐标点的偏移量,这个要结合具体App来实践。
暂停
方法:Wait()
wait(self, ms=0)
暂停脚本的执行,单位为毫秒。
释放
方法release() 结束的行动取消屏幕上的指针。
release(self)
执行
perform() 执行的操作发送到服务器的命令操作。
perform(self)
from appium import webdriver
from  time import sleep
from appium.webdriver.common.touch_action import TouchAction
from selenium.webdriver.support.ui import WebDriverWait
from selenium.common.exceptions import NoSuchElementException


desired_caps={}
desired_caps['platformName']='Android'
desired_caps['platformVersion']='5.1.1'
desired_caps['deviceName']='127.0.0.1:62025'

desired_caps['app']=r'C:\Users\Shuqing\Desktop\mymoney.apk'
desired_caps['appPackage']='com.mymoney'
desired_caps['appActivity']='com.mymoney.biz.splash.SplashScreenActivity'

driver = webdriver.Remote('http://localhost:4723/wd/hub', desired_caps)
driver.implicitly_wait(5)

def get_size():
    x=driver.get_window_size()['width']
    y=driver.get_window_size()['height']
    return x,y

def swipeLeft():
    l=get_size()
    x1=int(l[0]*0.9)
    y1=int(l[1]*0.5)
    x2=int(l[0]*0.1)
    driver.swipe(x1,y1,x2,y1,1000)

def swipeUp():
    l = get_size()
    x1 = int(l[0] * 0.5)
    y1 = int(l[1] * 0.95)
    y2 = int(l[1] * 0.35)
    driver.swipe(x1, y1, x1, y2, 1000)

#等待启动页面元素,然后向左滑动两次,跳过引导页面
WebDriverWait(driver,6).until(lambda x:x.find_element_by_id("com.mymoney:id/next_btn"))
for i in range(2):
    swipeLeft()
    sleep(1)


#点击“开始随手记”按钮
driver.find_element_by_id('com.mymoney:id/begin_btn').click()

#检测是否有活动页面弹窗,如果有就点击关闭
try:
    closBtn=driver.find_element_by_id('com.mymoney:id/close_iv')
except NoSuchElementException:
    pass
else:
    closBtn.click()

#点击更多菜单
driver.find_element_by_id('com.mymoney:id/nav_setting_btn').click()

#等待界面菜单加载出来,然后向上滑动
WebDriverWait(driver,6).until(lambda x:x.find_element_by_id("com.mymoney:id/content_container_ly"))
swipeUp()

#点击高级菜单
driver.find_element_by_android_uiautomator('new UiSelector().text("高级")').click()
#点击密码与手势密码菜单
driver.find_element_by_id('com.mymoney:id/password_protected_briv').click()
#点击手势密码保护
driver.find_element_by_id('com.mymoney:id/lock_pattern_or_not_sriv').click()

#连续滑动两次设置图案密码
for i in range(2):
    TouchAction(driver).press(x=243,y=381).wait(2000)\
        .move_to(x=455,y=390).wait(1000)\
        .move_to(x=643,y=584).wait(1000)\
        .move_to(x=647,y=784).wait(1000)\
        .release().perform()
多点触控功能
MultiAction 是多点触控的类,可以模拟用户多点操作。主要包含 add() 和 perform() 两个方法, MultiAction可以结合前面所学的 ActionTouch可以模拟出用户的多个手指滑动的操作效果;
from appium.webdriver.common.multi_action import MultiAction
from appium.webdriver.common.touch_action import TouchAction
如两指缩放地图
from appium import webdriver
from time import sleep
from appium.webdriver.common.touch_action import TouchAction
from appium.webdriver.common.multi_action import MultiAction


desired_caps={}
desired_caps['platformName']='Android'
desired_caps['deviceName']='127.0.0.1:62025'
desired_caps['platforVersion']='5.1.1'

desired_caps['app']=r'C:\Users\Shuqing\Desktop\com.baidu.BaiduMap.apk'
desired_caps['appPackage']='com.baidu.BaiduMap'
desired_caps['appActivity']='com.baidu.baidumaps.WelcomeScreen'

driver=webdriver.Remote('http://localhost:4723/wd/hub',desired_caps)
driver.implicitly_wait(5)

driver.find_element_by_id('com.baidu.BaiduMap:id/dj2').click()
driver.find_element_by_id('com.baidu.BaiduMap:id/byo').click()

x=driver.get_window_size()['width']
y=driver.get_window_size()['height']

def pinch():
    action1=TouchAction(driver)
    action2=TouchAction(driver)
    zoom_action=MultiAction(driver)


    action1.press(x=x*0.2,y=y*0.2).wait(1000).move_to(x=x*0.4,y=y*0.4).wait(1000).release()
    action2.press(x=x*0.8,y=y*0.8).wait(1000).move_to(x=x*0.6,y=y*0.6).wait(1000).release()

    print('start pinch...')
    zoom_action.add(action1,action2)
    zoom_action.perform()

def zoom():
    action1=TouchAction(driver)
    action2=TouchAction(driver)
    zoom_action=MultiAction(driver)


    action1.press(x=x*0.4,y=y*0.4).wait(1000).move_to(x=x*0.2,y=y*0.2).wait(1000).release()
    action2.press(x=x*0.6,y=y*0.6).wait(1000).move_to(x=x*0.8,y=y*0.8).wait(1000).release()

    print('start zoom...')
    zoom_action.add(action1,action2)
    zoom_action.perform()

if __name__ == '__main__':
    for i in range(3):
        pinch()

    for i in range(3):
        zoom()
移动端测试分类
1.app功能测试
1.业务逻辑正确性测试
依据产品文档设计测试用例,加上隐性需求文档
2.兼容性测试
1.系统版本
2.分辨率
3.网络情况
3.异常测试
1.热启动应用:应用由后台转为前台的过程
2.网络切换&中断恢复
3.电话&信息中断恢复
4.升级&安装卸载测试
5.健壮性测试
1.手机资源消耗
2.流量消耗
3.崩溃恢复等测试


