本文由我们团队的刚毕业的帅小伙
真帅童鞋在学校写的一个小动画。发出来分享一下。
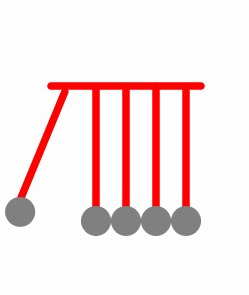
做了一个小动画,放上来请大家拍砖指教。
牛顿摆大家应该都不陌生的吧,其实用代码实现起来,挺简单的,下边我们就来实际的写一下这个动画。
0 动画拆分
这个动画看起来并不是很难,由6根线,5个圆组成,其实拆分来看的话,其中中间的三根线和最上边的一根线是不用动的,做动画的只是两边的两条线和两个圆,其中,左边的动画来说,就是先摆动起来,然后回落,当落下来的时候,右边的开始向上摆动,然后回落,当落下来的时候,左边的开始摆动,以此循环。
也就是说,我们只需要控制两个动画,然后让其交替进行即可。
单个动画拆分
对于左边动画来说,是由两个动画组成的:线的动画,圆的动画
线的动画:对于左边的额线来说,只是绕着上方的端点旋转了45°
圆的动画:对于左边的圆来说,也只是沿着一个以左边线为长度的弧,走了45°
两者结合起来就形成了,线和球是在一起摆动的视觉效果,但其实在实现的过程中,他们是分开的
1 动画的实现
在该例子中,所有的图形都是由CAShaplayer绘制的。
1.1 绘制线
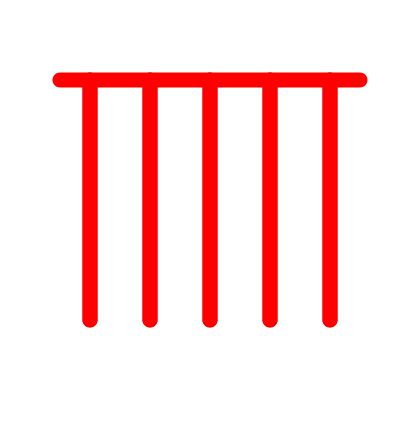
首选,我们需要绘制6条线,来构成牛顿摆的基本图形,下边我们来看代码,
CAShapeLayer * layer = [CAShapeLayer layer]; //创建一个layer
CGMutablePathRef path = CGPathCreateMutable(); //初始化一个路径
CGPathMoveToPoint(path, nil, startPoint.x, startPoint.y); //移动到开始的地方
CGPathAddLineToPoint(path, nil, endPoint.x, endPoint.y); //划线,画到结束的点
layer.path = path; // 指定layer的Path
layer.lineCap = kCALineCapRound; //设置线端点的形状
layer.lineWidth = self.lineWithd; //设置线宽
layer.strokeColor = [UIColor redColor].CGColor; //设置线的颜色
这是绘制一条线我们所需要做的工作,其中,我们要指定这个线从哪开始,到哪结束,其中关于lineCap,这里有张图可以很好理解这是个什么玩意

其实我们可以封装一个方法循环来创建这些个线条,这样,我们的界面会看起来像这个样子
1.2 绘制圆
同上边绘制线一样,我们需要绘制5个圆,看代码
    CAShapeLayer * cycleLayer = [CAShapeLayer layer]; //创建一个layer
    CGMutablePathRef path = CGPathCreateMutable(); //初始化一个路径
    CGPathAddArc(path, nil, center.x, center.y, radius, 0, M_PI * 2, YES); // 画一个圆
    cycleLayer.path = path; //指定layer的path
    cycleLayer.fillColor = [UIColor grayColor].CGColor; //填充layer的颜色
对于CGPathAddArc来说,参数分别是,路径,形变,圆心的X,圆心的Y,圆的半径,开始角度,结束角度,是否为顺时针
画完之后,我们的界面看起来像是这个样子

这样我们的牛顿摆就画完了,当然,你可以适当的加一些阴影开始这个形状看起来更有立体感。下边我们就可以来做动画了。
2 动画
就像上边我们所说的一样,我们拆开来做这些动画,首先我们先做左边的动画。
2.1.1 左边线的动画
左边的线的动画,就是让左边的线,围绕着上边的而端点,顺时针摆动45°,我们先来看代码。
_leftLineBaseAnimation = [CABasicAnimation animation]; //初始化一个动画
_leftLineBaseAnimation.keyPath = @"transform.rotation.z"; //动画运动的方式,现在指定的是围绕Z轴旋转
_leftLineBaseAnimation.duration = 0.4; //动画持续时间
_leftLineBaseAnimation.fromValue = [NSNumber numberWithFloat:0]; //开始的角度
_leftLineBaseAnimation.toValue = [NSNumber numberWithFloat:M_PI_4/2]; //结束的角度
_leftLineBaseAnimation.timingFunction =[CAMediaTimingFunction functionWithName: kCAMediaTimingFunctionEaseOut]; //动画的运动方式,
_leftLineBaseAnimation.autoreverses = YES; //是否反向移动动画
_leftLineBaseAnimation.delegate = self; //动画的代理
_leftLineBaseAnimation.fillMode = kCAFillModeForwards;//动画结束后的状态
首先我们先来看
keyPath这个属性,这个是行是一个字符串,指定了你要让那个CALayer或CALayer的子类的某个可以做动画的属性的值,关于这个值,大家可以在这里fromeValue和toValue都好理解,从一个值,到另一值,这里从0°到45°我们来看
timingFunction这个属性,一图省千言
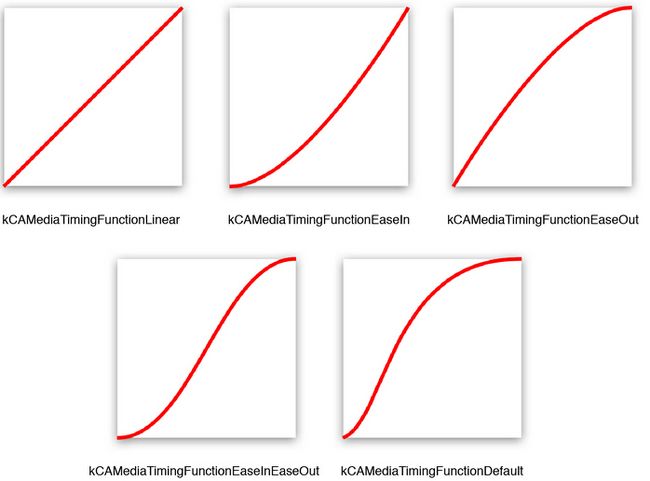
这里我们能够看出,也就是运动的速度曲线,先快后慢,先慢后快等等,我们也可以用贝塞尔曲线来定制我们自己的运动速度曲线,这样可以实现更加优美的动画。
autoreverses这个就是是否反向动画,也就是,逆序在播放一遍动画,因为这里我们要的效果是先摆上去,然后在摆下来,正好是动画播放一遍然后在反向播放一遍,所以我们指定为YES。fillMode这个属性是提供了一个动画结束后的状态,是应该移除,还是继续保持,反向等等。
2.1.2 左边圆的动画
我们来看左边圆的动画
CGMutablePathRef path  = CGPathCreateMutable(); // 创建一个路径
CGPathAddArc(path, nil, 0, 10, self.height - 20, M_PI_2, M_PI_2+M_PI_4/2, NO); //这里的圆心我们制定左边第一条线的上边的端点,长为线的长度,角度为45°
_leftCycleKeyframeAnimation = [CAKeyframeAnimation animation]; //创建一个动画
_leftCycleKeyframeAnimation.keyPath = @"position"; //我们要移动小球的位置,所以keyPath中我们要改变小球的position
_leftCycleKeyframeAnimation.path = path; //制定动画路径
_leftCycleKeyframeAnimation.duration = 0.4f; //动画持续时间
_leftCycleKeyframeAnimation.timingFunction = [CAMediaTimingFunction functionWithName:kCAMediaTimingFunctionEaseOut]; //动画的速度曲线
_leftCycleKeyframeAnimation.autoreverses = YES; // 是否反向运动
_leftCycleKeyframeAnimation.fillMode = kCAFillModeForwards; //动画结束后的状态
_leftCycleKeyframeAnimation.delegate = self;
[_leftCycleKeyframeAnimation setValue:@"left" forKey:@"left"]; //key-value,用于在代理中监听动画
关键帧动画,可以说是指定了一个动画路径,使得动画按照一个路径来进行动画,相对于基础动画来说,关键帧动画更加细腻,基础动画只能提供一个点到另一个点的动画,中间过程要系统自动补全,但关键帧动画可以完整的定制动画的运动轨迹,使得动画更加细腻平滑,效果也更加好看
右边的动画和左边的动画类似,详细的就不说了,贴一下代码。
右边线
_rightLineBaseAnimation = [CABasicAnimation animation];
_rightLineBaseAnimation.keyPath = @"transform.rotation.z";
_rightLineBaseAnimation.duration = 0.4;
_rightLineBaseAnimation.fromValue = [NSNumber numberWithFloat:0];
_rightLineBaseAnimation.toValue = [NSNumber numberWithFloat:-M_PI_4/2];
_rightLineBaseAnimation.timingFunction =[CAMediaTimingFunction functionWithName: kCAMediaTimingFunctionEaseOut];
_rightLineBaseAnimation.autoreverses = YES;
_rightLineBaseAnimation.fillMode = kCAFillModeForwards;
_rightLineBaseAnimation.delegate = self;
右边圆
CGMutablePathRef path = CGPathCreateMutable();
CGPathAddArc(path, nil, 90, 10, self.height - 20, M_PI_2,M_PI_2-M_PI_4/2, YES);
_rightCycleKeyframeAnimation = [CAKeyframeAnimation animation];
_rightCycleKeyframeAnimation.keyPath = @"position";
_rightCycleKeyframeAnimation.path = path;
_rightCycleKeyframeAnimation.duration = 0.4f;
_rightCycleKeyframeAnimation.timingFunction = [CAMediaTimingFunction functionWithName:kCAMediaTimingFunctionEaseOut];
_rightCycleKeyframeAnimation.autoreverses = YES;
_rightCycleKeyframeAnimation.fillMode = kCAFillModeForwards;
_rightCycleKeyframeAnimation.delegate = self;
[_rightCycleKeyframeAnimation setValue:@"right" forKey:@"right"];
来来来,我们把左右动画结合起来,让左边动画先开始,然后结束了之后,在开始右边的动画,右边的动画结束了,在开始左边的动画,然后循环进行,那我们怎么能检测到动画结束呢,还记得我们在关键帧动画中设置的代理么,那么在动画结束后,代理方法- animationDidStop: finished: 会被调用,在这里,我们可以动过kvc的方式拿到我们在上述左右关键帧动画中设置的相关参数,然后来控制左右动画的运行,代码看起来是这个样子的
- (void)animationDidStop:(CAAnimation *)anim finished:(BOOL)flag {
    if ([[anim valueForKey:@"left"] isEqualToString:@"left"]) {

        [self doRightAnimation];
    } else if([[anim valueForKey:@"right"] isEqualToString:@"right"])
    {
        [self doLeftAnimation];
    }
}
好了,现在动画写完了,我们来运行一下,看看效果怎么样,来,喝口水,深呼吸,按下command + r 盯着模拟器,然后出现了这么个玩意

这这这,这是啥,这是啥,有瑕疵啊

一定是有什么不对的地方,恩,一定有什么不对 ( ˙-˙ )
2.3 anchorPoint & bounds & position & frame的关系
上边之所以会出现这种情况,主要是我们没有认清楚 anchorPoint bounds position frame三者之间的关系导致的,可以从上述代码中看到,我们并没有设置四者中的任何一个值。但我们的动画,和这四个值,关系还是很大的,下边我们就来一一分析这四者之间的关系
anchorPoint
锚点,这是个什么玩意,举个例子,桌子上有一张纸,你用一个手指头按着他,当他不动的时候,他就在那里,不增不减,当你要旋转他的时候,那就要看你按住的那个点的位置。动画中的旋转也是这个样子,这个锚点,决定了你的旋转。
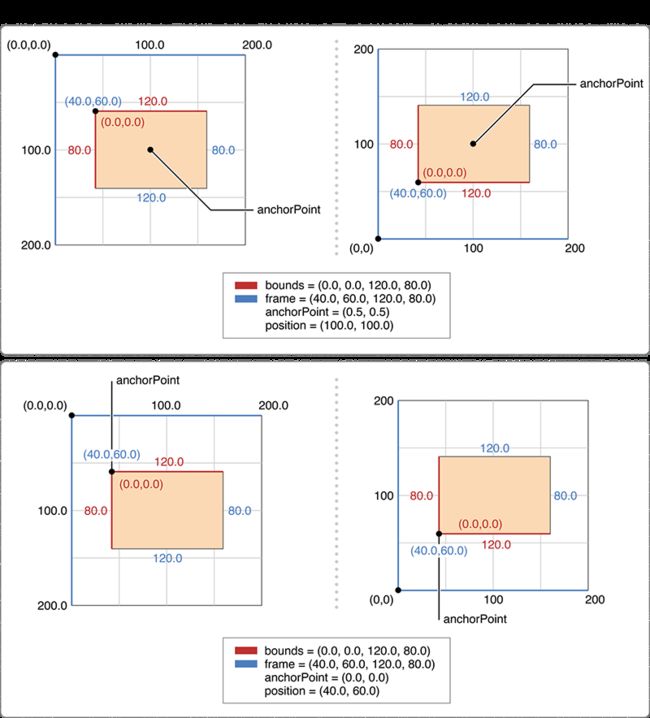
在这个图中我们可以看到,默认的锚点是(0.5,0.5),也就是layer的中心位置,当围绕着锚点旋转的时候,不同的锚点,旋转效果是不一样的
bounds
The bounds rectangle is the origin and size of the layer in its own coordinate space. When you create a new standalone layer, the default value for this property is an empty rectangle, which you must change before using the layer. The values of each coordinate in the rectangle are measured in points.
官方文档是这么说的,bounds这个属性想必大家都不陌生,我们把position和frame看完,在说他们的关系
position
The layer’s position in its superlayer’s coordinate space. Animatable.
The value of this property is specified in points and is always specified relative to the value in the anchorPoint property. For new standalone layers, the default position is set to (0.0, 0.0). Changing the frame property also updates the value in this property.
也就是说,position是这个layer在superLayer中的位置,创建一个layer的时候,默认值是0 和frame anchorPoint都有关系,我们在来看frame
frame
The frame rectangle is position and size of the layer specified in the superlayer’s coordinate space. For layers, the frame rectangle is a computed property that is derived from the values in thebounds, anchorPoint and position properties. When you assign a new value to this property, the layer changes its position and bounds properties to match the rectangle you specified. The values of each coordinate in the rectangle are measured in points.
官方文档说,这个属性也是在superlayer‘s坐标系中的位置,对于layer来说,其是一个计算属性,由bounds anchorPoint position 计算而来,当指定一个frame的时候,系统会重新计算position和bounds来改变layer的位置,所以说,frame bounds anchorPoint position 这几个值是有非常紧密的联系的,下边我们就来探究一下,究竟有什么联系
我们回过头先看anchorPoint的第一张图
第一组数据
frame = (40, 60, 120, 80);

bounds = (0, 0, 120, 80);

anchorPoint = (0.5, 0.5);

position = (100, 100);
第二组数据
frame = (40, 60, 120, 80);

bounds = (0, 0, 120, 80);

anchorPoint = (0, 0);

position = (40, 60);
上边说,四者是有联系的,而且frame和position都是在父坐标系中的位置,而bounds的宽和高是和frame的宽高一样的,那就很好解释了
frame.x = position.x - archonPoint.x * bounds.size.with
frame.y = position.y - archonPoint.y * bounds.size.height
那我们这样的想法对不对呢,我们还是写代码来看一下
CALayer * aLayer = [CALayer layer];
aLayer.backgroundColor = [UIColor redColor].CGColor;
aLayer.position = CGPointMake(200, 100);
aLayer.anchorPoint = CGPointMake(0.2, 0.2);
aLayer.bounds = CGRectMake(0, 0, 100, 150);
[self.view.layer addSublayer:aLayer];
NSLog(@"%@",NSStringFromCGRect(aLayer.frame));
当我们这样写的时候,根据上边的公式,应该能计算出来,frame.x = 180 frame.y = 70。那结果到底对不对呢,运行一下结果还真是。其实在日常开发过程中,我们一般都是先写好布局,然后设置锚点,在做动画,这样的时候,一运行就会发现,到处各种界面元素到处乱飞,根本就不是想要结果,这个时候,我们可以这么做,先设置锚点,然后在重设一遍frame,这样系统就能自动计算出position,这样的话,极大的简化了我们在动画中的布局问题
就拿上边的竖线摆动的话,我们可以看出,左边的动画和左边的圆,简单的话我们都可以直接把frame设置成(0, 0, superLayer.width, superLayer.height) 这样的话,我们想怎么运动,直接设置相应的锚点即可。
self.leftLine.anchorPoint = CGPointMake(0.1, 0);
self.leftLine.frame = CGRectMake(0, 0, self.width, self.height);

self.leftCycle.anchorPoint = CGPointMake(0, 0.9);
self.leftCycle.frame = CGRectMake(0, 0, self.width, self.height);

self.rightLine.anchorPoint = CGPointMake(0.9, 0);
self.rightLine.frame = CGRectMake(0, 0, self.width, self.height);

self.rightCycle.anchorPoint = CGPointMake(0.9, 0.9);
self.rightCycle.frame = CGRectMake(0, 0, self.width, self.height);
我们重新设置一遍anchorPoint和frame 把他们放在我们想要的位置,以及想要的锚点上,我们再来试一下
嗯,终于达到了我们想要的结果。
总结
其实,只要理解了 anchorPoint bounds position frame的关系,把我们想要做动画的控件摆放在合理的位置,在加上强大的CAAnimation,把复杂的动画拆分来看,在把简单的动画组合起来,我们可以做出很多很酷炫的动画。