本文按以下顺序讲解JUnit4的使用
- 下载jar包
- 单元测试初体验
- 自动生成测试类
- 执行顺序
- @Test的属性
下载jar包##
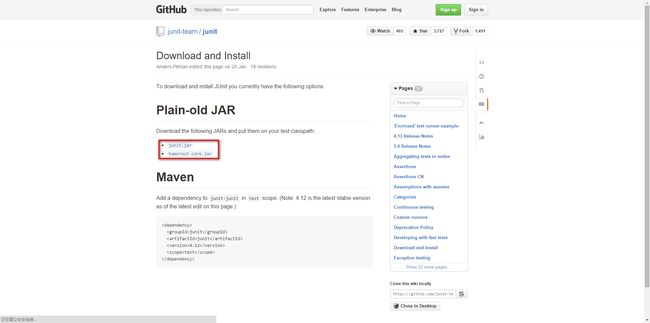
下载地址 在github上,把以下两个jar包都下载下来。
下载junit-4.12.jar,junit-4.12-javadoc.jar(文档),junit-4.12-sources.jar(源码)。
下载hamcrest-core-1.3.jar,hamcrest-core-1.3-javadoc.jar(文档),hamcrest-core-1.3-sources.jar(源码)。
最前面那个pom是Maven的配置文件,如果你需要的话也下载下来。
单元测试初体验##
先创建个简单的项目体验下单元测试是怎么一回事吧。
我创建一个项目叫JUnit4Demo,然后创建一个lib文件夹放刚下载的junit-4.12.jar和hamcrest-core-1.3.jar两个jar包并导入到项目里。
创建一个类com.xuhongchuan.util.Math,然后输入一个求阶乘的方法:
package com.xuhongchuan.util;

/**
 * Created by xuhongchuan on 2015/7/18.
 */
public class Math {

    /**
     * 阶乘
     * @param n
     * @return
     */
    public int factorial(int n) throws Exception {
        if (n < 0) {
            throw new Exception("负数没有阶乘");
        } else if (n <= 1) {
            return 1;
        } else {
            return n * factorial(n - 1);
        }
    }

}
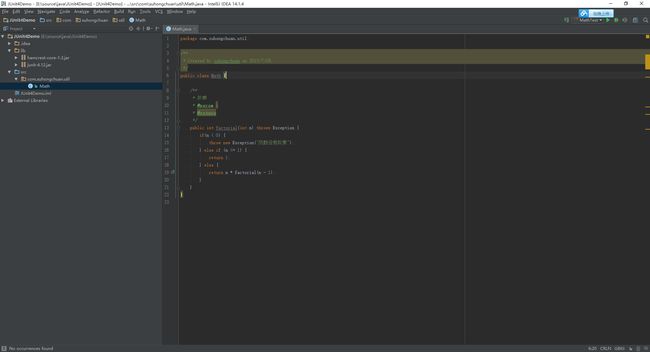
此时的项目结构是这样的:
好了,接下来要创建一个类来对Math类进行单元测试。
创建一个和src同级别的文件夹叫test(逻辑代码放src里,测试代码放test里是个好习惯)。
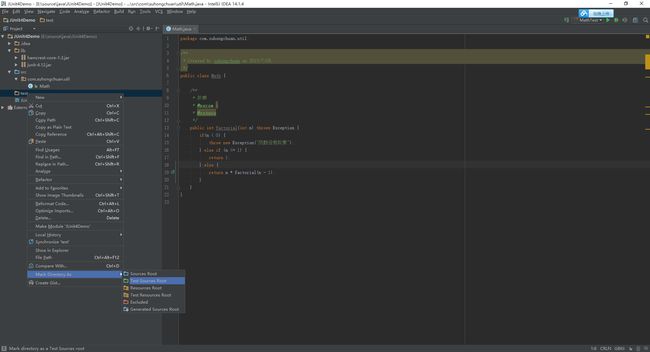
接着在IntelliJ IDEA里还要把这个test文件夹要设置成测试文件的根目录,右键选中
Mark Directory As - Test Sources Root。
然后创建com.xuhongchuan.util.MathTest类(包名一致,类名在要测试的类名后加上Test也是个好习惯)。
在MathTest里输入以下内容:
package com.xuhongchuan.util;

import org.junit.Test;
import static org.junit.Assert.*;

/**
 * Created by xuhongchuan on 2015/7/18.
 */
public class MathTest {

    @Test
    public void testFactorial() throws Exception {

        assertEquals(120, new Math().factorial(5));

    }

}
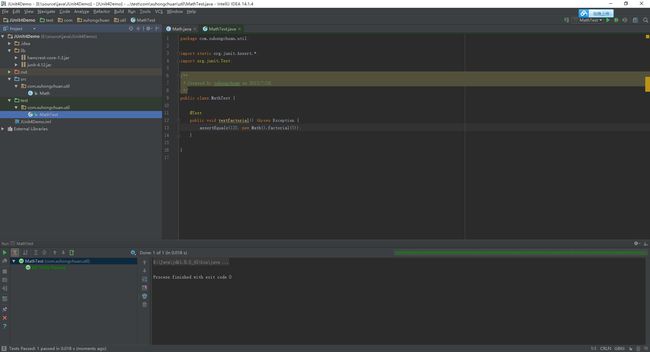
然后选中MathTest类ctrl + shift + F10运行一下,结果如下。
右下方一条绿色条说明测试通过,如果把120改成别的数字那么就会测试不通过显色红色条。JUnit4有一句话叫:“keeps the bar green to keep the code clean”。
解释一下MathTest,就六个地方要讲:
第一,导入了org.junit.Test;和org.junit.Assert.*;这两个包,注意后者是静态导入import static。
第二,testFactorial是在要测试的方法名Factorial前加个test(这也是个好习惯)。
第三,所有测试方法返回类型必须为void且无参数。
第四,一个测试方法之所以是个测试方法是因为@Test这个注解。
第五,assertEquals的作用是判断两个参数是否相等,例子中120是预期结果,new Math().factorial(5)是实际结果。但是通常不应该只比较一个值,要测试多几个特殊值,特别是临界值。例如Math().factorial(0)和Math().factorial(-1)等。
第六,assertEquals除了比较两个int,还重载了好多次可以比较很多种类型的参数。而且JUnit4包含一堆assertXX方法,assertEquals只是其中之一,这些assertXX统称为断言。刚不是下载了junit-4.12-javadoc.jar这个文档吗,解压后打开index.html如下图还有一堆断言。
自动生成测试类##
我们把测试类MathTest删掉,回到逻辑代码Math里再添加一个方法求斐波那契数列:
    /**
     * 斐波那契数列
     * @param n
     * @return
     */
    public int fibonacci(int n) throws Exception {
        if (n <= 0) {
            throw new Exception("斐波那契数列从第1位开始");
        } else if (n == 1) {
            return 0;
        } else if (n == 2) {
            return 1;
        } else {
            return fibonacci(n - 1) + fibonacci(n - 2);
        }
    }
现在的项目结构是这样的(测试类MathTest被删掉了)。
现在Math类有两个方法了,这里假设有十个、二十个甚至更多方法,如果要写测试方法都要自己一个一个写吗?那太累了,IntelliJ IDEA是可以自动生成测试方法的基本结构的。按快捷键ctrl - shift - T。
弹出的对话框点击Create New Test...
选择JUnit4,类名和包名还是默认的已经符合规范了,然后勾选要生成测试方法的方法。点击OK。
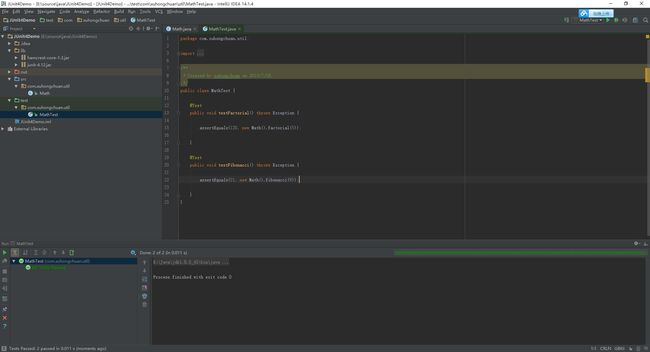
点击自动生成的测试类MathTest,可以看到测试方法的基本结构已经自动生成了。我们再自己添加测试代码就行了。
在testFactorial()添加:
assertEquals(120, new Math().factorial(5));
在testFibonacci()方法添加:
assertEquals(21, new Math().fibonacci(9));
运行后,绿条又出现了,测试成功。
执行顺序##
JUnit4利用JDK5的新特性Annotation,使用注解来定义测试规则。
这里讲一下以下几个常用的注解:
- @Test:把一个方法标记为测试方法
- @Before:每一个测试方法执行前自动调用一次
- @After:每一个测试方法执行完自动调用一次
- @BeforeClass:所有测试方法执行前执行一次,在测试类还没有实例化就已经被加载,所以用static修饰
- @AfterClass:所有测试方法执行完执行一次,在测试类还没有实例化就已经被加载,所以用static修饰
- @Ignore:暂不执行该测试方法
我们来试验一下,我新建一个测试类AnnotationTest,然后每个注解都用了,其中有两个用@Test标记的方法分别是test1和test2,还有一个用@Ignore标记的方法test3。然后我还创建了一个构造方法,这个构造方法很重要一会会引出一个问题。
具体代码如下:
package com.xuhongchuan.util;

import org.junit.*;
import static org.junit.Assert.*;

/**
 * Created by xuhongchuan on 2015/7/18.
 */
public class AnnotationTest {

    public AnnotationTest() {
        System.out.println("构造方法");
    }

    @BeforeClass
    public static void setUpBeforeClass() {
        System.out.println("BeforeClass");
    }

    @AfterClass
    public static void tearDownAfterClass() {
        System.out.println("AfterClass");
    }

    @Before
    public void setUp() {
        System.out.println("Before");
    }

    @After
    public void tearDown() {
        System.out.println("After");
    }

    @Test
    public void test1() {
        System.out.println("test1");
    }

    @Test
    public void test2() {
        System.out.println("test2");
    }

    @Ignore
    public void test3() {
        System.out.println("test3");
    }

}
运行结果如下:
 BeforeClass
 构造方法
 Before
 test1
 After
 构造方法
 Before
 test2
 After
 AfterClass
解释一下:@BeforeClass和@AfterClass在类被实例化前(构造方法执行前)就被调用了,而且只执行一次,通常用来初始化和关闭资源。@Before和@After和在每个@Test执行前后都会被执行一次。@Test标记一个方法为测试方法没什么好说的,被@Ignore标记的测试方法不会被执行,例如这个模块还没完成或者现在想测试别的不想测试这一块。
以上有一个问题,构造方法居然被执行了两次。所以我这里要说明一下,JUnit4为了保证每个测试方法都是单元测试,是独立的互不影响。所以每个测试方法执行前都会重新实例化测试类。
我再给你看一个实验:
添加一个成员变量
int i = 0;
然后把test1改为:
    i++;
    System.out.println("test1的i为" + i);
test2改为:
    i++;
    System.out.println("test2的i为" + i);
执行结果:
 BeforeClass
 构造方法
 Before
 test1的i为1
 After
 构造方法
 Before
 test2的i为1
 After
 AfterClass
可以看到test1和test2的i都只自增了一次,所以test1的执行不会影响test2,因为执行test2时又把测试类重新实例化了一遍。如果你希望test2的执行受test1的影响怎么办呢?把int i改为static的呗。
最后关于这些注解还有一个要说明的就是,你可以把多个方法标记为@BeforeClass、@AfterClass、@Before、@After。他们都会在相应阶段被执行。
@Test的属性##
最后来说一下@Test的两个属性
- excepted
- timeout
excepted属性是用来测试异常的,我们回到Math类,拿其中的求阶乘方法factorial()来说。
    public int factorial(int n) throws Exception {
        if (n < 0) {
            throw new Exception("负数没有阶乘");
        } else if (n <= 1) {
            return 1;
        } else {
            return n * factorial(n - 1);
        }
    }
如果传进来一个负数我们是希望抛出异常的,那要测试会不会抛异常怎么办呢?
我在测试类MathTest添加一个测试方法:
    @Test(expected = Exception.class)
    public void testFactorialException() throws Exception {
        new Math().factorial(-1);
        fail("factorial参数为负数没有抛出异常");
    }
这个方法就是(expected = Exception.class)和fail("factorial参数为负数没有抛出异常");之间的配合。就是这个测试方法会检查是否抛出Exception异常(当然也可以检测是否抛出其它异常),如果抛出了异常那么测试通过(因为你的预期就是传进负数会抛出异常)。没有抛出异常则测试不通过执行fail("factorial参数为负数没有抛出异常");
然后说下timeout属性,这个是用来测试性能的,就是测试一个方法能不能在规定时间内完成。
回到Math类,我创建一个数组排序的方法,用的是冒泡排序。
    public void sort(int[] arr) {
        //冒泡排序
        for (int i = 0; i < arr.length - 1; i++) { //控制比较轮数

            for (int j = 0; j < arr.length - i - 1; j++) { //控制每轮的两两比较次数
                if (arr[j] > arr[j + 1]) {
                    int temp = arr[j];
                    arr[j] = arr[j + 1];
                    arr[j + 1] = temp;
                }

            }

        }

    }
然后偶在测试类MathTest创建测试方法,随机生成一个长度为50000的数组然后测试排序所用时间。timeout的值为2000,单位和毫秒,也就是说超出2秒将视为测试不通过。
    @Test(timeout = 2000)
    public void testSort() throws Exception {
        int[] arr = new int[50000]; //数组长度为50000
        int arrLength = arr.length;
        //随机生成数组元素
        Random r = new Random();
        for (int i = 0; i < arrLength; i++) {
            arr[i] = r.nextInt(arrLength);
        }

        new Math().sort(arr);
    }
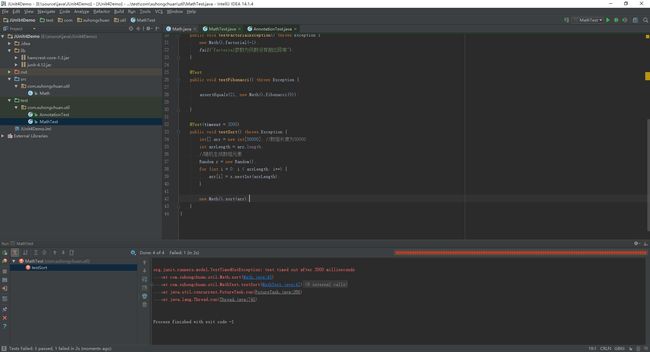
运行结果测试不通过,且提示TestTimedOutException。
那怎么办,修改代码提升性能呗。回到Math方法改为下sort()。这次我用快速排序,代码如下:
    public void sort(int[] arr) {
        //快速排序
        if (arr.length <= 1) {
            return;
        } else {
            partition(arr, 0, arr.length - 1);
        }

    }

    static void partition(int[] arr, int left, int right) {
        int i = left;
        int j = right;
        int pivotKey = arr[left]; //基准数

        while (i < j) {

            while (i < j && arr[j] >= pivotKey) {
                j--;
            }

            while (i < j && arr[i] <= pivotKey) {
                i++;
            }

            if (i < j) {
                int temp = arr[i];
                arr[i] = arr[j];
                arr[j] = temp;
            }
        }

        if (i != left) {
            arr[left] = arr[i];
            arr[i] = pivotKey;
        }

        if (i - left > 1) {
            partition(arr, left, i - 1);
        }

        if (right - j > 1) {
            partition(arr, j + 1, right);
        }

    }
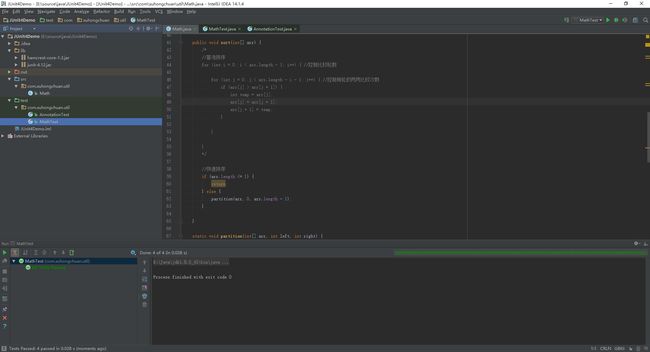
然后再运行一下测试类MathTest,绿色条出现了,测试通过妥妥的。
本文代码下载:百度网盘
