前言
即学即用Android Jetpack系列Blog的目的是通过学习Android Jetpack完成一个简单的Demo,本文是即学即用Android Jetpack系列Blog的第三篇。
在第二篇《即学即用Android Jetpack - Data Binding》,我们讨论了MVVM模式和Data Binding组件,所以这一章,我们继续学习跟MVVM模式相关的Android Jetpack组件ViewModel和LiveData。由于ViewModel和LiveData关联性比较强且使用简单(其实LiveData可以和很多组件一起使用),故打算一次性介绍这两个Android Jetpack组件。
学习本文需要掌握Data Binding,如果还没掌握,建议学习:
《即学即用Android Jetpack - Data Binding》
本文实现的效果:
语言:Kotlin
我的Demo:https://github.com/mCyp/Hoo
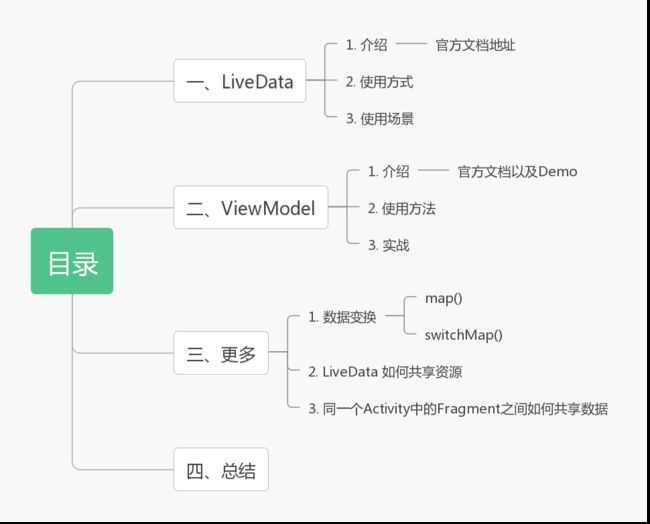
目录
一、LiveData
友情提醒:
官方文档:LiveData
在讲LiveData之前,我们先看看LiveData和ViewModel的作用:
从这一张图,我们可以看出
ViewModel和
LiveData在整个MVVM架构中担当数据驱动的职责,这也是
MVVM模式中
ViewModel层的作用。
1. 介绍
看了上面的图,对于LiveData我们还是感到疑惑,那么我们看看官网是如何定义的:
LiveDatais an observable data holder class. Unlike a regular observable, LiveData is lifecycle-aware, meaning it respects the lifecycle of other app components, such as activities, fragments, or services.
从官网的介绍可以看到,LiveData作用跟RxJava类似,是观察数据的类,相比RxJava,它能够在Activity、Fragment和Service之中正确的处理生命周期。那么LiveData有什么优点呢?
- 数据变更的时候更新UI
- 没有内存泄漏
- 不会因为停止Activity崩溃
- 无需手动处理生命周期
- 共享资源
乍看之下LiveData挺鸡肋的,事实也确实如此,因为LiveData能够实现的功能RxJava也可以实现,而且与LiveData相比,RxJava拥有着更加丰富的生态,当然,谷歌的官方架构仍然值得我们去学习。
2. 使用方式
LiveData常用的方法也就如下几个:
| 方法名 | 作用 |
|---|---|
observe(@NonNull LifecycleOwner owner, @NonNull Observer observer) |
最常用的方法,需要提供Observer处理数据变更后的处理。LifecycleOwner则是我们能够正确处理声明周期的关键! |
setValue(T value) |
设置数据 |
getValue():T |
获取数据 |
postValue(T value) |
在主线程中更新数据 |
3. 使用场景
我看见绝大部分的LiveData都是配合其他Android Jetpack组件使用的,具体情况具体分析。
-
ViewModel: 见下文。 -
Room:先参考Demo,文章后续推出。
二、ViewModel
友情提醒:
官方文档:ViewModel
谷歌实验室:教程
谷歌官方Demo地址:https://github.com/googlecodelabs/android-lifecycles
众所周知,MVVM层中ViewModel层用来作逻辑处理的,那么我们Android Jetpack组件中ViewModel的作用是否也一致呢?
1. 介绍
我们先来看官网的介绍:
The
ViewModelclass is designed to store and manage UI-related data in a lifecycle conscious way. TheViewModelclass allows data to survive configuration changes such as screen rotations.
ViewModel同样具有生命周期意识的处理跟UI相关的数据,并且,当设备的一些配置信息改变(例如屏幕旋转)它的数据不会消失。
通常情况下,如果我们不做特殊处理,当屏幕旋转的时候,数据会消失,那ViewModel管理的数据为什么不会消失呢,是因为ViewModel的生命周期:
ViewModel的另一个特点就是同一个Activity的Fragment之间可以使用ViewModel实现共享数据。
2. 使用方法
继承ViewModel即可。
3. 实战
第一步:添加依赖
添加进module下面的build.gradle:
ext.lifecycleVersion = '2.2.0-alpha01'
dependencies {
    //...

    // liveData
    implementation "androidx.lifecycle:lifecycle-livedata-ktx:$rootProject.lifecycleVersion"
    // viewModel
    implementation "androidx.lifecycle:lifecycle-viewmodel-ktx:$rootProject.lifecycleVersion"
    implementation "androidx.lifecycle:lifecycle-extensions:$rootProject.lifecycleVersion"
}
第二步:创建ShoeModel
继承ViewModel类,分别创建对品牌名的观察对象brand:MutableLiveData和对鞋子集合的观察对象shoes: LiveData:
class ShoeModel constructor(shoeRepository: ShoeRepository) : ViewModel() {

    // 品牌的观察对象 默认观察所有的品牌
    private val brand = MutableLiveData().apply {
        value = ALL
    }

    // 鞋子集合的观察类
    val shoes: LiveData> = brand.switchMap {
        // Room数据库查询,只要知道返回的是LiveData>即可
        if (it == ALL) {
            shoeRepository.getAllShoes()
        } else {
            shoeRepository.getShoesByBrand(it)
        }
    }

    //... 不重要的函数省略

    companion object {
        private const val ALL = "所有"
    }
}
第三步:获取ViewModel
无构造参数获取:
构造函数没有参数的情况下,获取ShoeModel很简单,ViewModelProviders.of(this).get(ShoeModel::class.java)这样就可以返回一个我们需要的ShoeModel了。
有构造参数获取
不过,上面的ShoeModel中我们在构造函数中需要一个ShoeRepository参数,上述方法是显然行不通的,这种情况下我们需要自定义实现Factory:
class ShoeModelFactory(
    private val repository: ShoeRepository
) : ViewModelProvider.NewInstanceFactory() {
    override fun  create(modelClass: Class): T {
        return ShoeModel(repository) as T
    }
}
为了使用方便,又写了一个工具类CustomViewModelProvider:
object CustomViewModelProvider {

    // ...省略无关代码

    fun providerShoeModel(context: Context):ShoeModelFactory{
        val repository:ShoeRepository = RepositoryProvider.providerShoeRepository(context)
        return ShoeModelFactory(repository)
    }
}
最后在ShoeFragment中获取:
    // by viewModels 需要依赖 "androidx.navigation:navigation-ui-ktx:$rootProject.navigationVersion"
    private val viewModel: ShoeModel by viewModels {
        CustomViewModelProvider.providerShoeModel(requireContext())
    }
第四步:使用ViewModel
ViewModel的使用需要结合具体的业务,比如我这里的ShoeModel,因为ShoeFragment的代码不多,我直接贴出来:
/**
 * 鞋子集合的Fragment
 *
 */
class ShoeFragment : Fragment() {

    // by viewModels 需要依赖 "androidx.navigation:navigation-ui-ktx:$rootProject.navigationVersion"
    private val viewModel: ShoeModel by viewModels {
        CustomViewModelProvider.providerShoeModel(requireContext())
    }

    override fun onCreateView(
        inflater: LayoutInflater, container: ViewGroup?,
        savedInstanceState: Bundle?
    ): View? {
        val binding: FragmentShoeBinding = FragmentShoeBinding.inflate(inflater, container, false)
        context ?: return binding.root
        ViewModelProviders.of(this).get(ShoeModel::class.java)
        // RecyclerView 的适配器 ShoeAdapter
        val adapter = ShoeAdapter()
        binding.recycler.adapter = adapter
        onSubscribeUi(adapter)
        return binding.root
    }

    /**
     * 鞋子数据更新的通知
     */
    private fun onSubscribeUi(adapter: ShoeAdapter) {
        viewModel.shoes.observe(viewLifecycleOwner, Observer {
            if (it != null) {
                adapter.submitList(it)
            }
        })
    }
}
在onSubscribeUi方法中,我们使用ShoeModel的LiveData进行了观察通知,当鞋子集合更新的时候,会更新到当前RecyclerView中的适配器。
布局文件fragment_shoe.xml很简单,虽使用了Data Binding,但是没有变量,且只有一个RecyclerView,这里不再赘述。ShoeAdapter的实现同样简单,感兴趣的可以查看源码,这里同样不再赘述。
这样写完之后,本文一开始的图的效果就出现了~
三、更多
一个例子并不能展现所有的关于LiveData和ViewModel的内容。LiveData和ViewModel仍有一些知识需要我们注意。
1. LiveData数据变换
LiveData中数据变换方法有map()和switchMap(),关于switchMap(),我在上面实战的ShoeModel已经实践过了:
// 本地数据仓库
class ShoeRepository private constructor(private val shoeDao: ShoeDao) {

    fun getAllShoes() = shoeDao.getAllShoes()

    /**
     * 通过品牌查询鞋子 返回 LiveData>
     */
    fun getShoesByBrand(brand:String) = shoeDao.findShoeByBrand(brand)

    /**
     * 插入鞋子的集合 返回 LiveData>
     */
    fun insertShoes(shoes: List) = shoeDao.insertShoes(shoes)

    // ... 单例省略
}

class ShoeModel constructor(shoeRepository: ShoeRepository) : ViewModel() {

    // 品牌的观察对象 默认观察所有的品牌
    private val brand = MutableLiveData().apply {
        value = ALL
    }

    // 鞋子集合的观察类
    val shoes: LiveData> = brand.switchMap {
        // Room数据库查询,只要知道返回的是LiveData>即可
        if (it == ALL) {
            shoeRepository.getAllShoes()
        } else {
            shoeRepository.getShoesByBrand(it)
        }
    }
}
map()的使用我们借用官方的例子:
val userLiveData: LiveData = UserLiveData()
val userName: LiveData = Transformations.map(userLiveData) {
    user -> "${user.name} ${user.lastName}"
}
可以看到,map()同样可以实现将A变成B,那么switchMap()和map()的区别是什么?map()中只有一个LiveData,他是在LiveData发送数据的时候把A变成B,而switchMap()中同时存在LiveData和LiveData,LiveData更新之后通知LiveData更新。
2. LiveData如何共享数据
假设我们有这样的需求:注册页需要记录信息,注册完成跳转到登录页,并将账号和密码显示在登录页。这种情况下,我们可以定义一个类然后继承LiveData,并使用单例模式即可:
// 登录信息
data class LoginInfo constructor(val account:String, val pwd:String, val email:String)

/**
 * 自定义单例LiveData
 */
class LoginLiveData:LiveData() {

    companion object {
        private lateinit var sInstance: LoginLiveData

        @MainThread
        fun get(): LoginLiveData {
            sInstance = if (::sInstance.isInitialized) sInstance else LoginLiveData()
            return sInstance
        }
    }
}
需要实例的时候用单例创建即可。
3. 使用ViewModel在同一个Activity中的Fragment之间共享数据
想要利用ViewModel实现Fragment之间数据共享,前提是Fragment中的FragmentActivity得相同,这里直接贴上官方的代码:
class SharedViewModel : ViewModel() {
val selected = MutableLiveData- ()
fun select(item: Item) {
selected.value = item
}
}
class MasterFragment : Fragment() {
private lateinit var itemSelector: Selector
private lateinit var model: SharedViewModel
override fun onCreate(savedInstanceState: Bundle?) {
super.onCreate(savedInstanceState)
model = activity?.run {
ViewModelProviders.of(this).get(SharedViewModel::class.java)
} ?: throw Exception("Invalid Activity")
itemSelector.setOnClickListener { item ->
// Update the UI
}
}
}
class DetailFragment : Fragment() {
private lateinit var model: SharedViewModel
override fun onCreate(savedInstanceState: Bundle?) {
super.onCreate(savedInstanceState)
model = activity?.run {
ViewModelProviders.of(this).get(SharedViewModel::class.java)
} ?: throw Exception("Invalid Activity")
model.selected.observe(this, Observer
- { item ->
// Update the UI
})
}
}
四、总结
本文到此就结束了,本人水平有限,难免有误,欢迎指正哟~
Over~
如果觉得本文不错,可以查看Android Jetpack系列的其他文章:
第一篇:《即学即用Android Jetpack - Navigation》
第二篇:《即学即用Android Jetpack - Data Binding》
第四篇:《即学即用Android Jetpack - Room》
第五篇:《即学即用Android Jetpack - Paging》
第六篇:《即学即用Android Jetpack - WorkManger》


