终于有时间继续写我的文章了,这段时间在赶学校的软件课程设计,可算弄完了!
下面继续我们的创造之旅~
本篇文章你会学到
- 用KVO方法优化键盘弹出动画
- 将同步下载消息改为异步,以减轻主线程的压力。
- 实现app登录、注册的功能
首先下载本章源代码:
百度网盘地址
在上一章结尾我提到:
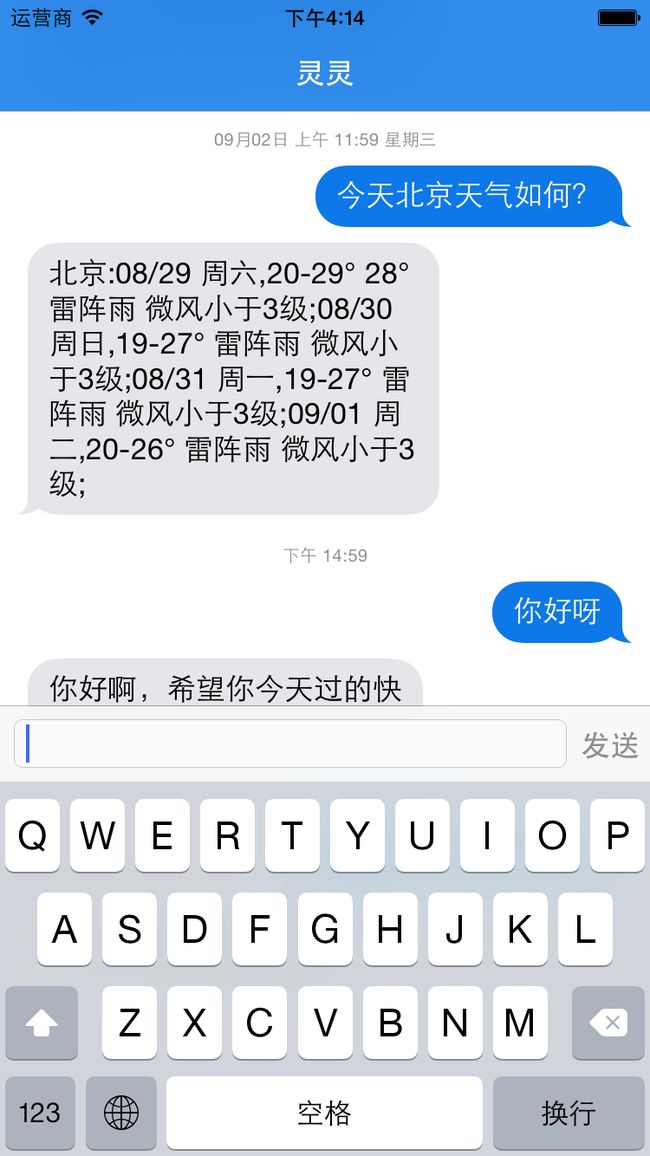
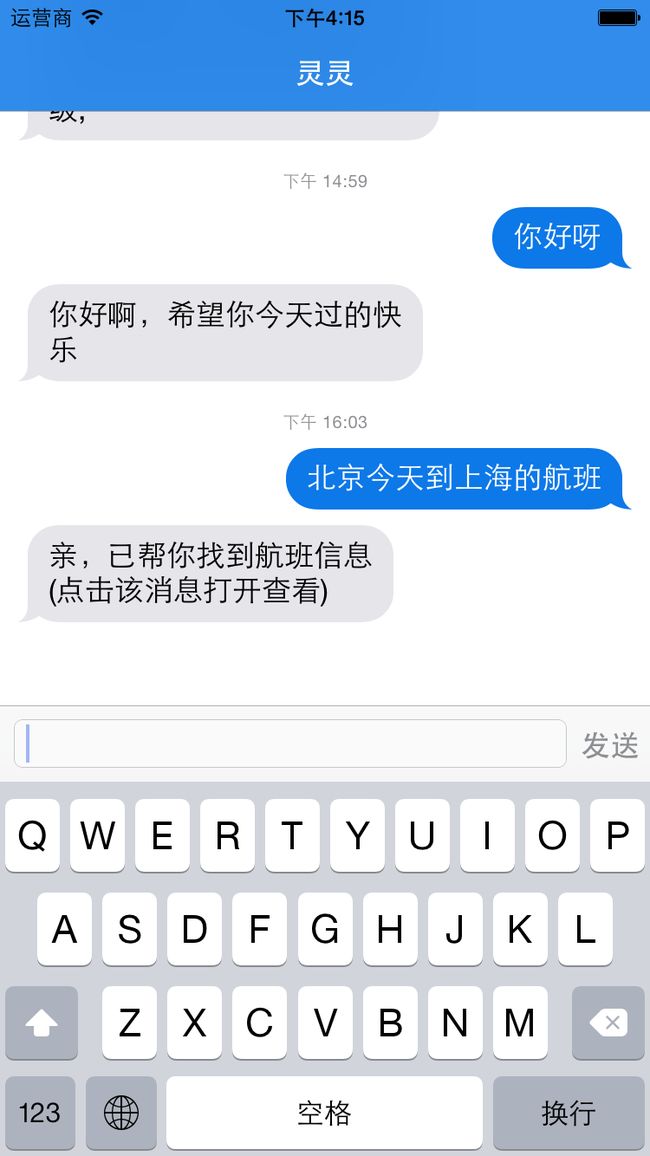
我们的app在键盘弹出时有一些问题: -
在我们点出键盘时会遮挡消息:
- 键盘弹出时把tableView拉到底部会有一个很难看的空白:
下面我们来解决它,我们需要在键盘弹出时修改tableView的一些属性和约束条件,所以我们需要在键盘弹出时得到通知,要做到这个,我们要使用KVO(Key-Value Observing)方法。
在viewDidLoad()中的结尾添加以下代码来添加键值监控:
        let notificationCenter = NSNotificationCenter.defaultCenter()
        notificationCenter.addObserver(self, selector: "keyboardWillShow:", name: UIKeyboardWillShowNotification, object: nil)
        notificationCenter.addObserver(self, selector: "keyboardDidShow:", name: UIKeyboardDidShowNotification, object: nil)
首先获取通知中心的实例,然后添加两个观察者,第一个用来监控UIKeyboardWillShowNotification键值的变化,这是系统提供的键值,当键盘将要弹出时会改变;第二个监控 UIKeyboardDidShowNotification,同样地,这也是系统提供的,当键盘完全弹出时会改变。
当这两个键值改变时,会向通知中心发送通知,然后由我们自定义的两个selector方法处理通知,下面定义这两个方法。
首先第一个方法:
    func keyboardWillShow(notification: NSNotification) {

        let userInfo = notification.userInfo as NSDictionary!
        let frameNew = (userInfo[UIKeyboardFrameEndUserInfoKey] as! NSValue).CGRectValue()
        let insetNewBottom = tableView.convertRect(frameNew, fromView: nil).height
        let insetOld = tableView.contentInset
        let insetChange = insetNewBottom - insetOld.bottom
        let overflow = tableView.contentSize.height - (tableView.frame.height-insetOld.top-insetOld.bottom)

        let duration = (userInfo[UIKeyboardAnimationDurationUserInfoKey] as! NSNumber).doubleValue
        let animations: (() -> Void) = {
            if !(self.tableView.tracking || self.tableView.decelerating) {
                // 根据键盘位置调整Inset
                if overflow > 0 {
                    self.tableView.contentOffset.y += insetChange
                    if self.tableView.contentOffset.y < -insetOld.top {
                        self.tableView.contentOffset.y = -insetOld.top
                    }
                } else if insetChange > -overflow {
                    self.tableView.contentOffset.y += insetChange + overflow
                }
            }
        }
        if duration > 0 {
            let options = UIViewAnimationOptions(UInt((userInfo[UIKeyboardAnimationCurveUserInfoKey] as! NSNumber).integerValue << 16)) // http://stackoverflow.com/a/18873820/242933
            UIView.animateWithDuration(duration, delay: 0, options: options, animations: animations, completion: nil)
        } else {
            animations()
        }
    }
很难懂?不着急,我们一步一步解释这些代码!
首先取出通知的userifno,键盘的所有属性都在这里面,他是一个字典类型的数据:
let userInfo = notification.userInfo as NSDictionary!
然后通过UIKeyboardFrameEndUserInfoKeykey取出键盘的位置、大小信息,也就是frame,并将其的参考view设置为tableView,记录下它的高度
 let frameNew = (userInfo[UIKeyboardFrameEndUserInfoKey] as! NSValue).CGRectValue()
  let insetNewBottom = tableView.convertRect(frameNew, fromView: nil).height
然后我们需要计算一些数据:
 let insetOld = tableView.contentInset
 let insetChange = insetNewBottom - insetOld.bottom
 let overflow = tableView.contentSize.height - (tableView.frame.height-insetOld.top-insetOld.bottom)
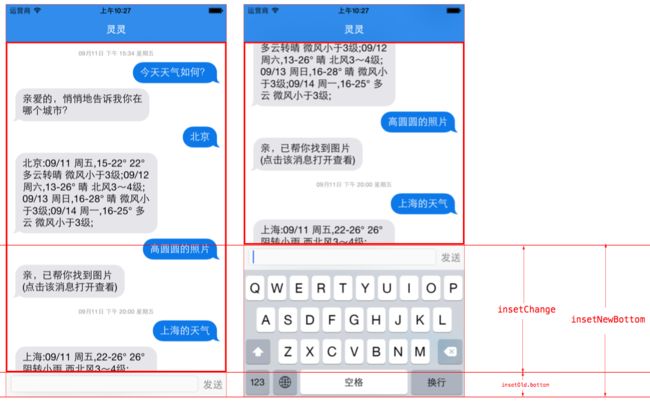
insetChange指的是那部分呢?我画出一个图大家就明白了:
tableview的
contentInset所指的是所图的红框部分。
overflow指的是所有消息的总高度和键盘弹出前contentInset的差值,实际上就是没有显示部分的高度,也就是溢出的部分。
然后通过
UIKeyboardAnimationDurationUserInfoKey
key来得到键盘弹出动画的持续时间,设置自定义的动画闭包:
        let duration = (userInfo[UIKeyboardAnimationDurationUserInfoKey] as! NSNumber).doubleValue
        let animations: (() -> Void) = {
            if !(self.tableView.tracking || self.tableView.decelerating) {
                // 根据键盘位置调整Inset
                if overflow > 0 {
                    self.tableView.contentOffset.y += insetChange
                    if self.tableView.contentOffset.y < -insetOld.top {
                        self.tableView.contentOffset.y = -insetOld.top
                    }
                } else if insetChange > -overflow {
                    self.tableView.contentOffset.y += insetChange + overflow
                }
            }
        }
我们看一下动画闭包内部做了些什么。
首先判断tableView的滚动是否停止了,如果没有停止滚动就不做任何事情。
tableView的滚动有两种情况:
- 手指点击tableView,开始滚动,即
tracking - 手指抬起,tableView还会有一段减速滚动,也就是
decelerating
  if !(self.tableView.tracking || self.tableView.decelerating){
.....
.....
}
如果溢出大于0,则将tableView当前位置contentOffset向下移动,也就对应着手指向上拖动insetChange的高度,这样可以保证消息和键盘同时向上移动,但是如果滚动之后仍然是负值,且超出insetOld.top的距离,也就是导航栏的高度,就把tableView的当前位置设置成屏幕之上一个导航栏的高度。
如果溢出是负值,但是绝对值小于insetChange,则contenOffset.y增加两者的差值。
当时长大于0时真正执行我们的动画闭包,否则就即时执行闭包:
        if duration > 0 {
            let options = UIViewAnimationOptions(UInt((userInfo[UIKeyboardAnimationCurveUserInfoKey] as! NSNumber).integerValue << 16)) // http://stackoverflow.com/a/18873820/242933
            UIView.animateWithDuration(duration, delay: 0, options: options, animations: animations, completion: nil)
        } else {
            animations()
        }
其中要注意的是,我们的动画曲线要和键盘弹出动画的曲线相同,所以要用 UIKeyboardAnimationCurveUserInfoKeykey得到曲线信息,这里的类型转换比较麻烦,要进行左移16的位运算,因为没有对应的 as类型转换可用,只能用最底层的方式。
为什么要这样呢,其实我也不知道。。我也是查来的= =
stackoverflow
第二个方法,是用来防止出现底下的白边,原理就是限制显示出的高度,将底部切掉一部分,也就是将contenInset.bottom值变大一些,变大为键盘的高度:
   func keyboardDidShow(notification: NSNotification) {
        let userInfo = notification.userInfo as NSDictionary!
        let frameNew = (userInfo[UIKeyboardFrameEndUserInfoKey] as! NSValue).CGRectValue()
        let insetNewBottom = tableView.convertRect(frameNew, fromView: nil).height

        //根据键盘高度设置Inset
        let contentOffsetY = tableView.contentOffset.y
        tableView.contentInset.bottom = insetNewBottom
        tableView.scrollIndicatorInsets.bottom = insetNewBottom
        // 优化,防止键盘消失后tableview有跳跃
        if self.tableView.tracking || self.tableView.decelerating {
            tableView.contentOffset.y = contentOffsetY
        }
    }
这样就好了,运行一下,是不是感觉舒服多了?
好的,下面我们解决下一个问题,在我们打开app的时候,会看到控制台显示如下内容:
2015-09-14 21:16:24.951 TuringChatMachine[820:36384] Warning: A long-running operation is being executed on the main thread.
 Break on warnBlockingOperationOnMainThread() to debug.
意思是有一个长运行时间的操作在主线程执行,由于主线程主要用于UI显示,所以如果有其他占用cpu的线程也在其中运行的话会使得UI显示变得很卡。
虽然没有什么感觉,但是如果我们去看cpu的负荷图的话,如下图所示:
会看到一个瞬间cpu负荷暴涨到了32%!这样很不酷对不对?
我们的解决办法就是,将这个占用cpu很多使用量的操作放在另一个线程中,但首先我们要找到这是哪个操作,细心的你一定注意到,当加载聊天界面的时候会比较慢,没错就是那个操作在作怪!
所以呢,我们对 initData()方法进行一些优化。
首先改变我们从Parse服务器下载数据的方法
query.findObjects(),这是同步下载数据,会占据我们很大一部分cpu负载,所以我们要改为异步下载,也就是放到其他线程执行,将以下代码修改一下:
 for object in query.findObjects() as! [PFObject]{

                let message = Message(incoming: object[incomingKey] as! Bool, text: object[textKey] as! String, sentDate: object[sentDateKey] as! NSDate)
                if let url = object[urlKey] as? String{
                    message.url = url

                }
                if index == 0{
                    currentDate = message.sentDate
                }
                let timeInterval = message.sentDate.timeIntervalSinceDate(currentDate!)


                if timeInterval < 120{
                    messages[section].append(message)
                }else{
                    section++
                    messages.append([message])


                }
                currentDate = message.sentDate
                index++
            }
修改为以下使用findObjectsInBackgroundWithBlock的版本:
        query.findObjectsInBackgroundWithBlock { (objects, error) -> Void in
            if error == nil {

                if objects!.count > 0 {

                    for object in objects as! [PFObject] {

                        if index == objects!.count - 1{

                            dispatch_async(dispatch_get_main_queue(), { () -> Void in

                                self.tableView.reloadData()

                            })

                        }

                        let message = Message(incoming: object["incoming"] as! Bool, text: object["text"] as! String, sentDate: object["sentDate"] as! NSDate)

                        if let url = object["url"] as? String{

                            message.url = url

                        }
                        if index == 0{

                            currentDate = message.sentDate

                        }
                        let timeInterval = message.sentDate.timeIntervalSinceDate(currentDate!)


                        if timeInterval < 120{

                            self.messages[section].append(message)


                        }else{

                            section++

                            self.messages.append([message])

                        }
                        currentDate = message.sentDate

                        index++

                    }
                }

            }else{
                println("error \(error?.userInfo)")
            }
        }
由于这是异步下载,所以tableView仍然会继续加载cell而不会去管messages里有没有值,这时一定会崩溃,所以为了防止这种情况发生,我们要首先给messages赋一个欢迎消息,在方法开头加上这一行代码:
messages = [[Message(incoming: true, text: "你好,请叫我灵灵,我是主人的贴身小助手!", sentDate: NSDate())]]
然后运行一下,同时看一下cpu的负荷率表:
仅有7%了!干的漂亮!
下面我们来为我们的app增加一个登录的功能,因为没有办法去区分聊天信息,所有人的聊天信息都是共享的,真正的聊天app可不会是这样的。
要做到这个,我们要为我们数据库上的聊天消息类增加一个新属性:
User类是Parse默认的用户类,我们的类型用指针,指向用户类,将信息与用户进行绑定,这样就能知道该条信息属于哪个用户了。
幸运的是Parse已经提供了登录的视图控制器,同样还有注册的视图控制器:
PFLogInViewController和 PFSignUpViewController
虽然它本身的语言是英文,但是我在初始项目里对他们进行了一下汉化修改,其实有更好的办法进行国际化,但这个只是为了演示。
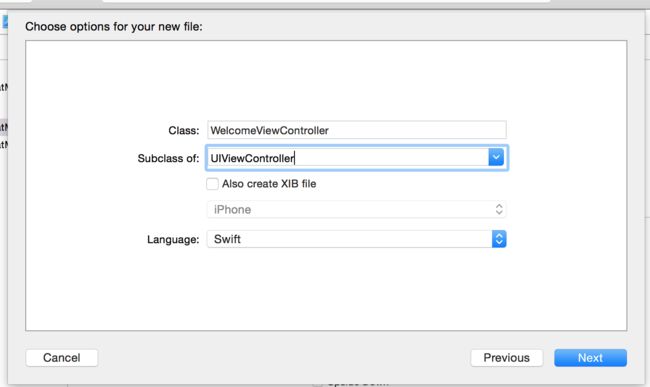
首先我们创建一个欢迎页面:
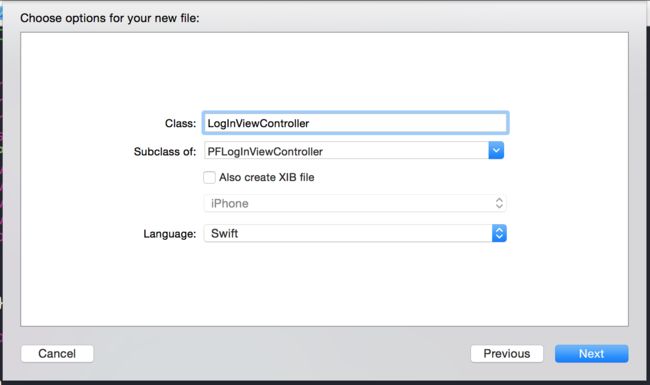
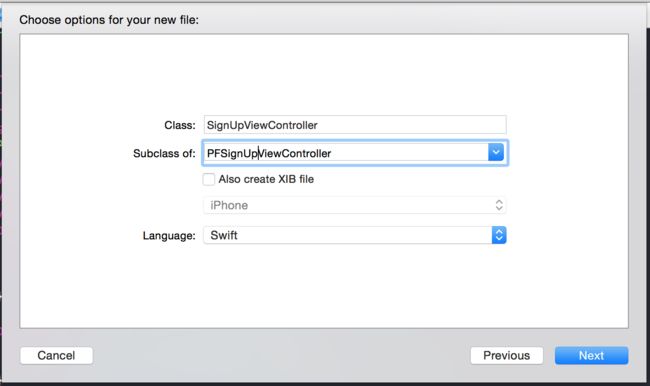
还有登录页面,注册页面:
都加上
import ParseUI
在LogInViewController.swift中的viewDidLoad()方法里添加以下代码来自定义logo:
self.logInView?.logo = UIImageView(image: UIImage(named: "logo"))
同样地,在SignUpViewController.swift中的viewDidLoad()方法里添加以下代码:
self.signInView?.logo = UIImageView(image: UIImage(named: "logo"))
在WelcomeViewController.swift增加import模块:
import Parse
import ParseUI
使WelcomeViewController遵循PFSignUpViewControllerDelegate和
PFLogInViewControllerDelegate代理:
class WelcomeViewController: UIViewController,PFSignUpViewControllerDelegate,PFLogInViewControllerDelegate{


}
增加属性,登录视图控制器和注册视图控制器,还有欢迎界面的logo和welcomeLabel用来显示logo和欢迎语:
    var loginVC:LogInViewController!
    var signUpVC:SignUpViewController!
    var logo:UIImageView!
    var welcomeLabel:UILabel!
我们来实现一些代理方法,首先是登录的代理方法:
    func logInViewController(logInController: PFLogInViewController, shouldBeginLogInWithUsername username: String, password: String) -> Bool {
        if (!username.isEmpty && !password.isEmpty )
        {
            return true
        }
        UIAlertView(title: "缺少信息", message: "请补全缺少的信息", delegate: self, cancelButtonTitle:"确定").show()


        return false
    }
    func logInViewController(logInController: PFLogInViewController, didLogInUser user: PFUser) {
       self.dismissViewControllerAnimated(true, completion: nil)
    }
    func logInViewController(logInController: PFLogInViewController, didFailToLogInWithError error: NSError?) {

        println("登录错误")


    }
第一个方法是执行我们自定义的用户名密码的合法性检查方法;第二个是在登录之后执行,可以通过user参数知道登录的是哪个用户;第三个是如果登录出现错误,错误信息可以在这里找到。
同样地,实现注册相应的三个方法:
    func signUpViewController(signUpController: PFSignUpViewController, shouldBeginSignUp info: [NSObject : AnyObject]) -> Bool {

        var infomationComplete = true
        for key in info.values {
            var field = key as! String
            if (field.isEmpty){
                infomationComplete = false
                break
            }
        }

        if (!infomationComplete){


            UIAlertView(title: "缺少信息", message: "请补全缺少的信息", delegate: self, cancelButtonTitle:"确定").show()

            return false
        }
        return true
    }
    func signUpViewController(signUpController: PFSignUpViewController, didSignUpUser user: PFUser) {

        self.dismissViewControllerAnimated(true, completion: nil)

    }
    func signUpViewController(signUpController: PFSignUpViewController, didFailToSignUpWithError error: NSError?) {
        println("注册失败")
    }
下面我们在viewDidLoad()中配置一下欢迎界面:
        view.backgroundColor = UIColor.whiteColor()
        self.navigationController?.navigationBarHidden = true
        logo = UIImageView(image: UIImage(named: "logo"))
        logo.center = CGPoint(x: view.center.x, y: view.center.y - 50)
        welcomeLabel = UILabel(frame: CGRect(x: view.center.x - 150/2, y: view.center.y + 20, width: 150, height: 50))
        welcomeLabel.font = UIFont.systemFontOfSize(22)
        welcomeLabel.textColor = UIColor(red:0.11, green:0.55, blue:0.86, alpha:1)
        welcomeLabel.textAlignment = .Center
        view.addSubview(welcomeLabel)

        view.addSubview(logo)
我们在viewWillAppear()方法中实现欢迎页面逻辑,当已经登录时,显示欢迎语欢迎某某某,然后2s后进入聊天界面,否则显示未登录,进入登录界面:
    override func viewWillAppear(animated: Bool) {
        if (PFUser.currentUser() != nil){
            self.welcomeLabel.text = "欢迎 \(PFUser.currentUser()!.username!)!"
            delay(seconds: 2.0, { () -> () in
                var  chatVC = ChatViewController()
                chatVC.title = "灵灵"
                var naviVC  =  UINavigationController(rootViewController: chatVC)
                self.presentViewController(naviVC, animated: true, completion: nil)
            })
        }else{
            self.welcomeLabel.text = "未登录"
            delay(seconds: 2.0) { () -> () in
                self.loginVC = LogInViewController()
                self.loginVC.delegate = self
                self.signUpVC = SignUpViewController()
                self.signUpVC.delegate = self
                self.loginVC.signUpController = self.signUpVC
                self.presentViewController(self.loginVC, animated: true, completion: nil)
            }


        }

    }
定义这个延时方法,在import下面:
func delay(#seconds: Double, completion:()->()) {
    let popTime = dispatch_time(DISPATCH_TIME_NOW, Int64( Double(NSEC_PER_SEC) * seconds ))

    dispatch_after(popTime, dispatch_get_main_queue()) {
        completion()
    }
}
运行之前还有一步,就是在AppDelegate.swift的application()方法里修改我们的初始视图控制器:
    func application(application: UIApplication, didFinishLaunchingWithOptions launchOptions: [NSObject: AnyObject]?) -> Bool {
        // Override point for customization after application launch.
        Parse.setApplicationId("CYdFL9mvG8jHqc4ZA5PJsWMInBbMMun0XCoqnHgf", clientKey: "6tGOC1uIKeYp5glvJE6MXZOWG9pmLtMuIUdh2Yzo")

        var welcomeVC:WelcomeViewController = WelcomeViewController()

        UINavigationBar.appearance().tintColor = UIColor.whiteColor()
        UINavigationBar.appearance().barTintColor = UIColor(red: 0.05, green: 0.47, blue: 0.91, alpha: 1.0)
        UINavigationBar.appearance().titleTextAttributes = [NSForegroundColorAttributeName: UIColor.whiteColor()]
        UIApplication.sharedApplication().statusBarStyle = UIStatusBarStyle.LightContent


        let frame = UIScreen.mainScreen().bounds
        window = UIWindow(frame: frame)

        window!.rootViewController = welcomeVC
        window!.makeKeyAndVisible()
        return true
    }
还有一件事,我们要在读取数据的时候只读取当前登录用户的信息,而不是全部,所以我们要加上一个限制,在query.findObjectsInBackgroundWithBlock执行前加上以下代码:
        if let user = PFUser.currentUser(){
            query.whereKey("createdBy", equalTo: user)
            messages = [[Message(incoming: true, text: "\(user.username!)你好,请叫我灵灵,我是主人的贴身小助手!", sentDate: NSDate())]]
        }
同样地,我们保存消息的时候,将当前用户赋值给createdBy属性,修改一下saveMessage()方法:
    func saveMessage(message:Message){
        var saveObject = PFObject(className: "Messages")
        saveObject["incoming"] = message.incoming
        saveObject["text"] = message.text
        saveObject["sentDate"] = message.sentDate
        saveObject["url"] = message.url
        var user = PFUser.currentUser()
        saveObject["createdBy"] = user
        saveObject.saveEventually { (success, error) -> Void in

            if success{
                println("消息保存成功!")
            }else{

                println("消息保存失败! \(error)")

            }
        }

    }
至此我们的登录注册功能就集成进我们的app了,当然这只是一个演示,为了演示如何用ParseUI库实现登录功能,并没有太多的自定义,更复杂的应用这里先不进行扩展了。
到此我们的app已经有一些正式的样子了,下一章还会对其进行功能的扩充和优化!请持续关注!
本章完成源代码下载
如果我的文章对你有帮助,请点一下喜欢,大家的支持是我继续写作的动力!
