从Xcode 6开始,我们可以通过IB_DESIGNABLE和IBInspectable属性实现自定义视图的实时渲染,即在代码中添加该功能后,可以在Interface Builder中直接查看和修改自定义视图,而非运行程序才能查看视图效果。
这里我们讲述的是在Objective-C语言中,使用
IB_DESIGNABLE和IBInspectable,如果是在Swift中,应该使用@IBDesignable和@IBInspectable替换。
1 IB_DESIGNABLE
IB_DESIGNABLE用于标记自定义视图的可设计性,在类定义时使用,可以轻松地调整自定义控件的呈现以得到想要的确切的结果。当应用到UIView的子类中时,IB_DESIGNABLE可以让Interface Builder知道它能在画布上直接渲染视图,任何改变,无论是从代码或属性检查器中,都将立即呈现在画布上。比如在CoreGraphics绘图过程中,在类名前使用IB_DESIGNABLE标记后,当我们更新drawRect:中的视图时,不必编译并运行应用程序,它会将更新结果立即显示在storyborad上。

注意,上图中的
IB_DESIGNABLE添加在类的实现文件(.m文件)里,除此之外,还可以添加到类的头文件(.h文件)中,如下:
#import

IB_DESIGNABLE

@interface testView : UIView

@end
2 IBInspectable
IBInspectable用于标记属性的可观察性。使用IBInspectable标记的属性会显示在storyboard中属性检查器的顶部,允许我们更改其内容,如果配合使用了IBDesignable,则会将更改结果实时显示在画布上。然而,IBInspectable并非对所有属性都适用,只有能够在 Runtime Attributes 中指定的类型才能够被标记后显示在IB中,目前IBInspectable只支持以下几种类型:
BOOLNSNumberNSStringNSRangeCGFloatCGPointCGSizeCGRectUIColorUIImage
3 示例
下面我们通过一个简单的例子具体学习IB_DESIGNABLE 和 IBInspectable的用法。
3.1 创建项目
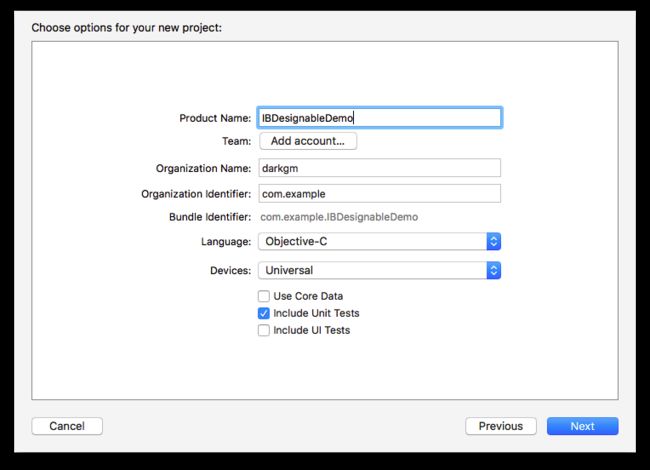
首先打开Xcode,创建一个新的项目(File\New\Project...),选择iOS一栏下Application中的Single View Application模版,然后点击Next,填写项目选项。在Product Name中填写IBDesignableDemo,选择语言为Objective-C,点击Next,选择文件位置,并单击Create创建工程。
3.2 绘制自定义视图
绘制自定义视图一般需要创建一个UIView的子类,通过重写drawRect:方法并添加一些Core Graphics图形代码来实现。
在这里,我们首先创建一个新的文件(File\New\File...),选择iOS\Source\Cocoa Touch Class并命名新的CustomView类,使它成为UIView的子类,并确保语言为Objective-C,单击Next,然后单击Create创建。

打开Main.storyboard,选中控制器中的View,在最右边的Identity Inspector中找到Custom Class一栏,将该类更改为刚才创建的CustomView类,这样我们就将控制器中的主视图改成了我们自定义的视图。

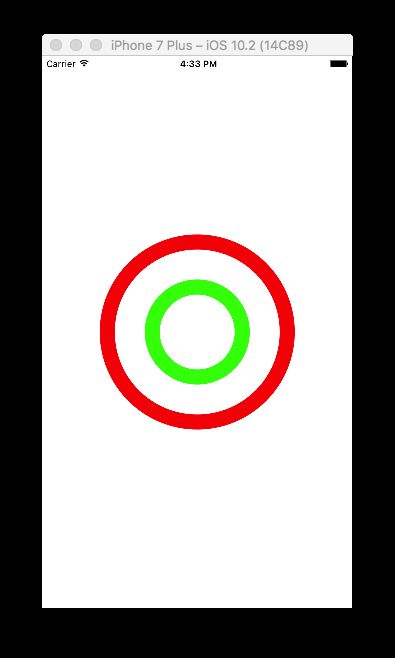
打开CustomView.m文件,取消注释,在drawRect:方法中使用UIBezierPath绘制两个同心圆,代码如下:
- (void)drawRect:(CGRect)rect
{
    // 绘制最里面的圆
    UIBezierPath *innerPath = [UIBezierPath bezierPathWithArcCenter:self.center radius:60 startAngle:0 endAngle:2 * M_PI clockwise:YES];
    [innerPath setLineWidth:20];
    [[UIColor greenColor] setStroke];
    [innerPath stroke];

    // 绘制最外面的圆
    UIBezierPath *outterPath = [UIBezierPath bezierPathWithArcCenter:self.center radius:120 startAngle:0 endAngle:2 * M_PI clockwise:YES];
    [outterPath setLineWidth:20];
    [[UIColor redColor] setStroke];
    [outterPath stroke];
}
运行程序,我们会看到下图中的绘制结果:
关于使用
UIBezierPath绘图的内容,可以参考文档或相关文章。
3.3 使用IB_DESIGNABLE查看绘制结果
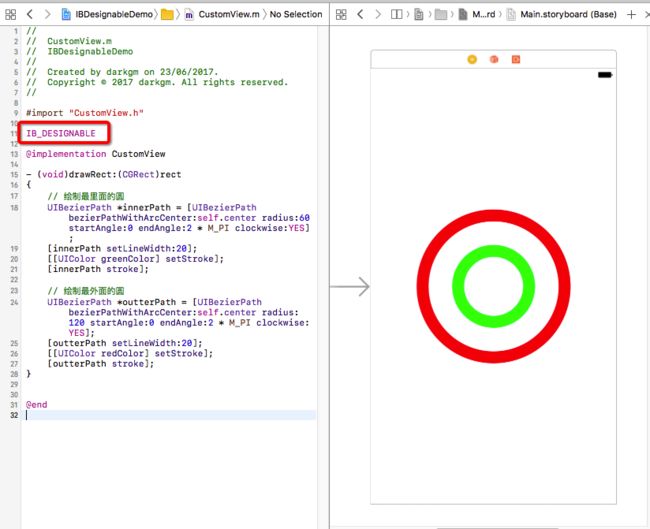
如果不想运行模拟器,我们可以通过添加IB_DESIGNABLE,在storyboard中可以看到同样的绘制结果,更好的是,当我们修改代码,storyboard中的内容也会同步更新。
让我们先点击右上角的辅助编辑器,让storyboard显示在代码右侧,具体操作如下图:
也可以在顶部选择�View\Assistant Editor\Show Assistant Editor打开辅助编辑器。
现在我们看到的storyboard还是空白的,接下来我们在实现部分前面添加IB_DESIGNABLE关键词,再看storyboard,是的,代码中绘制的同心圆已经显示出来了:
尝试将代码中的绘制颜色设置为其它颜色看看!
3.4 使用IBInspectable自定义storyboard中的属性
为了便于设置颜色,我们声明两个UIColor的属性,并用IBInspectable标记,在@implementation CustomView前添加如下代码:
#import "CustomView.h"

IB_DESIGNABLE

// 新添加的代码
@interface CustomView ()

@property (nonatomic) IBInspectable UIColor *innerColor;
@property (nonatomic) IBInspectable UIColor *outterColor;

@end

@implementation CustomView
然后将两个圆的绘制颜色分别设置为该属性,修改drawRect:方法中代码如下:
- (void)drawRect:(CGRect)rect
{
    // 绘制最里面的圆
    ...
    [self.innerColor setStroke];
    [innerPath stroke];

    // 绘制最外面的圆
    ...
    [self.outterColor setStroke];
    [outterPath stroke];
}
然后打开属性检查器,我们会看到刚才声明的属性,将属性的内容修改为其他颜色,看看storyboard的变化:

接下来,我们继续添加一些属性来设置圆的半径和宽度:
@interface CustomView ()

@property (nonatomic) IBInspectable UIColor *innerColor;
@property (nonatomic) IBInspectable UIColor *outterColor;

// 新添加的属性
@property (nonatomic) IBInspectable CGFloat innerRadius;
@property (nonatomic) IBInspectable CGFloat outterRadius;

@property (nonatomic) IBInspectable CGFloat innerWidth;
@property (nonatomic) IBInspectable CGFloat outterWidth;

@end
然后修改drawRect:方法,将圆的半径和绘制的线宽设置为上面的属性:
- (void)drawRect:(CGRect)rect
{
    // 绘制最里面的圆
    UIBezierPath *innerPath = [UIBezierPath bezierPathWithArcCenter:self.center radius:self.innerRadius startAngle:0 endAngle:2 * M_PI clockwise:YES];
    [innerPath setLineWidth:self.innerWidth];
    [self.innerColor setStroke];
    [innerPath stroke];

    // 绘制最外面的圆
    UIBezierPath *outterPath = [UIBezierPath bezierPathWithArcCenter:self.center radius:self.outterRadius startAngle:0 endAngle:2 * M_PI clockwise:YES];
    [outterPath setLineWidth:self.outterWidth];
    [self.outterColor setStroke];
    [outterPath stroke];
}
打开属性检查器,修改属性内容,就可以自由地定义圆的颜色、大小和宽度:
至此,我们已经学会了IB_DESIGNABLE 和 IBInspectable的用法,在绘图中使用该功能替代运行模拟器,可以节省了大量的时间。然而它也有局限性,一般我们用它来绘制简单的代码,对于创建复杂的设计,storyboard常常会超时,这种情况下Playground可能是更好的选择。
最后,如果在创建demo中遇到问题,可以下载IBDesignableDemo查看完整代码。