关键知识点
- Handler
- MessageQueue
- ThreadLocal
- Loop
- ActivityThread
先来看关键部分的代码,不关键的部分我删掉了
- Handler
    public Handler() {
        this(null, false);
    }

    public Handler(Callback callback, boolean async) {
        mLooper = Looper.myLooper();
        if (mLooper == null) {
            throw new RuntimeException(
                "Can't create handler inside thread that has not called Looper.prepare()");
        }
        mQueue = mLooper.mQueue;
    }
- Looper
    private Looper(boolean quitAllowed) {
        mQueue = new MessageQueue(quitAllowed);
        mThread = Thread.currentThread();
    }

    public static void prepare() {
        prepare(true);
    }

    private static void prepare(boolean quitAllowed) {
        if (sThreadLocal.get() != null) {
            throw new RuntimeException("Only one Looper may be created per thread");
        }
        sThreadLocal.set(new Looper(quitAllowed));
    }

    public static Looper myLooper() {
        return sThreadLocal.get();
    }

    public static void prepareMainLooper() {
        prepare(false);
        synchronized (Looper.class) {
            if (sMainLooper != null) {
                throw new IllegalStateException("The main Looper has already been prepared.");
            }
            sMainLooper = myLooper();
        }
    }

    public static void loop() {
        final Looper me = myLooper();
        if (me == null) {
            throw new RuntimeException("No Looper; Looper.prepare() wasn't called on this thread.");
        }
        final MessageQueue queue = me.mQueue;

        for (;;) {
            Message msg = queue.next(); // might block
            if (msg == null) {
                // No message indicates that the message queue is quitting.
                return;
            }
            msg.target.dispatchMessage(msg);
            msg.recycleUnchecked();
        }
    }
- ActivityThread
public static void main(String[] args) {
     SamplingProfilerIntegration.start();
     CloseGuard.setEnabled(false);

     Environment.initForCurrentUser();

     // Set the reporter for event logging in libcore
     EventLogger.setReporter(new EventLoggingReporter());

     Process.setArgV0("");

     Looper.prepareMainLooper();// 1、创建消息循环Looper

     ActivityThread thread = new ActivityThread();
     thread.attach(false);

     if (sMainThreadHandler == null) {
         sMainThreadHandler = thread.getHandler(); // UI线程的Handler
     }

     AsyncTask.init();

     if (false) {
         Looper.myLooper().setMessageLogging(new
                 LogPrinter(Log.DEBUG, "ActivityThread"));
     }

     Looper.loop();   // 2、执行消息循环

     throw new RuntimeException("Main thread loop unexpectedly exited");
 }
我们从下面的代码开始分析
    @Override
    protected void onCreate(Bundle savedInstanceState) {
        super.onCreate(savedInstanceState);
        setContentView(R.layout.activity_main);
        new Thread(){
            @Override
            public void run() {
                Looper.prepare();
                Handler handler = new Handler(new Handler.Callback() {
                    @Override
                    public boolean handleMessage(Message msg) {
                        Log.d("tag","已收到消息");
                        return false;
                    }
                });
                handler.sendMessage(...);
                Looper.loop();
            }
        }.start();
    }
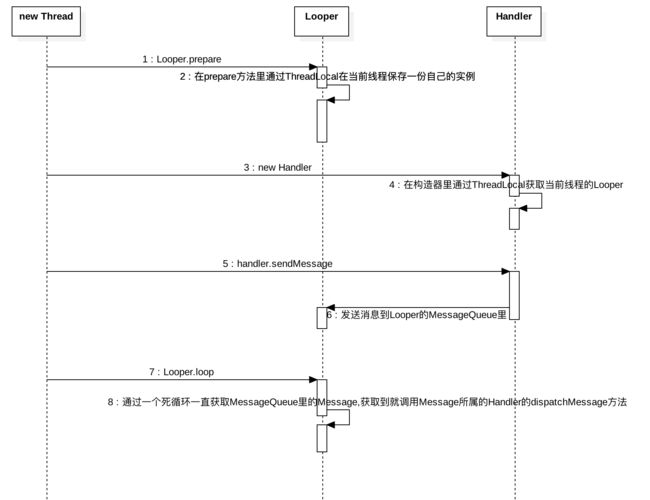
1.Looper.prepare()
在这个方法里,sThreadLocal.get()获取之前保存的当前线程的Looper,如果不存在就创建一个Looper然后保存到当前线程,关于ThreadLocal请谷歌张孝祥老师的多线程部分,有讲解ThreadLocal,在这里sThreadLocal能保证每个线程只有一个Looper
2.Handler handler = new Handler
这个方法,会创建一个Handler,在创建的时候会调用Looper.myLooper()方法,在Looper.myLooper()方法里会调用
sThreadLocal.get()方法获取当前线程保存过的Looper,而我们在创建Handler之前调用了Looper.prepare(),所以这里不为空,如果没有调用Looper.prepare()这里就会抛出异常.在这个方法里会保存一份Looper里的MessageQueue引用
3.handler.sendMessage(...)
看源码会发现,最终该方法会调用下面的代码
private boolean enqueueMessage(MessageQueue queue, Message msg, long uptimeMillis) {
  msg.target = this;
  if (mAsynchronous) {
    msg.setAsynchronous(true);
  }
  return queue.enqueueMessage(msg, uptimeMillis);
}
其中queue是在Handler创建的时候,从Looper获取的Looper中的MessageQueue的引用,在enqueueMessage这个方法里,会把Message的target设置为自己,然后把这条Message放到queue里,后面的uptimeMillis参数会根据时间调整消息发送的顺序,这里不多讲,有兴趣可以自己研究一下
4.Looper.loop()
这个方法的实现请看上面Looper类的源码,在这个方法里会有一个死循环一直从MessageQueue里获取Message,取到以后就调用Message所属的Handler的dispatchMessage方法
下面我用一张图总结一下上面onCreate方法里的调用流程
在我们平时写代码的时候,并不会去执行Looper的prepare方法和loop方法,这是因为系统帮我们做了这件事情,Android应用程序的入口为ActivityThread.main方法,在上面的ActivityThread.main方法里我们可以看到有调用Looper.prepareMainLooper()和Looper.loop()方法
