CoreData
CoreData是苹果为iOS和OSX系统应用提供的数据持久化技术,也就是常说的数据库。其底层就是SQLite数据库,二进制文件和内存数据保存,下面通过创建一个名叫ToDoList(随便取的名字,和数据内容无关)的工程来了解CoreData的简单使用。
要使用CoreData首先就要先了解这样的三个类:
NSManagedObjectContext它是被管理对象的上下文类,在数据库中对数据,做删除,插入,修改,查找数据等,都要经过这个类。然后再通过栈同步到持久化对象存储。
NSManagedObjectModel它使被管理对象模型类,是系统中数据库”实体“,与数据库中的表的对象相对应。
NSPersistentStoreCoordinator它使持久化存储协调器,在持久化对象存储上提供了一个接口,相当于被操作对象与数据库中实体对象之间的连接。
在我们创建工程的时候,如果勾选了CoreData这个选项,Xcode则会在工程文件的AppDelegate文件中自动为我们实现这三个类的实例化方法及一些相关方法。
首先,先来看看AppDelegate.m文件中对这三个类的实现。
首先这里这个方法是返回一个URL的地址。返回的路径是Document,其实数据库的文件就是保存在该目录下的。具体获得数据库文件的方法在下面会讲到。
- (NSURL *)applicationDocumentsDirectory {
    // The directory the application uses to store the Core Data store file. This code uses a directory named "com.weibo.Aaronzjp.ToDoList" in the application's documents directory.
    return [[[NSFileManager defaultManager] URLsForDirectory:NSDocumentDirectory inDomains:NSUserDomainMask] lastObject];
}
这里是获取被管理的数据模型,如果没有Model则从modeURL的地址获取实体并在内存中新建一个数据模型。下面获取文件扩展之所以是momd格式的是因为。ToDoList.xcdatamodeld数据模型在编译后会被编译成ToDoList.momd资源,并且保存到App的Bundle目录。
- (NSManagedObjectModel *)managedObjectModel {
    // The managed object model for the application. It is a fatal error for the application not to be able to find and load its model.
    if (_managedObjectModel != nil) {
        return _managedObjectModel;
    }
    NSURL *modelURL = [[NSBundle mainBundle] URLForResource:@"ToDoList" withExtension:@"momd"];
    _managedObjectModel = [[NSManagedObjectModel alloc] initWithContentsOfURL:modelURL];
    return _managedObjectModel;
}
这里在通过上下文管理期和在上面一个方法中获取到的文件的地址初始化了一个储存协调器,同样的这里的ToDoList.sqlite文件也是ToDoList.xcdatamodeld这个文件在编译后生成的数据库的文件。
- (NSPersistentStoreCoordinator *)persistentStoreCoordinator {
    // The persistent store coordinator for the application. This implementation creates and returns a coordinator, having added the store for the application to it.
    if (_persistentStoreCoordinator != nil) {
        return _persistentStoreCoordinator;
    }

    // Create the coordinator and store

    _persistentStoreCoordinator = [[NSPersistentStoreCoordinator alloc] initWithManagedObjectModel:[self managedObjectModel]];
    NSURL *storeURL = [[self applicationDocumentsDirectory] URLByAppendingPathComponent:@"ToDoList.sqlite"];
    NSError *error = nil;
    NSString *failureReason = @"There was an error creating or loading the application's saved data.";
    if (![_persistentStoreCoordinator addPersistentStoreWithType:NSSQLiteStoreType configuration:nil URL:storeURL options:nil error:&error]) {
        // Report any error we got.
        NSMutableDictionary *dict = [NSMutableDictionary dictionary];
        dict[NSLocalizedDescriptionKey] = @"Failed to initialize the application's saved data";
        dict[NSLocalizedFailureReasonErrorKey] = failureReason;
        dict[NSUnderlyingErrorKey] = error;
        error = [NSError errorWithDomain:@"YOUR_ERROR_DOMAIN" code:9999 userInfo:dict];
        // Replace this with code to handle the error appropriately.
        // abort() causes the application to generate a crash log and terminate. You should not use this function in a shipping application, although it may be useful during development.
        NSLog(@"Unresolved error %@, %@", error, [error userInfo]);
        abort();
    }

    return _persistentStoreCoordinator;
}
在初始化上下文管理器的同时需要选择其类型,以及设置上下文的存储协调器,然后返回一个上下文管理器
在这里这个选择类型有三个:
NSConfinementConcurrencyType
这个是默认项,每个线程一个独立的Context,主要是为了兼容之前的设计。
NSPrivateQueueConcurrencyType
创建一个private queue(使用GCD),这样就不会阻塞主线程。
NSMainQueueConcurrencyType
创建一个main queue,使用主线程,会阻塞。
- (NSManagedObjectContext *)managedObjectContext {
    // Returns the managed object context for the application (which is already bound to the persistent store coordinator for the application.)
    if (_managedObjectContext != nil) {
        return _managedObjectContext;
    }

    NSPersistentStoreCoordinator *coordinator = [self persistentStoreCoordinator];
    if (!coordinator) {
        return nil;
    }
    _managedObjectContext = [[NSManagedObjectContext alloc] initWithConcurrencyType:NSMainQueueConcurrencyType];
    [_managedObjectContext setPersistentStoreCoordinator:coordinator];
    return _managedObjectContext;
}
最后这里就是一个数据库的保存的方法,ManagedObjectContext中对像所有的修改都只是在当前读取的内存中,需要调用这个saveContext方法来保存到存储文件中,也就是Documents路径下的ToDoList.sqlite文件中。
#pragma mark - Core Data Saving support

- (void)saveContext {
    NSManagedObjectContext *managedObjectContext = self.managedObjectContext;
    if (managedObjectContext != nil) {
        NSError *error = nil;
        if ([managedObjectContext hasChanges] && ![managedObjectContext save:&error]) {
            // Replace this implementation with code to handle the error appropriately.
            // abort() causes the application to generate a crash log and terminate. You should not use this function in a shipping application, although it may be useful during development.
            NSLog(@"Unresolved error %@, %@", error, [error userInfo]);
            abort();
        }
    }
}
接下来就是创建数据模式实体(自定义NSManagedObject):
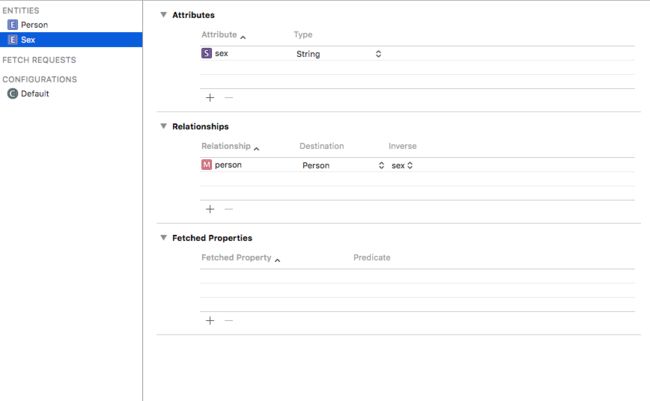
选择工程中的ToDoList.xcdatamodeld文件如下图一样添加一个Person和Sex实体对象,并添加相对应的属性,和关系。可以看到在该界面左侧有三个项目:
ENTITIES就是我们要添加的实体的对象类
FETCH REQUESTS项目则是可以将我们对数据库的预定义的请求存储被管理对象的模型中。(相当于我们将NSFetchRequest用来描述数据请求的类,设置好对应的模板存储在这里,)模板可以包含变量。
CONFIGURATIONS配置包含了一个名称和若干个相关的实体。实体的集合是可以重叠的——这就是说,一个实体可以出现在多个配置中。在代码中,我们使用setEntities: forConfiguration:的方法来指定配置。也可以用Xcode的建模工具来指定。要获取某项配置的实体,需要用entitiesForConfiguration:的方法。
这里特别的说一下几个属性的类型。
Decimal(十进制)一般用来处理货币和其他十进制的数据,当该属性类型生成对应的NSManagedObject子类时该属性的最终类型时NSDecimalNumber。使用NSDecimalNumber执行计算时(加减乘除),为了保证其计算进度只能使用该类内建的一些方法。
Binary Data用来表示照片,音频,或一些BLOB类型数据(“Binary Large OBjects” such as image and sound data)。当生成实体对应的NSManagedObject子类时,Binary Data数据类型会被表示为NSData。
Transformable该类型用于存储一个Objective-C对象。该属性类型允许你存储任何类的实例,比如你使用Transformable属性表示UIColor。当生成对应的NSManagedObject子类实体时,会用id类型来表示。
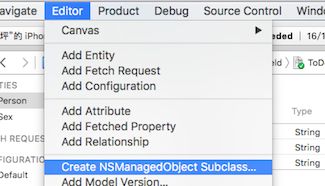
添加实体完成后,就可以为各个实体生成具体的NSManagedObject相对于的子类了。操作如下
然后勾选需要生成NSManagedObject子类所在的模型,然后选择相对于的实体Entities并创建(创建完成后你会在项目中看到新生成的对应的NSManagedObject子类Person和Sex以及他的扩展文件。)
接下来是往数据库中添加数据。这里是在新建的界面中,点击按钮后根据用户的输入添加数据。首先通过AppDelegate来获取到当前的NSManagedObjectContext(上下文管理器),然后记得对操作的数据进行保存。
添加数据:
//获取appdelegate
    AppDelegate *delegate = [[UIApplication sharedApplication]delegate];
    //通过appdelegate获取上下文管理区
    NSManagedObjectContext *context = delegate.managedObjectContext;
    //通过上下文管理器添加数据到数据库
    Person *per = [NSEntityDescription insertNewObjectForEntityForName:@"Person" inManagedObjectContext:context];
    per.name = self.name.text;
    per.age = self.age.text;
    per.phone = self.phone.text;

    Sex *sex = [NSEntityDescription insertNewObjectForEntityForName:@"Sex" inManagedObjectContext:context];
    sex.sex = self.sex.text;
    per.sex = sex;

    NSError *error;
    if (![context save:&error])
    {
        NSLog(@"%@",error);
    }
查询数据:
//获取上下文管理器
    AppDelegate *delegate = [[UIApplication sharedApplication]delegate];
    NSManagedObjectContext *cxt = delegate.managedObjectContext;
    //获取要查询的对应的实体类
    NSEntityDescription *entity = [NSEntityDescription entityForName:@"Person" inManagedObjectContext:cxt];
    //设置数据请求
    NSFetchRequest *request = [[NSFetchRequest alloc]init];
    //设置要请求的数据的实体类
    request.entity = entity;
    //设置请求的排序属性,以及排序的方式(YES为升序)
    NSSortDescriptor *sortDescriptor = [[NSSortDescriptor alloc]initWithKey:@"name" ascending:YES];
    NSArray *sortDescriptors = @[sortDescriptor];
    //设置请求的排序描述
    request.sortDescriptors = sortDescriptors;
    //如果数据库的数据过大,可以如下,设置限制来分次提取数据。
    //限制请求的数量
    //request.fetchLimit = 20;

    //限制提取记录的偏移量
    //request.fetchOffset = 1;

    //设置查询条件(这里不需要条件查询,具体怎么设置查询条件,去了解谓词)
    //request.predicate = [NSPredicate predicateWithFormat:@"name contains %@",@"t"];

    NSError *error = nil;
    //用listData去接收请求到的数据。
    NSArray *listData = [cxt executeFetchRequest:request error:&error];
    //快速遍历下请求到的数据,打印下验证是否正确请求到了
    for (Person *per in listData) {
        NSLog(@"----%@---%@",per.name,per.phone);
    }
删除数据:这里直接删除你要删除的对象就行了。(这里的self.person我通过tableView选中后传值到详情也的对象)
//获取appdelegate
    AppDelegate *delegate = [[UIApplication sharedApplication]delegate];
    //通过appdelegate获取上下文管理区
    NSManagedObjectContext *context = delegate.managedObjectContext;
    [context deleteObject:self.person];
    NSError *error;
    if (![context save:&error])
    {
        NSLog(@"%@",error);
    }
    [self.navigationController popViewControllerAnimated:YES];
如果要修改数据的话,直接通过NSManagedObjectContext(上下文管理器)获取要修改的对象修改数据后保存即可。在删除数据,或者修改数据后要对tableView进行刷新,或者响应的操作,比如删除某行要同时删除cell和数据源。我这里没有在tableView上做响应的操作是因为我在这个例子中使用了NSFetchedResultsController,在NSFetchedResultsController中做了相应的操作。下面就记录下CoreData怎么配合NSFetchedResultsController来使用。
NSFetchedResultsController:
NSFetchedResultsController的作用就是有效率的管理从CoreData获取请求的数据结果,并将结果提供给UITableView作为数据源。
首先配置NSFetchedResultsController
- (NSFetchedResultsController *)fetchedResultsController
{
    if (_fetchedResultsController != nil) {
        return _fetchedResultsController;
    }

    //获取上下文管理器
    AppDelegate *delegate = [[UIApplication sharedApplication]delegate];
    NSManagedObjectContext *context = delegate.managedObjectContext;

    //初始化NSFetchRequest,设置数据请求
    NSFetchRequest *fetchRequest = [[NSFetchRequest alloc] init];
    //获取要查询的对应的实体类
    NSEntityDescription *entity = [NSEntityDescription entityForName:@"Person" inManagedObjectContext:context];
    //设置数据请求需要请求的实体对象
    [fetchRequest setEntity:entity];

    //限制每次获取数据请求的数量
    [fetchRequest setFetchBatchSize:20];

    //设置数据请求的排序描述(这里是根据实体类的name这个属性排序,YES为升序 NO为降序)
    NSSortDescriptor *sortDescriptor = [[NSSortDescriptor alloc] initWithKey:@"name" ascending:YES];
    [fetchRequest setSortDescriptors:@[sortDescriptor]];

    //请求数据,并设置分组的名称的属性。
    NSFetchedResultsController *aFetchedResultsController = [[NSFetchedResultsController alloc] initWithFetchRequest:fetchRequest managedObjectContext:context sectionNameKeyPath:nil cacheName:@"Master"];
    aFetchedResultsController.delegate = self;
    self.fetchedResultsController = aFetchedResultsController;

    NSError *error = nil;
    if (![self.fetchedResultsController performFetch:&error]) {
        NSLog(@"Unresolved error %@, %@", error, [error userInfo]);
    }

    return _fetchedResultsController;
}
当执行performFetch(error: NSErrorPointer) -> Bool方法成功后,你可以通过NSFetchedResultsController的fetchedObjects属性来获取数据结果,如果为UITableView提供数据,可以用objectAtIndexPath(indexPath: NSIndexPath!) -> AnyObject!方法来更加便捷的将数据与NSIndexPath对接上。在我们的例子中,会把数据结果转化为NSManagedObject的子类Person或Sex类。
下面就是配置成为tableView的DataSource(数据源):
- (NSInteger)tableView:(UITableView *)tableView numberOfRowsInSection:(NSInteger)section
{
    id  sectionInfo = [self.fetchedResultsController sections][section];
    return [sectionInfo numberOfObjects];
}

- (UITableViewCell*)tableView:(UITableView *)tableView cellForRowAtIndexPath:(NSIndexPath *)indexPath
{
    static NSString *identify = @"cell";
    MyTableViewCell *cell = [tableView dequeueReusableCellWithIdentifier:identify];
    if (!cell) {
        cell = [[MyTableViewCell alloc]initWithStyle:UITableViewCellStyleDefault reuseIdentifier:identify];
    }
    [self configureCell:cell atIndexPath:indexPath];
    return cell;
}
设置tableView的编辑模式,以及当删除该条数据后的方法:
- (BOOL)tableView:(UITableView *)tableView canEditRowAtIndexPath:(NSIndexPath *)indexPath {
    //设置tableView可以进入到编辑模式
    return YES;
}

- (void)tableView:(UITableView *)tableView commitEditingStyle:(UITableViewCellEditingStyle)editingStyle forRowAtIndexPath:(NSIndexPath *)indexPath {
    if (editingStyle == UITableViewCellEditingStyleDelete) {
        NSManagedObjectContext *context = [self.fetchedResultsController managedObjectContext];
        //当tableView被删除一行的时候,该行对应的数据也要在数据库中删除。
        [context deleteObject:[self.fetchedResultsController objectAtIndexPath:indexPath]];
        NSError *error = nil;
        if (![context save:&error]) {
            NSLog(@"Unresolved error %@, %@", error, [error userInfo]);
            abort();
        }
    }
}
同时需要实现NSFetchResultsController的代理方法以便监听数据源的改变,然后对tableView的数据进行更新
- (void)controllerWillChangeContent:(NSFetchedResultsController *)controller {
    [_tableView beginUpdates];
}

- (void)controller:(NSFetchedResultsController *)controller
   didChangeObject:(id)anObject atIndexPath:(NSIndexPath *)indexPath
     forChangeType:(NSFetchedResultsChangeType)type
      newIndexPath:(NSIndexPath *)newIndexPath {

    switch(type) {
        case NSFetchedResultsChangeInsert:{
            [_tableView insertRowsAtIndexPaths:[NSArray arrayWithObject:newIndexPath] withRowAnimation:UITableViewRowAnimationFade];
        }
            break;

        case NSFetchedResultsChangeDelete:
            [_tableView deleteRowsAtIndexPaths:[NSArray arrayWithObject:indexPath] withRowAnimation:UITableViewRowAnimationBottom];
            break;

        case NSFetchedResultsChangeUpdate:
            [_tableView reloadRowsAtIndexPaths:[NSArray arrayWithObject:indexPath] withRowAnimation:UITableViewRowAnimationFade];
            break;

        case NSFetchedResultsChangeMove:
            [_tableView deleteRowsAtIndexPaths:[NSArray arrayWithObject:indexPath] withRowAnimation:UITableViewRowAnimationBottom];
            [_tableView insertRowsAtIndexPaths:[NSArray arrayWithObject:newIndexPath] withRowAnimation:UITableViewRowAnimationTop];
            break;
    }
}

- (void)controllerDidChangeContent:(NSFetchedResultsController *)controller {

    [_tableView endUpdates];
}
好了这里CoreData的使用以及怎么利用NSFetchResultsController配合CoreData来进行使用就介绍得差不多了,在使用过程中用到的相关的方法大概就是上面的这些(部分方法看方法名就知道这个方法的用法,所以也就不需要注释了)。
个人博客地址:Aaronzjp.cn


