大纲
一、Tomcat 基本配置
1.为Tomcat提供SysV脚本
2.catalina 脚本讲解
3.telnet 登录管理Tomcat
4.配置Tomcat虚拟主机
5.Tomcat图形管理接口
manager 管理应用程序的部署及监控
host-manager 虚拟主机的管理
6.部署JSP网站案例
布署JavaCenter Home(开源的SNS网站)
二、Nginx反向代理Tomcat服务器
1.Nginx将请求反向代理到后端Tomcat
2.Nginx将图片缓存到本地
3.Nginx将请求实现动静分离
注,实验环境说明,操作系统:CentOS 6.4 x86_64,软件版本:jdk-7u40、apache-tomcat-7.0.42、Nginx-1.4.2,博客中所用到的软件请到这里下载:http://yunpan.cn/QGBCLwrZnpLMS。
一、Tomcat 基本配置
1.为Tomcat提供SysV脚本
注,在上一篇博文中我们已经演示安装了Tomcat,这里我们就不在演示,不清楚的博友可以参考这篇博文,http://freeloda.blog.51cto.com/2033581/1299644,在上一篇博文中我们没有增加,SysV脚本,在这篇博文中我们来增加一下,下面我们就来具体演示一下。
[root@tomcat ~]# vim /etc/init.d/tomcat
#!/bin/sh
# Tomcat init script for Linux.
#
# chkconfig: 2345 96 14
# description: The Apache Tomcat servlet/JSP container.
CATALINA_HOME=/usr/local/tomcat #注意你的脚本路径
export CATALINA_HOME
# export CATALINA_OPTS="-Xms128m -Xmx256m"
exec $CATALINA_HOME/bin/catalina.sh $*
下面我们来增加执行权限,并加入服务列表设置开机自启动,
[root@tomcat ~]# chmod +x /etc/init.d/tomcat
[root@tomcat ~]# chkconfig --add tomcat
[root@tomcat ~]# chkconfig tomcat --list
tomcat 0:关闭 1:关闭 2:启用 3:启用 4:启用 5:启用 6:关闭
下面我们来启动一下Tomcat并测试一下,
[root@tomcat ~]# service tomcat start
Using CATALINA_BASE:  /usr/local/tomcat
Using CATALINA_HOME:  /usr/local/tomcat
Using CATALINA_TMPDIR: /usr/local/tomcat/temp
Using JRE_HOME:    /usr
Using CLASSPATH:    /usr/local/tomcat/bin/bootstrap.jar:/usr/local/tomcat/bin/tomcat-juli.jar
查看一下启动的端口号,
[root@tomcat ~]# netstat -ntulp
Active Internet connections (only servers)
Proto Recv-Q Send-Q Local Address        Foreign Address       State    PID/Program name
tcp    0   0 0.0.0.0:22         0.0.0.0:*          LISTEN   1044/sshd
tcp    0   0 127.0.0.1:25        0.0.0.0:*          LISTEN   1121/master
tcp    0   0 127.0.0.1:6010       0.0.0.0:*          LISTEN   12988/sshd
tcp    0   0 127.0.0.1:6011       0.0.0.0:*          LISTEN   13053/sshd
tcp    0   0 :::8080           :::*            LISTEN   13088/java
tcp    0   0 :::22            :::*            LISTEN   1044/sshd
tcp    0   0 ::1:25           :::*            LISTEN   1121/master
tcp    0   0 ::1:6010          :::*            LISTEN   12988/sshd
tcp    0   0 ::1:6011          :::*            LISTEN   13053/sshd
tcp    0   0 ::ffff:127.0.0.1:8005    :::*            LISTEN   13088/java
tcp    0   0 :::8009           :::*            LISTEN   13088/java
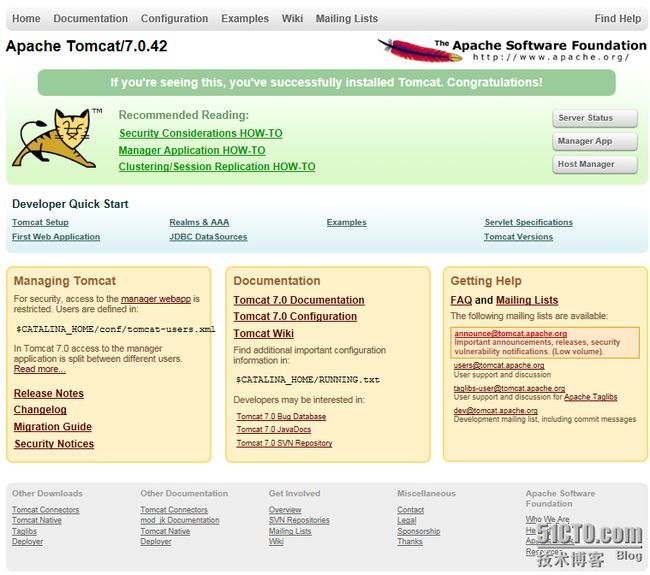
用浏览器访问一下,
好了,到这里Tomcat的SysV脚本增加完成,下面我们来说一下catalina脚本。
2.catalina 脚本讲解
首先我们来查看一下这个脚本,
[root@tomcat bin]# catalina.sh -h
Using CATALINA_BASE:  /usr/local/tomcat
Using CATALINA_HOME:  /usr/local/tomcat
Using CATALINA_TMPDIR: /usr/local/tomcat/temp
Using JRE_HOME:    /usr/java/jdk1.7.0_40
Using CLASSPATH:    /usr/local/tomcat/bin/bootstrap.jar:/usr/local/tomcat/bin/tomcat-juli.jar
Usage: catalina.sh ( commands ... )
commands:
 debug       Start Catalina in a debugger
 debug -security  Debug Catalina with a security manager
 jpda start    Start Catalina under JPDA debugger
 run        Start Catalina in the current window
 run -security   Start in the current window with security manager
 start       Start Catalina in a separate window
 start -security  Start in a separate window with security manager
 stop       Stop Catalina, waiting up to 5 seconds for the process to end
 stop n      Stop Catalina, waiting up to n seconds for the process to end
 stop -force    Stop Catalina, wait up to 5 seconds and then use kill -KILL if still running
 stop n -force   Stop Catalina, wait up to n seconds and then use kill -KILL if still running
 configtest    Run a basic syntax check on server.xml - check exit code for result
 version      What version of tomcat are you running?
Note: Waiting for the process to end and use of the -force option require that $CATALINA_PID is defined
注,从帮助上来看,这个脚本使用还是挺简单的。下面我们来说几个常用的选项,
catalina.sh
start 启动Tomcat
stop 关闭Tomcat
configtest 测试配置文件是否有错
version 查看Tomcat版本
下面我们就来具体演示一下,
[root@tomcat ~]# catalina.sh configtest
Using CATALINA_BASE:  /usr/local/tomcat
Using CATALINA_HOME:  /usr/local/tomcat
Using CATALINA_TMPDIR: /usr/local/tomcat/temp
Using JRE_HOME:    /usr/java/jdk1.7.0_40
Using CLASSPATH:    /usr/local/tomcat/bin/bootstrap.jar:/usr/local/tomcat/bin/tomcat-juli.jar
九月 21, 2013 11:08:26 下午 org.apache.catalina.core.AprLifecycleListener init
信息: The APR based Apache Tomcat Native library which allows optimal performance in production environments was not found on the java.library.path: /usr/java/packages/lib/amd64:/usr/lib64:/lib64:/lib:/usr/lib
九月 21, 2013 11:08:27 下午 org.apache.coyote.AbstractProtocol init
信息: Initializing ProtocolHandler ["http-bio-8080"]
九月 21, 2013 11:08:27 下午 org.apache.coyote.AbstractProtocol init
信息: Initializing ProtocolHandler ["ajp-bio-8009"]
九月 21, 2013 11:08:27 下午 org.apache.catalina.startup.Catalina load
信息: Initialization processed in 1269 ms
注,使用configtest选项时,得关闭Tomcat,不然会报错。
启动Tomcat,
[root@tomcat ~]# catalina.sh start
Using CATALINA_BASE:  /usr/local/tomcat
Using CATALINA_HOME:  /usr/local/tomcat
Using CATALINA_TMPDIR: /usr/local/tomcat/temp
Using JRE_HOME:    /usr/java/jdk1.7.0_40
Using CLASSPATH:    /usr/local/tomcat/bin/bootstrap.jar:/usr/local/tomcat/bin/tomcat-juli.jar
关闭Tomcat,
[root@tomcat ~]# catalina.sh stop
Using CATALINA_BASE:  /usr/local/tomcat
Using CATALINA_HOME:  /usr/local/tomcat
Using CATALINA_TMPDIR: /usr/local/tomcat/temp
Using JRE_HOME:    /usr/java/jdk1.7.0_40
Using CLASSPATH:    /usr/local/tomcat/bin/bootstrap.jar:/usr/local/tomcat/bin/tomcat-juli.jar
查看Tomcat版本,
[root@tomcat ~]# catalina.sh version
Using CATALINA_BASE:  /usr/local/tomcat
Using CATALINA_HOME:  /usr/local/tomcat
Using CATALINA_TMPDIR: /usr/local/tomcat/temp
Using JRE_HOME:    /usr/java/jdk1.7.0_40
Using CLASSPATH:    /usr/local/tomcat/bin/bootstrap.jar:/usr/local/tomcat/bin/tomcat-juli.jar
Server version: Apache Tomcat/7.0.42
Server built:  Jul 2 2013 08:57:41
Server number: 7.0.42.0
OS Name:    Linux
OS Version:   2.6.32-358.el6.x86_64
Architecture:  amd64
JVM Version:  1.7.0_40-b43
JVM Vendor:   Oracle Corporation
好了,catalina脚本,我们就说到这里了,下面我们来说一下telnet管理Tomcat。
3.telnet 登录管理Tomcat
注,在说telnet管理Tomcat之前,我们得先看一下默认的配置文件,这里面定义了默认的管理端口,
[root@tomcat ~]# vim /usr/local/tomcat/conf/server.xml
说明,定义了一个管理端口为8005,我们可以用telnet直接登录进本机的8005端口,来执行SHUTDOWN命令,来关闭Tomcat实例。下面我们来具体演示一下,
先安装telnet客户端,
[root@tomcat ~]# yum install -y telnet
下面我们一测试并查看,
[root@tomcat ~]# telnet localhost 8005
Trying ::1...
telnet: connect to address ::1: Connection refused
Trying 127.0.0.1...
Connected to localhost.
Escape character is '^]'.
SHUTDOWN #输入SHOWDOWN就可以直接关闭Tomcat服务。
Connection closed by foreign host.
[root@tomcat ~]# netstat -ntulp
Active Internet connections (only servers)
Proto Recv-Q Send-Q Local Address        Foreign Address       State    PID/Program name
tcp    0   0 0.0.0.0:22         0.0.0.0:*          LISTEN   1044/sshd
tcp    0   0 127.0.0.1:25        0.0.0.0:*          LISTEN   1121/master
tcp    0   0 127.0.0.1:6010       0.0.0.0:*          LISTEN   12988/sshd
tcp    0   0 127.0.0.1:6011       0.0.0.0:*          LISTEN   13053/sshd
tcp    0   0 :::22            :::*            LISTEN   1044/sshd
tcp    0   0 ::1:25           :::*            LISTEN   1121/master
tcp    0   0 ::1:6010          :::*            LISTEN   12988/sshd
tcp    0   0 ::1:6011          :::*            LISTEN   13053/sshd
注,大家可以看到Tomcat服务器已经关闭。好了,telnet管理我们就说到这里,下面我们来说一下,Tomcat虚拟主机的配置。
4.配置Tomcat虚拟主机
注,在说Tomcat虚拟主机之前,咱们来详细的看看默认的配置文件,虽然在上一篇博客中全部有讲解,在这篇博客中我还是再和大家简单说一下,下面是默认配置文件。大家可以看到,绝大部分的配置文件是注释,包含在、全是注释。下面我们就来具体的看看,注释我们就不说了,说具体的定义的内容
[root@tomcat ~]# cat /usr/local/tomcat/conf/server.xml#大家可以看到,这里是我们刚才讲解的,定义一个管理接口 #定义一个Service命令为Catalina #这里定义了一个连接器,协议为http,端口为8080,最大连接超时为20s,这里还定义了一个SSL的重定向端口8443。我们可以根据需要进行修改。一般我们都用80端口与443端口。 #这里定义了一个支持AJP协议的连接器。 #这里定义了一个名为Catalina的引擎,并定义了一个默认主机为localhost。 #这里就是定义的虚拟主机。 #这里定义了一个日志相关的属性。
好了,在这里我们又简单的说明一下,配置文件下面我们就来具体演示一下怎么配置虚拟主机。
首先,我们来修改一下配置文件,
[root@tomcat conf]# vim server.xml
#增加下面几行
接下来我们来创建文档目录与测试页面,
[root@tomcat ~]# mkdir -pv /web/webapp [root@tomcat ~]# cd /web/webapp [root@tomcat webapp]# vim index.jsp <%@ page language="java" %> <%@ page import="java.util.*" %>JSP test page. <% out.println("Welcome to test. Site, http://www.test.com"); %>
现在我们来测试一下我们修改的配置文件,
[root@tomcat ~]# service tomcat stop
Using CATALINA_BASE:  /usr/local/tomcat
Using CATALINA_HOME:  /usr/local/tomcat
Using CATALINA_TMPDIR: /usr/local/tomcat/temp
Using JRE_HOME:    /usr
Using CLASSPATH:    /usr/local/tomcat/bin/bootstrap.jar:/usr/local/tomcat/bin/tomcat-juli.jar
^[[A[root@tomcat service tomcat configtest
Using CATALINA_BASE:  /usr/local/tomcat
Using CATALINA_HOME:  /usr/local/tomcat
Using CATALINA_TMPDIR: /usr/local/tomcat/temp
Using JRE_HOME:    /usr
Using CLASSPATH:    /usr/local/tomcat/bin/bootstrap.jar:/usr/local/tomcat/bin/tomcat-juli.jar
Sep 22, 2013 2:15:47 AM org.apache.catalina.core.AprLifecycleListener init
INFO: The APR based Apache Tomcat Native library which allows optimal performance in production environments was not found on the java.library.path: /usr/java/packages/lib/amd64:/usr/lib64:/lib64:/lib:/usr/lib
Sep 22, 2013 2:15:47 AM org.apache.coyote.AbstractProtocol init
INFO: Initializing ProtocolHandler ["http-bio-80"]
Sep 22, 2013 2:15:47 AM org.apache.coyote.AbstractProtocol init
INFO: Initializing ProtocolHandler ["ajp-bio-8009"]
Sep 22, 2013 2:15:47 AM org.apache.catalina.startup.Catalina load
INFO: Initialization processed in 1294 ms
注,大家可以看到,我们这里没有报错,说明配置都是正确的,若配置有错误,会在最后一行提醒你。
再下面我们来启动Tomcat并测试一下,
[root@tomcat ~]# service tomcat start
Using CATALINA_BASE:  /usr/local/tomcat
Using CATALINA_HOME:  /usr/local/tomcat
Using CATALINA_TMPDIR: /usr/local/tomcat/temp
Using JRE_HOME:    /usr
Using CLASSPATH:    /usr/local/tomcat/bin/bootstrap.jar:/usr/local/tomcat/bin/tomcat-juli.jar
[root@tomcat ~]# netstat -ntulp
Active Internet connections (only servers)
Proto Recv-Q Send-Q Local Address        Foreign Address       State    PID/Program name
tcp    0   0 0.0.0.0:22         0.0.0.0:*          LISTEN   1044/sshd
tcp    0   0 127.0.0.1:25        0.0.0.0:*          LISTEN   1121/master
tcp    0   0 127.0.0.1:6010       0.0.0.0:*          LISTEN   13368/sshd
tcp    0   0 127.0.0.1:6011       0.0.0.0:*          LISTEN   13387/sshd
tcp    0   0 127.0.0.1:6012       0.0.0.0:*          LISTEN   13407/sshd
tcp    0   0 :::80            :::*            LISTEN   13557/java
tcp    0   0 :::22            :::*            LISTEN   1044/sshd
tcp    0   0 ::1:25           :::*            LISTEN   1121/master
tcp    0   0 ::1:6010          :::*            LISTEN   13368/sshd
tcp    0   0 ::1:6011          :::*            LISTEN   13387/sshd
tcp    0   0 ::1:6012          :::*            LISTEN   13407/sshd
tcp    0   0 :::8009           :::*            LISTEN   13557/java
注,还有一点得说明一下,我这里为了方便测试,将默认端口8080修改为了80端口。下面是测试效果,
为了帮助大家理解,我们这里再次讲解一下,Host组件与Context组件以及相关属性。
Host组件:
位于Engine容器中用于接收请求并进行相应处理的主机或虚拟主机,如前面我们自定义的内容:
常用属性说明:
name:定义虚拟主机的域名
appBase:此Host的webapps目录,即存放非归档的web应用程序的目录或归档后的WAR文件的目录路径;可以使用基于$CATALINA_HOME的相对路径;
autoDeploy:在Tomcat处于运行状态时放置于appBase目录中的应用程序文件是否自动进行deploy;默认为true;
unpackWars:在启用此webapps时是否对WAR格式的归档文件先进行展开;默认为true;
主机别名定义:
如果一个主机有两个或两个以上的主机名,额外的名称均可以以别名的形式进行定义,如下:
Context组件: Context在某些意义上类似于apache中的路径别名,一个Context定义用于标识tomcat实例中的一个Web应用程序。如下面的定义: web.test.com
在Tomcat中,每一个context定义也可以使用一个单独的XML文件进行,其文件的目录为$CATALINA_HOME/conf/
常用的属性定义有:
docBase:相应的Web应用程序的存放位置;也可以使用相对路径,起始路径为此Context所属Host中appBase定义的路径;切记,docBase的路径名不能与相应的Host中appBase中定义的路径名有包含关系,比如,如果appBase为deploy,而docBase绝不能为deploy-bbs类的名字;
path:相对于Web服务器根路径而言的URI;如果为空“”,则表示为此webapp的根路径;如果context定义在一个单独的xml文件中,此属性不需要定义;
reloadable:是否允许重新加载此context相关的Web应用程序的类;默认为false;
为了便于大家理解,我们这里再定义一个Context并测试一下,
我们先来修改一下配置文件
[root@tomcat conf]# vim server.xml#增加这一行
下面来增加目录文档与测试文件,
[root@tomcat webapp]# mkdir /web/test [root@tomcat webapp]# cd /web/test [root@tomcat test]# vim index.jsp <%@ page language="java" %>TomcatA TomcatA
| Session ID | <% session.setAttribute("abc","abc"); %><%= session.getId() %> |
| Created on | <%= session.getCreationTime() %> |
测试一下配置文件是否有错并启动Tomcat,
[root@tomcat ~]# service tomcat configtest
Using CATALINA_BASE:  /usr/local/tomcat
Using CATALINA_HOME:  /usr/local/tomcat
Using CATALINA_TMPDIR: /usr/local/tomcat/temp
Using JRE_HOME:    /usr
Using CLASSPATH:    /usr/local/tomcat/bin/bootstrap.jar:/usr/local/tomcat/bin/tomcat-juli.jar
Sep 22, 2013 2:40:57 AM org.apache.catalina.core.AprLifecycleListener init
INFO: The APR based Apache Tomcat Native library which allows optimal performance in production environments was not found on the java.library.path: /usr/java/packages/lib/amd64:/usr/lib64:/lib64:/lib:/usr/lib
Sep 22, 2013 2:40:58 AM org.apache.coyote.AbstractProtocol init
INFO: Initializing ProtocolHandler ["http-bio-80"]
Sep 22, 2013 2:40:58 AM org.apache.coyote.AbstractProtocol init
INFO: Initializing ProtocolHandler ["ajp-bio-8009"]
Sep 22, 2013 2:40:58 AM org.apache.catalina.startup.Catalina load
INFO: Initialization processed in 1352 ms
[root@tomcat ~]# service tomcat start
Using CATALINA_BASE:  /usr/local/tomcat
Using CATALINA_HOME:  /usr/local/tomcat
Using CATALINA_TMPDIR: /usr/local/tomcat/temp
Using JRE_HOME:    /usr
Using CLASSPATH:    /usr/local/tomcat/bin/bootstrap.jar:/usr/local/tomcat/bin/tomcat-juli.jar
[root@tomcat ~]# netstat -ntulp
Active Internet connections (only servers)
Proto Recv-Q Send-Q Local Address        Foreign Address       State    PID/Program name
tcp    0   0 0.0.0.0:22         0.0.0.0:*          LISTEN   1044/sshd
tcp    0   0 127.0.0.1:25        0.0.0.0:*          LISTEN   1121/master
tcp    0   0 127.0.0.1:6010       0.0.0.0:*          LISTEN   13587/sshd
tcp    0   0 127.0.0.1:6011       0.0.0.0:*          LISTEN   13387/sshd
tcp    0   0 127.0.0.1:6012       0.0.0.0:*          LISTEN   13407/sshd
tcp    0   0 :::80            :::*            LISTEN   13945/java
tcp    0   0 :::22            :::*            LISTEN   1044/sshd
tcp    0   0 ::1:25           :::*            LISTEN   1121/master
tcp    0   0 ::1:6010          :::*            LISTEN   13587/sshd
tcp    0   0 ::1:6011          :::*            LISTEN   13387/sshd
tcp    0   0 ::1:6012          :::*            LISTEN   13407/sshd
tcp    0   0 ::ffff:127.0.0.1:8005    :::*            LISTEN   13945/java
tcp    0   0 :::8009           :::*            LISTEN   13945/java
下面我们就用浏览器测试一下,
好了,到这里我们的Tomcat虚拟主机的讲解就到这里了,下面我们来说一下Tomcat图形管理接口。
5.Tomcat图形管理接口
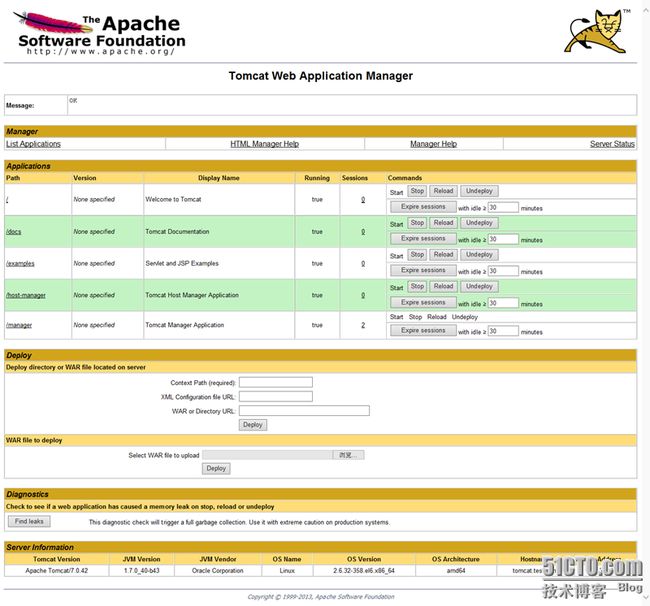
manager 管理应用程序的部署及监控
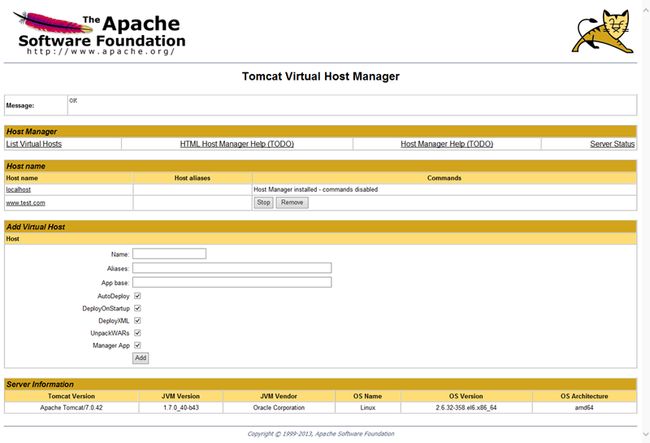
host-manager 虚拟主机的管理
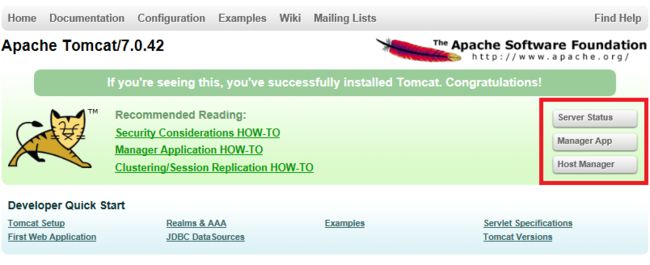
我们先来看一下默认的图形配置界面,
注,大家注意看右上角,我用红色方框标记出来的,大家可以看有三个按钮,分别为
Server Status 主要用来查看服务器的状态
Manager App 主要用来管理应用程序的部署及监控
Host Manager 主要用来管理虚拟主机
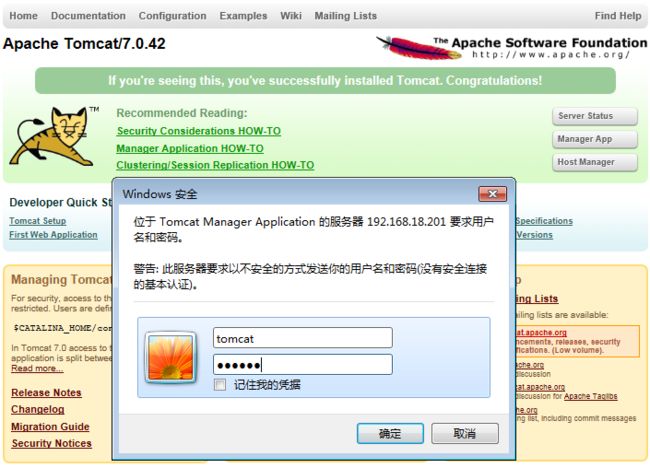
下面我们就来具休的配置一下,大家可以看到,你点击任何一个按钮都要输入用户名和密码的,在我们配置之前我们先来说一下,Tomcat的Manager功能,
Manager的四个管理角色:
manager-gui - allows access to the HTML GUI and the status pages
manager-script - allows access to the text interface and the status pages
manager-jmx - allows access to the JMX proxy and the status pages
manager-status - allows access to the status pages only
注,这里我说一下,上面的英文比较简单我就不在里翻译了,大家自己看一下。
下面我们就来启用manager功能,修改tomcat-user.xml文件,添加如下行:
简单解释一下,Tomcat有内置的角色,我们这里增加了两个角色一个为manager-gui,另一个为admin-gui,用户名和密码都为tomcat。
注,增加的内容一定要在
[root@tomcat ~]# service tomcat configtest
Using CATALINA_BASE:  /usr/local/tomcat
Using CATALINA_HOME:  /usr/local/tomcat
Using CATALINA_TMPDIR: /usr/local/tomcat/temp
Using JRE_HOME:    /usr
Using CLASSPATH:    /usr/local/tomcat/bin/bootstrap.jar:/usr/local/tomcat/bin/tomcat-juli.jar
Sep 22, 2013 3:08:44 AM org.apache.catalina.core.AprLifecycleListener init
INFO: The APR based Apache Tomcat Native library which allows optimal performance in production environments was not found on the java.library.path: /usr/java/packages/lib/amd64:/usr/lib64:/lib64:/lib:/usr/lib
Sep 22, 2013 3:08:44 AM org.apache.coyote.AbstractProtocol init
INFO: Initializing ProtocolHandler ["http-bio-80"]
Sep 22, 2013 3:08:44 AM org.apache.coyote.AbstractProtocol init
INFO: Initializing ProtocolHandler ["ajp-bio-8009"]
Sep 22, 2013 3:08:44 AM org.apache.catalina.startup.Catalina load
INFO: Initialization processed in 1213 ms
[root@tomcat ~]# service tomcat start
Using CATALINA_BASE:  /usr/local/tomcat
Using CATALINA_HOME:  /usr/local/tomcat
Using CATALINA_TMPDIR: /usr/local/tomcat/temp
Using JRE_HOME:    /usr
Using CLASSPATH:    /usr/local/tomcat/bin/bootstrap.jar:/usr/local/tomcat/bin/tomcat-juli.jar
[root@tomcat ~]# netstat -ntulp
Active Internet connections (only servers)
Proto Recv-Q Send-Q Local Address        Foreign Address       State    PID/Program name
tcp    0   0 0.0.0.0:22         0.0.0.0:*          LISTEN   1044/sshd
tcp    0   0 127.0.0.1:25        0.0.0.0:*          LISTEN   1121/master
tcp    0   0 127.0.0.1:6010       0.0.0.0:*          LISTEN   13587/sshd
tcp    0   0 127.0.0.1:6011       0.0.0.0:*          LISTEN   13387/sshd
tcp    0   0 127.0.0.1:6012       0.0.0.0:*          LISTEN   13407/sshd
tcp    0   0 :::80            :::*            LISTEN   14197/java
tcp    0   0 :::22            :::*            LISTEN   1044/sshd
tcp    0   0 ::1:25           :::*            LISTEN   1121/master
tcp    0   0 ::1:6010          :::*            LISTEN   13587/sshd
tcp    0   0 ::1:6011          :::*            LISTEN   13387/sshd
tcp    0   0 ::1:6012          :::*            LISTEN   13407/sshd
tcp    0   0 ::ffff:127.0.0.1:8005    :::*            LISTEN   14197/java
tcp    0   0 :::8009           :::*            LISTEN   14197/java
好了,下面我们用浏览器查看一下,
注,点击Server Status按钮,让你输入用户名和密码。我这里全部设置是tomcat。
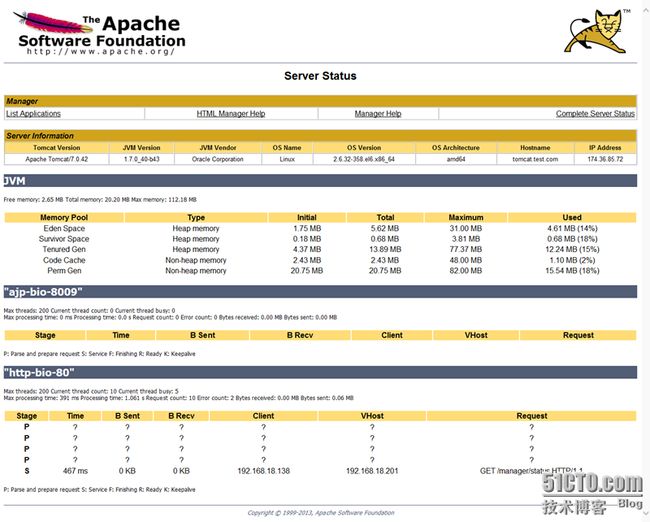
然后,会出现以下界面。显示全部服务器运行状态!大家可以仔细的看一下,我就不带着大家看了。
下面是应用程序部署管理界面,
下面是虚拟主机管理页面,
注,我们一般在生产环境中用的最多是应用程序部署界面,可以进行热布署应用程序,很方便,大家可以尝试一下。好了,图形管理界面我们就说到这里了,下面我们来说一下,Tomcat的一个小案例。我们说了那么多,有朋友就会说了,怎么一个案例也没有呢?下面我们就来布署一个社交网站的案例JavaCenter Home。
6.部署JSP网站案例
首页,我们来修改一下配置文件,
[root@tomcat conf]# vim server.xml
注,增加一下虚拟主机,文件目录为/web/webapp。
下面我们来解压一下我们下载好的JavaCenter Home网站程序,
[root@tomcat src]# tar xf JavaCenter_Home_2.0_GBK.tar.bz2
接下来将解压好的JavaCenter Home程序移动到/web/webapp下,
[root@tomcat src]# cd JavaCenter_Home_2.0_GBK
[root@tomcat JavaCenter_Home_2.0_GBK]# mv * /web/webapp/
下面我们来测试一下配置文件并启动Tomcat服务,
[root@tomcat ~]# service tomcat configtest
Using CATALINA_BASE:  /usr/local/tomcat
Using CATALINA_HOME:  /usr/local/tomcat
Using CATALINA_TMPDIR: /usr/local/tomcat/temp
Using JRE_HOME:    /usr/java/jdk1.6.0_21
Using CLASSPATH:    /usr/local/tomcat/bin/bootstrap.jar:/usr/local/tomcat/bin/tomcat-juli.jar
Sep 23, 2013 5:31:18 PM org.apache.catalina.core.AprLifecycleListener init
INFO: The APR based Apache Tomcat Native library which allows optimal performance in production environments was not found on the java.library.path: /usr/java/jdk1.6.0_21/jre/lib/amd64/server:/usr/java/jdk1.6.0_21/jre/lib/amd64:/usr/java/jdk1.6.0_21/jre/../lib/amd64:/usr/java/packages/lib/amd64:/usr/lib64:/lib64:/lib:/usr/lib
Sep 23, 2013 5:31:20 PM org.apache.coyote.AbstractProtocol init
INFO: Initializing ProtocolHandler ["http-bio-80"]
Sep 23, 2013 5:31:20 PM org.apache.coyote.AbstractProtocol init
INFO: Initializing ProtocolHandler ["ajp-bio-8009"]
Sep 23, 2013 5:31:20 PM org.apache.catalina.startup.Catalina load
INFO: Initialization processed in 2493 ms
[root@tomcat ~]# service tomcat start
Using CATALINA_BASE:  /usr/local/tomcat
Using CATALINA_HOME:  /usr/local/tomcat
Using CATALINA_TMPDIR: /usr/local/tomcat/temp
Using JRE_HOME:    /usr/java/jdk1.6.0_21
Using CLASSPATH:    /usr/local/tomcat/bin/bootstrap.jar:/usr/local/tomcat/bin/tomcat-juli.jar
[root@tomcat ~]# netstat -ntulp
Active Internet connections (only servers)
Proto Recv-Q Send-Q Local Address        Foreign Address       State    PID/Program name
tcp    0   0 0.0.0.0:22         0.0.0.0:*          LISTEN   1026/sshd
tcp    0   0 127.0.0.1:25        0.0.0.0:*          LISTEN   1256/master
tcp    0   0 127.0.0.1:6010       0.0.0.0:*          LISTEN   1339/sshd
tcp    0   0 0.0.0.0:3306        0.0.0.0:*          LISTEN   1165/mysqld
tcp    0   0 :::80            :::*            LISTEN   1499/java
tcp    0   0 :::22            :::*            LISTEN   1026/sshd
tcp    0   0 ::1:25           :::*            LISTEN   1256/master
tcp    0   0 ::1:6010          :::*            LISTEN   1339/sshd
tcp    0   0 :::8009           :::*            LISTEN   1499/java
下面我们用浏览器访问一下,http://www.test.com(注,要想用域名访问,必须配置本机有hosts文件,Windows7hosts文件目录,C:\Windows\System32\drivers\etc\hosts)
注,上面的错误说明我们连接Mysql数据库失败。因为我们这里还没有安装与配置嘛。下面我们赶快来配置一下,
先安装数据库,我们这里就用yum安装一下,
[root@tomcat ~]# yum install -y mysql-server
下面来启动并配置mysql,
[root@tomcat ~]# service mysqld start
Starting mysqld:                      [ OK ]
[root@tomcat ~]# mysql
Welcome to the MySQL monitor. Commands end with ; or \g.
Your MySQL connection id is 2
Server version: 5.1.69 Source distribution
Copyright (c) 2000, 2013, Oracle and/or its affiliates. All rights reserved.
Oracle is a registered trademark of Oracle Corporation and/or its
affiliates. Other names may be trademarks of their respective
owners.
Type 'help;' or '\h' for help. Type '\c' to clear the current input statement.
mysql>
好了,到这里我们mysql就安装完成了,下面我们来看一下我们的程序目录,
[root@tomcat ~]# cd /web/webapp/
[root@tomcat webapp]# ls
admin    avatar.jsp     data     help.jsp  js.jsp    rss.jsp  userapp.jsp
admincp.jsp config.properties do.jsp    p_w_picpath    link.jsp   source   WEB-INF
api     contact.jsp    editor.jsp  index.jsp  magic.jsp  space.jsp xmlrpc.jsp
app.jsp   cp.jsp       errors    install   META-INF   template
p_w_upload  crossdomain.xml  favicon.ico invite.jsp network.jsp theme
大家可以看到里面有个install的目录,下面我们用浏览器访问一下,http://www.test.com/install,会跳出一个安装界面,如下图
从图中,我们可以看出,所以环境配置完成,都符合要求。下面我们点击“接受授权协议,开始安装JavaCenter Home”,会跳出下一界面,如下图
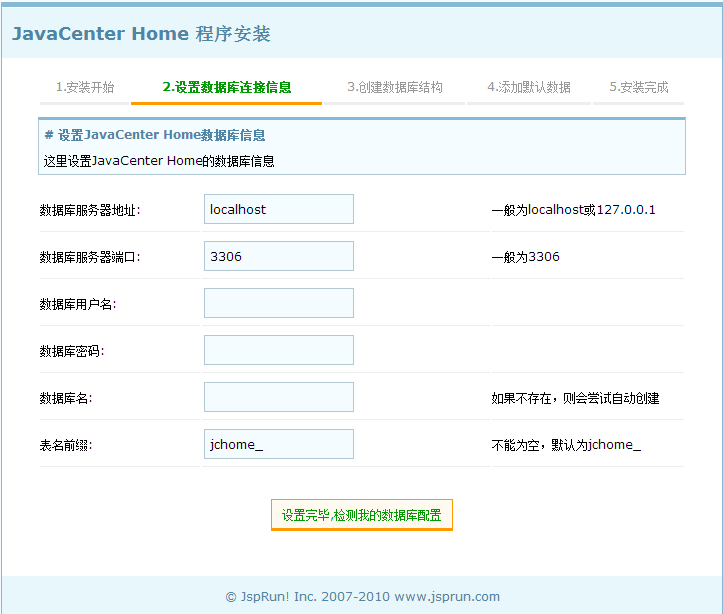
从图中,我们可以看出得输入,数据库名称、数据库用户名、数据库密码。下面我们就来增加一下,
[root@tomcat ~]# mysql
Welcome to the MySQL monitor. Commands end with ; or \g.
Your MySQL connection id is 13
Server version: 5.1.69 Source distribution
Copyright (c) 2000, 2013, Oracle and/or its affiliates. All rights reserved.
Oracle is a registered trademark of Oracle Corporation and/or its
affiliates. Other names may be trademarks of their respective
owners.
Type 'help;' or '\h' for help. Type '\c' to clear the current input statement.
mysql> create database jcenter;
Query OK, 1 row affected (0.00 sec)
mysql> grant all privileges on jcenter.* to jcenter@'localhost' identified by '123456';
Query OK, 0 rows affected (0.00 sec)
mysql> grant all privileges on jcenter.* to jcenter@'127.0.0.1' identified by '123456';
Query OK, 0 rows affected (0.00 sec)
mysql> flush privileges;
Query OK, 0 rows affected (0.00 sec)
上面创建一个jcenter数据库,授权访问一个jcenter用户,密码为123456。下面我们继续配置,
我们输入刚才设置的数据库用户名、数据库密码、数据库名称。点击“设置完毕,检测我的数据库配置”,图显示的3和4会看自动进行安装,我们只等一会即可。安装完成的效果如下图,
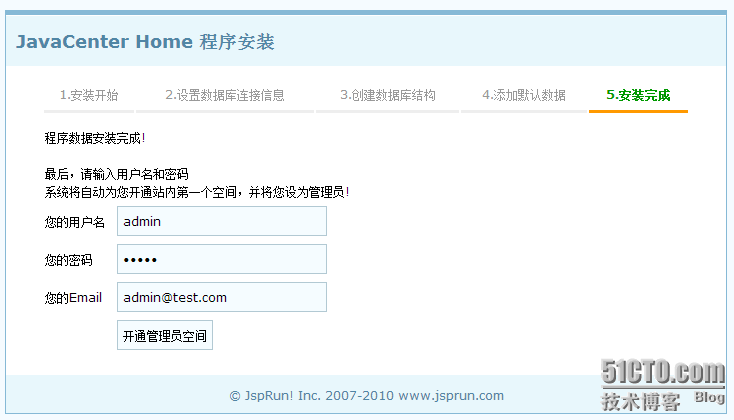
下面我们开通一个管理员空间,用户名和密码都为admin,如下图
点击“开通管理员空间”,会跳出另一个界面,如下图
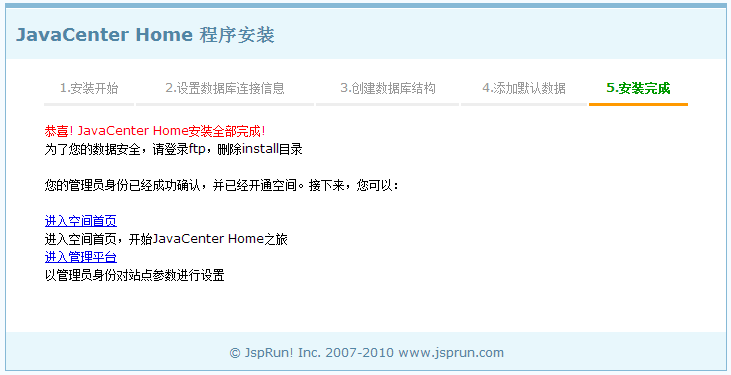
我们点击“进入空间首页”,效果如下图
好了,到这里我们的JavaCenter Home就全部配置完成了,我们第一阶段的基本配置就这里全部完成,下面我们主要讲解Nginx反向代理Tomcat服务器。
二、Nginx反向代理Tomcat服务器
0.测试环境准备阶段
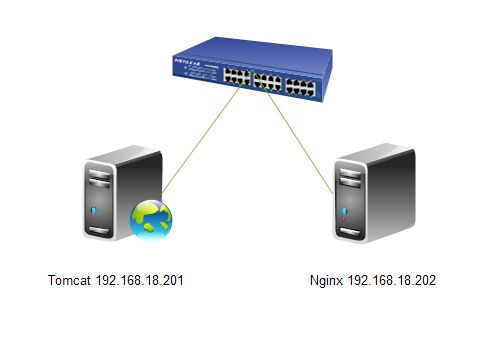
下面先看一下实验拓扑,
接着来同步各节点时间,
[root@tomcat ~]# ntpdate 202.120.2.101
[root@nginx ~]# ntpdate 202.120.2.101
下面我们来安装nginx服务器,首先来解决nginx的依赖关系,
[root@nginx ~]# yum groupinstall -y "Development Tools" "Server Platform Deveopment"
[root@nginx ~]# yum install -y openssl-devel pcre-devel
下面我们来新建nginx用户,
[root@nginx ~]# groupadd -r -g 108 nginx
[root@nginx ~]# useradd -r -g 108 -u 108 nginx
[root@nginx ~]# id nginx
uid=108(nginx) gid=108(nginx) 组=108(nginx)
接着我们来开始编译和安装,
[root@nginx src]# tar xf nginx-1.4.2.tar.gz
[root@nginx src]# cd nginx-1.4.2
[root@nginx nginx-1.4.2]# ls
auto CHANGES CHANGES.ru conf configure contrib html LICENSE man README src
[root@nginx nginx-1.4.2]# ./configure \
>  --prefix=/usr \
>  --sbin-path=/usr/sbin/nginx \
>  --conf-path=/etc/nginx/nginx.conf \
>  --error-log-path=/var/log/nginx/error.log \
>  --http-log-path=/var/log/nginx/access.log \
>  --pid-path=/var/run/nginx/nginx.pid \
>  --lock-path=/var/lock/nginx.lock \
>  --user=nginx \
>  --group=nginx \
>  --with-http_ssl_module \
>  --with-http_flv_module \
>  --with-http_stub_status_module \
>  --with-http_gzip_static_module \
>  --http-client-body-temp-path=/var/tmp/nginx/client/ \
>  --http-proxy-temp-path=/var/tmp/nginx/proxy/ \
>  --http-fastcgi-temp-path=/var/tmp/nginx/fcgi/ \
>  --http-uwsgi-temp-path=/var/tmp/nginx/uwsgi \
>  --http-scgi-temp-path=/var/tmp/nginx/scgi \
>  --with-pcre
[root@nginx nginx-1.4.2]# make && make install
说明:
Nginx可以使用Tmalloc(快速、多线程的malloc库及优秀性能分析工具)来加速内存分配,使用此功能需要事先安装gperftools,而后在编译nginx添加--with-google_perftools_module选项即可。
如果想使用nginx的perl模块,可以通过为configure脚本添加--with-http_perl_module选项来实现,但目前此模块仍处于实验性使用阶段,可能会在运行中出现意外,因此,其实现方式这里不再介绍。如果想使用基于nginx的cgi功能,也可以基于FCGI来实现,具体实现方法请参照网上的文档。
下面我们为nginx提供SysV init脚本,
[root@nginx ~]# cat /etc/init.d/nginx
#!/bin/sh
#
# nginx - this script starts and stops the nginx daemon
#
# chkconfig:  - 85 15
# description: Nginx is an HTTP(S) server, HTTP(S) reverse \
#        proxy and IMAP/POP3 proxy server
# processname: nginx
# config:   /etc/nginx/nginx.conf
# config:   /etc/sysconfig/nginx
# pidfile:   /var/run/nginx.pid
# Source function library.
. /etc/rc.d/init.d/functions
# Source networking configuration.
. /etc/sysconfig/network
# Check that networking is up.
[ "$NETWORKING" = "no" ] && exit 0
nginx="/usr/sbin/nginx"
prog=$(basename $nginx)
NGINX_CONF_FILE="/etc/nginx/nginx.conf"
[ -f /etc/sysconfig/nginx ] && . /etc/sysconfig/nginx
lockfile=/var/lock/subsys/nginx
make_dirs() {
  # make required directories
  user=`nginx -V 2>&1 | grep "configure arguments:" | sed 's/[^*]*--user=\([^ ]*\).*/\1/g' -`
  options=`$nginx -V 2>&1 | grep 'configure arguments:'`
  for opt in $options; do
    if [ `echo $opt | grep '.*-temp-path'` ]; then
      value=`echo $opt | cut -d "=" -f 2`
      if [ ! -d "$value" ]; then
        # echo "creating" $value
        mkdir -p $value && chown -R $user $value
      fi
    fi
  done
}
start() {
  [ -x $nginx ] || exit 5
  [ -f $NGINX_CONF_FILE ] || exit 6
  make_dirs
  echo -n $"Starting $prog: "
  daemon $nginx -c $NGINX_CONF_FILE
  retval=$?
  echo
  [ $retval -eq 0 ] && touch $lockfile
  return $retval
}
stop() {
  echo -n $"Stopping $prog: "
  killproc $prog -QUIT
  retval=$?
  echo
  [ $retval -eq 0 ] && rm -f $lockfile
  return $retval
}
restart() {
  configtest || return $?
  stop
  sleep 1
  start
}
reload() {
  configtest || return $?
  echo -n $"Reloading $prog: "
  killproc $nginx -HUP
  RETVAL=$?
  echo
}
force_reload() {
  restart
}
configtest() {
 $nginx -t -c $NGINX_CONF_FILE
}
rh_status() {
  status $prog
}
rh_status_q() {
  rh_status >/dev/null 2>&1
}
case "$1" in
  start)
    rh_status_q && exit 0
    $1
    ;;
  stop)
    rh_status_q || exit 0
    $1
    ;;
  restart|configtest)
    $1
    ;;
  reload)
    rh_status_q || exit 7
    $1
    ;;
  force-reload)
    force_reload
    ;;
  status)
    rh_status
    ;;
  condrestart|try-restart)
    rh_status_q || exit 0
      ;;
  *)
    echo $"Usage: $0 {start|stop|status|restart|condrestart|try-restart|reload|force-reload|configtest}"
    exit 2
esac
而后为此脚本赋予执行权限,
[root@nginx ~]# chmod +x /etc/init.d/nginx
添加至服务管理列表,并让其开机自动启动,
[root@nginx ~]# chkconfig --add nginx
[root@nginx ~]# chkconfig nginx on
而后就可以启动服务并测试了,
[root@nginx ~]# service nginx start
正在启动 nginx:                      [确定]
[root@nginx ~]# netstat -ntulp
Active Internet connections (only servers)
Proto Recv-Q Send-Q Local Address        Foreign Address       State    PID/Program name
tcp    0   0 0.0.0.0:80         0.0.0.0:*          LISTEN   14006/nginx
tcp    0   0 0.0.0.0:22         0.0.0.0:*          LISTEN   1029/sshd
tcp    0   0 127.0.0.1:25        0.0.0.0:*          LISTEN   1105/master
tcp    0   0 127.0.0.1:6010       0.0.0.0:*          LISTEN   1345/sshd
tcp    0   0 :::22            :::*            LISTEN   1029/sshd
tcp    0   0 ::1:25           :::*            LISTEN   1105/master
tcp    0   0 ::1:6010          :::*            LISTEN   1345/sshd
下面是测试结果,
好了,到这里我们准备工作就全部完成了,下面们来简单的配置一下Nginx反向代理Tomcat服务器。
1.Nginx将请求反向代理到后端Tomcat
首先,我们来修改一下nginx的配置文件,
[root@nginx ~]# cd /etc/nginx/
[root@nginx nginx]# cp nginx.conf nginx.conf.bak
[root@nginx nginx]# vim nginx.conf
#user nobody;
worker_processes 1;
#error_log logs/error.log;
#error_log logs/error.log notice;
#error_log logs/error.log info;
#pid    logs/nginx.pid;
events {
  worker_connections 1024;
}
http {
  include    mime.types;
  default_type application/octet-stream;
  #log_format main '$remote_addr - $remote_user [$time_local] "$request" '
  #         '$status $body_bytes_sent "$http_referer" '
  #         '"$http_user_agent" "$http_x_forwarded_for"';
  #access_log logs/access.log main;
  sendfile    on;
  #tcp_nopush   on;
  #keepalive_timeout 0;
  keepalive_timeout 65;
  #gzip on;
  server {
    listen    80;
    server_name localhost;
    #charset koi8-r;
    #access_log logs/host.access.log main;
    location / {
      #root  html;
      #index index.html index.htm;
      proxy_pass http://192.168.18.201/; #注释默认两行,新增一行。
    }
    #error_page 404       /404.html;
    # redirect server error pages to the static page /50x.html
    #
    error_page  500 502 503 504 /50x.html;
    location = /50x.html {
      root  html;
    }
  }
}
重新加载一下配置文件,
[root@nginx ~]# service nginx reload
nginx: the configuration file /etc/nginx/nginx.conf syntax is ok
nginx: configuration file /etc/nginx/nginx.conf test is successful
重新载入 nginx:                      [确定]
下面进行测试一下,(注,首先你得保证你的tomcat服务器能正常访问,下面我们先来访问一下tomcat服务器,如下图)
大家可以看到我们的tomcat服务器可以正常访问,下面我们来看测试一下nginx可不可以进行反向代理。(注,还有问题,这里为了方便测试我们先将tomcat的默认主机设置为www.test.com)
[root@tomcat ~]# vim /usr/local/tomcat/conf/server.xml
重新启动一下tomcat并测试,
[root@tomcat ~]# service tomcat stop
Using CATALINA_BASE:  /usr/local/tomcat
Using CATALINA_HOME:  /usr/local/tomcat
Using CATALINA_TMPDIR: /usr/local/tomcat/temp
Using JRE_HOME:    /usr/java/jdk1.6.0_21
Using CLASSPATH:    /usr/local/tomcat/bin/bootstrap.jar:/usr/local/tomcat/bin/tomcat-juli.jar
[root@tomcat ~]# service tomcat start
Using CATALINA_BASE:  /usr/local/tomcat
Using CATALINA_HOME:  /usr/local/tomcat
Using CATALINA_TMPDIR: /usr/local/tomcat/temp
Using JRE_HOME:    /usr/java/jdk1.6.0_21
Using CLASSPATH:    /usr/local/tomcat/bin/bootstrap.jar:/usr/local/tomcat/bin/tomcat-juli.jar
[root@tomcat ~]# netstat -ntulp
Active Internet connections (only servers)
Proto Recv-Q Send-Q Local Address        Foreign Address       State    PID/Program name
tcp    0   0 0.0.0.0:22         0.0.0.0:*          LISTEN   1026/sshd
tcp    0   0 127.0.0.1:25        0.0.0.0:*          LISTEN   1256/master
tcp    0   0 127.0.0.1:6010       0.0.0.0:*          LISTEN   1339/sshd
tcp    0   0 127.0.0.1:6011       0.0.0.0:*          LISTEN   2744/sshd
tcp    0   0 0.0.0.0:3306        0.0.0.0:*          LISTEN   2382/mysqld
tcp    0   0 :::80            :::*            LISTEN   3299/java
tcp    0   0 :::22            :::*            LISTEN   1026/sshd
tcp    0   0 ::1:25           :::*            LISTEN   1256/master
tcp    0   0 ::1:6010          :::*            LISTEN   1339/sshd
tcp    0   0 ::1:6011          :::*            LISTEN   2744/sshd
tcp    0   0 :::8009           :::*            LISTEN   3299/java
下面我们来访问测试一下tomcat服务器,
下面我们来测试看nginx是否能代理tomcat服务器,
好了,大家可以看到我们成功设置了nginx反向代理tomcat服务器。好了,大家可以看到,我们网站上有很多的图片,每次访问都要去后端的tomcat服务器上去取,很消耗服务器资源。我们下面将设置在nginx服务器上缓存图片。
2.Nginx将图片缓存到本地
同样的,我们先来修改配置文件,
[root@nginx nginx]# cat nginx.conf
#user nobody;
worker_processes 1;
#error_log logs/error.log;
#error_log logs/error.log notice;
#error_log logs/error.log info;
#pid    logs/nginx.pid;
events {
  worker_connections 1024;
}
http {
  include    mime.types;
  default_type application/octet-stream;
  #log_format main '$remote_addr - $remote_user [$time_local] "$request" '
  #         '$status $body_bytes_sent "$http_referer" '
  #         '"$http_user_agent" "$http_x_forwarded_for"';
  #access_log logs/access.log main;
  sendfile    on;
  #tcp_nopush   on;
  #keepalive_timeout 0;
  keepalive_timeout 65;
  #gzip on;
  proxy_cache_path /nginx/cache levels=1:2 keys_zone=first:10m inactive=24h max_size=1G; #新建缓存路径与相关属性
  upstream backend { #建立后端tomcat服务器
  server 192.168.18.201 weight=1;
  }
  server {
    listen    80;
    server_name localhost;
    #charset koi8-r;
    #access_log logs/host.access.log main;
    location / {
      #root  html;
      #index index.html index.htm;
      #proxy_pass http://192.168.18.201/; #注释原来的代理设置
      proxy_pass http://backend/; #启动后端服务器
    }
  location ~* "\.(jpg|jpeg|png|gif|html|css|js)$" { #缓存图片与静态内容
    proxy_pass http://backend;
    proxy_cache first;
    proxy_cache_valid 200 24h; #200状态缓存24小时
    proxy_cache_valid 302 10m; #302状态缓存10分钟
    add_header X-Cache-Status $upstream_cache_status; #在http头部增加一个字段显示是否命令缓存
  }
    #error_page 404       /404.html;
    # redirect server error pages to the static page /50x.html
    #
    error_page  500 502 503 504 /50x.html;
    location = /50x.html {
      root  html;
    }
  }
}
下面我们来新建缓存目录,
[root@nginx ~]# mkdir -pv /nginx/cache
mkdir: 已创建目录 "/nginx"
mkdir: 已创建目录 "/nginx/cache"
测试一下配置文件是否有错,
[root@nginx ~]# nginx -t
nginx: the configuration file /etc/nginx/nginx.conf syntax is ok
nginx: configuration file /etc/nginx/nginx.conf test is successful
重新加载配置文件,
[root@nginx ~]# service nginx reload
nginx: the configuration file /etc/nginx/nginx.conf syntax is ok
nginx: configuration file /etc/nginx/nginx.conf test is successful
重新载入 nginx:                      [确定]
那么下面我们就来测试一下,
大家可以看到我们访问的所有的静态内容都是命中的,X-Cache-Status: HIT,下面们来看一下缓存的目录,
[root@nginx ~]# cd /nginx/cache/
[root@nginx cache]# ls
0 1 2 3 4 5 6 7 8 9 b c d e
大家可以看到,缓存目录当中有我们缓存的内容,好了到这里我们的nginx缓存服务就配置完成了,下面我们看一下如何实现动静分离。
3.Nginx将请求实现动静分离
首先,我们来说一下我们要实现的效果,上面我们已经将静态内容缓存在nginx服务器上,我们想让用户请求的静态内容到nginx去取,动态内容到tomcat服务器上去取,这就能实现动静分享效果。同样的首先我们来修改配置文件,
[root@nginx nginx]# cat nginx.conf
#user nobody;
worker_processes 1;
#error_log logs/error.log;
#error_log logs/error.log notice;
#error_log logs/error.log info;
#pid    logs/nginx.pid;
events {
  worker_connections 1024;
}
http {
  include    mime.types;
  default_type application/octet-stream;
  #log_format main '$remote_addr - $remote_user [$time_local] "$request" '
  #         '$status $body_bytes_sent "$http_referer" '
  #         '"$http_user_agent" "$http_x_forwarded_for"';
  #access_log logs/access.log main;
  sendfile    on;
  #tcp_nopush   on;
  #keepalive_timeout 0;
  keepalive_timeout 65;
  #gzip on;
  proxy_cache_path /nginx/cache levels=1:2 keys_zone=first:10m inactive=24h max_size=1G;
  upstream backend {
  server 192.168.18.201 weight=1;
  }
  server {
    listen    80;
    server_name localhost;
    #charset koi8-r;
    #access_log logs/host.access.log main;
  index index.jsp index.html;
    location ~* "\.(jsp|do)$" { #当请求的是jsp或do文件时直接到tomcat上去取
      #root  html;
      #index index.html index.htm;
      #proxy_pass http://192.168.18.201/;
      #proxy_pass http://backend/;
      proxy_pass http://backend;
    }
  location = / {
    root html;
    rewrite ^/ http://192.168.18.201/index.jsp last;
  }
  location ~* "\.(jpg|jpeg|png|gif|html|css|js)$" {
    proxy_pass http://backend;
    proxy_cache first;
    proxy_cache_valid 200 24h;
    proxy_cache_valid 302 10m;
    add_header X-Cache-Status $upstream_cache_status;
  }
    #error_page 404       /404.html;
    # redirect server error pages to the static page /50x.html
    #
    error_page  500 502 503 504 /50x.html;
    location = /50x.html {
      root  html;
    }
  }
}
下面我们来检查一下配置文件是否有误,
[root@nginx ~]# nginx -t
nginx: the configuration file /etc/nginx/nginx.conf syntax is ok
nginx: configuration file /etc/nginx/nginx.conf test is successful
重新加载一下配置文件,
[root@nginx ~]# service nginx reload
nginx: the configuration file /etc/nginx/nginx.conf syntax is ok
nginx: configuration file /etc/nginx/nginx.conf test is successful
重新载入 nginx:                      [确定]
下面我们来访问测试一下,
大家可以看到我们的静态内容来自缓存,动态内容全部代理到后端的tomcat服务器上了,说明我们动态分离配置完成,好了到这里我们的tomcat的基本配置与nginx反向代理tomcat的配置就全部完成了,最后希望大家有所收获^_^……
