身为一个没有女朋友的屌丝程序猿,幸亏还有苍老师可以想想,看看。
带小红点的tabbar
其实这种情况比较简单,因为系统给我们提供了方法
self.navigationController.tabBarItem.badgeValue = @"1";
系统提供的方法下标默认是红色,我们也可以修改颜色
self.navigationController.tabBarItem.badgeColor = [UIColor blackColor];
But
一提但是我们就知道事情还没有结束,当我们的需求只是要求有小红点,不要数字的时候,我们系统给的方法就会有一些问题了。
我们设置badgeValue为空
self.navigationController.tabBarItem.badgeValue = @"";
圆圈太大,感觉好丑啊。这个时候就需要我们来自己定制比较漂亮的小红点了。
我们写一个UITabbar的分类badge,里面写一些方法来实现我们的功能
分类里面有两个方法,一个是隐藏小红点,一个是显示小红点
/**
 显示小红点

 @param index item
 */
- (void)showBadgeOnItemIndex:(int)index;

/**
 隐藏小红点

 @param index item
 */
- (void)hidenBadgeOnItemIndex:(int)index;
在.m文件中我们写实现方法
#import "UITabBar+badge.h"
#define TabbarItemNums 4.0    //tabbar的数量 如果是5个设置为5.0
@implementation UITabBar (badge)


/**
 显示小红点

 @param index item
 */
- (void)showBadgeOnItemIndex:(int)index{
    [self removeBadgeOnItemIndex:index];

    //新建一个小红点
    UIView *badgeView = [[UIView alloc]init];
    badgeView.tag = 100 + index;
    badgeView.layer.cornerRadius = 5;//badge的直径是10
    badgeView.backgroundColor = [UIColor redColor];
    //设置frame
    CGRect tabbarFrame = self.frame;
    float percentX = (index +0.6) / TabbarItemNums;
    CGFloat x = ceilf(percentX * tabbarFrame.size.width);
    CGFloat y = ceilf(0.1 * tabbarFrame.size.height);
    badgeView.frame = CGRectMake(x, y, 10, 10);//圆形大小为10
    [self addSubview:badgeView];
 };

/**
 隐藏小红点

 @param index item
 */
- (void)hidenBadgeOnItemIndex:(int)index{
    [self removeBadgeOnItemIndex:index];
};

//移除小红点
- (void)removeBadgeOnItemIndex:(int)index{
    //按照tag值移除小红点
    for (UIView *subView in self.subviews) {
        if (subView.tag == 100 + index) {
            [subView removeFromSuperview];
        }
    }
}
我们在需要设置时导入分类头文件#import "UITabBar+badge.h"
调用方法
//显示
[self.tabBarController.tabBar showBadgeOnItemIndex:2];
//隐藏
[self.tabBarController.tabBar hidenBadgeOnItemIndex:2];
效果图如下
点击tabbar没有执行系统事件
要想让tabbar不执行系统事件,我们需要了解一下UITabBarControllerDelegate的代理事件,我们常用的有一下几个代理事件
1、视图将要切换时调用,viewController为将要显示的控制器,如果返回的值为NO,则无法点击其它分栏了(viewController指代将要显示的控制器)
- (BOOL)tabBarController:(UITabBarController *)tabBarController shouldSelectViewController:(UIViewController *)viewController
{

   NSLog(@"被选中的控制器将要显示的按钮");
   //return NO;不能显示选中的控制器
   return YES;

}
 2、视图已经切换后调用,viewController 是已经显示的控制器

 - (void)tabBarController:(UITabBarController *)tabBarController didSelectViewController:(UIViewController *)viewController
{
  NSLog(@"视图显示后调用");
}
 3、将要开始自定义item的顺序

- (void)tabBarController:(UITabBarController *)tabBarController willBeginCustomizingViewControllers:(NSArray<__kindof UIViewController *> *)viewControllers
{

      NSLog(@"将要开始自定义item时调用");

      NSLog(@"%@",viewControllers);
}
 4、将要结束自定义item的顺序

 - (void)tabBarController:(UITabBarController *)tabBarController willEndCustomizingViewControllers:(NSArray<__kindof UIViewController *> *)viewControllers changed:(BOOL)changed

{

       NSLog(@"将要结束自定义item时调用");

       NSLog(@"%@",viewControllers);
}
想要了解更多的关于tabbar的代理,大家可以参考这篇文章UITabBarDelegate & UITabBarControllerDelegate详解
这里我们只需要- (BOOL)tabBarController:(UITabBarController *)tabBarController shouldSelectViewController:(UIViewController *)viewController这个代理事件。使用之前需要TabBarViewController在设置代理UITabBarControllerDelegate,并且遵守代理self.delegate = self;
自定义事件一:弹出菜单按钮
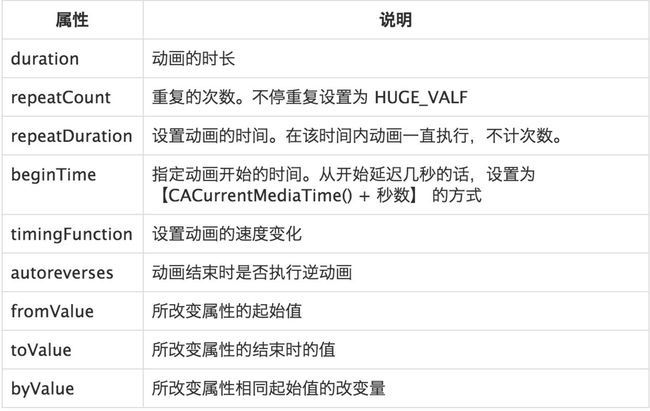
学习之前需要先了解一个概念CABasicAnimation。CABasicAnimation基础动画,通过设定起始点,终点,时间,动画会沿着你这设定点进行移动。
实例化
使用方法animationWithKeyPath:对 CABasicAnimation进行实例化,并指定Layer的属性作为关键路径进行注册。
//围绕y轴旋转CABasicAnimation *transformAnima = [CABasicAnimation animationWithKeyPath:@"transform.rotation.y"];
设定动画的属性和说明属性说明
关键代码1
遵守UITabBarControllerDelegate协议,设置代理self.delegate = self;
- (void)tabBarController:(UITabBarController *)tabBarController didSelectViewController:(UIViewController *)viewController{
   if (tabBarController.selectedIndex == 2){
       //点击第二个的时候创建一个view,覆盖整个视图
   }
}
关键代码2:动画的执行
其实的核心就是一个扇形等分,然后根据勾股定理计算出每一个菜单的frame。我参考了这篇文章的代码思路
CGPoint farPoint = CGPointMake(kRZPopupMenuCenterBtnCenterX + kRZPopupMenuItemFarRadius * cosf(angle), kRZPopupMenuCenterBtnCenterY + kRZPopupMenuItemFarRadius * sinf(angle));
- (void)setupMenuItems
{
    CGFloat gapAngle = kRZPopupMenuItemWholeAngle / (self.menuItems.count - 1);
    for (RZPopupMenuItem *item in self.menuItems) {

        CGFloat angle = kRZPopupMenuItemStartAngle + item.tag * gapAngle;

        item.startPoint = CGPointMake(kRZPopupMenuCenterBtnCenterX, kRZPopupMenuCenterBtnCenterY);

        CGPoint farPoint = CGPointMake(kRZPopupMenuCenterBtnCenterX + kRZPopupMenuItemFarRadius * cosf(angle), kRZPopupMenuCenterBtnCenterY + kRZPopupMenuItemFarRadius * sinf(angle));
        item.farPoint = RotateCGPointAroundCenter(farPoint, self.startPoint, kRZPopupMenuItemStartAngle);
        item.farPoint = farPoint;

         CGPoint nearPoint = CGPointMake(kRZPopupMenuCenterBtnCenterX + kRZPopupMenuItemNearRadius * cosf(angle), kRZPopupMenuCenterBtnCenterY + kRZPopupMenuItemNearRadius * sinf(angle));
        item.nearPoint = RotateCGPointAroundCenter(nearPoint, self.startPoint, kRZPopupMenuItemStartAngle);
        item.nearPoint = nearPoint;

        CGPoint endPoint = CGPointMake(kRZPopupMenuCenterBtnCenterX + kRZPopupMenuItemEndRadius * cosf(angle), kRZPopupMenuCenterBtnCenterY + kRZPopupMenuItemEndRadius * sinf(angle));
        item.endPoint = RotateCGPointAroundCenter(endPoint, self.startPoint, kRZPopupMenuItemStartAngle);;
        item.endPoint = endPoint;

        item.center = self.startPoint;
        item.width = kRZPopupMenuCenterBtnWidth;
        item.height = kRZPopupMenuCenterBtnWidth;

        [self insertSubview:item belowSubview:self.centerBtn];
    }
}
我把我参考的作者的代码放在这里了,需要的朋友可以拿一下
自定义事件二:双击刷新
我们在用支付宝的时候,细心的同学会发现,我们在双击tabbar的时候可以刷新。其实原理很简单,用到的代理事件跟上面的那一个一样。
核心思路
监听点击了哪一个按钮,当点击两下的时候,发出一个通知刷新。
怎么判断点击了两下
- 可以根据时间判定,如果要是联系点击某一个tabbar的时间间隔小于0.5S的话,就判断为连续点击了两下。
- 可以设置一个tag值纪录tabBarController.selectedIndex,如果两次的tag值一样就发出通知刷新。
时间判定代码
1、先定义一个全局变量来记录上次点击的时间
@property (strong, nonatomic) NSDate *lastDate;
2、 实现代理方法中的事件
- (void)tabBarController:(UITabBarController *)tabBarController didSelectViewController:(UIViewController *)viewController{
    if (tabBarController.selectedIndex == 2){
      NSDate *date = [[NSDate alloc] init];
    // 处理双击事件
         if (date.timeIntervalSince1970 - _lastDate.timeIntervalSince1970 < 0.5) {
             //发出通知
         }
         _lastDate = date;
    }
}
3、 接收通知,实现刷新
tag值判定代码
1、先定义一个全局变量来记录上次点击了哪一个item
@property (strong, nonatomic)NSInteger tag;
2、 实现代理方法中的事件
- (void)tabBarController:(UITabBarController *)tabBarController didSelectViewController:(UIViewController *)viewController{
    if (tabBarController.selectedIndex == 2){
        if(_tag ==tabBarController.selectedIndex ){
            //发出刷新通知
          }
     }
}
3、 接收通知,实现刷新
Tabbar按钮变大
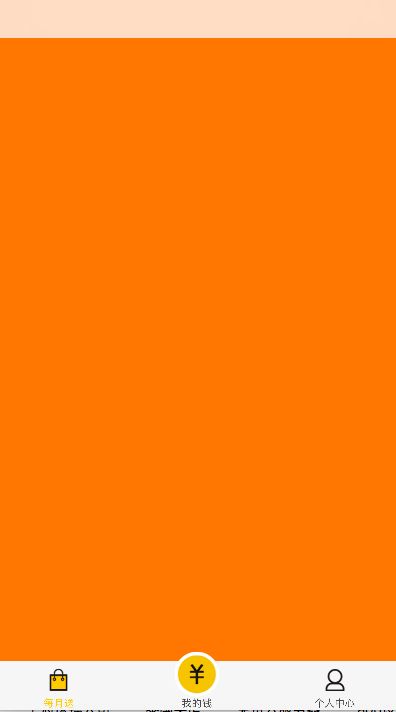
方案一:自定制一个button
遇到问题
自定制butto的时候会有一道阴影
解决方法:
button.adjustsImageWhenHighlighted=NO;,或者// 取消tabber的背景色 [[UITabBar appearance] setShadowImage:[[UIImage alloc]init]]; [[UITabBar appearance] setBackgroundImage:[[UIImage alloc]init]];导航推进下一页的时候那个大圆按钮不会消失
解决办法:写一个基础类
baseViewController,判断self.navigationController.viewControllers.count,当数值大于1的时候,发出一个通知隐藏大圆按钮
核心代码
如果button和UITabBar一样高呢,我们就包button的center和UITabBar的center对齐。如果button稍微高那么一点呢,我们做同样的事情,然后设定center的Y值,以对应高度的差
UIButton* button = [UIButton buttonWithType:UIButtonTypeCustom];
    button.frame = CGRectMake(0.0, 0.0, buttonImage.size.width, buttonImage.size.height);
    [button setBackgroundImage:buttonImage forState:UIControlStateNormal];
    [button setBackgroundImage:highlightImage forState:UIControlStateHighlighted];

    CGFloat heightDifference = buttonImage.size.height - self.tabBar.frame.size.height;
    if (heightDifference < 0)
      button.center = self.tabBar.center;
    else
    {
      CGPoint center = self.tabBar.center;
      center.y = center.y - heightDifference/2.0;
      button.center = center;
    }

    [self.view addSubview:button];
方案二:采用绘制背景的方法实现TabBar背景
核心代码
// 画背景的方法,返回 Tabbar的背景
- (UIImageView *)drawTabbarBgImageView
{
    NSLog(@"tabBarHeight:  %f" , tabBarHeight);// 设备tabBar高度 一般49
    CGFloat radius = 30;// 圆半径
    CGFloat allFloat= (pow(radius, 2)-pow((radius-standOutHeight), 2));// standOutHeight 突出高度 12
    CGFloat ww = sqrtf(allFloat);
    UIImageView *imageView = [[UIImageView alloc]initWithFrame:CGRectMake(0, -standOutHeight,ScreenW , tabBarHeight +standOutHeight)];// ScreenW设备的宽
    //    imageView.backgroundColor = [UIColor redColor];
    CGSize size = imageView.frame.size;
    CAShapeLayer *layer = [CAShapeLayer layer];
    UIBezierPath *path = [UIBezierPath bezierPath];
    [path moveToPoint:CGPointMake(size.width/2 - ww, standOutHeight)];
    NSLog(@"ww: %f", ww);
    NSLog(@"ww11: %f", 0.5*((radius-ww)/radius));
    CGFloat angleH = 0.5*((radius-standOutHeight)/radius);
    NSLog(@"angleH:%f", angleH);
    CGFloat startAngle = (1+angleH)*((float)M_PI); // 开始弧度
    CGFloat endAngle = (2-angleH)*((float)M_PI);//结束弧度
    // 开始画弧:CGPointMake:弧的圆心  radius:弧半径 startAngle:开始弧度 endAngle:介绍弧度 clockwise:YES为顺时针,No为逆时针
    [path addArcWithCenter:CGPointMake((size.width)/2, radius) radius:radius startAngle:startAngle endAngle:endAngle clockwise:YES];
    // 开始画弧以外的部分
    [path addLineToPoint:CGPointMake(size.width/2+ww, standOutHeight)];
    [path addLineToPoint:CGPointMake(size.width, standOutHeight)];
    [path addLineToPoint:CGPointMake(size.width,size.height)];
    [path addLineToPoint:CGPointMake(0,size.height)];
    [path addLineToPoint:CGPointMake(0,standOutHeight)];
    [path addLineToPoint:CGPointMake(size.width/2-ww, standOutHeight)];
    layer.path = path.CGPath;
    layer.fillColor = [UIColor whiteColor].CGColor;// 整个背景的颜色
    layer.strokeColor = [UIColor colorWithWhite:0.765 alpha:1.000].CGColor;//边框线条的颜色
    layer.lineWidth = 0.5;//边框线条的宽
    // 在要画背景的view上 addSublayer:
    [imageView.layer addSublayer:layer];
    return imageView;
}
+(CGFloat)getTabBarHeight
{

    // 获取tabBarHeight
    UITabBarController *tabBarController =[[UITabBarController alloc]init];
    return CGRectGetHeight(tabBarController.tabBar.bounds);
}
参考自实现Tabbar的中间按钮向上突出的两种方法
方案三:使用KVC修改
1、写一个MYTarbar继承于UITabBar;
2、在MYTabbar 上加一个按钮,设置按钮的image、size,中心点在tabbar的中心点,按钮点击事件可用delegate或者block传递;
3、在layoutSubviews重新排布MYTarbar上的UITabBarButton的frame(size.width,origin.x);
需要注意点:是超出tabbar部分没有点击事件,我们需要扩大点击相应
/**
 重写hitTest方法,去监听中间按钮的点击,目的是为了让凸出的部分点击也有反应

 @param point 点击point
 @param event 事件
 @return view
 */
- (UIView *)hitTest:(CGPoint)point withEvent:(UIEvent *)event {

    //判断当前手指是否点击到中间按钮上,如果是,则响应按钮点击,其他则系统处理
    //首先判断当前View是否被隐藏了,隐藏了就不需要处理了
    if (self.isHidden == NO) {

        //将当前tabbar的触摸点转换坐标系,转换到中间按钮的身上,生成一个新的点
        CGPoint newP = [self convertPoint:point toView:self.centerBtn];

        //判断如果这个新的点是在中间按钮身上,那么处理点击事件最合适的view就是中间按钮
        if ( [self.centerBtn pointInside:newP withEvent:event]) {
            return self.centerBtn;
        }
    }

    return [super hitTest:point withEvent:event];
}
代码
#import
typedef void(^MYTabbarClickBlock)();

@interface MYTabbar : UITabBar

- (void)setBtnClickBlock:(MYTabbarClickBlock)block;

@end


#import "MYTabbar.h"


@interface MYTabbar ()

@property (nonatomic, strong) UIButton *centerBtn;
@property (nonatomic, copy  ) MYTabbarClickBlock block;

@end
@implementation MYTabbar

- (instancetype)initWithFrame:(CGRect)frame
{
    self = [super initWithFrame:frame];
    if (self) {
        self.backgroundColor = [UIColor blueColor];
        [self setBackgroundImage:[UIImage new]];
        [self setShadowImage:[UIImage new]];

        self.centerBtn = [[UIButton alloc]init];
        [self.centerBtn setBackgroundImage:[UIImage imageNamed:@"tab_launch"]
                                  forState:UIControlStateNormal];
        [self.centerBtn setBackgroundImage:[UIImage imageNamed:@"tab_launch"]
                                  forState:UIControlStateHighlighted];
        self.centerBtn.size = self.centerBtn.currentBackgroundImage.size;
        [self.centerBtn addTarget:self action:@selector(centerBtnDidClick) forControlEvents:UIControlEventTouchUpInside];
        [self addSubview:self.centerBtn];
    }
    return self;
}

- (void)centerBtnDidClick {
    if (self.block) {
        self.block();
    }
}
- (void)setBtnClickBlock:(ICETabBarClickBlock)block {
    self.block = block;
}

- (void)layoutSubviews {
    [super layoutSubviews];
    //系统自带的按钮类型是UITabBarButton,找出这些类型的按钮,然后重新排布位置,空出中间的位置
    Class class = NSClassFromString(@"UITabBarButton");

    self.centerBtn.centerX = self.centerX;
    //调整中间按钮的中线点Y值
    self.centerBtn.centerY = (self.height - (self.centerBtn.height - self.height)) * 0.5;

    NSInteger btnIndex = 0;
    for (UIView *btn in self.subviews) {//遍历tabbar的子控件
        if ([btn isKindOfClass:class]) {//如果是系统的UITabBarButton,那么就调整子控件位置,空出中间位置
            //按钮宽度为TabBar宽度减去中间按钮宽度的一半
            btn.width = (self.width - self.centerBtn.width) * 0.5;
            //中间按钮前的宽度,这里就3个按钮,中间按钮Index为1
            if (btnIndex < 1) {
                btn.x = btn.width * btnIndex;
            } else { //中间按钮后的宽度
                btn.x = btn.width * btnIndex + self.centerBtn.width;
            }

            btnIndex++;
            //如果是索引是0(从0开始的),直接让索引++,目的就是让消息按钮的位置向右移动,空出来中间按钮的位置
            if (btnIndex == 0) {
                btnIndex++;
            }
        }
    }
    [self bringSubviewToFront:self.centerBtn];
}


/**
 重写hitTest方法,去监听中间按钮的点击,目的是为了让凸出的部分点击也有反应

 @param point 点击point
 @param event 事件
 @return view
 */
- (UIView *)hitTest:(CGPoint)point withEvent:(UIEvent *)event {

    //判断当前手指是否点击到中间按钮上,如果是,则响应按钮点击,其他则系统处理
    //首先判断当前View是否被隐藏了,隐藏了就不需要处理了
    if (self.isHidden == NO) {

        //将当前tabbar的触摸点转换坐标系,转换到中间按钮的身上,生成一个新的点
        CGPoint newP = [self convertPoint:point toView:self.centerBtn];

        //判断如果这个新的点是在中间按钮身上,那么处理点击事件最合适的view就是中间按钮
        if ( [self.centerBtn pointInside:newP withEvent:event]) {
            return self.centerBtn;
        }
    }

    return [super hitTest:point withEvent:event];
}
调用方法
//利用kvc将系统的tabbar替换成ICETabbar
    MYTabbar *tabbar = [[MYTabbar alloc]init];
    [self setValue:tabbar forKey:@"tabBar"];

    [tabbar setBtnClickBlock:^{
        NSLog(@"click Center");
    }];


