需要提前了解的概念
Linux内核驱动:
UIO:
DPDK的官方文档http://doc.dpdk.org/guides/linux_gsg/linux_drivers.html#UIO说的比较清楚,摘录如下:
A small kernel module to set up the device, map device memory to user-space and register interrupts. In many cases, the standard uio_pci_generic module included in the Linux kernel can provide the uio capability.
For some devices which lack support for legacy interrupts, e.g. virtual function (VF) devices, the igb_uio module may be needed in place of uio_pci_generic.
包括两部分:
UIO Driver
- The device tree node for the device can use whatever you want in the compatible property as it only has to match what is used in the kernel space driver as with any platform device driver
UIO Platform Device Driver
- The device tree node for the device needs to use "generic - uio" in it's compatible property
基本框架如下:
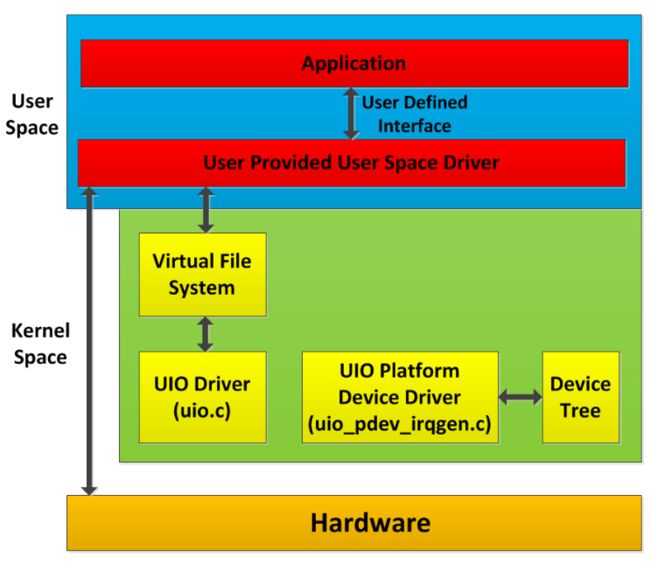
用户态驱动工作流程:
1. 在启动用户态驱动前装载内核态UIO设备驱动;
2. 启动用户态应用,开启对应UIO设备(/dev/uioX),从用户空间看,UIO设备向其他设备一样是文件系统中的一个设备节点;
3. 通过UIO大小(如/sys/class/uio/uio0/maps/map0/size)在相应的sysfs文件目录下找到设备内存地址信息;
4. 通过调用UIO驱动的mmap()函数将设备内存映射到进程地址空间;
5. 应用访问设备硬件来控制设备;
6. 通过调用mynmap()来移除设备内存的映射;
7. 关闭UIO设备文件;

更多关于UIO的细节参见:https://www.cnblogs.com/vlhn/p/7761869.html
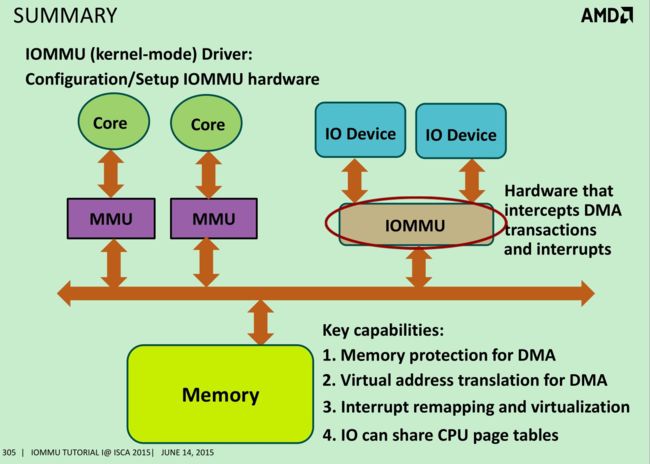
VFIO:
向用户态开放了IOMMU接口,通过IOCTL配置IOMMU将DMA地址空间映射并将其限制在进程虚拟地址空间。可参考:
1)https://www.kernel.org/doc/Documentation/vfio.txt
2)https://www.ibm.com/developerworks/community/blogs/5144904d-5d75-45ed-9d2b-cf1754ee936a/entry/vfio?lang=en_us
需要BIOS和内核的支持,并配置使能IO virtualization(Intel® VT-d)
IOMMU:
参考https://nanxiao.me/iommu-introduction/,IOMMU提供了IO设备访问实际物理内存的一套机制。在虚拟化领域,内部实现了guest虚机内存地址和host内存地址的转换。


PCI BAR (base address register):
参见简单说就是PCI配置机制,包括寄存器配置帧头,设备编号(B/D/F)及对应的软硬件实现,最终实现PCI设备的寻址。
摘录于https://en.wikipedia.org/wiki/PCI_configuration_space的一段话,简要说明了BDF的划分和寻址。
One of the major improvements the PCI Local Bus had over other I/O architectures was its configuration mechanism. In addition to the normal memory-mapped and I/O port spaces, each device function on the bus has a configuration space, which is 256 bytes long, addressable by knowing the eight-bit PCI bus, five-bit device, and three-bit function numbers for the device (commonly referred to as the BDF or B/D/F, as abbreviated from bus/device/function). This allows up to 256 buses, each with up to 32 devices, each supporting eight functions. A single PCI expansion card can respond as a device and must implement at least function number zero. The first 64 bytes of configuration space are standardized; the remainder are available for vendor-defined purposes.
以下是SPDK自带的脚本工具显示的系统信息,目前SPDK支持的驱动包括NVMe,I/OAT(Intel的I/O加速技术)和virtio(半虚拟化的设备抽象接口规范,其规定的实现接口有PCI,MMIO和Channel I/O方式)
NVMe devices
BDF Numa Node Driver name Device name
I/OAT DMA
BDF Numa Node Driver Name
0000:00:04.0 0 vfio-pci
0000:80:04.0 1 vfio-pci
...
virtio
BDF Numa Node Driver Name Device Name
MMIO(memory-mapped I/O)
MMIO和PMIO(port-mapped I/O)作为互补的解决方案实现了CPU和外围设备的IO互通。IO和内存使用相同的地址空间,即CPU指令中的地址既可以指向内存,也可以指向特定的IO设备。每个IO设备监控CPU的地址总线并对CPU对该地址的访问进行回应,同时连接数据总线至指定设备的硬件寄存器,使得CPU指令可以像访问内存一样访问IO设备,类比于DMA的memory-to-device,MMIO是一种cpu-to-device的技术。
参考https://en.wikipedia.org/wiki/Memory-mapped_I/O
NVMe(non-volatile memory express)
优化的高性能可扩展的主机控制器接口,利用基于PCIE的SSD来实现企业和客户系统的需要。参见www.nvmexpress.org

官方推荐的一个线程模型,即CPU:thread:NVMe queue=1:1:1
threading model for an application using SPDK is to spawn a fixed number of threads in a pool and dedicate a single NVMe queue pair to each thread. A further improvement would be to pin each thread to a separate CPU core, and often the SPDK documentation will use "CPU core" and "thread" interchangeably because we have this threading model in mind.
SPDK基本框架

存储协议层:
iSCSI target: Implementation of the established specification for block traffic over Ethernet; about twice as efficient as kernel LIO. Current version uses the kernel TCP/IP stack by default.
NVMe-oF target: Implements the new NVMe-oF specification. Though it depends on RDMA hardware, the NVMe-oF target can serve up to 40 Gbps of traffic per CPU core.
vhost-scsi target (在上图未体现出来,当前版本18.04已发布): A feature for KVM/QEMU that utilizes the SPDK NVMe driver, giving guest VMs lower latency access to the storage media and reducing the overall CPU load for I/O intensive workloads.
存储服务层:
Block device abstraction layer (bdev): This generic block device abstraction is the glue that connects the storage protocols to the various device drivers and block devices. Also provides flexible APIs for additional customer functionality (RAID, compression, dedup, and so on) in the block layer.
Blobstore: Implements a highly streamlined file-like semantic (non-POSIX*) for SPDK. This can provide high-performance underpinnings for databases, containers, virtual machines (VMs), or other workloads that do not depend on much of a POSIX file system’s feature set, such as user access control.
硬件驱动层:
NVMe driver: The foundational component for SPDK, this highly optimized, lockless driver provides unparalleled scalability, efficiency, and performance.
Intel® QuickData Technology: Also known as Intel® I/O Acceleration Technology (Intel® IOAT), this is a copy offload engine built into the Intel® Xeon® processor-based platform. By providing user space access, the threshold for DMA data movement is reduced, allowing greater utilization for small-size I/Os or NTB.
安装编译(参考https://github.com/spdk/spdk)
# git clone https://github.com/spdk/spdk
# cd spdk
# git submodule update --init
# git submodule (可以看到DPDK做为其中的一个模块被包含了进来)
b6ae5bcff6ca09a7e1536eaa449aa6f4e704a6d9 dpdk (v18.05-12-gb6ae5bc)
134c90c912ea9376460e9d949bb1319a83a9d839 intel-ipsec-mb (v0.49-1-g134c90c)
# ./scripts/pkgdep.sh (安装依赖包)
# ./configure (这个会在当前目录下生成CONFIG.local,默认情况下里面只指定了DPDK的目录路径,通过添加其他的选项,比如--with-rdma可以将对应的配置项CONFIG_RDMA?=y写入CONFIG.local。执行./configure -h来查看所有的选项)
# make (make也提供了类似的选项用于生成最后的CONFIG.local)
执行SPDK应用之前需要分配大页和NVMe,I/OAT和Virtio设备的绑定,通过setup.sh这个脚本完成
# HUGEMEM=8192 scripts/setup.sh
# ./scripts/setup.sh status
Hugepages
node hugesize free / total
node0 1048576kB 4 / 8
node0 2048kB 1024 / 1024
node1 1048576kB 4 / 8
node1 2048kB 1024 / 1024
NVMe devices
BDF Numa Node Driver name Device name
I/OAT DMA
BDF Numa Node Driver Name
0000:00:04.0 0 ioatdma
0000:80:04.0 1 ioatdma
...
virtio
BDF Numa Node Driver Name Device Name
官方github源代码包含:
--NVMe driver
--I/OAT (DMA engine) driver
--NVMe over Fabrics target
--iSCSI target
--vhost target
--Virtio-SCSI driver
NVMe driver
官方提供了vagrant工具搭建的虚拟化环境,其中挂载了NVMe设备用于实践。更多在文后展开
I/OAT (DMA engine) driver
跳转的网页仅提供了API接口
NVMe over Fabrics target
# apt-get install libibverbs-dev librdmacm-dev (或者yum install libibverbs-devel librdmacm-devel)
# ./configure --with-rdma
# make
编译完毕后查看对应的binary
[root@localhost spdk]# cd app/nvmf_tgt/
[root@localhost nvmf_tgt]# ls
Makefile nvmf_main.c nvmf_main.d nvmf_main.o nvmf_tgt
参考示例的配置文件,添加对应的PCIe NVMe设备


[vagrant@localhost spdk]$ cp ./etc/spdk/nvmf.conf.in app/nvmf_tgt/nvmf.conf
[vagrant@localhost spdk]$ sudo app/nvmf_tgt/nvmf_tgt -c app/nvmf_tgt/nvmf.conf
Starting SPDK v18.10-pre / DPDK 18.05.0 initialization...
[ DPDK EAL parameters: nvmf -c 0x1 --legacy-mem --file-prefix=spdk_pid25254 ]
EAL: Detected 2 lcore(s)
EAL: Detected 1 NUMA nodes
EAL: Multi-process socket /var/run/dpdk/spdk_pid25254/mp_socket
EAL: Probing VFIO support...
app.c: 530:spdk_app_start: *NOTICE*: Total cores available: 1
reactor.c: 718:spdk_reactors_init: *NOTICE*: Occupied cpu socket mask is 0x1
reactor.c: 492:_spdk_reactor_run: *NOTICE*: Reactor started on core 0 on socket 0
EAL: PCI device 0000:00:0e.0 on NUMA socket 0
EAL: probe driver: 80ee:4e56 spdk_nvme
示例给出了对应CPU核绑定的方法(cores 24, 25, 26 and 27)
# app/nvmf_tgt/nvmf_tgt -m 0xF000000
利用nvme cli进行发现,配置
# modprobe nvme-rdma
# apt-get install nvme-cli(yum install nvme-cli)
# nvme list
示例基本操作
# nvme discover -t rdma -a 192.168.100.8 -s 4420
# nvme connect -t rdma -n "nqn.2016-06.io.spdk:cnode1" -a 192.168.100.8 -s 4420
# nvme disconnect -n "nqn.2016-06.io.spdk:cnode1"
iSCSI target
基本的配置调优都可以参见http://www.spdk.io/doc/iscsi.html,说得比较详细。其中提到了VPP,思科开源的一套高性能网络报文处理框架,可用来做vswitch,vrouter甚至vfirewall等,这里展开一下。
VPP安装
# touch /etc/apt/sources.list.d/99fd.io.list
# echo deb [trusted=yes] https://nexus.fd.io/content/repositories/fd.io.ubuntu.xenial.main/ ./ >> /etc/apt/sources.list.d/99fd.io.list
# apt-get update
# apt-get install -y vpp-lib vpp vpp-plugins
# vppctl
vpp# set interface state tapcli-0 up
vpp# set interface ip address tapcli-0 10.0.0.1/24
vpp# show int
Name Idx State MTU (L3/IP4/IP6/MPLS) Counter Count
GigabitEthernet1/0/0 1 down 9000/0/0/0
GigabitEthernet1/0/1 2 down 9000/0/0/0
GigabitEthernet1/0/2 3 down 9000/0/0/0
GigabitEthernet1/0/3 4 down 9000/0/0/0
TenGigabitEthernet6/0/0 5 down 9000/0/0/0
TenGigabitEthernet6/0/1 6 down 9000/0/0/0
TenGigabitEthernet82/0/1 7 down 9000/0/0/0
local0 0 down 0/0/0/0
tapcli-0 8 up 9000/0/0/0 drops 8
vpp# show hardware tapcli-0
Name Idx Link Hardware
tapcli-0 8 up tapcli-0
vpp# show int addr
GigabitEthernet1/0/0 (dn):
GigabitEthernet1/0/1 (dn):
GigabitEthernet1/0/2 (dn):
GigabitEthernet1/0/3 (dn):
TenGigabitEthernet6/0/0 (dn):
TenGigabitEthernet6/0/1 (dn):
TenGigabitEthernet82/0/1 (dn):
local0 (dn):
tapcli-0 (up):
L3 10.0.0.1/24
kernel上挂载一个接口进行ping测试
root@ONAP-Test-Temp:/home/set# ip addr add 10.0.0.2/24 dev tap0
root@ONAP-Test-Temp:/home/set# ip link set tap0 up
root@ONAP-Test-Temp:/home/set# ping 10.0.0.1
PING 10.0.0.1 (10.0.0.1) 56(84) bytes of data.
64 bytes from 10.0.0.1: icmp_seq=1 ttl=64 time=0.327 ms
64 bytes from 10.0.0.1: icmp_seq=2 ttl=64 time=0.033 ms

vhost target
协议参见vhost-user protocol
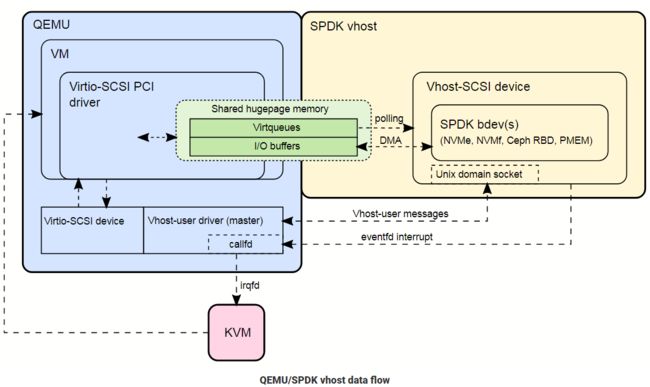
SPDK上启动vhost target (http://www.spdk.io/doc/vhost.html)
# qemu-system-x86_64 -version
# qemu-system-x86_64 -device vhost-user-scsi-pci,help
# echo 4 > /sys/devices/system/node/node0/hugepages/hugepages-1048576kB/nr_hugepages
# echo 4 > /sys/devices/system/node/node1/hugepages/hugepages-1048576kB/nr_hugepages
# grep Huge /proc/meminfo
AnonHugePages: 477184 kB
HugePages_Total: 8
HugePages_Free: 3
HugePages_Rsvd: 0
HugePages_Surp: 0
Hugepagesize: 1048576 kB
# app/vhost/vhost -S /var/tmp/ -m 0x30
Starting SPDK v18.07-pre / DPDK 18.05.0 initialization...
[ DPDK EAL parameters: vhost -c 0x30 -m 1024 --legacy-mem --file-prefix=spdk_pid16756 ]
EAL: Detected 48 lcore(s)
EAL: Detected 2 NUMA nodes
EAL: Multi-process socket /var/run/dpdk/spdk_pid16756/mp_socket
EAL: Probing VFIO support...
EAL: VFIO support initialized
app.c: 530:spdk_app_start: *NOTICE*: Total cores available: 2
reactor.c: 718:spdk_reactors_init: *NOTICE*: Occupied cpu socket mask is 0x1
reactor.c: 492:_spdk_reactor_run: *NOTICE*: Reactor started on core 5 on socket 0
reactor.c: 492:_spdk_reactor_run: *NOTICE*: Reactor started on core 4 on socket 0
# ls -al /var/tmp/
drwxrwxrwt 5 root root 4096 Aug 17 01:32 .
drwxr-xr-x 12 root root 4096 Dec 11 2017 ..
srwxr-xr-x 1 root root 0 Aug 17 01:32 spdk.sock
-rw------- 1 root root 0 Aug 17 01:32 spdk.sock.lock
创建bdev
# scripts/rpc.py construct_malloc_bdev 64 512 -b Malloc0
Malloc0
创建vhost设备
参考http://www.spdk.io/doc/vhost.html SPDK vhost application is started on CPU cores 0 and 1, QEMU on cores 2 and 3.
先创建bdev
host:~# ./scripts/rpc.py construct_nvme_bdev -b Nvme0 -t pcie -a 0000:01:00.0
EAL: PCI device 0000:01:00.0 on NUMA socket 0
EAL: probe driver: 8086:953 spdk_nvme
EAL: using IOMMU type 1 (Type 1)
host:~# ./scripts/rpc.py construct_malloc_bdev 128 4096 Malloc0
Malloc0
host:~# ./scripts/rpc.py construct_malloc_bdev 64 512 -b Malloc1
Malloc1
创建vhost SCSI
host:~# ./scripts/rpc.py construct_vhost_scsi_controller --cpumask 0x1 vhost.0
VHOST_CONFIG: vhost-user server: socket created, fd: 21
VHOST_CONFIG: bind to /var/tmp/vhost.0
vhost.c: 596:spdk_vhost_dev_construct: *NOTICE*: Controller vhost.0: new controller added
host:~# ./scripts/rpc.py add_vhost_scsi_lun vhost.0 0 Nvme0n1
vhost_scsi.c: 840:spdk_vhost_scsi_dev_add_tgt: *NOTICE*: Controller vhost.0: defined target 'Target 0' using lun 'Nvme0'
host:~# ./scripts/rpc.py add_vhost_scsi_lun vhost.0 1 Malloc0
vhost_scsi.c: 840:spdk_vhost_scsi_dev_add_tgt: *NOTICE*: Controller vhost.0: defined target 'Target 1' using lun 'Malloc0'
创建vhost blk
host:~# ./scripts/rpc.py construct_vhost_blk_controller --cpumask 0x2 vhost.1 Malloc1
vhost_blk.c: 719:spdk_vhost_blk_construct: *NOTICE*: Controller vhost.1: using bdev 'Malloc1'
Vhost-NVMe (experimental)
rpc_py construct_vhost_nvme_controller --cpumask 0x1 vhost.2 16 /*创建vhost nvme控制器*/
rpc_py add_vhost_nvme_ns vhost.2 Malloc0 /*绑定bdev Malloc0到对应的控制器上*/
同时在QEMU指定虚机对应启动参数并启动虚机
Vhost-SCSI
chardev socket,id=char0,path=/var/tmp/vhost.0
device vhost-user-scsi-pci,id=scsi0,chardev=char0
Vhost-BLK
chardev socket,id=char1,path=/var/tmp/vhost.1
device vhost-user-blk-pci,id=blk0,chardev=char1
Vhost-NVMe (experimental)
chardev socket,id=char2,path=/var/tmp/vhost.2
device vhost-user-nvme,id=nvme0,chardev=char2,num_io_queues=4
host:~# taskset -c 2,3 qemu-system-x86_64 \ --enable-kvm \ -cpu host -smp 2 \ -m 1G -object memory-backend-file,id=mem0,size=1G,mem-path=/dev/hugepages,share=on -numa node,memdev=mem0 \ -drive file=guest_os_image.qcow2,if=none,id=disk \ -device ide-hd,drive=disk,bootindex=0 \ -chardev socket,id=spdk_vhost_scsi0,path=/var/tmp/vhost.0 \ -device vhost-user-scsi-pci,id=scsi0,chardev=spdk_vhost_scsi0,num_queues=4 \ -chardev socket,id=spdk_vhost_blk0,path=/var/tmp/vhost.1 \ -device vhost-user-blk-pci,chardev=spdk_vhost_blk0,num-queues=4

Virtio-SCSI driver
TBD