最近用`Unity2017`打包的文件嵌入到现有`iOS`工程中发现也是可以的,更加方便。出现的问题在最底下已经解决。
因为现有项目有个功能需要调用Unity页面,所以就叫同事用Unity打一个包给我嵌入到现有iOS工程,就一个导入过程就非常曲折。(泪奔~~o(>_<)o ~~)
以下所有的文件结构和TARGETS配置都是参考Unity导出来的工程结构和配置,后面所有的删除都是删除引用。
1,首先将导出的包跑一下看看能不能跑起来(注意打出来的包是否支持模拟器运行),能跑起来才做下面的将Unity项目下面的四个文件复制到iOS项目的根目录
复制到iOS的项目后的目录如下:
2,在自己iOS项目中引用这几个文件,但是引用跟我们平时引用的不一样,右键Add Files to ···分别选择Classes 和 Libraries 、MapFileParser.sh,在Options里面勾选 Create groups,不要选Copy items if needed
2.1,剩下的Data文件,右键Add Files to ···,在Options里面勾选 Create folder references,不要选Copy items if needed
完成之后的文件夹目录如下:
2.2,接下来删除多余的引用:
在Classes->Native目录,将目录下的.h文件全部删除(注意:只删除引用,而且只有.h,因为里面还有.cpp,据说Unity2017不用删除,但是我还没有测试成功)
2.3,再删除Libraries->libil2cpp,这个文件的引用,同上面操作步骤一样的
3,对iOS工程环境的配置,这里的配置都是以Unity的配置为参考
3.1,添加应用库
3.2,添加头文件和库的搜索路径
每一个项目的配置和路径不一样,这里只是参考,一切以你
Unity项目的配置为准
3.3,其它一些配置
上面注意:如果自己的
iOS项目有
pch文件,那就把
Prefix.pch里面的文件拷贝到自己的
pch文件中,反之也行(注意pch路径),并添加
#import"UnityAppController.h"
3.4,添加用户定义的设置(这个图是我用Unity2017来试的时候截的图,但是失败了,5.6可以)
4,修改main.m文件
把Classes/文件夹里面的main.mm里面的代码,拷贝到Supporting Files/下的main.m文件中,并把后缀改成.mm,修改如下图
然后删除
Classes目录下单
main.mm文件。注意:一样是删除引用
到了这里基本集成完毕了~~~
5,修改AppDelegate 文件
AppDelegate.h文件
#import

@interface AppDelegate : UIResponder

@property (strong, nonatomic) UnityAppController * unityController;
@property (strong, nonatomic) UIWindow *window;
@property (strong, nonatomic) UIWindow * unityWindow;

- (void)showUnityWindow;
- (void)hideUnityWindow;


@end
AppDelegate.m文件
#import "AppDelegate.h"
#import "ViewController.h"

@interface AppDelegate ()

@end

@implementation AppDelegate

- (UIWindow *)unityWindow {
    return UnityGetMainWindow();
}

- (void)showUnityWindow {

    UIButton * btn = [UIButton buttonWithType:UIButtonTypeSystem];
    [btn setTitle:@"返回iOS世界" forState:UIControlStateNormal];
    [btn setFrame:CGRectMake(100, 100, 100, 40)];
    [btn addTarget:self action:@selector(hideUnityWindow) forControlEvents:UIControlEventTouchUpInside];
    [self.unityWindow addSubview:btn];

    [self.unityWindow makeKeyAndVisible];
}

- (void)hideUnityWindow {
    [self.window makeKeyAndVisible];
}


- (BOOL)application:(UIApplication *)application didFinishLaunchingWithOptions:(NSDictionary *)launchOptions {
    // Override point for customization after application launch.

    self.window = [[UIWindow alloc] initWithFrame:[UIScreen mainScreen].bounds];
    self.window.backgroundColor = [UIColor whiteColor];
    UINavigationController * nav = [[UINavigationController alloc] initWithRootViewController:[[ViewController alloc] init]];

    self.window.rootViewController = nav;
    self.unityController = [[UnityAppController alloc] init];
    [self.unityController application:application didFinishLaunchingWithOptions:launchOptions];
    [self.window makeKeyAndVisible];

    return YES;
}


- (void)applicationWillResignActive:(UIApplication *)application {
    // Sent when the application is about to move from active to inactive state. This can occur for certain types of temporary interruptions (such as an incoming phone call or SMS message) or when the user quits the application and it begins the transition to the background state.
    // Use this method to pause ongoing tasks, disable timers, and invalidate graphics rendering callbacks. Games should use this method to pause the game.
    [_unityController applicationWillResignActive:application];
}


- (void)applicationDidEnterBackground:(UIApplication *)application {
    // Use this method to release shared resources, save user data, invalidate timers, and store enough application state information to restore your application to its current state in case it is terminated later.
    // If your application supports background execution, this method is called instead of applicationWillTerminate: when the user quits.
    [_unityController applicationDidEnterBackground:application];
}


- (void)applicationWillEnterForeground:(UIApplication *)application {
    // Called as part of the transition from the background to the active state; here you can undo many of the changes made on entering the background.
    [_unityController applicationWillEnterForeground:application];
}


- (void)applicationDidBecomeActive:(UIApplication *)application {
    // Restart any tasks that were paused (or not yet started) while the application was inactive. If the application was previously in the background, optionally refresh the user interface.
    [_unityController applicationDidBecomeActive:application];
}


- (void)applicationWillTerminate:(UIApplication *)application {
    // Called when the application is about to terminate. Save data if appropriate. See also applicationDidEnterBackground:.
    [_unityController applicationWillTerminate:application];
}

@end
6,修改UnityAppController.h文件
#import "AppDelegate.h"

inline UnityAppController*  GetAppController()
{
    AppDelegate * delegate = (AppDelegate *)[UIApplication sharedApplication].delegate;
    return delegate.unityController;
//    return (UnityAppController*)[UIApplication sharedApplication].delegate;
}
7,启动Unity界面
进入Unity界面
[(AppDelegate *)[UIApplication sharedApplication].delegate showUnityWindow];
UnityPause(false);
跳出Unity界面
[(AppDelegate*)[UIApplication sharedApplication].delegate  hideUnityWindow];
UnityPause(true);
8,一些报错汇总:
1,报错:libil2cpp/include/codegen/il2cpp-codegen.h:368:1: Control may reach end of non-void function
添加 return NULL;
2,编译时遇到Permission denied错误的是因为当前开发账号对项目目录没有权限执行MapFileParser.sh
解决方法:chmod +x   /Users/......./MapFileParser.sh (MapFileParser.sh所在的目录)
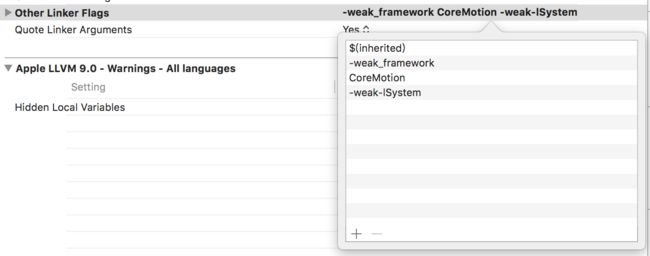
3,clang: error: no such file or directory: 'CoreMotion',注意Other Linker Flags的导入的顺序
4,加了extern "c",却不认识,一直报少“(”,在Build Settings选项中找到Compile Sources As这项设置成Objective-C++ 就解决问题了
5,最近使用Unity2017打包的导入发现出现如下错误
*** Terminating app due to uncaught exception 'NSInvalidArgumentException', reason: 'Storyboard () doesn't contain a view controller with identifier 'unitySplashStoryboard''
解决办法如下:在SplashScreen.mm文件修改下面的方法
void ShowSplashScreen(UIWindow* window)
{
//    bool hasStoryboard = [[NSBundle mainBundle] pathForResource: @"LaunchScreen" ofType: @"storyboardc"] != nullptr;
//
//    if (hasStoryboard)
//    {
//        UIStoryboard *storyboard = [UIStoryboard storyboardWithName: @"LaunchScreen" bundle: [NSBundle mainBundle]];
//        _controller = [storyboard instantiateViewControllerWithIdentifier: @"unitySplashStoryboard"];
//    }
//    else
        _controller = [[SplashScreenController alloc] init];

    [_controller create: window];
    [window makeKeyAndVisible];
}
最后感谢这两位作者的引导文章:
Unity(2017版本)嵌入现有iOS工程
unity与iOS合并
iOS (Swift)集成 Unity步骤和各种填坑。


