Mac OS下基于XAMPP搭建Phabricator
Phabricator作为Facebook官方开发并使用的可视化代码评审工具,功能很强大,而且属于开源项目。我们小组最近准备在开发流程中加强CodeReview,打算采用这款工具。
阅读本文之前,可先简单的过一遍 Phabricator官方安装指引文档
[TOC]
1. 运行环境依赖
Phabricator是一款LAMP (Linux, Apache, MySQL, PHP) 应用,由于我们是基于MacOS搭建,所以此处我们还需要提前安装的东西如下:
- Apache
- MySQL
- PHP
为了省时省事,我采用集成安装包XAMPP来安装上述工具和环境。
可直接点击这里XAMPP下载地址找到对应的dmg安装即可,本文下载的是XAMPP for OS X 5.6.21
安装完成后,打开xampp-manager,就可以看到以下GUI界面,在这个界面可以进行一些可视化的操作:

2. 下载安装必要的运行组件
按照官方提示的步骤:
$ cd somewhere/ # pick some install directory
somewhere/$ git clone https://github.com/phacility/libphutil.git
somewhere/$ git clone https://github.com/phacility/arcanist.git
somewhere/$ git clone https://github.com/phacility/phabricator.git
但实际上我在安装的过程发现下载这几个组件的速度实在是慢得可怜,这里我提供一个CSDN下载地址供大家打包下载,应该会快很多。下载后解压到对应目录即可。
3. 设置虚拟主机映射
由于我们是使用XAMPP搭建的Apache+PHP环境,所以设置映射大概步骤如下:
3.1 开启虚拟主机功能
用文本编辑器或者vim打开 /Applications/XAMPP/xamppfiles/etc/httpd.conf 这个文件,找到如下两行内容:
# Virtual hosts
#Include /Applications/XAMPP/etc/extra/httpd-vhosts.conf
去掉第二行前面的#号注释并保存,这样才能使Apache去加载我们自定义的虚拟主机配置文件:
# Virtual hosts
Include /Applications/XAMPP/etc/extra/httpd-vhosts.conf
3.2 创建自己的虚拟主机
用文本编辑器或者vim打开 /Applications/XAMPP/xamppfiles/etc/extra/httpd-vhosts.conf 这个文件。可以简单粗暴注释掉其他内容,添加以下内容:
  # Change this to the domain which points to your host.
  ServerName 192.168.3.13

  # Change this to the path where you put 'phabricator' when you checked it
  # out from GitHub when following the Installation Guide.
  #
  # Make sure you include "/webroot" at the end!

  DocumentRoot /Users/Kido/Documents/app/phabricator/webroot


      Options Indexes FollowSymLinks Includes execCGI
      AllowOverride All
      Require all granted


  RewriteEngine on
  RewriteRule ^/rsrc/(.*)     -                       [L,QSA]
  RewriteRule ^/favicon.ico   -                       [L,QSA]
  RewriteRule ^(.*)$          /index.php?__path__=$1  [B,L,QSA]
注:
此处ServerName添加的是自己机器的IP地址(有域名可以填写域名)。
DocumentRoot对应下载的phabricator的webroot目录,Directory亦是如此。
设置完成后保存,重启Apache。
3.3 访问验证
确保上述设置的路径正确无误后,打开浏览器访问上述自己的IP地址,看看是否能成功访问。
若出现403错误,请打开 /Applications/XAMPP/xamppfiles/etc/httpd.conf 文件,并找到以下内容行:
# User/Group: The name (or #number) of the user/group to run httpd as.
# It is usually good practice to create a dedicated user and group for
# running httpd, as with most system services.
#
User daemon
Group daemon
将User后面对应的名字更改为自己机器的登陆用户名。
User yourusername
更改保存后重启Apache,此时应该可以顺利的看到Phabricator的界面,一开始可能会提示你“storage upgrade”之类的,别紧张,还没全部配置完,下面会讲到。
4. 配置mysql数据库
进入phabricator目录运行命令:
phabricator/ $ ./bin/storage upgrade
第一次可能失败,会提示你设置mysql的地址、用户名、密码等,根据输出的提示一步步设置即可。mysql默认用户名是root,密码为空,以我为例,设置命令如下:
# 由于mysql安装在本机,这里的mysql.host可填localhost或127.0.0.1或本机实际IP

phabricator/ $ ./bin/config set mysql.host localhost
phabricator/ $ ./bin/config set mysql.user root
phabricator/ $ ./bin/config set mysql.pass ""
设置完成后,重新运行:
phabricator/ $ ./bin/storage upgrade
等待运行完成,重新尝试在浏览器打开访问自己的host,看是否能正常访问。
若出现以下错误提示:
Site Not Found

This request asked for "/" on host "192.168.3.13", but no site is configured which can serve this request.
不怕,很简单,只需要设置一下phabricator的base uri即可。执行以下命令:
phabricator/ $ ./bin/config set phabricator.base-uri 'http://192.168.3.13'
再次访问,顺利的话,第一次会看到创建帐号的页面,在页面上按提示自行创建即可。
若想在命令行创建用户,可以执行如下语句,然后按提示一步步填写完成即可:
phabricator/ $ ./bin/accountadmin
对应删除用户的命令如下:
phabricator/ $ ./bin/remove destroy @username
登陆后的页面大致如下:

5. 相关配置
5.1 启动后台进程
phabricator使用了一些后台程序(daemons)去处理一系列相关的任务,比如记录操作日志、发送邮件等。为确保这些daemons处于运行状态,可以执行:
phabricator/ $ ./bin/phd start
若启动失败。提示一些问题,请根据问题描述Google搜索一下即可。
5.2 邮件配置
邮件发送我采用SMTP方式,使用自己的163邮箱进行发送。主要设置如下:
- Config->Config->Mail

- Config->Config->PHPMailer
(此处在网页端无法直接设置,请根据网页端的提示到命令行执行)
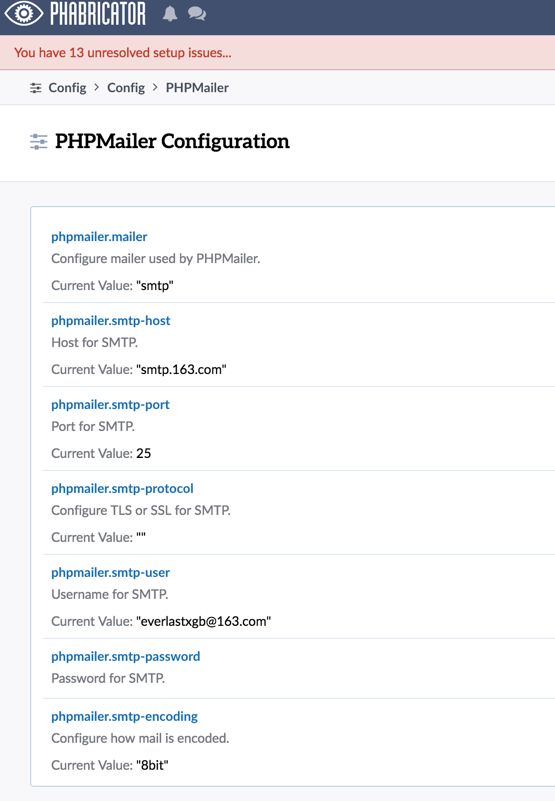
以163邮箱为例,大概设置命令如下:
phabricator/ $ ./bin/config set phpmailer.mailer smtp
phabricator/ $ ./bin/config set phpmailer.smtp-host smtp.163.com
phabricator/ $ ./bin/config set phpmailer.smtp-port 25
phabricator/ $ ./bin/config set phpmailer.smtp-user [email protected]
phabricator/ $ ./bin/config set phpmailer.smtp-password **
若为exmail之类的走ssl协议的,则还需要设置smtp-protocol:
phabricator/ $ ./bin/config set phpmailer.smtp-protocol ssl
5.3 未完待续...
6. 参考资料
《 Configuring VirtualHosts in XAMPP on Mac 》
《 Phabricator Installation Guide 》