一.发送一个简单的本地通知
1.注册通知
需要导入头文件或者框架
UserNotifications在iOS8.0之后,如果想要用户接收通知需要主动请求授权,为了能让该代码一定被执行,一般写在Appdelegate中
func application(_ application: UIApplication, didFinishLaunchingWithOptions launchOptions: [UIApplicationLaunchOptionsKey: Any]?) -> Bool {

// 1.获取通知中心

let center = UNUserNotificationCenter.current()

// 2.注册通知(会弹框请求用户授权)

// 如果有错误则直接返回

if error != nil {

return

}

// 授权成功则为true

if granted {

print("用户同意通知")

} else {

print("用户拒绝通知")

}

}
2.发送通知(点击控制器View的时候发送通知)
override func touchesBegan(_ touches: Set, with event: UIEvent?) {

// 创建通知标识(用于标识哪一个通知)

let identifier = "SimpleNotificationIdentifier"

// 创建通知中的内容

let content = UNMutableNotificationContent()

// 设置内容

content.body = "我是内容"

// 设置通知发送的时间

// 注意:重复时间必须大于60秒

let trigger = UNTimeIntervalNotificationTrigger(timeInterval: 3, repeats: false)

// 创建请求对象

let request = UNNotificationRequest(identifier: identifier, content: content, trigger: trigger)

// 获取通知中心

let center = UNUserNotificationCenter.current()

// 添加本地通知

center.add(request, withCompletionHandler: {(error: Error?) in

if error == nil {

print("本地通知添加成功")

}

})

}
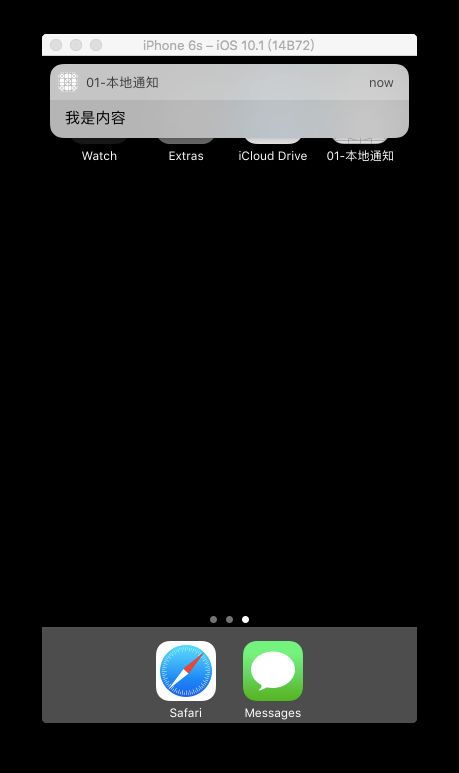
3.展示效果
前台没有弹框
后台/退出应用/通知中心/锁屏均可以接收到弹框
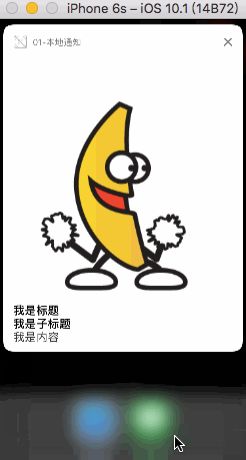
二.发送一个带附件的通知
在iOS10之后发送通知的时候可以附带一些内容
内容包含图片、GIF图片、视频以及音频(格式最好是caf,否则没有效果)
/* 设置其他内容 */
// 应用文字
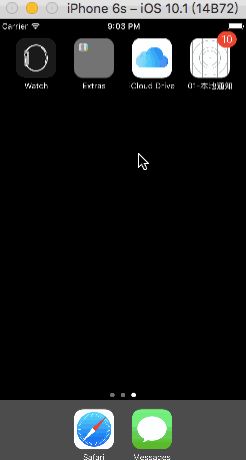
content.badge = 10
// 设置通知的声音
content.sound = UNNotificationSound(named: "win.aac")
// 设置标题
content.title = "我是标题"
// 设置子标题
content.subtitle = "我是子标题"
// 设置附件内容
// 附件标识
let attachmentIdentifier = "ImageAttachmentIdentifier"
// 附件URL
if let url = Bundle.main.url(forResource: "70s Electric Piano 52.caf", withExtension: nil) {
do {
let attachment = try UNNotificationAttachment(identifier: attachmentIdentifier, url: url, options: nil)
content.attachments = [attachment]
print("---")
} catch {
print(error)
}
}
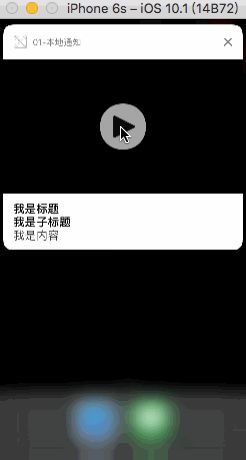
- 展示的效果
图片

Gif
音频
视频
三.对通知的操作
当一个通知添加成功之后,可以对添加成功的通知做一些操作,分别为:
查看即将发送的通知
取消即将发送的通知
查看已经发送的通知
取消已经发送的通知
/// 查看即将发送的通知

@IBAction func showUnsendNotification() {

UNUserNotificationCenter.current().getPendingNotificationRequests { (request: [UNNotificationRequest]) in

print("即将发送的通知:\(request)")

}

}

/// 删除即将发送的通知

@IBAction func removeUnsendNotification() {

// 通过标识删除某一个通知

// UNUserNotificationCenter.current().removePendingNotificationRequests(withIdentifiers: <#T##[String]#>)

// 删除所有

UNUserNotificationCenter.current().removeAllPendingNotificationRequests()

}

/// 查看发送成功的通知

@IBAction func showSendedNotification() {

UNUserNotificationCenter.current().getDeliveredNotifications { (notification: [UNNotification]) in

print("查看发送成功的通知:\(notification)")

}

}

/// 删除发送成功的通知

@IBAction func removeSendedNotification() {

// 通过标识删除某一个发送成功的通知

// UNUserNotificationCenter.current().removeDeliveredNotifications(withIdentifiers: <#T##[String]#>)

// 删除所有发送成功的通知

UNUserNotificationCenter.current().removeAllDeliveredNotifications()

}
四.监听通知的点击
当用户点击通知进入App后,监听用户通知行为
需要设置通知的代理,当用户点击了通知后,会通过代理告诉我们
设置代理
UNUserNotificationCenter.current().delegate = self
遵守协议并实现代理方法
extension ViewController: UNUserNotificationCenterDelegate {

/// 当接收到通知的时候会来到该方法

///

/// - Parameters:

/// - center: 通知中心

/// - response: 响应

/// - completionHandler: 成功回调

func userNotificationCenter(_ center: UNUserNotificationCenter, didReceive response: UNNotificationResponse, withCompletionHandler completionHandler: @escaping () -> Void) {

print("接收到通知\(response)")

completionHandler()

}

/// 当一个通知发送成功后会来到该方法

///

/// - Parameters:

/// - center: 通知中心

/// - notification: 发送的通知

/// - completionHandler: 回调闭包,可以设置在前台收到通知横幅

func userNotificationCenter(_ center: UNUserNotificationCenter, willPresent notification: UNNotification, withCompletionHandler completionHandler: @escaping (UNNotificationPresentationOptions) -> Void) {

print("发送通知成功\(notification)")

// 在前台也能接收到通知

completionHandler([.alert,.badge,.sound])

}

}
五.通知的触发条件
iOS10与之前的通知的触发条件一共有三种
多少时间之后发送通知
指定日期发送通知
触发区域发送通知
在iOS10之后,触发条件的类为
UNNotificationTrigger而具体设置需要使用到它的子类
UNTimeIntervalNotificationTrigger : 多少时间之后
UNCalendarNotificationTrigger : 指定日期
UNLocationNotificationTrigger : 指定区域
1.多少时间之后发送通知
注意: 如果需要重复,那么时间必须大于60秒
let trigger = UNTimeIntervalNotificationTrigger(timeInterval: 3, repeats: false)
2.指定日期发送通知
可以通过添加年月日时,来固定一个时间发送通知
// 创建时间组件

var components = DateComponents()

// 设置为日历时间

components.calendar = Calendar(identifier: .gregorian)

// 每天的早上10点10分发送通知

components.hour = 10

components.minute = 10

print(components.date)

let trigger = UNCalendarNotificationTrigger(dateMatching: components, repeats: true)
3.指定区域发送通知
注意:在使用模拟器调试的过程中,可能会无法显示,重置模拟器,或者换个模拟器则会解决该问题
// 1.请求授权(iOS8.0之后获取用户的位置要主动请求授权,注意在info.plist中配置对应的key)

lazy var locationM: CLLocationManager = {

let locationM = CLLocationManager()

locationM.requestAlwaysAuthorization()

return locationM

}()

// 2.创建区域触发器

let region = CLCircularRegion(center: CLLocationCoordinate2D(latitude: 12.123, longitude: 123.456), radius: 1000, identifier: "RegionNotification")

locationM.startMonitoring(for: region)

let trigger = UNLocationNotificationTrigger(region: region, repeats: true)
六.额外操作项
1.设置通知的额外信息
// 1.设置额外信息

content.userInfo = ["name": "张三", "age": 18]

// 2.在接收到通知后,可以获取到额外信息

/// 当接收到通知的时候会来到该方法

///

/// - Parameters:

/// - center: 通知中心

/// - response: 响应

/// - completionHandler: 成功回调

func userNotificationCenter(_ center: UNUserNotificationCenter, didReceive response: UNNotificationResponse, withCompletionHandler completionHandler: @escaping () -> Void) {

print("接收到通知获取额外信息\(response.notification.request.content.userInfo)")

completionHandler()

}

// 打印为:接收到通知获取额外信息[AnyHashable("name"): 张三, AnyHashable("age"): 18]
2.设置额外操作项
步骤
注册操作集合
注册操作组,添加到操作集合中
注册操作行为,添加到操作组中
设置通知所用到的操作组
// 1.注册操作项

// 1.创建操作项

let action1: UNNotificationAction = UNNotificationAction(identifier: "huifu", title: "回复", options: .foreground)

let action2: UNNotificationAction = UNNotificationAction(identifier: "jujue", title: "拒绝", options: .destructive)

let actions: [UNNotificationAction] = [action1, action2]

// 创建操作组

// identifier: 操作组标识

// actions: 操作组行为

// intentIdentifiers:暂时未发现该用途

// options: 支持的场景

let categoryIdentifier = "category1"

let category: UNNotificationCategory = UNNotificationCategory(identifier: categoryIdentifier, actions: actions, intentIdentifiers: [], options: .customDismissAction)

// 注册操作集合(其中设置操作组)

let categories: Set = [category]

center.setNotificationCategories(categories)

// 设置该通知用到的额外操作组

content.categoryIdentifier = "category1"
展示效果
点击
回复打开app点击
拒绝则不会打开app两者都会调用接收通知的代理方法

七.设置快捷回复
操作行为有2个类来实现'UNNotificationAction'以及
UNTextInputNotificationAction其中
UNTextInputNotificationAction是'UNNotificationAction'的子类,用于实现快捷回复下列代码中的
action3为便捷回复行为
// 1.创建操作项

let action1: UNNotificationAction = UNNotificationAction(identifier: "huifu", title: "回复", options: .foreground)

let action2: UNNotificationAction = UNNotificationAction(identifier: "jujue", title: "拒绝", options: .destructive)

let action3 = UNTextInputNotificationAction(identifier: "kuaijie", title: "快捷回复", options: .foreground, textInputButtonTitle: "回复按钮", textInputPlaceholder: "占位字符")

let actions: [UNNotificationAction] = [action1, action2,action3]

// 创建操作组

// identifier: 操作组标识

// actions: 操作组行为

// intentIdentifiers:暂时未发现该用途

// options: 支持的场景

let categoryIdentifier = "category1"

let category: UNNotificationCategory = UNNotificationCategory(identifier: categoryIdentifier, actions: actions, intentIdentifiers: [], options: .customDismissAction)

// 注册操作集合(其中设置操作组)

let categories: Set = [category]

center.setNotificationCategories(categories)
- 展示效果

八.通知触发的场景
在实际开发中,前台获取通知与后台获取通知所要执行的逻辑不一致,那么就有必要去判断一下,当前的通知触发的场景
步骤
在获取到通知的代理方法中获取该应用的状态
判断当前状态
/// 当接收到通知的时候会来到该方法

///

/// - Parameters:

/// - center: 通知中心

/// - response: 响应

/// - completionHandler: 成功回调

func userNotificationCenter(_ center: UNUserNotificationCenter, didReceive response: UNNotificationResponse, withCompletionHandler completionHandler: @escaping () -> Void) {

if let response = response as? UNTextInputNotificationResponse {

print(response.userText)

} else {

print("接收到通知获取额外信息\(response.notification.request.content.userInfo)")

}

let status = UIApplication.shared.applicationState

switch status {

case .active:

print("在前台")

case .inactive:

print("进入前台")

default:

print("在后台")

}

completionHandler()

}
iOS10远程推送通知
一.获取DeviceToken
此处省略配置
真机调试证书、通知调试证书以及通知生产证书步骤必须保证
BundleId与在开发者中心的AppId一致必须使用真机
1.注册通知
需要导入头文件或者框架
UserNotifications在iOS8.0之后,如果想要用户接收通知需要主动请求授权,为了能让该代码一定被执行,一般写在Appdelegate中
// 1.获取通知中心

let center = UNUserNotificationCenter.current()

// 2.注册通知

center.requestAuthorization(options: [.alert,.carPlay,.badge,.sound], completionHandler: {(granted: Bool, error: Error?) in

if error != nil {

return

}

if granted {

print("用户允许通知")

} else {

print("用户拒绝通知")

}

})
2.向苹果服务器申请DeviceToken
- 获取方式与iOS8.0一致
// 3.获取deviceToken

application.registerForRemoteNotifications()
从代理中获取deviceToken
此处Data打印的是32types,转为NSData即可
/// 当获取到deviceToken会来到该方法

func application(_ application: UIApplication, didRegisterForRemoteNotificationsWithDeviceToken deviceToken: Data) {

print(NSData(data: deviceToken))

}

/// 注册失败会来到该方法

func application(_ application: UIApplication, didFailToRegisterForRemoteNotificationsWithError error: Error) {

print(error)

}
3.开启远程推送功能
工程->target->Capabilities->Push
开启的条件
1.Apple Id 必须配置了远程推送通知
2.权利文件(打开会自动生成该文件)
4.运行真机,获取DeviceToken
二.发送通知
- 借助
PushMeBaby作为服务器向苹果服务器发送消息,苹果服务器推送通知
极光推送
注册应用
上传通知证书.p12
集成Jpush SDK
1.注册Jpush并获取DeviceToken
func application(_ application: UIApplication, didFinishLaunchingWithOptions launchOptions: [UIApplicationLaunchOptionsKey: Any]?) -> Bool {

// 注册通知

let entity = JPUSHRegisterEntity()

entity.types = Int(JPAuthorizationOptions.alert.rawValue | JPAuthorizationOptions.badge.rawValue | JPAuthorizationOptions.sound.rawValue)

JPUSHService.register(forRemoteNotificationConfig: entity, delegate: self)

// 初始化JUSH

JPUSHService.setup(withOption: launchOptions, appKey: "b29ccf03d1e6aca9baa3c34a", channel: "App Store", apsForProduction: false)

return true

}

/// 获取DeviceToken

func application(_ application: UIApplication, didRegisterForRemoteNotificationsWithDeviceToken deviceToken: Data) {

JPUSHService.registerDeviceToken(deviceToken)

}

/// 注册失败

func application(_ application: UIApplication, didFailToRegisterForRemoteNotificationsWithError error: Error) {

print(error)

}
2.设置代理,处理通知
extension AppDelegate : JPUSHRegisterDelegate {

/// 获取通知

func jpushNotificationCenter(_ center: UNUserNotificationCenter!, didReceive response: UNNotificationResponse!, withCompletionHandler completionHandler: (() -> Void)!) {

}

/// 可设置在前台获取通知

func jpushNotificationCenter(_ center: UNUserNotificationCenter!, willPresent notification: UNNotification!, withCompletionHandler completionHandler: ((Int) -> Void)!) {

let userInfo = notification.request.content.userInfo

let isPushTrigger = notification.request.trigger?.isKind(of: UNPushNotificationTrigger.self) ?? false

if isPushTrigger {

JPUSHService.handleRemoteNotification(userInfo)

}

let value = Int(UNNotificationPresentationOptions.alert.rawValue | UNNotificationPresentationOptions.sound.rawValue | UNNotificationPresentationOptions.badge.rawValue)

completionHandler(value)

// 需要执行这个方法,选择是否提醒用户,有Badge、Sound、Alert三种类型可以选择设置

}

}
来源:http://bbs.520it.com/forum.php?mod=viewthread&tid=3020