EventBus是一个 发布/订阅 模式的消息总线库,它简化了应用程序内各组件间、组件与后台线程间的通信,解耦了事件的发送者和接收者,避免了复杂的、易于出错的依赖及生命周期问题,可以使我们的代码更加简洁、健壮。
在不使用EventBus的情况下,我们也可能会使用诸如 Observable/Observer 这样得一些机制来处理事件的监听/发布。如果在我们的应用程序中,有许多地方需要使用事件的监听/发布,则我们应用程序的整个结构可能就会像下面这个样子:
每一处需要用到事件的
监听/发布的地方,都需要实现一整套
监听/发布的机制,比如定义Listener接口,定义Notification Center/Observable,定义事件类,定义注册监听者的方法、移除监听者的方法、发布事件的方法等。我们不得不写许多繁琐的,甚至常常是重复的冗余的代码来实现我们的设计目的。
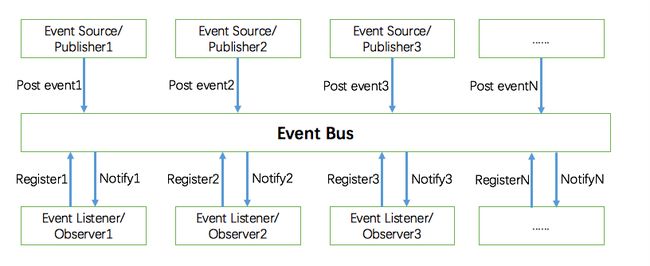
引入EventBus库之后,事件的监听/发布将变得非常简单,我们应用程序的结构也将更加简洁,会如下面这样:
我们可以将事件监听者的管理,注册监听者、移除监听者,事件发布等方法等都交给EventBus来完成,而只定义事件类,实现事件处理方法即可。
在使用Observable/Observer来实现事件的监听/发布时,监听者和事件发布者之间的关联关系非常明晰,事件发布者找到事件的监听者从不成为问题。引入EventBus之后,它会统一管理所有对不同类型事件感兴趣的监听者,则事件发布者在发布事件时,能够准确高效地找到对事件感兴趣的监听者将成为重要的问题。后面我们就通过对EventBus代码实现的分析,来获取这样一些重要问题的答案,同时来欣赏EventBus得设计。
EventBus的基本使用
在具体分析EventBus的代码之前,我们先来了解一下EventBus的用法。想要使用EventBus,首先需要在我们应用程序的Gradle脚本中添加对于EventBus的依赖,以当前最新版3.0.0为例:
compile 'org.greenrobot:eventbus:3.0.0'
然后,我们需要定义事件。事件是POJO(plain old Java object),并没有特殊的要求:
public class MessageEvent {
    public final String message;

    public MessageEvent(String message) {
        this.message = message;
    }
}
其次,准备订阅者,订阅者实现事件处理方法(也称为“订阅者方法”)。当事件被发布时,这些方法会被调用。在EventBus 3中,它们通过 @Subscribe annotation进行声明,方法名可以自由地进行选择。而在EventBus 2中,则是通过命名模式来声明监听者方法的。
// This method will be called when a MessageEvent is posted (in the UI thread for Toast)
@Subscribe(threadMode = ThreadMode.MAIN)
public void onMessageEvent(MessageEvent event) {
    Toast.makeText(getActivity(), event.message, Toast.LENGTH_SHORT).show();
}

// This method will be called when a SomeOtherEvent is posted
@Subscribe
public void handleSomethingElse(SomeOtherEvent event) {
    doSomethingWith(event);
}
订阅者需要向EventBus注册和注销它自己。只有当订阅者注册了,它们才能收到事件。在Android中,Activities和Fragments通常根据它们的生命周期来进行绑定:
@Override
public void onStart() {
    super.onStart();
    EventBus.getDefault().register(this);
}

@Override
public void onStop() {
   EventBus.getDefault().unregister(this);
    super.onStop();
}
最后即是事件源发布事件。我们可以在代码的任何位置发布事件,当前所有事件类型与发布的事件类型匹配的订阅者都将收到它。
EventBus.getDefault().post(new MessageEvent("Hello everyone!"));
EventBus 更多特性说明
了解了EventBus的基本用法之后,我们再来了解一下它提供的一些高级特性,以方便我们后续理解它的设计决策。
Sticky事件
某些事件携带的信息在事件被发布之后依然有价值。比如,一个指示初始化过程完成的事件信号。或者如果你有传感器或位置数据,你想要获取它们的最新值的情况。不是实现自己的缓存,而是使用sticky事件。EventBus将在内存中保存最新的某一类型的sticky事件。Sticky事件可以被发送给订阅者,也可以显式地查询。从而使你可以不需要特别的逻辑来考虑已经可用的数据。这与Android中的sticky broadcast有些类似。
比如,一个sticky事件在一段时间之前被抛出:
EventBus.getDefault().postSticky(new MessageEvent("Hello everyone!"));
现在,sticky事件被抛出后的某个时刻,一个新的Activity启动了。在注册阶段所有的sticky订阅者方法将立即获得之前抛出的sticky事件:
    @Override
    public void onStart() {
        super.onStart();
        EventBus.getDefault().register(this);
    }

    @Subscribe(sticky = true, threadMode = ThreadMode.MAIN)
    public void onEvent(MessageEvent event) {
        // UI updates must run on MainThread
        textField.setText(event.message);
    }

    @Override
    public void onStop() {
        EventBus.getDefault().unregister(this);
        super.onStop();
    }
正如前面看到的,最新的sticky事件会在注册时立即自动地被传递给匹配的订阅者。但有时手动地去检查sticky事件可能会更方便一些。有时也可能需要移除(消费)sticky事件以便于它不会再被传递。比如:
MessageEvent stickyEvent = EventBus.getDefault().getStickyEvent(MessageEvent.class);
// Better check that an event was actually posted before
if(stickyEvent != null) {
    // "Consume" the sticky event
    EventBus.getDefault().removeStickyEvent(stickyEvent);
    // Now do something with it
}
removeStickyEvent方法是重载的:当你传递class时,它将返回持有的之前的sticky事件。使用如下的变体,我们可以改进前面的例子:
MessageEvent stickyEvent = EventBus.getDefault().removeStickyEvent(MessageEvent.class);
// Better check that an event was actually posted before
if(stickyEvent != null) {
    // Now do something with it
}
优先级及事件取消
尽管使用EventBus的大多数场景不需要优先级或事件的取消,但在某些特殊的场景下它们还是很方便的。比如,在app处于前台时一个事件可能触发某些UI逻辑,而如果app当前对用户不可见则需要有不同的响应。
我们可以定制订阅者的优先级。可以通过在注册期间给订阅者提供一个优先级来改变事件传递的顺序。
@Subscribe(priority = 1);
public void onEvent(MessageEvent event) {
…
}
在相同的传递线程(ThreadMode)内,高优先级的订阅者将先于低优先级的订阅者收到事件。默认的优先级是0。优先级不影响处于不同ThreadModes中的订阅者的事件传递顺序。
我们还可以取消事件的传递。我们可以在一个订阅者的事件处理方法中通过调用cancelEventDelivery(Object event)来取消事件的传递进程。所有后续的事件传递将被取消:后面的订阅者将无法接收到事件。
// Called in the same thread (default)
@Subscribe
public void onEvent(MessageEvent event){
// Process the event
…

EventBus.getDefault().cancelEventDelivery(event) ;
}
事件通常由高优先级的订阅者取消。取消被限制只能在发布线程ThreadMode.PostThread的事件处理方法中进行。
传递线程
EventBus可以帮忙处理线程:事件可以在不同于抛出事件的线程中传递。一个常见的使用场景是处理UI变化。在Android中,UI变化必须在UI(主)线程中完成。另一方面,网络,或任何耗时任务,必须不运行在主线程。EventBus帮忙处理了那些任务并与UI线程同步(不需要深入了解线程事务,使用AsyncTask即可,等等)。
ThreadMode: POSTING
订阅者将在与抛出事件相同的线程中被调用。这是默认的方式。事件传递是同步完成的,事件传递完成时,所有的订阅者将已经被调用一次了。这个ThreadMode意味着最小的开销,因为它完全避免了线程的切换。对于已知耗时非常短的简单的不需要请求主线程的任务,这是建议采用的模式。使用这个模式的事件处理器应该迅速返回以避免阻塞发布事件的线程,而后者可能是主线程。比如:
// Called in the same thread (default)

@Subscribe(threadMode = ThreadMode.POSTING) // ThreadMode is optional here
public void onMessage(MessageEvent event) {
    log(event.message);
}
ThreadMode: MAIN
订阅者将在Android的主线程中被调用(有时被称为UI线程)。如果发布事件的线程是主线程,事件处理器方法将会直接被调用(如同ThreadMode.POSTING中描述的那样)。事件处理器使用这个模式必须快速地返回以避免阻塞主线程。比如:
// Called in Android UI's main thread
@Subscribe(threadMode = ThreadMode.MAIN)
public void onMessage(MessageEvent event) {
    textField.setText(event.message);
}
ThreadMode: BACKGROUND
订阅者将在一个后台线程中被调用。如果发布事件的线程不是主线程,事件处理器方法将直接在发布的线程中被调用。如果发布线程是主线程,EventBus使用一个单独的后台线程,它将顺序地传递它所有的事件。使用这个模式的事件处理器应该尝试快速返回以避免阻塞后台线程。
// Called in the background thread
@Subscribe(threadMode = ThreadMode.BACKGROUND)
public void onMessage(MessageEvent event){
    saveToDisk(event.message);
}
ThreadMode: ASYNC
事件处理器方法在另外一个线程中被调用。这总是独立于发布事件的线程和主线程。发布线程从不等待使用这一模式的事件处理器。对于执行比较耗时的事件处理器方法应该使用这个模式,比如对于网络访问。避免同时大量地触发长时间运行的异步处理器方法而限制并发线程的数量。EventBus使用了一个线程池以有效地复用已完成异步事件处理器通知的线程。
// Called in a separate thread
@Subscribe(threadMode = ThreadMode.ASYNC)
public void onMessage(MessageEvent event){
    backend.send(event.message);
}
EventBus对象的创建
大体了解了EventBus提供的特性之后,我们来分析EventBus的设计与实现。我们从EventBus对象的创建开始。EventBus对象需要用EventBusBuilder来创建。以EventBus提供的default EventBus对象为例,我们来看一下创建的过程。
应用程序可以通过EventBus.getDefault()来获取默认的EventBus对象:
    /** Convenience singleton for apps using a process-wide EventBus instance. */
    public static EventBus getDefault() {
        if (defaultInstance == null) {
            synchronized (EventBus.class) {
                if (defaultInstance == null) {
                    defaultInstance = new EventBus();
                }
            }
        }
        return defaultInstance;
    }
双重加锁检查手法来保证对EventBus.getDefault()调用的线程安全。来看EventBus的构造函数:
    public static EventBusBuilder builder() {
        return new EventBusBuilder();
    }
......
    /**
     * Creates a new EventBus instance; each instance is a separate scope in which events are delivered. To use a
     * central bus, consider {@link #getDefault()}.
     */
    public EventBus() {
        this(DEFAULT_BUILDER);
    }

    EventBus(EventBusBuilder builder) {
        subscriptionsByEventType = new HashMap<>();
        typesBySubscriber = new HashMap<>();
        stickyEvents = new ConcurrentHashMap<>();

        mainThreadPoster = new HandlerPoster(this, Looper.getMainLooper(), 10);
        backgroundPoster = new BackgroundPoster(this);
        asyncPoster = new AsyncPoster(this);

        indexCount = builder.subscriberInfoIndexes != null ? builder.subscriberInfoIndexes.size() : 0;
        subscriberMethodFinder = new SubscriberMethodFinder(builder.subscriberInfoIndexes,
                builder.strictMethodVerification, builder.ignoreGeneratedIndex);
        logSubscriberExceptions = builder.logSubscriberExceptions;
        logNoSubscriberMessages = builder.logNoSubscriberMessages;
        sendSubscriberExceptionEvent = builder.sendSubscriberExceptionEvent;
        sendNoSubscriberEvent = builder.sendNoSubscriberEvent;
        throwSubscriberException = builder.throwSubscriberException;
        eventInheritance = builder.eventInheritance;
        executorService = builder.executorService;
    }
EventBus类提供了一个public的构造函数,可以以默认的配置来构造EventBus对象。EventBusBuilder是繁杂的EventBus构造时所需配置信息的容器。至于利用EventBusBuilder进行配置的配置项具体的含义,暂时先不详述。
package org.greenrobot.eventbus;

import org.greenrobot.eventbus.meta.SubscriberInfoIndex;

import java.util.ArrayList;
import java.util.List;
import java.util.concurrent.ExecutorService;
import java.util.concurrent.Executors;

/**
 * Creates EventBus instances with custom parameters and also allows to install a custom default EventBus instance.
 * Create a new builder using {@link EventBus#builder()}.
 */
public class EventBusBuilder {
    private final static ExecutorService DEFAULT_EXECUTOR_SERVICE = Executors.newCachedThreadPool();

    boolean logSubscriberExceptions = true;
    boolean logNoSubscriberMessages = true;
    boolean sendSubscriberExceptionEvent = true;
    boolean sendNoSubscriberEvent = true;
    boolean throwSubscriberException;
    boolean eventInheritance = true;
    boolean ignoreGeneratedIndex;
    boolean strictMethodVerification;
    ExecutorService executorService = DEFAULT_EXECUTOR_SERVICE;
    List> skipMethodVerificationForClasses;
    List subscriberInfoIndexes;

    EventBusBuilder() {
    }

    /** Default: true */
    public EventBusBuilder logSubscriberExceptions(boolean logSubscriberExceptions) {
        this.logSubscriberExceptions = logSubscriberExceptions;
        return this;
    }

    /** Default: true */
    public EventBusBuilder logNoSubscriberMessages(boolean logNoSubscriberMessages) {
        this.logNoSubscriberMessages = logNoSubscriberMessages;
        return this;
    }

    /** Default: true */
    public EventBusBuilder sendSubscriberExceptionEvent(boolean sendSubscriberExceptionEvent) {
        this.sendSubscriberExceptionEvent = sendSubscriberExceptionEvent;
        return this;
    }

    /** Default: true */
    public EventBusBuilder sendNoSubscriberEvent(boolean sendNoSubscriberEvent) {
        this.sendNoSubscriberEvent = sendNoSubscriberEvent;
        return this;
    }

    /**
     * Fails if an subscriber throws an exception (default: false).
     *
     * Tip: Use this with BuildConfig.DEBUG to let the app crash in DEBUG mode (only). This way, you won't miss
     * exceptions during development.
     */
    public EventBusBuilder throwSubscriberException(boolean throwSubscriberException) {
        this.throwSubscriberException = throwSubscriberException;
        return this;
    }

    /**
     * By default, EventBus considers the event class hierarchy (subscribers to super classes will be notified).
     * Switching this feature off will improve posting of events. For simple event classes extending Object directly,
     * we measured a speed up of 20% for event posting. For more complex event hierarchies, the speed up should be
     * >20%.
     *
     * However, keep in mind that event posting usually consumes just a small proportion of CPU time inside an app,
     * unless it is posting at high rates, e.g. hundreds/thousands of events per second.
     */
    public EventBusBuilder eventInheritance(boolean eventInheritance) {
        this.eventInheritance = eventInheritance;
        return this;
    }


    /**
     * Provide a custom thread pool to EventBus used for async and background event delivery. This is an advanced
     * setting to that can break things: ensure the given ExecutorService won't get stuck to avoid undefined behavior.
     */
    public EventBusBuilder executorService(ExecutorService executorService) {
        this.executorService = executorService;
        return this;
    }

    /**
     * Method name verification is done for methods starting with onEvent to avoid typos; using this method you can
     * exclude subscriber classes from this check. Also disables checks for method modifiers (public, not static nor
     * abstract).
     */
    public EventBusBuilder skipMethodVerificationFor(Class clazz) {
        if (skipMethodVerificationForClasses == null) {
            skipMethodVerificationForClasses = new ArrayList<>();
        }
        skipMethodVerificationForClasses.add(clazz);
        return this;
    }

    /** Forces the use of reflection even if there's a generated index (default: false). */
    public EventBusBuilder ignoreGeneratedIndex(boolean ignoreGeneratedIndex) {
        this.ignoreGeneratedIndex = ignoreGeneratedIndex;
        return this;
    }

    /** Enables strict method verification (default: false). */
    public EventBusBuilder strictMethodVerification(boolean strictMethodVerification) {
        this.strictMethodVerification = strictMethodVerification;
        return this;
    }

    /** Adds an index generated by EventBus' annotation preprocessor. */
    public EventBusBuilder addIndex(SubscriberInfoIndex index) {
        if(subscriberInfoIndexes == null) {
            subscriberInfoIndexes = new ArrayList<>();
        }
        subscriberInfoIndexes.add(index);
        return this;
    }

    /**
     * Installs the default EventBus returned by {@link EventBus#getDefault()} using this builders' values. Must be
     * done only once before the first usage of the default EventBus.
     *
     * @throws EventBusException if there's already a default EventBus instance in place
     */
    public EventBus installDefaultEventBus() {
        synchronized (EventBus.class) {
            if (EventBus.defaultInstance != null) {
                throw new EventBusException("Default instance already exists." +
                        " It may be only set once before it's used the first time to ensure consistent behavior.");
            }
            EventBus.defaultInstance = build();
            return EventBus.defaultInstance;
        }
    }

    /** Builds an EventBus based on the current configuration. */
    public EventBus build() {
        return new EventBus(this);
    }

}
这是一个蛮常规的Builder。我们看到了自定义可配置项创建EventBus对象的方法,也就是通过EventBusBuilder.build()方法。
EventBusBuilder还提供了一个方法installDefaultEventBus()可以让我们在创建自定义EventBus对象时,将该对象设置为default EventBus对象。
总结一下EventBus对象创建的方式:
- 通过
EventBus的public不带参数构造函数,创建默认配置的EventBus对象。EventBus库提供的defaultEventBus对象的创建方式。 - 通过
EventBusBuilder创建自定义配置的EventBus对象。这种方式的对象可以通过EventBusBuilder.installDefaultEventBus()在对象被创建的同时设置为defaultEventBus对象。
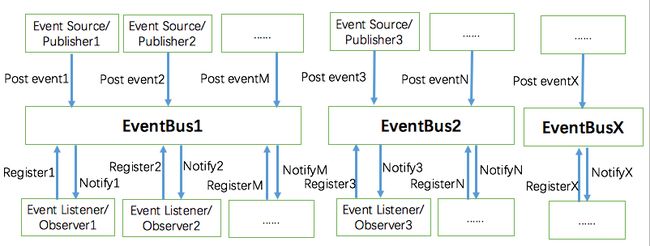
由此可见,引入EventBus库之后,我们应用程序的结构实际上将如下面这样:
EventBus所提供的特性就先介绍到这里。


