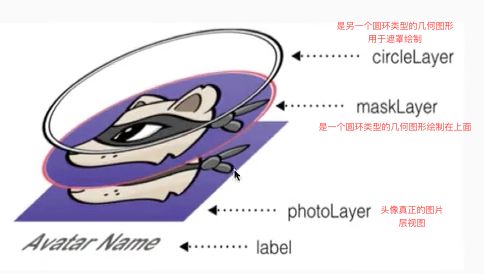
当看到遮罩层类的动画和碰撞或者挤压这样的视图时,应该涉及多个形状视图间的动画。此时,应该明白将有一个形状图层,应该有calayershapelayer类进行处理。calayershapelayer类继承calayer,在这个层上将会绘制各种形状的图形。
用一个头像示意图的分层效果图
额外增加的知识点:1.photoLayer.mask = maskLayer,标示的是将mask layer作为photo layer的遮罩层。
2.@IBInspectable和@IBDesignable的作用是让storyboard控件图片的显示与代码的设置保持一致
把这3个图层添加到涂层上的核心代码:
 // 当avatarview 对象呈现在视图上的时候,会调用didMoveToWindow方法。让layer呈现到视图上
  override func didMoveToWindow() {
    layer.addSublayer(photoLayer)
    photoLayer.mask = maskLayer
    layer.addSublayer(circleLayer)
    addSubview(label)
  }
//layout方法中可以知道每一个层都将是一个矩形
override func layoutSubviews() {
    //Size the avatar image to fit
    photoLayer.frame = CGRect(
      x: (bounds.size.width - image.size.width + lineWidth)/2,
      y: (bounds.size.height - image.size.height - lineWidth)/2,
      width: image.size.width,
      height: image.size.height)
    //Draw the circle
    circleLayer.path = UIBezierPath(ovalInRect: bounds).CGPath
    circleLayer.strokeColor = UIColor.whiteColor().CGColor
    circleLayer.lineWidth = lineWidth
    circleLayer.fillColor = UIColor.clearColor().CGColor
    //Size the layer
    maskLayer.path = circleLayer.path
    maskLayer.position = CGPoint(x: 0.0, y: 10.0)
    //Size the label
    label.frame = CGRect(x: 0.0, y: bounds.size.height + 10.0, width: bounds.size.width, height: 24.0)
  }
截下来就要开始做动画了,实现一个头像发生碰撞的动画
游戏开始的时候搜索对手的动画核心代码:
思路:头像从原始位置到达碰撞点,当碰撞的动画完成之后,返回到原始的位置,接着在重复做上述动画。
首先为在搜索对手需要准备的偏移量,变形大小,形变写入一个方法里,将它传入头像视图里做动画
func searchForOpponent(){
        let avatarSize = myAvatar.frame.size
        let bounceXOffset: CGFloat = avatarSize.width/1.9//设置一个水平方向上的反弹偏移量
        let morphSize = CGSize(
            width: avatarSize.width * 0.85,
            height: avatarSize.height * 1.1)//设置了头像的变形大小
      //计算2个头像到达反弹点时发生轻微的碰撞,计算出左右2个反弹点,然后通过动画将其分开
        let rightBouncePoint = CGPoint(
            x: view.frame.size.width/2.0 + bounceXOffset,
            y: myAvatar.center.y)
        let leftBouncePoint = CGPoint(
            x: view.frame.size.width/2.0 - bounceXOffset,
            y: myAvatar.center.y)
        myAvatar.bounceOffPoint(rightBouncePoint, morphSize: morphSize)
/*第一个参数是头像发生碰撞的点,
         第二个参数是头像发生碰撞时的变形大小*/
     opponentAvatar.bounceOffPoint(leftBouncePoint, morphSize: morphSize)
        delay(seconds: 4.0, completion: foundOpponent)
    }
动画代码:
  func bounceOffPoint(bouncePoint: CGPoint,             morphSize: CGSize) {

       let originalCenter = center

      UIView.animateWithDuration(animationDuration, delay: 0.0, usingSpringWithDamping: 0.8, initialSpringVelocity: 0.0, options: [], animations: {
            self.center = bouncePoint
        }, completion: {_ in

        })

         UIView.animateWithDuration(animateWithDuration, delay: animateWithDuration, usingSpringWithDamping: 0.7,initialSpringVelocity: 1.0, options: [], animations: {
           self.center = originalCenter

        },completion: {
            delay(seconds: 0.1){
                self.bounceOffPoint(bouncePoint, morphSize: morphSize)
            }
        })
    }
截下来做2个头像接触之后的一个变形动画
思路:根据左右2个头像的frame分别设置动画,应为2个头像发生碰撞变形后的frame是不同的。对每个头像进行变形动画
核心代码:
let morphedFrame = (originalCenter.x >  bouncePoint.x) ?
            CGRect(x: 0.0, y: bounds.height - morphSize.height,width: morphSize.width, height: morphSize.height):
            CGRect(x: bounds.width - morphSize.width,
                   y: bounds.height - morphSize.height,
                   width: morphSize.width, height: morphSize.height)

        let morphAnimation = CABasicAnimation(keyPath: "path")
        morphAnimation.duration = animationDuration
        morphAnimation.toValue =  UIBezierPath(ovalInRect: morphedFrame).CGPath
        morphAnimation.timingFunction = CAMediaTimingFunction(name: kCAMediaTimingFunctionEaseOut)//缓出的方式进行动画
        circleLayer.addAnimation(morphAnimation, forKey:nil)
        maskLayer.addAnimation(morphAnimation, forKey: nil)
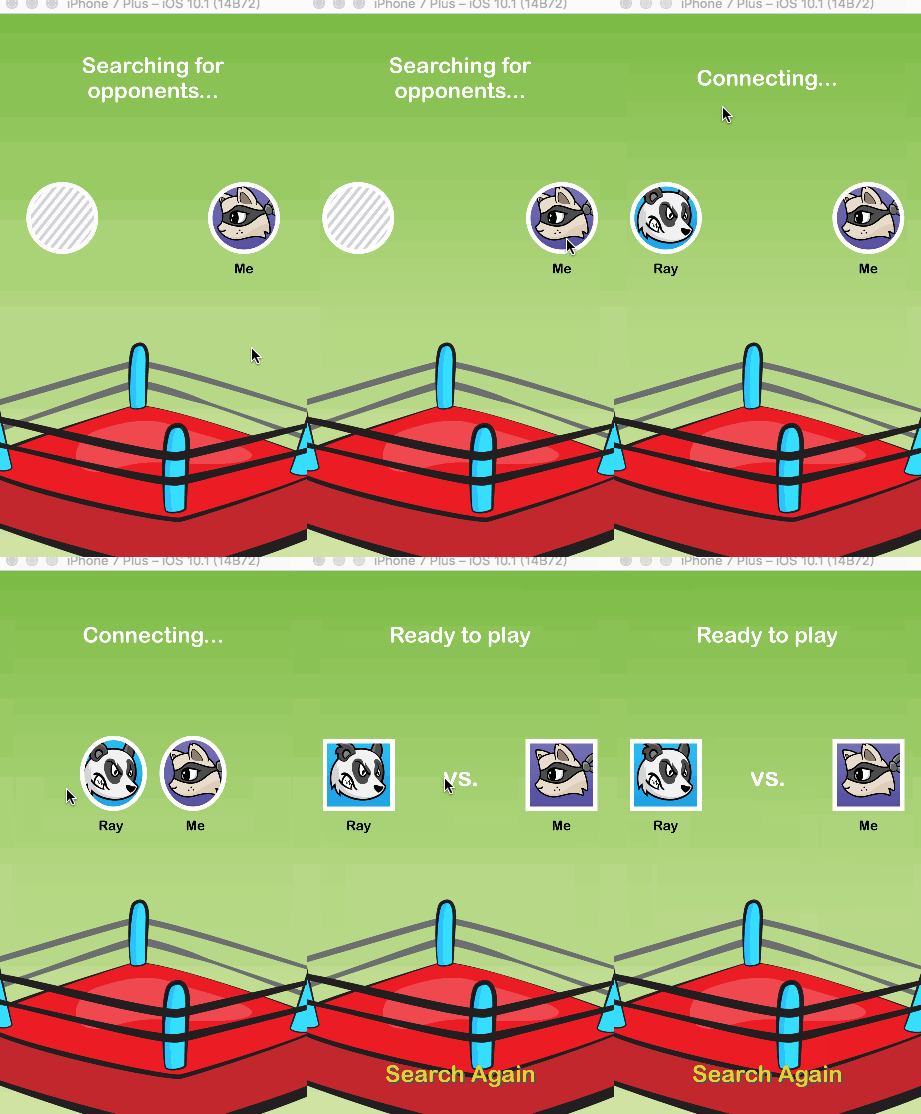
接下来应该是现实对手的数据,并且改变页面上方状态label的显示文字
思路:在开始动画的过程中,对对手的头像图片和label的状态进行显示。
核心代码如下:
//搜索中的方法
 func foundOpponent() {
        status.text = "Connecting..."

        opponentAvatar.image = UIImage(named: "avatar-2")
        opponentAvatar.name = "Ray"

        delay(seconds: 4.0, completion: connectedToOpponent)
    }

    func connectedToOpponent() {
        myAvatar.shouldTransitionToFinishedState = true//
        opponentAvatar.shouldTransitionToFinishedState = true

        delay(seconds: 1.0, completion: completed)
    }

//最终的显示状态
    func completed() {
        status.text = "Ready to play"
        UIView.animateWithDuration(0.2) {
            self.vs.alpha = 1.0//显示头像之间的label
            self.searchAgain.alpha = 1.0//显示开始游戏的button按钮
        }
    }
}
要实现的效果基本上是已经出来了,还差一个就是怎样才能让搜索状态信息完成之后使动画结束呢
思路:用一个变量标示是否结束动画,如是结束动画,执行将动画停止的方法,不在持续调用动画的方法
核心代码:
动画完成后的判断:
if self.shouldTransitionToFinishedState {

                self.animateToSquare()
            }
结束动画:
func animateToSquare() {
        isSquare = true

        let squarePath = UIBezierPath(rect: bounds).CGPath
        let morph = CABasicAnimation(keyPath: "path")
        morph.duration = 0.25
        morph.fromValue = circleLayer.path
        morph.toValue = squarePath

        circleLayer.addAnimation(morph, forKey: nil)
        maskLayer.addAnimation(morph, forKey: nil)

        circleLayer.path = squarePath
        maskLayer.path = squarePath
    }
不在调用动画方法的判断:
if !self.isSquare{
                    self.bounceOffPoint(bouncePoint, morphSize: morphSize)
                }
效果图:
下载地址

