ios10出来之后,友盟推送无法及时适配还是很慌张的,联系客服在那几天压根不理人,搞出来之后一直没时间更新,昨天重新回去看了一次集成文档,发现写的真的很坑,很多改动的地方并没写出来,所以在这里分享一下如何同时适配iOS10及iOS10之前版本,一天研究的成果,过程会比较详细,希望能帮助到大家(觉得不错就点个喜欢鼓励鼓励吼-)
一、下载SDK及类库添加
1、使用的无IDFA版,具体的区别在我的另一篇文章里有《iOS集成友盟统计及测试》
将这个sdk拖到你的文件中
2、添加类库,文档中只给了一个UserNotifications.framework,在ios10出来后,我用老版本SDK发现iOS10获取不到deviceToken或报错等情况,试试添加security.framework,我当时是这么解决的
3、配置(当然这里有Push Notifacations的前提是你已经配置好了推送的开发证书和生产证书,怎么配置这里不细说了凹)
二、开始集成
(这里我希望大家可以按照我的步骤来,然后再回去友盟文档看细节,否则会蒙圈,这里需要你在友盟的AppKey,记得在友盟端添加生产证书和开发证书)
1、单纯推送接收(didFinishLaunchingWithOptions:注册)
(这里为了方便观看方便我把didFinishLaunchingWithOptions:方法中的代码整体粘贴了,每段代码的作用都标注了,如果你只想单纯推送接收,那么你可以这样写)
#import "AppDelegate.h"
#import "UMessage.h"

@interface AppDelegate ()
@end
//友盟推送
  - (BOOL)application:(UIApplication *)application didFinishLaunchingWithOptions:(NSDictionary *)launchOptions {
    //友盟推送
    [UMessage startWithAppkey:@"YOUR APPKEY" launchOptions:launchOptions];
 //iOS10必须加下面这段代码。
    UNUserNotificationCenter *center = [UNUserNotificationCenter currentNotificationCenter];
    center.delegate=self;
    UNAuthorizationOptions types10=UNAuthorizationOptionBadge|  UNAuthorizationOptionAlert|UNAuthorizationOptionSound;
    [center requestAuthorizationWithOptions:types10   completionHandler:^(BOOL granted, NSError * _Nullable error) {
        if (granted) {
            //点击允许
            //这里可以添加一些自己的逻辑
        } else {
            //点击不允许
            //这里可以添加一些自己的逻辑
        }
    }];
    //打开日志,方便调试
    [UMessage setLogEnabled:YES];
 //推送注册
    [[UIApplication sharedApplication] registerForRemoteNotifications];
    [UNUserNotificationCenter currentNotificationCenter].delegate = self;
    return YES;
}
2、在iOS10之前,高级功能加入(也就是自定义按钮)实现需要的是UIUserNotificationAction,在iOS10之后需要使用的是UNNotificationAction
----(这里如果你只把开发文档中给的适配ios10的高级功能代码添加上,那在ios10之前的系统上接收推送会崩溃,开发文档中没有提到也没有将iOS10之前的代码告诉大家,对于第一次集成友盟推送的孩纸很坑爹)
- (BOOL)application:(UIApplication *)application didFinishLaunchingWithOptions:(NSDictionary *)launchOptions {
    //友盟推送
    [UMessage startWithAppkey:@"YOUR APPKEY" launchOptions:launchOptions];

    //iOS10必须加下面这段代码。
    UNUserNotificationCenter *center = [UNUserNotificationCenter currentNotificationCenter];
    center.delegate=self;
    UNAuthorizationOptions types10=UNAuthorizationOptionBadge|  UNAuthorizationOptionAlert|UNAuthorizationOptionSound;
    [center requestAuthorizationWithOptions:types10   completionHandler:^(BOOL granted, NSError * _Nullable error) {
        if (granted) {
            //点击允许
            //这里可以添加一些自己的逻辑
        } else {
            //点击不允许
            //这里可以添加一些自己的逻辑
        }
    }];
    //打开日志,方便调试
    [UMessage setLogEnabled:YES];

    //高级功能加入
    if ( [[[UIDevice currentDevice] systemVersion] floatValue] >= 10) {
        /*ios10以上*/
        UNNotificationAction *action1 = [UNNotificationAction actionWithIdentifier:@"action1" title:@"打开" options:UNNotificationActionOptionForeground];

        UNTextInputNotificationAction *action2 = [UNTextInputNotificationAction actionWithIdentifier:@"action2" title:@"清除" options:UNNotificationActionOptionDestructive textInputButtonTitle:@"textInputButtonTitle" textInputPlaceholder:@"textInputPlaceholder"];

        UNNotificationCategory *category1 = [UNNotificationCategory categoryWithIdentifier:@"Category1" actions:@[action2,action1]  intentIdentifiers:@[@"action1",@"action2"] options:UNNotificationCategoryOptionCustomDismissAction];

        UNNotificationAction *action3 = [UNNotificationAction actionWithIdentifier:@"action3" title:@"查看" options:UNNotificationActionOptionForeground];

        UNNotificationAction *action4 = [UNNotificationAction actionWithIdentifier:@"action4" title:@"关闭" options:UNNotificationActionOptionAuthenticationRequired];

        UNNotificationCategory *category2 = [UNNotificationCategory categoryWithIdentifier:@"Category2" actions:@[action3,action4]  intentIdentifiers:@[@"action3",@"action4"] options:UNNotificationCategoryOptionCustomDismissAction];
        //注册
        [[UNUserNotificationCenter currentNotificationCenter] setNotificationCategories:[NSSet setWithObjects:category1,category2, nil]];

        [[UNUserNotificationCenter currentNotificationCenter] requestAuthorizationWithOptions:UNAuthorizationOptionBadge | UNAuthorizationOptionSound | UNAuthorizationOptionAlert completionHandler:^(BOOL granted, NSError * _Nullable error) {
            NSLog(@"completionHandler");
        }];

    }else{
        /*ios10以下*/
        UIMutableUserNotificationAction * action1 = [[UIMutableUserNotificationAction alloc] init];
        action1.identifier = @"action1";
        action1.title=@"查看";
        action1.activationMode = UIUserNotificationActivationModeForeground;
        action1.destructive = YES;

        UIMutableUserNotificationAction * action2 = [[UIMutableUserNotificationAction alloc] init];
        action2.identifier = @"action2";
        action2.title=@"关闭";
        action2.activationMode = UIUserNotificationActivationModeBackground;
        action1.activationMode = UIUserNotificationActivationModeForeground;
        action1.destructive = YES;

        UIMutableUserNotificationCategory * category1 = [[UIMutableUserNotificationCategory alloc] init];
        category1.identifier = @"Category1";
        [category1 setActions:@[action2,action1] forContext:(UIUserNotificationActionContextDefault)];
        //注册
        UIUserNotificationSettings *settings = [UIUserNotificationSettings settingsForTypes:(UIUserNotificationTypeAlert|UIUserNotificationTypeBadge|UIUserNotificationTypeSound) categories:[NSSet setWithObjects: category1, nil]];
        [[UIApplication sharedApplication] registerUserNotificationSettings:settings];
    }
    //推送注册
    [[UIApplication sharedApplication] registerForRemoteNotifications];
    [UNUserNotificationCenter currentNotificationCenter].delegate = self;
    return YES;
}
3、通知的接收
----(不管是单纯功能还是还是高级功能接收通知的方法是通用的,直接将下面的代码添加到AppDelegate.m里就可以了)
----(这里iOS10和iOS10之前接受通知的代码是不同的,做处理是记得两种都要处理,里面有一些我打的NSLog,你们可以去掉哈!)
-(void)application:(UIApplication *)application handleActionWithIdentifier:(NSString *)identifier forRemoteNotification:(NSDictionary *)userInfo completionHandler:(void (^)())completionHandler
{
    NSLog(@"按钮:identifier:%@",identifier);//

    [UMessage sendClickReportForRemoteNotification:userInfo];
    //通过identifier对各个交互式的按钮进行业务处理
}
//iOS10之前使用这个方法接收通知
- (void)application:(UIApplication *)application didReceiveRemoteNotification:(NSDictionary *)userInfo
{
    // 当应用在前台时,不推送
    if([UIApplication sharedApplication].applicationState == UIApplicationStateActive){
        //关闭对话框
        [UMessage setAutoAlert:NO];
    }
    [UMessage didReceiveRemoteNotification:userInfo];
}

//iOS10新增:处理前台收到通知的代理方法
-(void)userNotificationCenter:(UNUserNotificationCenter *)center willPresentNotification:(UNNotification *)notification withCompletionHandler:(void (^)(UNNotificationPresentationOptions))completionHandler{
    NSDictionary * userInfo = notification.request.content.userInfo;
    NSLog(@"前台括号外:userNotificationCenter:willPresentNotification");

    if([notification.request.trigger isKindOfClass:[UNPushNotificationTrigger class]]) {

        NSLog(@"前台括号内:userNotificationCenter:willPresentNotification");
        //可以自定义前台弹出框
        [[NSNotificationCenter defaultCenter] postNotificationName:@"userInfoNotification" object:self userInfo:userInfo];

        //应用处于前台时的远程推送接受
        //关闭友盟自带的弹出框
        [UMessage setAutoAlert:NO];
        //必须加这句代码
        [UMessage didReceiveRemoteNotification:userInfo];

    }else{
        //应用处于前台时的本地推送接受
    }
    //当应用处于前台时提示设置,需要哪个可以设置哪一个
    completionHandler(UNNotificationPresentationOptionSound|UNNotificationPresentationOptionBadge|UNNotificationPresentationOptionAlert);
}

//iOS10新增:处理后台点击通知的代理方法
//iOS10以后接收的方法
-(void)userNotificationCenter:(UNUserNotificationCenter *)center didReceiveNotificationResponse:(UNNotificationResponse *)response withCompletionHandler:(void (^)())completionHandler{
    NSDictionary * userInfo = response.notification.request.content.userInfo;
    NSLog(@"后台括号外:userNotificationCenter:didReceiveNotificationResponse");
    if([response.notification.request.trigger isKindOfClass:[UNPushNotificationTrigger class]]) {
        NSLog(@"后台括号内:userNotificationCenter:didReceiveNotificationResponse");

        //        代理方法
        [[NSNotificationCenter defaultCenter] postNotificationName:@"userInfoNotification" object:self userInfo:userInfo];

        [UMessage didReceiveRemoteNotification:userInfo];
        if([response.actionIdentifier isEqualToString:@"*****你定义的action id****"])
        {

        }else
        {

        }
        //这个方法用来做action点击的统计
        [UMessage sendClickReportForRemoteNotification:userInfo];

    }else{
        //应用处于后台时的本地推送接受
    }
}
三、测试
1、获取deviceToken
----记得只能用真机运行程序!!!
----在手机上把程序删除重按,提示开启推送,点击开启,就可以获取到了
----这里我将获取到的deviceToken保存到了偏好设置,目的是为了将deviceToken和我们用户的用户ID绑定在一起上传服务器,方便以后对用户的定点推送,不需要可以删掉
//获取device_Token
-(void)application:(UIApplication *)application didRegisterForRemoteNotificationsWithDeviceToken:(NSData *)deviceToken{
    [UMessage registerDeviceToken:deviceToken];
    NSString *dt = [[[[deviceToken description] stringByReplacingOccurrencesOfString: @"<" withString: @""]
                     stringByReplacingOccurrencesOfString: @">" withString: @""]
                    stringByReplacingOccurrencesOfString: @" " withString: @""];
    // 获取用户偏好设置对象
    NSUserDefaults *defaults = [NSUserDefaults standardUserDefaults];
    // 保存用户偏好设置
    [defaults setObject:dt forKey:@"deviceToken"];
    [defaults synchronize];
}
2、添加测试设备
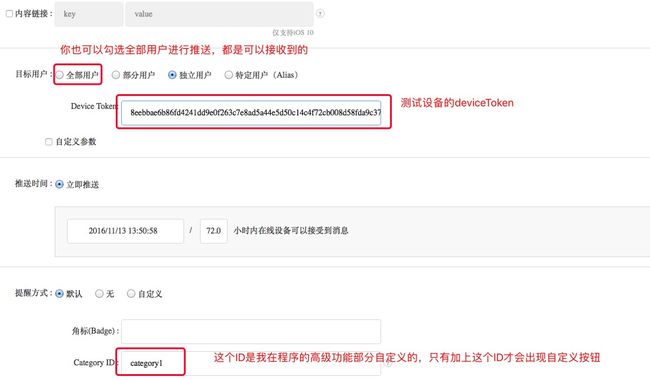
----拿到deviceToken后进入友盟推送测试界面
3、推送
----添加测试消息(在‘进入测试模式’图片中可以找到按钮)
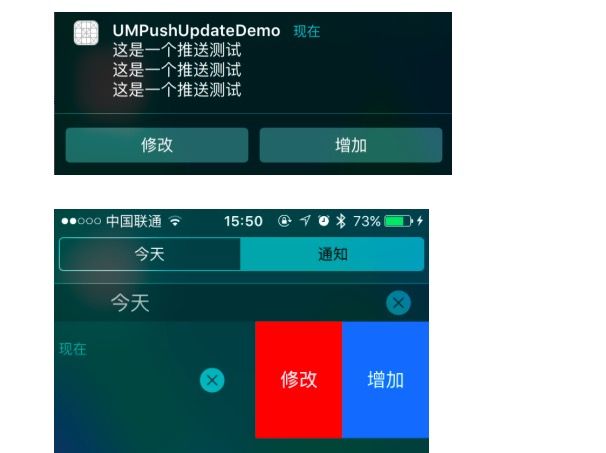
----然后你就可以看到这样的效果
额外的功能
----接收到推送信息跳转到不同页面,这里分享给大家一篇文章,我觉得写得很好理解 iOS收到推送后,跳转到某一页面
以上内容为本人原创,都是工作中总结的经验分享给大家,有不足的地方请反馈给我,我会及时修改,期待和各位的交流~~


