Shiny 是RStudio公司开发的新包,利用Shiny 可以轻松构建交互式Web应用程序(App)。
安装Shiny包
> install.packages("shiny")
Shiny包中内置了11个例子来展示Shiny的使用。
Example 1: Hello Shiny
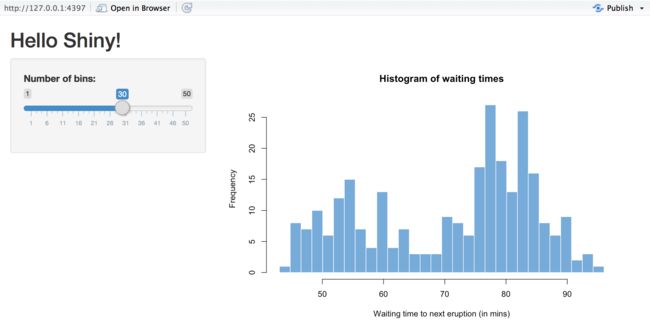
Hello Shiny 使用faithful数据画了一个直方图,这个直方图可以调节bin的个数。
Hello Shiny运行
> library(shiny)
> runExample("01_hello")
Shiny App的架构
Shiny App 本质上基于一个R脚本(app.R).
app.R 有三个组成成分:
- 一个用户界面
- 一个服务器功能
- 调用
shinyApp函数
用户界面(ui)包含了App的的布局和外观。
服务器功能(server)包含了电脑构建app需要的指令。
shinyApp 函数根据UI/server创建Shiny app。
注:版本0.10.2以前,Shiny 不支持一个文件构建App,ui 和server各自需要一个单独的文件:i.R and server.R。
下面研究Hello Shiny的组成
用户界面:ui
library(shiny)

# Define UI for app that draws a histogram ----
ui <- fluidPage(

  # App title ----
  titlePanel("Hello Shiny!"),

  # Sidebar layout with input and output definitions ----
  sidebarLayout(

    # Sidebar panel for inputs ----
    sidebarPanel(

      # Input: Slider for the number of bins ----
      sliderInput(inputId = "bins",
                  label = "Number of bins:",
                  min = 1,
                  max = 50,
                  value = 30)

    ),

    # Main panel for displaying outputs ----
    mainPanel(

      # Output: Histogram ----
      plotOutput(outputId = "distPlot")

    )
  )
)
服务器功能:server
# Define server logic required to draw a histogram ----
server <- function(input, output) {

  # Histogram of the Old Faithful Geyser Data ----
  # with requested number of bins
  # This expression that generates a histogram is wrapped in a call
  # to renderPlot to indicate that:
  #
  # 1. It is "reactive" and therefore should be automatically
  #    re-executed when inputs (input$bins) change
  # 2. Its output type is a plot
  output$distPlot <- renderPlot({

    x    <- faithful$waiting
    bins <- seq(min(x), max(x), length.out = input$bins + 1)

    hist(x, breaks = bins, col = "#75AADB", border = "white",
         xlab = "Waiting time to next eruption (in mins)",
         main = "Histogram of waiting times")

    })

}
shinyApp
shinyApp函数根据上面构建的UI/server创建Shiny app
shinyApp(ui, server)
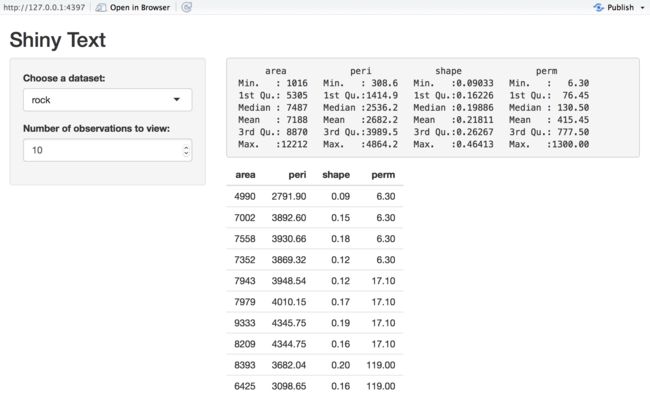
Example 2: Shiny Text
library(shiny)
runExample("02_text")
ui
# Define UI for dataset viewer app ----
ui <- fluidPage(

  # App title ----
  titlePanel("Shiny Text"),

  # Sidebar layout with a input and output definitions ----
  sidebarLayout(

    # Sidebar panel for inputs ----
    sidebarPanel(

      # Input: Selector for choosing dataset ----
      selectInput(inputId = "dataset",
                  label = "Choose a dataset:",
                  choices = c("rock", "pressure", "cars")),

      # Input: Numeric entry for number of obs to view ----
      numericInput(inputId = "obs",
                   label = "Number of observations to view:",
                   value = 10)
    ),

    # Main panel for displaying outputs ----
    mainPanel(

      # Output: Verbatim text for data summary ----
      verbatimTextOutput("summary"),

      # Output: HTML table with requested number of observations ----
      tableOutput("view")

    )
  )
)
server
# Define server logic to summarize and view selected dataset ----
server <- function(input, output) {

  # Return the requested dataset ----
  datasetInput <- reactive({
    switch(input$dataset,
           "rock" = rock,
           "pressure" = pressure,
           "cars" = cars)
  })

  # Generate a summary of the dataset ----
  output$summary <- renderPrint({
    dataset <- datasetInput()
    summary(dataset)
  })

  # Show the first "n" observations ----
  output$view <- renderTable({
    head(datasetInput(), n = input$obs)
  })

}
Example 3: Reactivity
[站外图片上传中...(image-930865-1560176024515)]
library(shiny)
runExample("03_reactivity")
- 响应式编程
响应式编程是一种面向数据流和变化传播的编程范式。
input values => R code => output values
input values变化时,R code会自动执行,同时更新结果
使用reactive()可以创建响应式表达式
datasetInput <- reactive({
   switch(input$dataset,
          "rock" = rock,
          "pressure" = pressure,
          "cars" = cars)
})
改变input或者input$obs, 下面的表达式都会重新运行。
output$view <- renderTable({
   head(datasetInput(), n = input$obs)
})
ui
# Define UI for dataset viewer app ----
ui <- fluidPage(

  # App title ----
  titlePanel("Reactivity"),

  # Sidebar layout with input and output definitions ----
  sidebarLayout(

    # Sidebar panel for inputs ----
    sidebarPanel(

      # Input: Text for providing a caption ----
      # Note: Changes made to the caption in the textInput control
      # are updated in the output area immediately as you type
      textInput(inputId = "caption",
                label = "Caption:",
                value = "Data Summary"),

      # Input: Selector for choosing dataset ----
      selectInput(inputId = "dataset",
                  label = "Choose a dataset:",
                  choices = c("rock", "pressure", "cars")),

      # Input: Numeric entry for number of obs to view ----
      numericInput(inputId = "obs",
                   label = "Number of observations to view:",
                   value = 10)

    ),

    # Main panel for displaying outputs ----
    mainPanel(

      # Output: Formatted text for caption ----
      h3(textOutput("caption", container = span)),

      # Output: Verbatim text for data summary ----
      verbatimTextOutput("summary"),

      # Output: HTML table with requested number of observations ----
      tableOutput("view")

    )
  )
)
server
# Define server logic to summarize and view selected dataset ----
server <- function(input, output) {

  # Return the requested dataset ----
  # By declaring datasetInput as a reactive expression we ensure
  # that:
  #
  # 1. It is only called when the inputs it depends on changes
  # 2. The computation and result are shared by all the callers,
  #    i.e. it only executes a single time
  datasetInput <- reactive({
    switch(input$dataset,
           "rock" = rock,
           "pressure" = pressure,
           "cars" = cars)
  })

  # Create caption ----
  # The output$caption is computed based on a reactive expression
  # that returns input$caption. When the user changes the
  # "caption" field:
  #
  # 1. This function is automatically called to recompute the output
  # 2. New caption is pushed back to the browser for re-display
  #
  # Note that because the data-oriented reactive expressions
  # below don't depend on input$caption, those expressions are
  # NOT called when input$caption changes
  output$caption <- renderText({
    input$caption
  })

  # Generate a summary of the dataset ----
  # The output$summary depends on the datasetInput reactive
  # expression, so will be re-executed whenever datasetInput is
  # invalidated, i.e. whenever the input$dataset changes
  output$summary <- renderPrint({
    dataset <- datasetInput()
    summary(dataset)
  })

  # Show the first "n" observations ----
  # The output$view depends on both the databaseInput reactive
  # expression and input$obs, so it will be re-executed whenever
  # input$dataset or input$obs is changed
  output$view <- renderTable({
    head(datasetInput(), n = input$obs)
  })

}
参考
The basic parts of a Shiny app

