目录
- 一、Redis Cluster简单介绍
- 二、背景
- 三、环境准备
- 3.1 主机环境
- 3.2 主机规划
- 四、部署Redis
- 4.1 安装Redis软件
- 4.2 编辑Redis配置文件
- 4.3 启动Redis服务
- 五、构建Redis Cluster集群
- 5.1 Redis主从复制原理
- 5.2 部署集群节点
- 5.3 创建Redis Cluster集群
- 5.4 集群管理
- 六、实现Python链接Redis Cluster集群
- 6.1 搭建python开发环境
- 6.2 安装Redis-py驱动程序
- 6.3 安装Redis-py-cluster驱动程序
- 6.4 测试API读写功能
一、Redis Cluster简单介绍
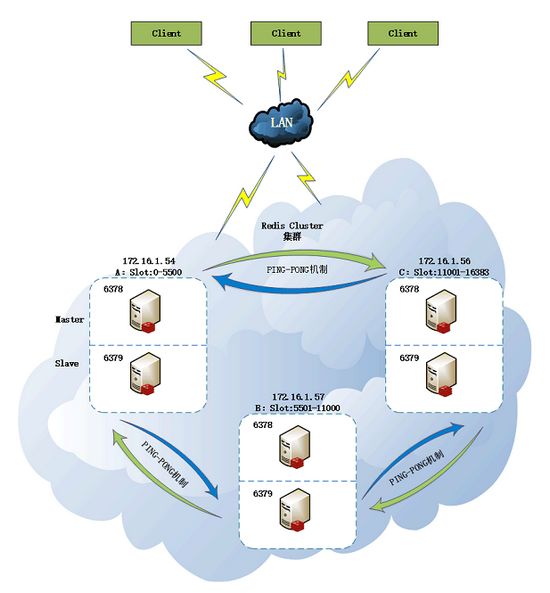
Redis集群搭建的方式有多种,例如Redis主从复制、Sentinel高可用集群等,但从Redis 3.0之后版本支持Redis-cluster集群,Redis-Cluster采用无中心结构,每个节点保存数据和整个集群状态,每个节点都和其他所有节点连接。
Redis Cluster集群的运行机制:
- 所有的Redis节点彼此互联(PING-PONG机制),内部使用二进制协议优化传输速度和带宽。
- 节点的Failover是通过集群中超过半数的节点检测失效时才生效。
- 客户端与Redis节点直连,不需要中间Proxy层。客户端不需要连接集群所有节点,连接集群中任何一个可用节点即可(默认slave从节点只提供备份)。
- Redis-cluster把所有的物理节点映射到[0-16383]Slot上(不一定是平均分配),Cluster 负责维护node<->slot<->value。
- Redis集群预分好16384个桶,当需要在 Redis 集群中放置一个 key-value 时,根据 CRC16(key) mod 16384的值,决定将一个key放到哪个槽中。
二、背景
为了保证Redis集群的高可用性,即使使用Sentinel哨兵实现Failover自动切换,Redis每个实例也是全量存储,每个Redis存储的内容都是完整的数据,比较浪费内存。为了最大化利用内存,可以采用数据分片的形式,保存到不同的Redis实例上,这就是分布式存储。即每台redis存储不同的内容,Redis Cluster集群架构正是满足这种分布式存储要求的一种体现。
Redis Cluster集群提供了以下两个好处:
- 将数据自动切分(split)到多个节点的能力。
- 当集群中的一部分节点失效或者无法进行通讯时, 仍然可以继续处理命令请求的能力。
三、环境准备
3.1 主机环境
[root@cache06 ~]# cat /etc/redhat-release
CentOS Linux release 7.4.1708 (Core)
[root@cache06 ~]# uname -m
x86_64
3.2 主机规划
规划三台虚拟主机,每台主机分别搭建一个master主节点和一个slave从节点。并将一个分片(主机)的两个节点,分到不同的主机上,防止主节点Crash造成整个分片数据丢失。

四、部署Redis
4.1 安装Redis软件
#下载redis
[root@cache06 server]# cd /server/tools && wget http://download.redis.io/releases/redis-3.2.12.tar.gz
#解压并进入src目录
[root@cache06 server]# tar xf redis-3.2.12.tar.gz && cd redis-3.2.12
#编译软件,参数MALLOC=jemalloc,2.4.4以上版本默认的内存分配器(可省略)
[root@cache06 redis-3.2.12]# make
#将软件安装到指定目录下
[root@cache06 redis-3.2.12]# make PREFIX=/application/redis-3.2.12 install
#创建软链接
[root@cache06 redis-3.2.12]# ln -s /application/redis-3.2.12 /application/redis
#修改PATH环境变量并使其生效
[root@cache06 redis]# echo 'PATH=/application/redis/bin:$PATH'>>/etc/profile && source /etc/profile
#检查安装结果
[root@cache06 redis]# ll bin
-rwxr-xr-x 1 root root 2432992 Apr 10 13:34 redis-benchmark
-rwxr-xr-x 1 root root   25176 Apr 10 13:34 redis-check-aof
-rwxr-xr-x 1 root root 5192440 Apr 10 13:34 redis-check-rdb
-rwxr-xr-x 1 root root 2586080 Apr 10 13:34 redis-cli
lrwxrwxrwx 1 root root      12 Apr 10 13:34 redis-sentinel -> redis-server
-rwxr-xr-x 1 root root 5192440 Apr 10 13:34 redis-server
命令解释:
- redis-server:Redis 服务端的启动程序 。
- redis-cli:Redis客户端程序,也可以用 telnet 根据其纯文本协议来操作Redis缓存。
- redis-benchmark:Redis 性能测试工具,测试 Redis 在当前系统下的读写性能。
- redis-check-aof:数据修复。
- redis-check-dump:检查导出工具。
4.2 编辑Redis配置文件
[root@cache06 redis]# mkdir /application/redis/conf
[root@cache06 redis]# cp /server/tools/redis-3.2.12/redis.conf ./conf/
[root@cache06 redis]# cd conf
[root@cache06 redis]# vim redis.conf
#是否后台运行
daemonize yes
#默认端口
port 6379
#日志文件位置
logfile /var/log/redis.log
#持久化文件存储位置
dir /data/6379
#RDB持久化数据文件
dbfilename dump.rdb
4.3 启动Redis服务
4.3.1 启动前优化内存分配策略
有三种方法进行修改,但是需要root权限:
- sysctl vm.overcommit_memory=1
- echo 'vm.overcommit_memory=1' >>/etc/sysctl.conf && sysctl -p
- echo 1 >/proc/sys/vm/overcommit_memory
Overcommit_Memory参数可选值含义:
- 0 表示内核将检查是否有足够的可用内存供应用进程使用;如果有足够的可用内存,内存申请允许;否则,内存申请失败,并把错误返回给应用进程。
- 1 表示内核允许分配所有的物理内存,而不管当前的内存状态如何。
- 2 表示内核允许分配超过所有物理内存和交换空间总和的内存。
4.3.2 启动redis-server
#启动服务
[root@cache06 redis]# redis-server /application/redis/conf/redis.conf &
#追加启动命令到/etc/rc.local文件中
echo -e '#start redis-server\nredis-server /application/redis/conf/redis.conf &' >>/etc/rc.local
#添加执行权限
[root@cache06 ~]# chmod +x /etc/rc.d/rc.local
4.3.3 检查服务
#默认端口6379
[root@cache06 redis]# lsof -i :6379
COMMAND     PID USER   FD   TYPE DEVICE SIZE/OFF NODE NAME
redis-ser 10835 root    4u  IPv4  26242      0t0  TCP localhost:6379 (LISTEN)
4.3.4 客户端连接测试
#交互式简单存取数据
[root@cache06 redis]# redis-cli
127.0.0.1:6379> set name oldboy
OK
127.0.0.1:6379> get name
"oldboy"
#非交互式简单存取数据:类似mysql -e参数
[root@cache06 redis]# redis-cli set name oldboy
OK
[root@cache06 redis]# redis-cli get name
"oldboy"
#删除数据
[root@cache06 redis]# redis-cli del name
注:也可以通过telnet命令通过文本协议方式,实现redis交互式存取数据。
五、构建Redis Cluster集群
Redis Cluster集群正常工作至少需要3个主节点,同时为了保证数据的高可用性,加入了主从模式。因此至少创建6个节点,一个主节点对应一个或多个从节点,主节点提供数据存取,从节点默认情况下只负责从Master拉取数据进行备份。当这个主节点挂掉后,集群就会通过下线检测的方式,由从节点中选举一个节点来充当主节点,实现故障转移,从而保证集群正常运行。
5.1 Redis主从复制原理
Redis-Cluster集群的复制特性重用了 SLAVEOF 命令的代码,所以集群节点的复制行为和 SLAVEOF 命令的复制行为完全相同。
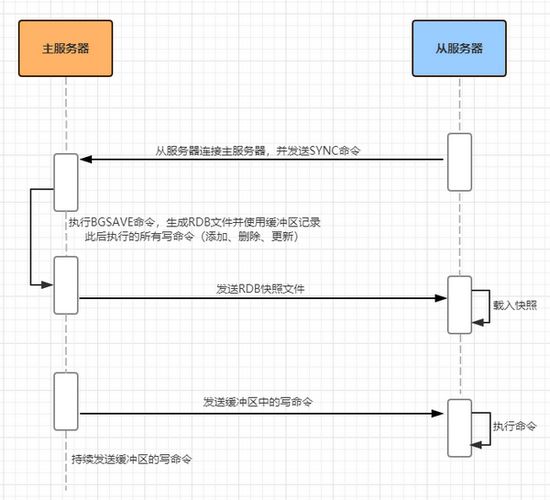
Redis全量复制一般在Slave初始化阶段执行,通过SLAVEOF命令开启主从复制,此时Slave需要将Master上的所有数据都复制一份。
具体步骤如下:
- 从服务器连接主服务器,发送SYNC命令;
- 主服务器接收到SYNC命令后,开始执行BGSAVE命令生成RDB文件,并使用缓冲区记录此后执行的所有写命令;
- 主服务器BGSAVE执行完后,向所有从服务器发送快照文件,并在发送期间继续记录被执行的写命令;
- 从服务器收到快照文件后丢弃旧的数据,载入新的快照;
- 主服务器快照发送完毕后,开始向从服务器发送缓冲区中的写命令;
- 从服务器完成对快照的载入,开始接收命令请求,并执行来自主服务器缓冲区的写命令;
5.2 部署集群节点
规划三台虚拟主机,每台主机分别搭建一个master主节点和一个slave从节点。并将一个分片(主机)的两个节点,分到不同的主机上,防止主节点Crash造成整个分片数据丢失。
其主机规划如下:
- 主机172.16.1.54
- master节点:172.16.1.54:6378
- slave节点:172.16.1.54:6379 - 主机172.16.1.57
- master节点:172.16.1.57:6378
- slave节点:172.16.1.57:6379 - 主机172.16.1.56
- master节点:172.16.1.56:6378
- slave节点:172.16.1.56:6379
5.2.1 创建存放多个实例的目录(以单台主机为例)
#以单台主机为例,创建存放多个实例的目录
[root@cache06 ~]# mkdir -p /data/{6378,6379}
5.2.2 配置redis.conf文件
#配置6378实例
[root@cache06 ~]# cd /data/6378
#编辑redis实例配置文件
[root@cache06 6378]# vim redis.conf
port 6378
daemonize yes
pidfile /data/6378/redis.pid
logfile /data/6378/redis.log
loglevel notice
dir /data/6378
dbfilename dump.rdb
#禁用保护模式(避免影响主从复制)
protected-mode no
#开启cluster模式
cluster-enabled yes
#记录集群信息,cluster集群自动维护,不用手动更新、创建
cluster-config-file nodes.conf
#节点超时时间,目标节点超过指定时间没响应,就标记为FAIL或PFAIL(可能宕机)
cluster-node-timeout 5000
appendonly yes

#配置6379实例
[root@cache06 6378]# cd /data/6379
#拷贝redis.conf配置文件
[root@cache06 6379]# cp /data/{6378,6379}/redis.conf
#端口替换
[root@cache06 6379]# sed -i 's#6378#6379#g' redis.conf
#检查替换是否成功
[root@cache06 6379]# grep '6379' redis.conf
port 6379
pidfile /data/6379/redis.pid
logfile /data/6379/redis.log
dir /data/6379
5.2.3 启动实例
#启动Redis实例
[root@cache06 data]# redis-server /data/6378/redis.conf
[root@cache06 data]# redis-server /data/6379/redis.conf
#查看进程是否存在
[root@cache06 data]# ps -ef|grep [r]edis
root       2350      1  0 11:07 ?        00:00:01 redis-server *:6378 [cluster]
root       2399      1  0 11:21 ?        00:00:00 redis-server *:6379 [cluster]
之后根据主机规划,按照以上步骤创建其他Redis实例。
5.3 创建Redis Cluster集群
5.3.1 安装redis-trib.rb需要的依赖环境
#安装Epel源
[root@cache06 ~]# wget -O /etc/yum.repos.d/epel.repo http://mirrors.aliyun.com/repo/epel-7.repo
#安装Ruby环境
[root@cache06 ~]# yum install ruby rubygems -y
#使用国内源
[root@cache06 ~]# gem sources --add http://mirrors.aliyun.com/rubygems/ --remove https://rubygems.org/
#检查源
[root@cache06 ~]# gem sources -l
*** CURRENT SOURCES ***

http://mirrors.aliyun.com/rubygems/
#安装依赖软件
[root@cache06 ~]# gem install redis -v 3.3.3
5.3.2 创建集群
1)创建一个包含三个主节点和三个从节点的集群
#复制redis-trib.rb到/application/redis/bin目录
[root@cache06 ~]# cp /server/tools/redis-3.2.12/src/redis-trib.rb /application/redis/bin
#创建集群
[root@cache06 ~]# redis-trib.rb create --replicas 1 172.16.1.54:6378 172.16.1.54:6379 172.16.1.57:6378 \
172.16.1.57:6379 172.16.1.56:6378 172.16.1.56:6379
命令参数的含义:
- 选项 create 表示希望创建一个新的集群。
- 选项 --replicas 1 表示希望集群中的每个主节点创建一个从节点。
- 之后跟着的多个host:port参数,则是实例的地址列表,希望程序使用这些地址所指示的实例来创建新集群。
ERROR错误提示:如果集群节点少于6个,使用redis-trib.rb创建集群会提示如下信息
>>> Creating cluster
ERROR: Invalid configuration for cluster creation.
Redis Cluster requires at least 3 master nodes.
This is not possible with 4 nodes and 1 replicas per node.
At least 6 nodes are required.
2)redis-trib 会打印出一份预想中的配置,如果没问题就可以输入 yes ,redis-trib 就会将这份配置应用到集群当中
>>> Creating cluster
>>> Performing hash slots allocation on 6 nodes...
Using 3 masters:
172.16.1.54:6378
172.16.1.57:6378
172.16.1.56:6378
Adding replica 172.16.1.57:6379 to 172.16.1.54:6378
Adding replica 172.16.1.54:6379 to 172.16.1.57:6378
Adding replica 172.16.1.56:6379 to 172.16.1.56:6378
M: a560974d9721882574aaf7fa4cf7218f590e97e0 172.16.1.54:6378
   slots:0-5460 (5461 slots) master
S: 4b462992200244a66c63f085ffd7ef4983a9655b 172.16.1.54:6379
   replicates f2d4d17676e6166bcdc2d05d81fc891327d03319
M: f2d4d17676e6166bcdc2d05d81fc891327d03319 172.16.1.57:6378
   slots:5461-10922 (5462 slots) master
S: 90fc1e298bdfb55e35a9dae7137684c6217dc6ff 172.16.1.57:6379
   replicates a560974d9721882574aaf7fa4cf7218f590e97e0
M: ca2a21eb3b5679c61b186ca4ca661f93e11ec304 172.16.1.56:6378
   slots:10923-16383 (5461 slots) master
S: 78e4b73c8f5f57d55303db52e9774ba69a306bb2 172.16.1.56:6379
   replicates ca2a21eb3b5679c61b186ca4ca661f93e11ec304
Can I set the above configuration? (type 'yes' to accept):
3)输入yes并回车确认之后,集群将会配置应用到各个节点, 并连接各个节点,让节点之间开始互相通讯
Can I set the above configuration? (type 'yes' to accept): yes
>>> Nodes configuration updated
>>> Assign a different config epoch to each node
>>> Sending CLUSTER MEET messages to join the cluster
Waiting for the cluster to join...
>>> Performing Cluster Check (using node 172.16.1.54:6378)
M: a560974d9721882574aaf7fa4cf7218f590e97e0 172.16.1.54:6378
   slots:0-5460 (5461 slots) master
   1 additional replica(s)
M: f2d4d17676e6166bcdc2d05d81fc891327d03319 172.16.1.57:6378
   slots:5461-10922 (5462 slots) master
   1 additional replica(s)
S: 90fc1e298bdfb55e35a9dae7137684c6217dc6ff 172.16.1.57:6379
   slots: (0 slots) slave
   replicates a560974d9721882574aaf7fa4cf7218f590e97e0
S: 4b462992200244a66c63f085ffd7ef4983a9655b 172.16.1.54:6379
   slots: (0 slots) slave
   replicates f2d4d17676e6166bcdc2d05d81fc891327d03319
S: 78e4b73c8f5f57d55303db52e9774ba69a306bb2 172.16.1.56:6379
   slots: (0 slots) slave
   replicates ca2a21eb3b5679c61b186ca4ca661f93e11ec304
M: ca2a21eb3b5679c61b186ca4ca661f93e11ec304 172.16.1.56:6378
   slots:10923-16383 (5461 slots) master
   1 additional replica(s)
4)创建成功则输出如下信息
[OK] All nodes agree about slots configuration.
>>> Check for open slots...
>>> Check slots coverage...
[OK] All 16384 slots covered.
5.3.3 测试集群
#连接任一节点进行数据管理
[root@cache06 ~]# redis-cli -c -p 6378
172.16.1.56:6378> set msg 'oldboy'
-> Redirected to slot [6257] located at 172.16.1.57:6378
OK
172.16.1.57:6378> get msg
"oldboy"
模拟测试:实现热点数据缓存
1)创建学生表,并插入数据
#登录数据库
[root@db01 ~]# mysql -uroot -p123456

#创建stu学生表
mysql> create table stu(
 -> sid smallint(8) unsigned zerofill not null auto_increment comment 'sid',
 -> sname varchar(20) not null default '' comment 'sname',
 -> address varchar(20) not null default '' comment 'address',
 -> primary key(sid)
 -> )character set utf8 engine innodb;

#插入数据
mysql> use test;
mysql> insert into stu values(null,'张三丰','湖南长沙'),(null,'张无忌','河南洛阳'),(null,'段誉','北京市'),(null,' 乔峰','广州市'),(null,'沈浪','上海市');

#查询数据
mysql> select * from stu;
+----------+-------+----------+
|    sid   | sname | address  |
+----------+-------+----------+
| 00000001 | 张三丰 | 湖南长沙  |
| 00000002 | 张无忌 | 河南洛阳  |
| 00000003 | 段誉   | 北京市   |
| 00000004 | 乔峰   | 广州市   |
| 00000005 | 沈浪   | 上海市   |
+----------+---- ---+---------+
2)将stu表中数据导入到redis数据库中
[root@cache06 scripts]# vim hmset_data.sh
#!/bin/bash
IP=172.16.1.51
script='/server/scripts'
if [ ! -d $script ];then
    mkdir -p $script
fi

#从数据库获取学生表信息,调用concat()函数,拼接redis-cli客户端命令
#redis-cli -c -p 6378 hmset stu_00000001 sid 00000001 sname 张三丰 address 湖南长沙
cd $script && \
/usr/bin/ssh $IP "mysql -uroot -p123456 -e 'select concat(\"hmset stu_\",sid,\" sid \",sid,\" sname \",sname,\" address \",address) from test.stu;'"|grep -v '^concat'|awk '{print "redis-cli -c -p 6378",$0}' >db.cmd

#判断上一条命令执行是否成功
if [ $? -ne 0 ];then
    echo 'USAGE: Please check the Data or IP.'
    exit 1
fi

#执行命令,并将结果写入到缓存中
cat db.cmd|while read line
do
    $line
done
3)检查缓存结果
#查看集群信息,保证每个master主库都有一个从库
[root@cache06 scripts]# redis-trib.rb info 127.0.0.1:6378
127.0.0.1:6378 (ca2a21eb...) -> 2 keys | 5461 slots | 1 slaves.
172.16.1.57:6378 (f2d4d176...) -> 4 keys | 5462 slots | 1 slaves.
172.16.1.54:6378 (a560974d...) -> 4 keys | 5461 slots | 1 slaves.
[OK] 10 keys in 3 masters.
0.00 keys per slot on average.

#获取键值信息,在redis中存储中文,读取数据时会遇到字符集的问题
[root@cache06 scripts]# redis-cli -c -p 6378 hget stu_00000009 sname
"\xe6\xb1\xaa\xe6\xb6\xb5"

#在redis-cli后面加--raw参数,显示中文
[root@cache06 scripts]# redis-cli -c --raw -p 6378 hmget stu_00000009 sid sname
00000009
汪涵
5.4 集群管理
5.4.1 故障转移
1)查询172.16.1.54主机上的主节点(6378端口实例)数据
[root@cache06 ~]# redis-cli -c -h 172.16.1.54 -p 6378
172.16.1.54:6378> keys *
1) "stu_00000005"
2) "stu_00000001"
3) "stu_00000008"
4) "stu_00000004"

#查询学生stu_00000005的姓名
[root@cache06 ~]# redis-cli -c --raw -p 6378 hget stu_00000005 sname
沈浪
2)停止服务
#停止172.16.1.54主机上的主节点(6378实例)服务
[root@cache06 ~]# redis-cli -c -h 172.16.1.54 -p 6378 shutdown

#查看进程是否存在
[root@cache04 ~]# ps -ef|grep [r]edis
root       2631      1  0 15:47 ?        00:00:29 redis-server *:6379 [cluster]
3)检查集群节点状态
[root@cache06 ~]# redis-cli -c -p 6378 cluster nodes
ca2a21eb3b5679c61b186ca4ca661f93e11ec304 172.16.1.56:6378 master - 0 1555066929017 5 connected 10923-16383
90fc1e298bdfb55e35a9dae7137684c6217dc6ff 172.16.1.57:6379 master - 0 1555066928312 7 connected 0-5460
f2d4d17676e6166bcdc2d05d81fc891327d03319 172.16.1.57:6378 master - 0 1555066927808 3 connected 5461-10922
78e4b73c8f5f57d55303db52e9774ba69a306bb2 172.16.1.56:6379 myself,slave ca2a21eb3b5679c61b186ca4ca661f93e11ec304 0 0 6 connected
4b462992200244a66c63f085ffd7ef4983a9655b 172.16.1.54:6379 slave f2d4d17676e6166bcdc2d05d81fc891327d03319 0 1555066928008 3 connected
a560974d9721882574aaf7fa4cf7218f590e97e0 172.16.1.54:6378 master,fail - 1555066721816 1555066719602 1 disconnected
可以看到172.16.1.54的主节点显示fail状态,原来的172.16.1.57的从节点(6379实例),自动提升为master。
4)再次检索stu_00000005学生信息,可以正常查询
[root@cache06 ~]# redis-cli -c --raw -p 6378
127.0.0.1:6378> hgetall stu_00000005
-> Redirected to slot [5220] located at 172.16.1.57:6379
sid
00000005
sname
沈浪
address
上海市
5.4.2 添加节点
语法:redis-trib.rb add-node new_host:new_port existing_host:existing_port --slave --master-id
参数:
- --slave:以从节点身份加入集群。
- --master-id:主节点号。
- new_host:new_port:新增节点的地址。
- existing_host:existing_port:集群中任意一个节点的地址。
1)重置Redis实例
将摘除的Redis实例作为从节点,再次添加到Cluster集群中,添加节点前做如下操作。
#删除实例下的文件,只保留redis.conf配置文件
[root@cache04 data]# rm -f 6378/{appendonly.aof,dump.rdb,nodes.conf,redis.log}
#启动实例
[root@cache04 data]# redis-server /data/6378/redis.conf
#检查进程
[root@cache04 data]# ps -ef|grep [r]edis
root       2631      1  0 07:04 ?        00:00:59 redis-server *:6379 [cluster]
root       3607      1  0 12:35 ?        00:00:00 redis-server *:6378 [cluster]
#查看节点数据,当前节点数据为空
[root@cache04 data]# redis-cli -c -p 6378
127.0.0.1:6378> keys *
(empty list or set)
2)以slave身份加入到集群
[root@cache04 data]# redis-trib.rb add-node --slave --master-id 90fc1e298bdfb55e35a9dae7137684c6217dc6ff 172.16.1.54:6378 172.16.1.57:6379
>>> Adding node 172.16.1.54:6378 to cluster 172.16.1.57:6379
>>> Performing Cluster Check (using node 172.16.1.57:6379)
M: 90fc1e298bdfb55e35a9dae7137684c6217dc6ff 172.16.1.57:6379
   slots:0-5460 (5461 slots) master
   0 additional replica(s)
S: ca2a21eb3b5679c61b186ca4ca661f93e11ec304 172.16.1.56:6378
   slots: (0 slots) slave
   replicates 78e4b73c8f5f57d55303db52e9774ba69a306bb2
S: 4b462992200244a66c63f085ffd7ef4983a9655b 172.16.1.54:6379
   slots: (0 slots) slave
   replicates f2d4d17676e6166bcdc2d05d81fc891327d03319
M: 78e4b73c8f5f57d55303db52e9774ba69a306bb2 172.16.1.56:6379
   slots:10923-16383 (5461 slots) master
   1 additional replica(s)
M: f2d4d17676e6166bcdc2d05d81fc891327d03319 172.16.1.57:6378
   slots:5461-10922 (5462 slots) master
   1 additional replica(s)
[OK] All nodes agree about slots configuration.
>>> Check for open slots...
>>> Check slots coverage...
[OK] All 16384 slots covered.
>>> Send CLUSTER MEET to node 172.16.1.54:6378 to make it join the cluster.
Waiting for the cluster to join.
>>> Configure node as replica of 172.16.1.57:6379.
[OK] New node added correctly.
3)检查集群节点状态
[root@cache06 ~]# redis-cli -c -p 6378 cluster nodes
78e4b73c8f5f57d55303db52e9774ba69a306bb2 172.16.1.56:6379 master - 0 1555130226500 8 connected 10923-16383
4b462992200244a66c63f085ffd7ef4983a9655b 172.16.1.54:6379 slave f2d4d17676e6166bcdc2d05d81fc891327d03319 0 1555130225999 3 connected
f2d4d17676e6166bcdc2d05d81fc891327d03319 172.16.1.57:6378 master - 0 1555130227043 3 connected 5461-10922
90fc1e298bdfb55e35a9dae7137684c6217dc6ff 172.16.1.57:6379 master - 0 1555130227547 7 connected 0-5460
69f66290fd63721965c83a71b5f673a3907d38da 172.16.1.54:6378 slave 90fc1e298bdfb55e35a9dae7137684c6217dc6ff 0 1555130227547 7 connected
ca2a21eb3b5679c61b186ca4ca661f93e11ec304 172.16.1.56:6378 myself,slave 78e4b73c8f5f57d55303db52e9774ba69a306bb2 0 0 5 connected
a560974d9721882574aaf7fa4cf7218f590e97e0 :0 slave,fail,noaddr 90fc1e298bdfb55e35a9dae7137684c6217dc6ff 1555129672056 1555129671656 7 disconnected
可以看到172.16.1.54:6378实例以从节点身份加入集群,并且指向的主节点是172.16.1.57:6379实例。
4)检查节点数据
#查看节点数据是否存在,加入集群之后,会从主节点进行全量复制
[root@cache04 data]# redis-cli -c -p 6378
127.0.0.1:6378> keys *
1) "stu_00000001"
2) "stu_00000005"
3) "stu_00000004"
4) "stu_00000008"

#获取数据
[root@cache04 data]# redis-cli -c --raw -p 6378
127.0.0.1:6378> hgetall stu_00000005
-> Redirected to slot [5220] located at 172.16.1.57:6379
sid
00000005
sname
沈浪
address
上海市
遇到的问题小结:
ERROR1:new_host:new_port:待添加的节点,必须确保节点数据为空或者节点在集群中不存在,否则,会提示一下错误。
#使用redis-trib.rb添加新节点,在节点加入集群之前,会对新节点的状态进行检查
>>> Check for open slots...
>>> Check slots coverage...
[OK] All 16384 slots covered.
[ERR] Node 172.16.1.54:6378 is not empty. Either the node already knows other nodes (check with CLUSTER NODES) or contains some key in database 0.
ERROR2:--slave和--master-id必须跟在add-node后面,同样的参数,如果是以下这种写法,会提示错误。
[root@cache06 ~]# redis-trib.rb add-node 172.16.1.54:6378 172.16.1.57:6379 --slave --master-id 90fc1e298bdfb55e35a9dae7137684c6217dc6ff
[ERR] Wrong number of arguments for specified sub command
六、实现Python链接Redis Cluster集群
实现Python链接及操作Redis Cluster,需要以下环境支持:
1.搭建Python开发环境,Python2.7.2以上版本才支持Redis Cluster,这里选择的是3.5.5版本。
- Python2 使用2.7以后的版本
- Python3 使用3.4以后的版本
2.安装驱动程序,官方提供多种Python连接redis的API方式,这里推荐使用redis-py。
3.Redis-py并没有提供Redis-cluster的支持,需要下载redis-py-cluster。
6.1 搭建python开发环境
##安装之前,检查python版本
[root@cache04 tools]# python --version
Python 2.7.5

#下载python3.5.5版本
[root@cache04 tools]# wget https://www.python.org/ftp/python/3.5.5/Python-3.5.5.tgz

#源码安装
[root@cache04 tools]# tar xf Python-3.5.5.tgz
[root@cache04 tools]# cd Python-3.5.5/
[root@cache04 Python-3.5.5]# ./configure
[root@cache04 Python-3.5.5]# make && make install

#检查安装环境,这里使用python3命令,而不是python命令
[root@cache04 Python-3.5.5]# python3
Python 3.5.5 (default, Apr 14 2019, 11:13:51)
[GCC 4.8.5 20150623 (Red Hat 4.8.5-16)] on linux
Type "help", "copyright", "credits" or "license" for more information.
>>> exit()
6.2 安装Redis-py驱动程序
Redis-py提供两个类Redis和StrictRedis用于实现Redis的命令:
- StrictRedis用于实现大部分官方的命令,并使用官方的语法和命令(比如:SET命令对应与StrictRedis.set方法)。(开发推荐使用)
- Redis是StrictRedis的子类,用于向后兼容旧版本的redis-py。
#下载源码包
[root@cache04 tools]# wget https://github.com/andymccurdy/redis-py/archive/2.10.6.tar.gz
#解压
[root@cache04 tools]# tar xf 2.10.6.tar.gz
#切换到包目录下
[root@cache04 tools]# cd redis-py-2.10.6/
#安装驱动
[root@cache04 redis-py-2.10.6]# python3 setup.py install
#导入redis包,没有报错,驱动安装成功
[root@cache04 redis-py-cluster-1.3.6]# python3
Python 3.5.5 (default, Apr 14 2019, 11:13:51)
[GCC 4.8.5 20150623 (Red Hat 4.8.5-16)] on linux
Type "help", "copyright", "credits" or "license" for more information.
>>> import redis
>>>
6.3 安装Redis-py-cluster驱动程序
Redis-py并没有提供Redis-cluster的支持,需要下载redis-py-cluster包。
以上提示:redis-py3.0.x版本和redis-py-cluster版本存在不兼容的问题(目前redis-py-cluster最新版本为1.3.6),实际使用过程中,建议将redis-py固定为2.10.6版本。
#使用redis-py-3.0.1版本遇到的问题,在导入类文件的时候,出现报错
[root@cache04 redis-py-cluster-1.3.6]# python3
>>> from rediscluster import StrictRedisCluster
Traceback (most recent call last):
  File "", line 1, in
  File "/server/tools/redis-py-cluster-1.3.6/rediscluster/__init__.py", line 7, in
    from .client import StrictRedisCluster, RedisCluster
  File "/server/tools/redis-py-cluster-1.3.6/rediscluster/client.py", line 10, in
    from .connection import (
  File "/server/tools/redis-py-cluster-1.3.6/rediscluster/connection.py", line 11, in
    from .nodemanager import NodeManager
  File "/server/tools/redis-py-cluster-1.3.6/rediscluster/nodemanager.py", line 12, in
    from redis._compat import b, unicode, bytes, long, basestring
ImportError: cannot import name 'b'
安装Redis-py-cluster程序。
#下载源码包
[root@cache04 tools]# https://github.com/Grokzen/redis-py-cluster/archive/1.3.6.tar.gz
#解压
[root@cache04 tools]# tar xf 1.3.6.tar.gz
#切换到包目录下
[root@cache04 tools]# cd redis-py-cluster-1.3.6
#安装驱动
[root@cache04 redis-py-cluster-1.3.6]# python3 setup.py install
6.4 测试API读写功能
#写入数据
[root@cache04 tools]# python3
Python 3.5.5 (default, Apr 14 2019, 11:13:51)
[GCC 4.8.5 20150623 (Red Hat 4.8.5-16)] on linux
Type "help", "copyright", "credits" or "license" for more information.
>>> from rediscluster import StrictRedisCluster
>>> startup_nodes = [{"host": "127.0.0.1", "port": "6379"}]
>>> conn = StrictRedisCluster(startup_nodes=startup_nodes, decode_responses=True)
>>> conn.set("msg","Nice to meet you")
True

#读取数据,检查是否写入成功
[root@cache06 ~]# redis-cli -c -p 6378 get msg
"Nice to meet you"
遇到的问题小结:
ERROR1:使用python交互模式,在命令开头不能有任何空格,否则,会出现报错。
>>>  from rediscluster import StrictRedisCluster    #命令开头不能有空格或tab
  File "", line 1
    from rediscluster import StrictRedisCluster
    ^
IndentationError: unexpected indent 


