开发环境
- macOS Serria (10.12)
- xCode 8.0 (Swift 3)
总体思路
- 建立空白的 storyboard 用于呈现列表
- 实现自定义单个单元格(继承自:UICollectionViewCell)
- 将列表(UICollectionView)注册到页面(StoryBoard)中,同时将自定义单元格注册到列表中
总体效果
接下来,正式上代码。
建立 storyboard
示例代码集成了 Tab Bar 和 Navigation Bar,整个项目(main.storyboard)如下所示:
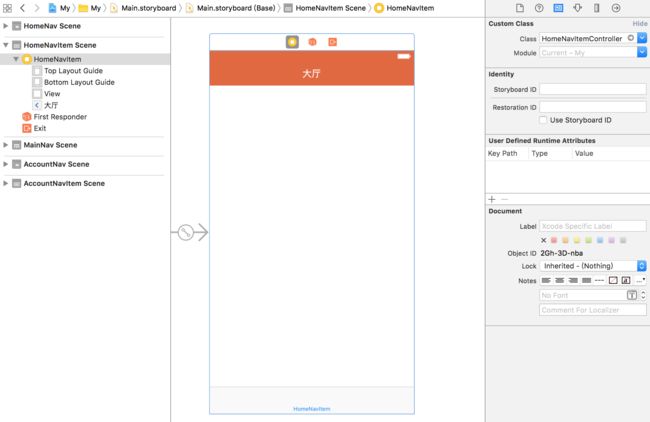
示例将在大厅页面(HomeNavItem Scene)呈现列表,如下图所示:
创建 HomeNavItemController.swift,作为上述页面的后台代码,关联方式如上图右上角 Custom Class 所示。
至此,界面端的工作就全部完毕了。
自定义单个单元格(HomeCollectionViewCell.swift)
自定义单元格,继承自 UICollectionViewCell,代码如下所示:
import UIKit;

class HomeCollectionViewCell: UICollectionViewCell {

    var id: Int = 0;   // 用于记录每个记录的ID

    var cover: UIImageView?;
    var avatar: UIImageView?;
    var title: UILabel?;
    var author: UILabel?;
    var follow: UILabel?;
    var begin: UILabel?;
    var like: UILabel?;

    override init(frame: CGRect) {
        super.init(frame: frame);

        // 将 cover 注册到单元格
        cover = UIImageView(image: UIImage.init(named: "DefaultCover"));
        cover?.frame = CGRect(x: 8, y: 10, width: UIScreen.main.bounds.width - 16, height: 160);
        cover?.contentMode = UIViewContentMode.scaleAspectFill;
        cover?.clipsToBounds = true;
        self.addSubview(cover!);

        // 添加 avatar 背景
        let avatarBack = UIView(frame: CGRect(x: 8, y: 16, width: 37.5, height: 25));
        avatarBack.backgroundColor = UIColor(red: 0, green: 0, blue: 0, alpha: 0.6);
        let path = UIBezierPath(roundedRect: avatarBack.bounds, byRoundingCorners: [UIRectCorner.topRight, UIRectCorner.bottomRight], cornerRadii: CGSize(width: 12.5, height: 12.5));
        let layer = CAShapeLayer();
        layer.frame = avatarBack.bounds;
        layer.path = path.cgPath;
        avatarBack.layer.mask = layer;
        self.addSubview(avatarBack);

        // 将 avatar 注册到单元格
        avatar = UIImageView(image: UIImage.init(named: "DefaultCover"));
        avatar?.frame = CGRect(x: 23, y: 18.5, width: 20, height: 20);
        avatar?.layer.cornerRadius = 10;
        avatar?.contentMode = UIViewContentMode.scaleAspectFill;
        avatar?.clipsToBounds = true;
        self.addSubview(avatar!);

        // 将 author 注册到单元格
        author = UILabel(frame: CGRect(x: 50, y: 19, width: UIScreen.main.bounds.width - 58, height: 11));
        author?.textColor = UIColor.black;
        author?.font = UIFont(name: "Heiti SC", size: 11);
        self.addSubview(author!);

        // 将 follow 注册到单元格
        follow = UILabel(frame: CGRect(x: 50, y: 31, width: UIScreen.main.bounds.width - 58, height: 9));
        follow?.textColor = UIColor.darkGray;
        follow?.font = UIFont(name: "Heiti SC", size: 9);
        self.addSubview(follow!);

        // 添加 title 引导线
        let sepTitle = UIView(frame: CGRect(x: 8, y: 175, width: 2, height: 31));
        sepTitle.backgroundColor = UIColor(red: 222/255, green: 81/255, blue: 27/255, alpha: 1);
        sepTitle.layer.cornerRadius = 1;
        self.addSubview(sepTitle);

        // 将 title 注册到单元格
        title = UILabel(frame: CGRect(x: 14 + sepTitle.bounds.width, y: 177, width: UIScreen.main.bounds.width - 22 - sepTitle.bounds.width, height: 14));
        title?.textColor = UIColor.black;
        title?.font = UIFont(name: "Heiti SC", size: 14);
        self.addSubview(title!);

        // 将 begin 注册到单元格
        begin = UILabel(frame: CGRect(x: 14 + sepTitle.bounds.width, y: 195, width: UIScreen.main.bounds.width - 22 - sepTitle.bounds.width, height: 10));
        begin?.textColor = UIColor.gray;
        begin?.font = UIFont(name: "Heiti SC", size: 10);
        self.addSubview(begin!);

        // 添加 good 分割线
        let sepLine = UIView(frame: CGRect(x: 0, y: 212, width: UIScreen.main.bounds.width, height: 1));
        sepLine.backgroundColor = UIColor(red: 240/255, green: 240/255, blue: 240/255, alpha: 1);
        self.addSubview(sepLine);

        // 将 begin 注册到单元格
        like = UILabel(frame: CGRect(x: UIScreen.main.bounds.width - 88, y: 220, width: 80, height: 12));
        like?.textColor = UIColor.gray;
        like?.font = UIFont(name: "Heiti SC", size: 12);
        self.addSubview(like!);
    }

    required init?(coder aDecoder: NSCoder) {
        fatalError("Cell 初始化失败");
    }
}
至此,自定义单元格的代码完毕。
接下来,将列表注册到页面中去,同时,将自定义单元格注册到列表中,代码如下:
import UIKit;

class HomeNavItemController: BaseViewController, UICollectionViewDataSource, UICollectionViewDelegate, UICollectionViewDelegateFlowLayout {

    var colView: UICollectionView?;   // 创建一个列表

    // 在手机反转时重绘列表
    override func viewWillLayoutSubviews() {
        super.viewWillLayoutSubviews();

        let layout = UICollectionViewFlowLayout();

        colView = UICollectionView(frame: CGRect.init(x: 0, y: 0, width: UIScreen.main.bounds.width, height: self.view.bounds.height), collectionViewLayout: layout);
        colView?.register(HomeCollectionViewCell.self, forCellWithReuseIdentifier: "homeCell")
        colView?.delegate = self;
        colView?.dataSource = self;
        colView?.backgroundColor = UIColor(red: 240/255, green: 240/255, blue: 240/255, alpha: 1);

        layout.scrollDirection = .vertical;
        layout.itemSize = CGSize(width: UIScreen.main.bounds.width, height: 240);

        self.view.addSubview(colView!);
    }

    // Cell 数量
    func collectionView(_ collectionView: UICollectionView, numberOfItemsInSection section: Int) -> Int {
        return 10;
    }

    // Cell 具体内容
    func collectionView(_ collectionView: UICollectionView, cellForItemAt indexPath: IndexPath) -> UICollectionViewCell {
        let cell = collectionView.dequeueReusableCell(withReuseIdentifier: "homeCell", for: indexPath) as! HomeCollectionViewCell;

        cell.id = indexPath.row + 10;

        cell.cover?.image = UIImage.downloadFromURL(url: "http://pic9.nipic.com/20100904/4845745_195609329636_2.jpg");
        //cell.cover!.image = UIImage.init(named: "DefaultCover");

        cell.title?.text = "\\(indexPath.row)这里是标题内容看这里是标题内容看这里看这里";
        cell.author?.text = "张三";
        cell.follow?.text = "\\(indexPath.row)关注";

        let now = Date();
        let format = DateFormatter();
        format.locale = Locale.current;
        format.dateFormat = "yyyy年M月d日 HH:mm";
        cell.begin?.text = "@ \\(format.string(from: now))";

        cell.like?.text = "\\(indexPath.row)点赞";

        cell.backgroundColor = UIColor.white;
        return cell;
    }

    // 单击单元格时,跳转到详情页面
    func collectionView(_ collectionView: UICollectionView, didSelectItemAt indexPath: IndexPath) {
        let cell = collectionView.cellForItem(at: indexPath) as! HomeCollectionViewCell;
        let player = PlayerController();
        player.id = cell.id;
        self.navigationController?.pushViewController(player, animated: true);
    }
}
至此,全部页面功能实现完毕。
在页面下载图片时,采用了对 UIImage 的扩展方式来实现,实现代码如下:
import UIKit;

extension UIImage {
    class func downloadFromURL(url: String) -> UIImage {
        let url = URL(string: url)!;
        var img = UIImage();

        do{
            let data = try Data(contentsOf: url);
            img = UIImage(data: data)!;
        } catch let err as NSError {
            print("下载图片出错:\\(err)");
        }

        return img;
    }
}
至此,所有功能实现完毕。


