SpringBoot + Swagger + SpringSecurity + Jwt做登陆认证
@author [email protected]
1.前置知识
 熟悉 SpringBoot

 了解 SpringSecurity

 熟悉 jwt
2.一些没用的废话
项目最近用到了 SpringSecutiry + JWT做登陆验证,之所以会使用这种登陆验证,因为前后端分离的情况下,服务器并不只是只有浏览器去访问,还包括了其他的设备,比如说手机,Pad,小程序等。如果采用的还是基于Session登陆,那么手机,Pad,小程序等并没有像浏览器一样存在着cookie,因此可以采用这种登陆认证方式。
3.准备工作
3.1 项目环境搭建
创建SpringBoot项目,并添加 JWT 依赖和SpringSecurity依赖,具体pom.xml内容如下:
    4.0.0

        org.springframework.boot
        spring-boot-starter-parent
        2.1.3.RELEASE


    com.briup
    security-demo
    0.0.1-SNAPSHOT
    security-demo
    Demo project for Spring Boot


        1.8


            org.springframework.boot
            spring-boot-starter-web


            org.mybatis.spring.boot
            mybatis-spring-boot-starter
            2.0.0


            mysql
            mysql-connector-java


            org.springframework.boot
            spring-boot-starter-test
            test


            io.springfox
            springfox-swagger2
            2.6.1


            io.springfox
            springfox-swagger-ui
            2.6.1


            org.springframework.boot
            spring-boot-starter-security


            io.jsonwebtoken
            jjwt
            0.9.0


            commons-lang
            commons-lang
            2.6


                org.springframework.boot
                spring-boot-maven-plugin
3.2 application.properties内容为:
server.port=8888
spring.datasource.driverClassName=com.mysql.cj.jdbc.Driver
spring.datasource.url=jdbc:mysql://localhost:3306/demo
spring.datasource.username=root
spring.datasource.password=root

mybatis.mapper-locations= classpath:/mapper/**/*Mapper.xml
3.3 创建表(mysql)
-- ----------------------------
-- Table structure for customer
-- ----------------------------
DROP TABLE IF EXISTS `customer`;
CREATE TABLE `customer` (
  `id` int(11) NOT NULL AUTO_INCREMENT,
  `name` varchar(255) DEFAULT NULL,
  `password` varchar(255) DEFAULT NULL,
  PRIMARY KEY (`id`)
) ENGINE=InnoDB AUTO_INCREMENT=2 DEFAULT CHARSET=utf8;

-- ----------------------------
-- Records of customer
-- ----------------------------
INSERT INTO `customer` VALUES ('1', 'admin', 'admin');

-- ----------------------------
-- Table structure for roles
-- ----------------------------
DROP TABLE IF EXISTS `roles`;
CREATE TABLE `roles` (
  `id` int(11) NOT NULL AUTO_INCREMENT,
  `name` varchar(255) DEFAULT NULL,
  `customer_id` int(11) DEFAULT NULL,
  PRIMARY KEY (`id`),
  KEY `roles_customer_id_fk` (`customer_id`),
  CONSTRAINT `roles_customer_id_fk` FOREIGN KEY (`customer_id`) REFERENCES `customer` (`id`) ON DELETE CASCADE ON UPDATE CASCADE
) ENGINE=InnoDB AUTO_INCREMENT=2 DEFAULT CHARSET=utf8;

-- ----------------------------
-- Records of roles
-- ----------------------------
INSERT INTO `roles` VALUES ('1', '管理员', '1');
3.4 根据表创建映射文件与映射接口,POJO类
Customer类内容如下:
package com.briup.security.bean;

import java.io.Serializable;
import java.util.List;

public class Customer implements Serializable {

    private static final long serialVersionUID = 1L;

    private long id;
    private String name;
    private String password;
    private List roles;

    public long getId() {
        return id;
    }

    public void setId(long id) {
        this.id = id;
    }

    public String getName() {
        return name;
    }

    public void setName(String name) {
        this.name = name;
    }

    public String getPassword() {
        return password;
    }

    public void setPassword(String password) {
        this.password = password;
    }

    public List getRoles() {
        return roles;
    }

    public void setRoles(List roles) {
        this.roles = roles;
    }

}
Role类内容如下:
package com.briup.security.bean;

import java.io.Serializable;

public class Role implements Serializable {

    private static final long serialVersionUID = -2158194219185524323L;

    private long id;
    private String name;

    private Customer customer;

    public long getId() {
        return id;
    }

    public void setId(long id) {
        this.id = id;
    }

    public String getName() {
        return name;
    }

    public void setName(String name) {
        this.name = name;
    }

    public Customer getCustomer() {
        return customer;
    }

    public void setCustomer(Customer customer) {
        this.customer = customer;
    }

}
CustomerMapper 映射接口为:
package com.briup.security.mapper;

import java.util.List;

import com.briup.security.bean.Customer;

public interface CustomerMapper {

    /**
     * 根据名字 查找用户信息
     * @param name
     * @return
     */
    Customer selectByName(String name);

    /**
     * 查询所有的用户信息
     * @return
     */
    List selectAll();

}
RoleMapper 映射接口为:
package com.briup.security.mapper;

import java.util.List;

import com.briup.security.bean.Role;

public interface RoleMapper {

    /**
     * 根据用户id查询用户所有的角色
     * @param customerId
     * @return
     */
    List selectAllByCustomerId(Integer customerId);

}
CustomerMapper.xml 映射文件为:
RoleMapper.xml 映射文件为:
3.5 编写service接口与实现类
ICustomerService 接口内容为:
package com.briup.security.service;

import java.util.List;

import com.briup.security.bean.Customer;

public interface ICustomerService {

    /**
     * 根据 名字查询
     * @param name
     * @return
     */
    Customer findByName(String name);

    /**
     * 查询所有
     * @return
     */
    List findAll();

}
CustomerServiceImpl 实现类如下:
package com.briup.security.service.impl;

import java.util.List;

import org.springframework.beans.factory.annotation.Autowired;
import org.springframework.stereotype.Service;

import com.briup.security.bean.Customer;
import com.briup.security.mapper.CustomerMapper;
import com.briup.security.service.ICustomerService;

@Service
public class CustomerServiceImpl implements ICustomerService {

    @Autowired
    private CustomerMapper customerMapper;

    @Override
    public Customer findByName(String name) {
        return customerMapper.selectByName(name);
    }

    @Override
    public List findAll() {
        return customerMapper.selectAll();
    }

}
IRoleService 接口如下:
package com.briup.security.mapper;

import java.util.List;

import com.briup.security.bean.Role;

public interface RoleMapper {

    /**
     * 根据用户id查询用户所有的角色
     * @param customerId
     * @return
     */
    List selectAllByCustomerId(long customerId);

}
RoleServiceImpl 内容如下
package com.briup.security.service.impl;

import java.util.List;

import org.springframework.beans.factory.annotation.Autowired;
import org.springframework.stereotype.Service;

import com.briup.security.bean.Role;
import com.briup.security.mapper.RoleMapper;
import com.briup.security.service.IRoleService;

@Service
public class RoleServiceImpl implements IRoleService {

    @Autowired
    private RoleMapper roleMapper;


    @Override
    public List findAllByCustomerId(long id) {
        return roleMapper.selectAllByCustomerId(id);
    }

}
4.编写controller测试所写功能
CustomerController内容如下:
package com.briup.security.web.controller;

import java.util.List;

import org.springframework.beans.factory.annotation.Autowired;
import org.springframework.web.bind.annotation.GetMapping;
import org.springframework.web.bind.annotation.RequestMapping;
import org.springframework.web.bind.annotation.RestController;

import com.briup.security.bean.Customer;
import com.briup.security.service.ICustomerService;

@RestController
@RequestMapping("/customer")
public class CustomerController {

    @Autowired
    private ICustomerService customerService;


    @GetMapping("/getCustomer")
    public Customer getCustomerByName(String name) {
        return customerService.findByName(name);
    }


    @GetMapping("/getAllCustomer")
    public List getAllCustomer() {
        return customerService.findAll();
    }


}
在启动类加上MapperScanner注解,启动,具体代码如下:
package com.briup.security;

import org.mybatis.spring.annotation.MapperScan;
import org.springframework.boot.SpringApplication;
import org.springframework.boot.autoconfigure.SpringBootApplication;

@SpringBootApplication
@MapperScan("com.briup.security.mapper")
public class SecurityDemoApplication {

    public static void main(String[] args) {
        SpringApplication.run(SecurityDemoApplication.class, args);
    }

}
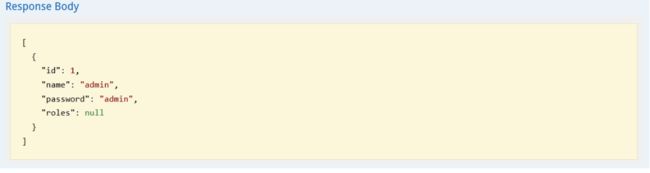
访问结果如下:
http://localhost:8888/customer/getAllCustomer

这种访问方式,在前后端分离的情况下,不方便前端人员去对接java后端人员编写的接口,因此我们使用swagger去暴露我们的服务
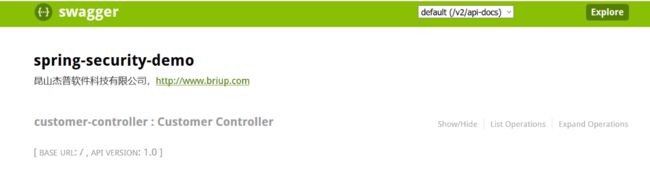
5.整合swagger
5.1 添加swagger依赖,在上面的pom.xml中已经添加,下面只是罗列出来,不需要重复添加
    io.springfox
    springfox-swagger2
    2.6.1


    io.springfox
    springfox-swagger-ui
    2.6.1
5.2 添加swagger2的配置类 Swagger2Config
package com.briup.security.config;

import org.springframework.context.annotation.Bean;
import org.springframework.context.annotation.Configuration;

import springfox.documentation.builders.ApiInfoBuilder;
import springfox.documentation.builders.PathSelectors;
import springfox.documentation.builders.RequestHandlerSelectors;
import springfox.documentation.service.ApiInfo;
import springfox.documentation.spi.DocumentationType;
import springfox.documentation.spring.web.plugins.Docket;
import springfox.documentation.swagger2.annotations.EnableSwagger2;


@Configuration
@EnableSwagger2
public class Swagger2Config {


    @Bean
    public Docket createRestApi() {
        return new Docket(DocumentationType.SWAGGER_2)
                .apiInfo(apiInfo())
                .select()
                .apis(RequestHandlerSelectors.basePackage("com.briup.security.web"))
                .paths(PathSelectors.any())
                .build();
    }


    private ApiInfo apiInfo() {
        return new ApiInfoBuilder()
                .title("spring-security-demo")
                .description("昆山杰普软件科技有限公司,http://www.briup.com")
                .termsOfServiceUrl("http://www.briup.com")
                .version("1.0")
                .build();
    }
}
5.3 重新启动项目,并访问如下网址:
http://localhost:8888/swagger-ui.html
经过上面的例子发现,所有的服务在没有安全认证的情况下都可以访问,因此我们需要添加安全认证,采用SpringSecurity + jwt去进行安全认证,至于为什么采用这种形式,在上文已经解释了使用session保存用户信息所带来的问题,这里不再赘述.
6.整合Security + JWT
6.1 导入security与JWT依赖,在上面的pom.xml中已经添加,下面只是罗列出来,不需要重复添加
    org.springframework.boot
    spring-boot-starter-security


    io.jsonwebtoken
    jjwt
    0.9.0
6.2 添加Security的配置类,SecurityConfig具体代码如下:
/**
 * Project Name:auth2
 * File Name:WebSecurityConfig.java
 * Package Name:com.briup.apps.auth2.config
 * Date:2018年9月17日上午10:23:44
 * Copyright (c) 2018, [email protected] All Rights Reserved.
 *
*/

package com.briup.security.config;


import org.springframework.beans.factory.annotation.Autowired;
import org.springframework.beans.factory.annotation.Qualifier;
import org.springframework.context.annotation.Bean;
import org.springframework.context.annotation.Configuration;
import org.springframework.security.config.annotation.authentication.builders.AuthenticationManagerBuilder;
import org.springframework.security.config.annotation.web.builders.HttpSecurity;
import org.springframework.security.config.annotation.web.configuration.EnableWebSecurity;
import org.springframework.security.config.annotation.web.configuration.WebSecurityConfigurerAdapter;
import org.springframework.security.config.http.SessionCreationPolicy;
import org.springframework.security.core.userdetails.UserDetailsService;
import org.springframework.security.crypto.bcrypt.BCryptPasswordEncoder;
import org.springframework.security.crypto.password.PasswordEncoder;
import org.springframework.security.web.authentication.UsernamePasswordAuthenticationFilter;
import org.springframework.util.DigestUtils;

/**
 * ClassName:WebSecurityConfig

 * Function: security 配置类

 * Date: 2018年9月17日 上午10:23:44

 *
 * @author wangzh
 * @version
 * @since JDK 1.8
 * @see
 */
@Configuration
@EnableWebSecurity
public class WebSecurityConfig extends WebSecurityConfigurerAdapter {

    @Autowired
    @Qualifier("userDetailServiceImpl")
    private UserDetailsService userDetailService;

    @Bean
    public PasswordEncoder getPasswordEncoderBean() {
        return new BCryptPasswordEncoder();
    }

    @Bean
    public JwtAuthenticationTokenFilter getauthenticationTokenFilterBean() {
        return new JwtAuthenticationTokenFilter();
    }

    @Bean
    public LoginSuccessHandler getLoginSuccessHandler() {
        return new LoginSuccessHandler();
    }

    @Bean
    public LoginFailHandler getLoginFailHandler() {
        return new LoginFailHandler();
    }

    @Override
    protected void configure(HttpSecurity http) throws Exception {
    http.formLogin()
            .loginPage("/authenticaion/login")
            .loginProcessingUrl("/authentication/form")
            .successHandler(getLoginSuccessHandler())
            .failureHandler(getLoginFailHandler())
            .and()
            .csrf().disable() //使用jwt,不需要csrf
            .sessionManagement().sessionCreationPolicy(SessionCreationPolicy.STATELESS) //基于token,不需要session
            .and()
            .authorizeRequests()
            // 设置允许访问的资源
            .antMatchers("/authenticaion/login").permitAll()
            // 设置允许访问的资源
            .antMatchers("/webjars/**").permitAll()
            .antMatchers(
                        "/v2/api-docs",
                        "/swagger-resources",
                        "/swagger-resources/**",
                        "/configuration/ui",
                        "/configuration/security",
                        "/swagger-ui.html/**",
                        "/webjars/**"

                ).permitAll()
                .anyRequest().authenticated();

         // 禁用缓存
        http.headers().cacheControl();

        // 添加JWT filter
        http.addFilterBefore(getauthenticationTokenFilterBean(), UsernamePasswordAuthenticationFilter.class);
    }


}
userDetailService: 用来实现自定义登陆逻辑
BCryptPasswordEncoder: 用来实现密码加密处理(这是security已经实现好了,我们不需要去实现)
JwtAuthenticationTokenFilter: 用来实现token验证
JwtTokenUtils: jwt工具类
LoginSuccessHandler: 登陆成功后的处理器
LoginFailHandler: 登陆失败后的处理器
/authenticaion/login : 登陆时访问的地址(会在SecurityController实现)
/authentication/form: 登陆的url地址(会在LoginController实现))
接下来让我们挨个实现
6.3 UserDetailService 这是一个security接口,需要我们自己写实现类去实现这个接口 UserDetailServiceImpl内容如下:
package com.briup.security.service.impl;

import java.util.ArrayList;
import java.util.List;

import org.springframework.beans.factory.annotation.Autowired;
import org.springframework.security.core.GrantedAuthority;
import org.springframework.security.core.authority.SimpleGrantedAuthority;
import org.springframework.security.core.userdetails.User;
import org.springframework.security.core.userdetails.UserDetails;
import org.springframework.security.core.userdetails.UserDetailsService;
import org.springframework.security.core.userdetails.UsernameNotFoundException;
import org.springframework.security.crypto.password.PasswordEncoder;
import org.springframework.stereotype.Component;

import com.briup.security.bean.Customer;
import com.briup.security.bean.Role;
import com.briup.security.service.ICustomerService;
import com.briup.security.service.IRoleService;

/**
 *
 *
 *      security 自定义登陆逻辑类
 *      用来做登陆认证,验证用户名与密码
 *
 *
 * @author wangzh
 *
 */
@Component("userDetailServiceImpl")
public class UserDetailServiceImpl implements UserDetailsService {

    @Autowired
    private ICustomerService customerService;

    @Autowired
    private IRoleService roleService;

    @Autowired
    private PasswordEncoder passwordEncoder;


    @Override
    public UserDetails loadUserByUsername(String username) throws UsernameNotFoundException {

        // 根据用户名去查找用户信息
        Customer customer = customerService.findByName(username);

        if(customer == null) {
            throw new UsernameNotFoundException(String.format("Not user Found with '%s'", username));
        }

        // 根据用户id查询角色
        List roles = roleService.findAllByCustomerId(customer.getId());

        return new User(customer.getName(),passwordEncoder.encode(customer.getPassword()),getGrantedAuthority(roles));
    }

    /***
     * @Description: 获取角色权限
     * @Param: [roles]
     * @return: java.util.List
     * @Author: wangzh
     * @Date: 2019/3/21
     */
    private List getGrantedAuthority(List roles) {
        List authorities = new ArrayList<>(roles.size());

        for (Role role : roles) {
            authorities.add(new SimpleGrantedAuthority(role.getName()));
        }
        return authorities;
    }


}
6.4 JwtTokenUtils内容如下:
package com.briup.security.util;

import java.util.Date;
import java.util.HashMap;
import java.util.List;
import java.util.Set;

import org.springframework.security.core.GrantedAuthority;
import org.springframework.security.core.authority.AuthorityUtils;
import org.springframework.security.core.userdetails.User;
import org.springframework.security.core.userdetails.UserDetails;

import io.jsonwebtoken.Claims;
import io.jsonwebtoken.Jwts;
import io.jsonwebtoken.SignatureAlgorithm;

/**
 * @author : wangzh
 * @version V1.0
 * @Description: jwt工具类
 */
public class JwtTokenUtils {

    public static final String TOKEN_HEADER = "Authorization";

    public static final String TOKEN_PREFIX = "Bearer ";
    /**
     * 密钥key
     */
    private static final String SECRET = "jwtsecurit";

    /**
     * JWT的发行人
     */
    private static final String ISS = "Kunshan Briup";

    /**
     * 自定义用户信息
     */
    private static final String ROLE_CLAIMS = "rol";

    /**
     * 过期时间是3600秒,既是1个小时
     */
    public static final long EXPIRATION = 3600L * 1000;

    /**
     * 选择了记住我之后的过期时间为7天
     */
    public static final long EXPIRATION_REMEMBER = 604800L * 1000;

    /**
     * 创建token
     *
     * @param username
     *            登录名
     * @param roles
     *            用户角色信息
     * @param isRememberMe
     *            是否记住我
     * @return
     */
    public static String createToken(UserDetails details, boolean isRememberMe) throws CustomerException {
        // 如果选择记住我,则token的过期时间为
        long expiration = isRememberMe ? EXPIRATION_REMEMBER : EXPIRATION;

        HashMap map = new HashMap<>();

        map.put(ROLE_CLAIMS, details.getAuthorities()); // 角色名字
        return Jwts.builder().signWith(SignatureAlgorithm.HS512, SECRET) // 加密算法
                .setClaims(map) // 自定义信息
                .setIssuer(ISS) // jwt发行人
                .setSubject(details.getUsername()) // jwt面向的用户
                .setIssuedAt(new Date()) // jwt发行人
                .setExpiration(new Date(System.currentTimeMillis() + expiration)) // key过期时间
                .compact();
    }

    /**
     * 从token获取用户信息
     *
     * @param token
     * @return
     */
    public static String getUsername(String token) throws CustomerException {
        return getTokenBody(token).getSubject();
    }

    /**
     * 从token中获取用户角色
     *
     * @param token
     * @return
     */
    public static Set getUserRole(String token) throws CustomerException {
        List userAuthorities = (List) getTokenBody(token).get(ROLE_CLAIMS);
        return AuthorityUtils.authorityListToSet(userAuthorities);
    }

    /**
     * 是否已过期
     *
     * @param token
     * @return
     */
    public static boolean isExpiration(String token) throws CustomerException {
        return getTokenBody(token).getExpiration().before(new Date());
    }

    private static Claims getTokenBody(String token) throws CustomerException {
        return Jwts.parser().setSigningKey(SECRET).parseClaimsJws(token).getBody();
    }

    /**
     * 验证token
     *
     * @param token
     * @param userDetails
     * @return
     */
    public static boolean validateToken(String token, UserDetails userDetails) throws CustomerException {
        User user = (User) userDetails;
        final String username = getUsername(token);
        return (username.equals(user.getUsername()) && isExpiration(token) == false);
    }

}
6.5 token校验过滤器
package com.briup.security.web.filter;

import java.io.IOException;

import javax.servlet.FilterChain;
import javax.servlet.ServletException;
import javax.servlet.http.HttpServletRequest;
import javax.servlet.http.HttpServletResponse;

import org.apache.commons.lang.StringUtils;
import org.springframework.beans.factory.annotation.Autowired;
import org.springframework.beans.factory.annotation.Qualifier;
import org.springframework.security.authentication.UsernamePasswordAuthenticationToken;
import org.springframework.security.core.context.SecurityContextHolder;
import org.springframework.security.core.userdetails.UserDetails;
import org.springframework.security.core.userdetails.UserDetailsService;
import org.springframework.security.web.authentication.WebAuthenticationDetails;
import org.springframework.web.filter.OncePerRequestFilter;

import com.briup.security.util.JwtTokenUtils;
import com.briup.security.util.MessageUtil;
import com.fasterxml.jackson.databind.ObjectMapper;

/**
 * @program: paz
 * @description: token过滤器,用来验证token的有效性
 * @author: wangzh
 * @create: 2019-03-21 15:41
 */
public class JwtAuthenticationTokenFilter extends OncePerRequestFilter {

    @Autowired
    @Qualifier("userDetailServiceImpl")
    private UserDetailsService userDetailService;

    @Autowired
    private ObjectMapper objectMapper;

    @Override
    protected void doFilterInternal(HttpServletRequest request, HttpServletResponse response, FilterChain filterChain) throws ServletException, IOException {
        String token = request.getHeader(JwtTokenUtils.TOKEN_HEADER);
        if(token != null && StringUtils.startsWith(token, JwtTokenUtils.TOKEN_PREFIX)) {
            token = StringUtils.substring(token, JwtTokenUtils.TOKEN_PREFIX.length());
        } else {
            filterChain.doFilter(request, response);
            return;
        }

        try {
            String username = JwtTokenUtils.getUsername(token);
            if (username != null && SecurityContextHolder.getContext().getAuthentication() == null) {
                /*
                 *  注意:
                 *       这里代码不应该从数据库中去查,而是从缓存中根据token去查,目前只是做测试,无关紧要
                 *      如果是真正的项目实际开发需要增加缓存
                 */
                UserDetails userDetails = userDetailService.loadUserByUsername(username);

                if (JwtTokenUtils.validateToken(token, userDetails)) {
                    UsernamePasswordAuthenticationToken authentication = new UsernamePasswordAuthenticationToken(
                            userDetails, null, userDetails.getAuthorities());
                    authentication.setDetails(new WebAuthenticationDetails(request));


                    SecurityContextHolder.getContext().setAuthentication(authentication);
                }

            }
        } catch (Exception e) {
            response.setContentType("application/json;charset=UTF-8");
            response.getWriter().write(objectMapper.writeValueAsString(MessageUtil.error(401,"token已失效")));
            return;
        }

        filterChain.doFilter(request, response);
    }
}
6.6 登陆成功处理器 LoginSuccessHandler 内容如下:
package com.briup.security.config;

import java.io.IOException;

import javax.servlet.ServletException;
import javax.servlet.http.HttpServletRequest;
import javax.servlet.http.HttpServletResponse;

import org.springframework.beans.factory.annotation.Autowired;
import org.springframework.beans.factory.annotation.Qualifier;
import org.springframework.security.core.Authentication;
import org.springframework.security.core.userdetails.User;
import org.springframework.security.core.userdetails.UserDetailsService;
import org.springframework.security.web.authentication.AuthenticationSuccessHandler;

import com.briup.security.util.JwtTokenUtils;
import com.briup.security.util.MessageUtil;
import com.fasterxml.jackson.databind.ObjectMapper;

/**
 *
 *     登陆失败处理器
 *
 * @Author: wangzh
 * @Date: 2019/3/21
 */
public class LoginSuccessHandler implements AuthenticationSuccessHandler {

    @Autowired
    @Qualifier("userDetailServiceImpl")
    private UserDetailsService userDetailsService;

    @Autowired
    private ObjectMapper objectMapper;


    @Override
    public void onAuthenticationSuccess(HttpServletRequest request, HttpServletResponse response,
            Authentication authentication) throws IOException, ServletException {
        response.setContentType("application/json;charset=UTF-8");
        try {
            User details = (User) userDetailsService.loadUserByUsername(authentication.getName());

            String token = JwtTokenUtils.TOKEN_PREFIX  + JwtTokenUtils.createToken(details, false);

            // 重定向
            response.setHeader(JwtTokenUtils.TOKEN_HEADER, token);
            response.getWriter().write(objectMapper.writeValueAsString(MessageUtil.success(token)));
        } catch (Exception e) {
            response.getWriter().write(objectMapper.writeValueAsString(MessageUtil.error(401,"创建token失败,请与管理员联系")));
        }

    }

}
6.7 登陆失败处理器 LoginFailHandler 内容如下:
package com.briup.security.config;

import java.io.IOException;

import javax.servlet.ServletException;
import javax.servlet.http.HttpServletRequest;
import javax.servlet.http.HttpServletResponse;

import org.springframework.beans.factory.annotation.Autowired;
import org.springframework.security.core.AuthenticationException;
import org.springframework.security.web.authentication.AuthenticationFailureHandler;

import com.briup.security.util.MessageUtil;
import com.fasterxml.jackson.databind.ObjectMapper;

/**
 *
 *     登陆失败处理器
 *
 * @Author: wangzh
 * @Date: 2019/3/21
 */
public class LoginFailHandler implements AuthenticationFailureHandler {

    @Autowired
    private ObjectMapper objectMapper;

    @Override
    public void onAuthenticationFailure(HttpServletRequest request, HttpServletResponse response,
            AuthenticationException exception) throws IOException, ServletException {

        response.setContentType("application/json;charset=UTF-8");
        response.getWriter().write(objectMapper.writeValueAsString(MessageUtil.error(401,"登陆失败:" + exception.getMessage())));
    }

}
SecurityController 内容如下:
package com.briup.security.web.controller;

import java.io.IOException;

import javax.servlet.http.HttpServletRequest;
import javax.servlet.http.HttpServletResponse;

import org.apache.commons.lang.StringUtils;
import org.springframework.http.HttpStatus;
import org.springframework.security.web.DefaultRedirectStrategy;
import org.springframework.security.web.RedirectStrategy;
import org.springframework.security.web.savedrequest.HttpSessionRequestCache;
import org.springframework.security.web.savedrequest.RequestCache;
import org.springframework.security.web.savedrequest.SavedRequest;
import org.springframework.web.bind.annotation.GetMapping;
import org.springframework.web.bind.annotation.RequestMapping;
import org.springframework.web.bind.annotation.ResponseStatus;
import org.springframework.web.bind.annotation.RestController;

import com.briup.security.util.Message;
import com.briup.security.util.MessageUtil;


/**
 * @program: paz
 * @description: 发送请求,如果token为空,跳转到这个controller
 * @author: wangzh
 * @create: 2019-03-21 15:41
 */
@RestController
@RequestMapping("/authenticaion")
public class SecurityController {

    private RequestCache requestCache = new HttpSessionRequestCache();

    private RedirectStrategy redirectStrategy = new DefaultRedirectStrategy();

    /**
     * 当需要身份认证时,跳转到这里
     *
     * @param request
     * @param response
     * @return
     * @throws IOException
     */
    @GetMapping("/login")
    @ResponseStatus(code = HttpStatus.UNAUTHORIZED)
    public Message requireAuthentication(HttpServletRequest request, HttpServletResponse response)
            throws IOException {

        SavedRequest savedRequest = requestCache.getRequest(request, response);

        if (savedRequest != null) {
            String targetUrl = savedRequest.getRedirectUrl();
            if (StringUtils.endsWithIgnoreCase(targetUrl, ".html")) {
                // TODO 跳转到登陆页面
                redirectStrategy.sendRedirect(request, response, "/login.html");
            }
        }
        return MessageUtil.error(401,"访问的服务需要身份认证,请引导用户到登录页");
    }
}
LoginController内容如下:
package com.briup.security.web.controller;

import javax.servlet.http.HttpServletRequest;
import javax.servlet.http.HttpServletResponse;

import org.apache.commons.lang.StringUtils;
import org.springframework.beans.factory.annotation.Autowired;
import org.springframework.beans.factory.annotation.Qualifier;
import org.springframework.security.core.userdetails.UserDetails;
import org.springframework.security.core.userdetails.UserDetailsService;
import org.springframework.web.bind.annotation.GetMapping;
import org.springframework.web.bind.annotation.PostMapping;
import org.springframework.web.bind.annotation.RequestMapping;
import org.springframework.web.bind.annotation.RestController;

import com.briup.security.util.JwtTokenUtils;
import com.briup.security.util.Message;
import com.briup.security.util.MessageUtil;

import io.swagger.annotations.Api;
import io.swagger.annotations.ApiOperation;

/**
 * @description: 登陆
 * @author: wangzh
 * @create: 2019-03-21 15:56
 **/
@Api(description = "登陆相关接口")
@RestController
@RequestMapping("/authentication")
public class LoginController {

    @Autowired
    @Qualifier("userDetailServiceImpl")
    private UserDetailsService userDetailsService;


    @PostMapping("/form")
    @ApiOperation(value = "登入身份验证(JWT验证)", notes = "登入")
    public void login(String username, String password) {
        // TODO 这里面不需要写任何代码,由UserDeatilsService去处理
    }

    @GetMapping("/getUserDetailByToken")
    @ApiOperation(value = "根据token得到用户信息")
    public Message getUserDetailByToken(HttpServletRequest request, HttpServletResponse response) {
        String token = request.getHeader(JwtTokenUtils.TOKEN_HEADER);
        response.setContentType("application/json;charset=UTF-8");
        if (token != null && StringUtils.startsWith(token, JwtTokenUtils.TOKEN_PREFIX)) {
            token = StringUtils.substring(token, JwtTokenUtils.TOKEN_PREFIX.length());
            UserDetails details = userDetailsService.loadUserByUsername(JwtTokenUtils.getUsername(token));
            return MessageUtil.success(details);
        } else {
            return MessageUtil.error(401, "token失效");
        }
    }


}
启动项目,访问swagger页面
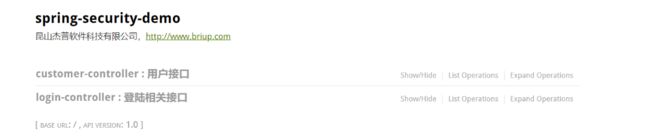
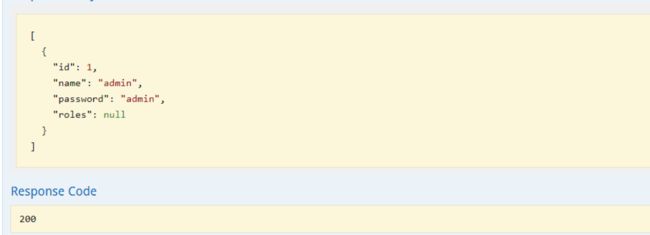
点击用户接口,并进行访问结果如下:
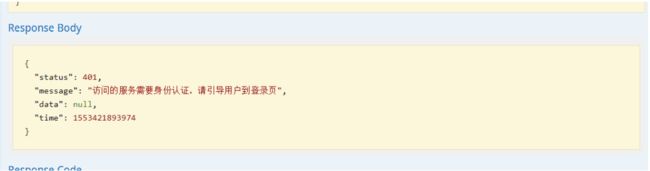
因为我们在请求的时候并没有携带token,所以我们需要登陆,点击登陆相关接口,进行登陆
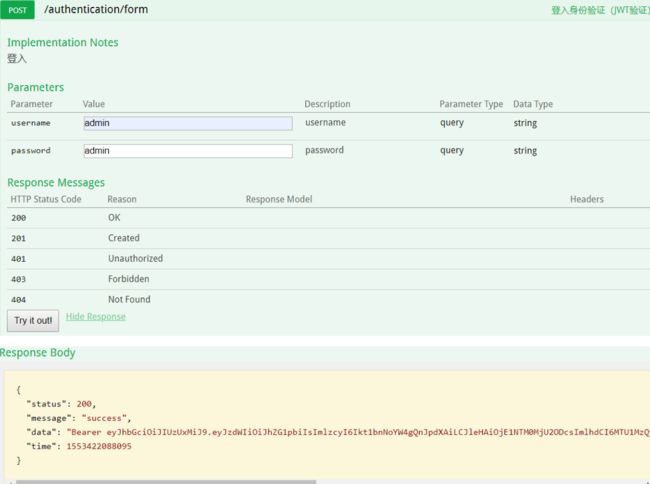
由此可以看见,当我们登陆成功时,会给我们返回一个token,token的值如下:
Bearer eyJhbGciOiJIUzUxMiJ9.eyJzdWIiOiJhZG1pbiIsImlzcyI6Ikt1bnNoYW4gQnJpdXAiLCJleHAiOjE1NTM0MjU2ODcsImlhdCI6MTU1MzQyMjA4Nywicm9sIjpbeyJhdXRob3JpdHkiOiLnrqHnkIblkZgifV19.BTVjSR8ony9G-EdP8MOIDww0L2XoyyTPCpdA-quvLdjqT3evXVsPmHPfkq9mKmJieBYoQexBEbAf2E3Lf5SsgA
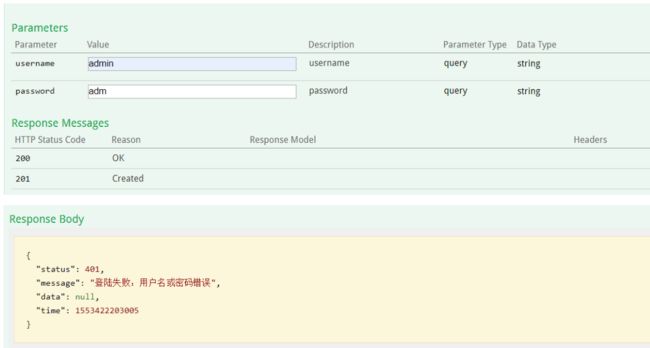
如果登陆失败,则结果如下:
现在又会引发一个新的问题,我们通过前面的token校验器知道,发送请求的时候token会存放在请求头中,但是目前我们的swagger页面并没有让我们输入token的文本框,因此我们需要改造Swagger2Config,内容如下:
package com.briup.security.config;

import java.util.ArrayList;
import java.util.List;

import org.springframework.context.annotation.Bean;
import org.springframework.context.annotation.Configuration;

import springfox.documentation.builders.ApiInfoBuilder;
import springfox.documentation.builders.ParameterBuilder;
import springfox.documentation.builders.PathSelectors;
import springfox.documentation.builders.RequestHandlerSelectors;
import springfox.documentation.schema.ModelRef;
import springfox.documentation.service.ApiInfo;
import springfox.documentation.service.Parameter;
import springfox.documentation.spi.DocumentationType;
import springfox.documentation.spring.web.plugins.Docket;
import springfox.documentation.swagger2.annotations.EnableSwagger2;


@Configuration
@EnableSwagger2
public class Swagger2Config {

    @Bean
    public Docket createRestApi() {
        ParameterBuilder tokenPar = new ParameterBuilder();
        List pars = new ArrayList<>();
        tokenPar.name("Authorization").description("令牌").modelRef(new ModelRef("string")).parameterType("header").required(false).build();
        pars.add(tokenPar.build());

        return new Docket(DocumentationType.SWAGGER_2)
                .select()
                .apis(RequestHandlerSelectors.basePackage("com.briup.security.web"))
                .paths(PathSelectors.any())
                .build()
                .globalOperationParameters(pars)
                .apiInfo(apiInfo());

    }


/*  @Bean
    public Docket createRestApi() {
        return new Docket(DocumentationType.SWAGGER_2)
                .apiInfo(apiInfo())
                .select()
                .apis(RequestHandlerSelectors.basePackage("com.briup.security.web"))
                .paths(PathSelectors.any())
                .build();
    }*/


    private ApiInfo apiInfo() {
        return new ApiInfoBuilder()
                .title("spring-security-demo")
                .description("昆山杰普软件科技有限公司,http://www.briup.com")
                .termsOfServiceUrl("http://www.briup.com")
                .version("1.0")
                .build();
    }
}
再次访问我们的swagger页面

将我们的令牌粘贴其中,并进行访问:
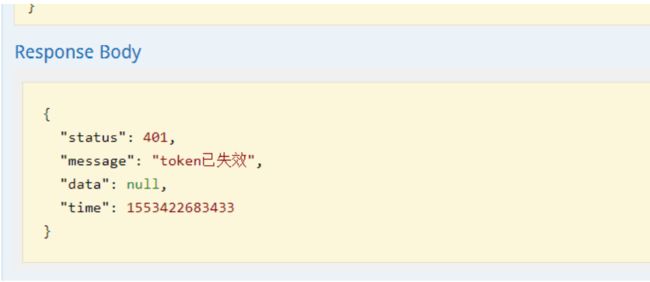
当我们把令牌输入错误是,结果如下:
至此,我们就已经完成了一个登陆验证。当然目前还是只是一个简单的表单验证,我会在后续的时间中,整理出手机短信验证,第三方登陆验证等等。