源码下载:源码
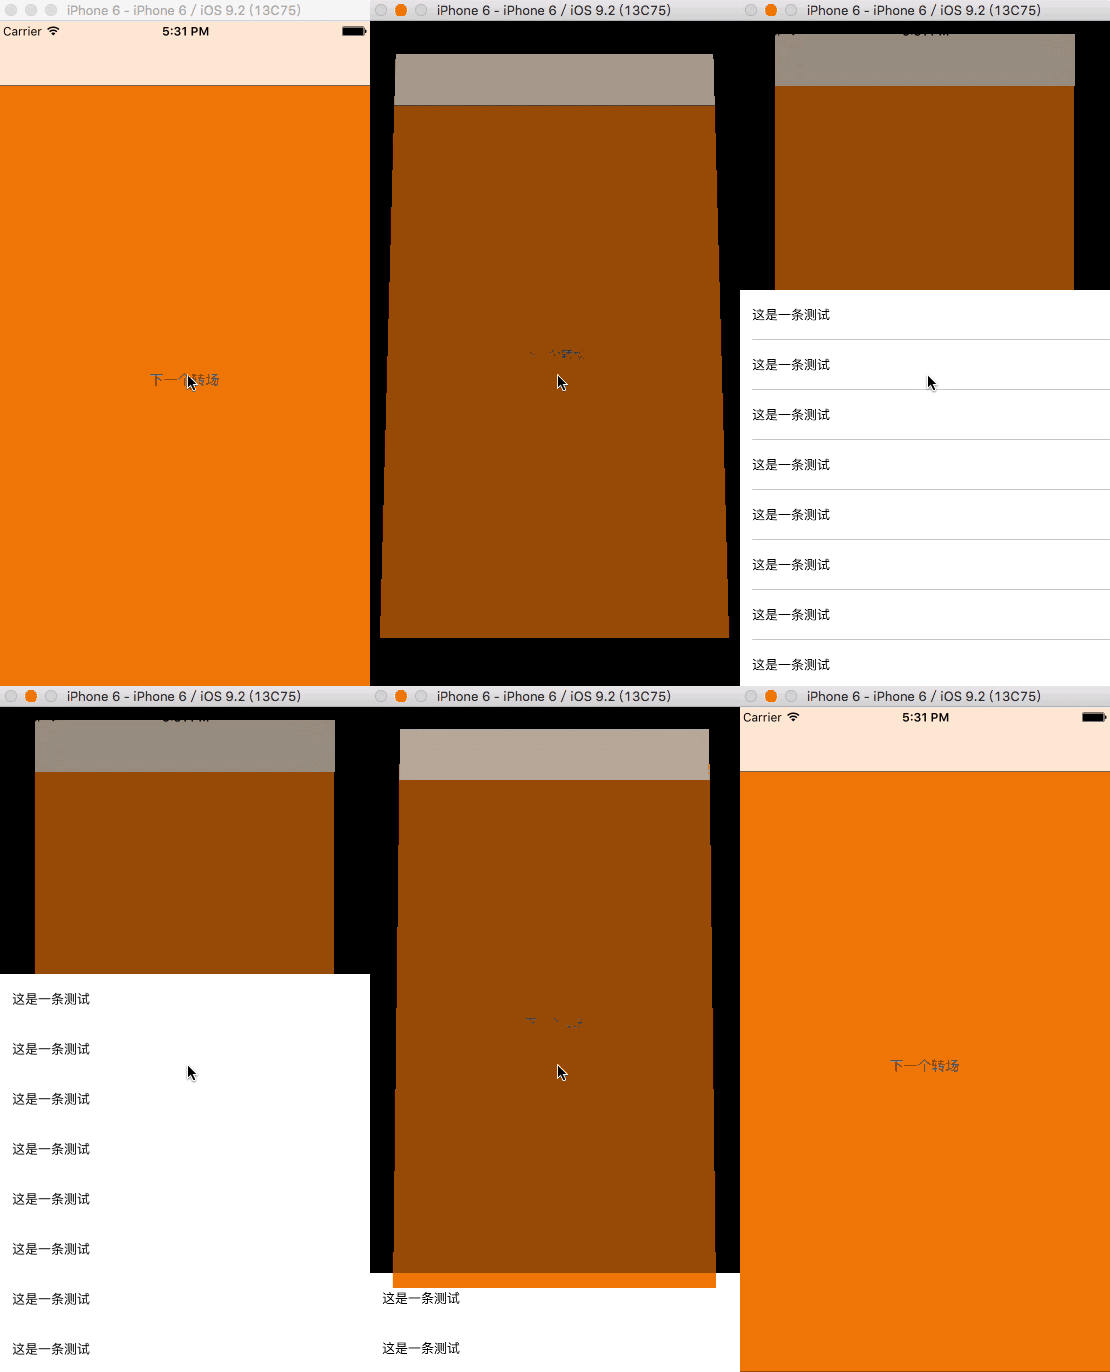
本篇文章是以的自定义转场为原型。先看一下的自定义转场动画如下:
创建项目
项目中创建两个继承UIViewController的类。分别为ViewController和SecondViewController。
从上图可以看出,是弹出的模态视图。本文自定义present转场的动画。实际上就是对
presentViewController和dismissViewControllerAnimated的转场动画进行自定义。
[self presentViewController:secondVC animated:YES completion:NULL];
和
[self dismissViewControllerAnimated:YES completion:NULL];
于是,要创建一个继承于NSObject的CustomPresentAnimationCotroller自定义动画控制器。
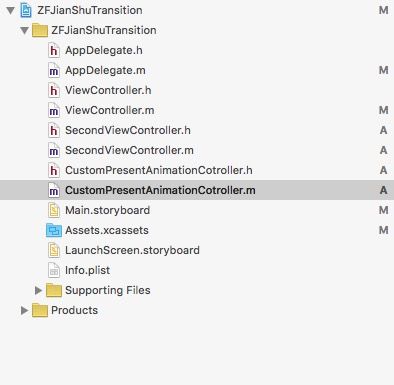
最终,项目目录如下:
分析动画
- 了解手机屏幕的坐标系。
解释旋转方向:
x轴和y轴都是沿着手机屏幕面的垂直方向旋转。但是不同的是:x轴是上下方向,y轴是左右方向。
z轴沿着手机屏幕面平行方向旋转。
分析present动画。
是由fromView和toView两个视图的动画。fromView暂且说是下面的视图,toView暂且说是上面的视图。
fromView动画:
先是沿x,y缩放,透明度减少。然后沿x轴旋转一定角度后向上平移,再缩放一定比例。
toView动画:
从屏幕底部滑入。分析dismiss动画
fromView变成上面的视图,toView则是下面的视图。
fromView动画:
从屏幕底部滑出。
toView动画:
先是沿x,y放大,透明度增大。然后恢复到原始状态。
定义转场动画
在iOS7后要遵循UIViewControllerTransitioningDelegate协议。
在本篇文章中使用了以下协议方法:
//方法1
- (nullable id )animationControllerForPresentedController:(UIViewController *)presented presentingController:(UIViewController *)presenting sourceController:(UIViewController *)source;
//方法2
- (nullable id )animationControllerForDismissedController:(UIViewController *)dismissed;
方法1 是在[self presentViewController:secondVC animated:YES completion:NULL];后调用。
方法2是在[self dismissViewControllerAnimated:YES completion:NULL];后调用。
在ViewController的按钮点击事件后赋予转场代理持有者。转场动画使用我们自定义的动画控制器CustomPresentAnimationCotroller实现。
-(void)presentNext:(UIButton *)sender{

    SecondViewController *secondVC =[SecondViewController new];
    //blow ios 7.0 can use UIModalPresentationCurrentContext
    secondVC.modalPresentationStyle = UIModalPresentationOverCurrentContext;
    secondVC.transitioningDelegate = self;

    [self presentViewController:secondVC animated:YES completion:NULL];
}

#pragma mark -UIViewControllerTransitioningDelegate

- (nullable id )animationControllerForPresentedController:(UIViewController *)presented presentingController:(UIViewController *)presenting sourceController:(UIViewController *)source{

    CustomPresentAnimationCotroller *presentAnimation = [CustomPresentAnimationCotroller new];
    presentAnimation.dismiss = NO;
    return presentAnimation;
}


- (nullable id )animationControllerForDismissedController:(UIViewController *)dismissed{

    CustomPresentAnimationCotroller *presentAnimation = [CustomPresentAnimationCotroller new];
    presentAnimation.dismiss = YES;
    return presentAnimation;
}
在自定义的动画控制器CustomPresentAnimationCotroller必须要实现下面的两个转场动画协议UIViewControllerAnimatedTransitioning。
//转场动画时间
- (NSTimeInterval)transitionDuration:(id)transitionContext {
    return 1.0;
}

- (void)animateTransition:(id)transitionContext {

    UIViewController *fromVC = [transitionContext viewControllerForKey:UITransitionContextFromViewControllerKey];
    UIViewController *toVC = [transitionContext viewControllerForKey:UITransitionContextToViewControllerKey];
    UIView *toView = toVC.view;
    UIView *fromView = fromVC.view;

    if(self.isDismissed){
        [self RunDismissAnimation:transitionContext fromVC:fromVC toVC:toVC fromView:fromView toView:toView];
    } else {
        [self RunPresentAnimation:transitionContext fromVC:fromVC toVC:toVC fromView:fromView toView:toView];
    }
}
最后,实现prensent与dismiss的自定义动画转场。在下面代码中小编写有详细的注解。
present动画:
-(void)RunPresentAnimation:(id)transitionContext fromVC:(UIViewController *)fromVC toVC:(UIViewController *)toVC fromView:(UIView *)fromView toView:(UIView *)toView {

    /*
     fromVC UINavigationController 的根视图控制器---->ViewController
     toVC --->SecondViewController
     */
    UIView* containerView = [transitionContext containerView];
    //获取fromVC(ViewController)的frame
    CGRect frame = [transitionContext initialFrameForViewController:fromVC];
    //底部滑进 离屏滑入 即y坐标 从height --->0
    CGRect offScreenFrame = frame;
    offScreenFrame.origin.y = offScreenFrame.size.height;
    toView.frame = offScreenFrame;

    [containerView insertSubview:toView aboveSubview:fromView];

    //三维变化
    CATransform3D t1 = CATransform3DIdentity;
    t1.m34 = 1.0/-1000;
    //x y方向各缩放比例为0.95
    t1 = CATransform3DScale(t1, 0.95, 0.95, 1);
    //x方向旋转15°
    t1 = CATransform3DRotate(t1, 15.0f * M_PI/180.0f, 1, 0, 0);

    CATransform3D t2 = CATransform3DIdentity;
    t2.m34 = 1.0/-1000;
    //沿Y方向向上移动
    t2 = CATransform3DTranslate(t2, 0, -fromView.frame.size.height*0.08, 0);
    //在x y方向各缩放比例为0.8
    t2 = CATransform3DScale(t2, 0.8, 0.8, 1);

    //UIView关键帧过渡动画 总的持续时间:1.0
    [UIView animateKeyframesWithDuration:1.0 delay:0.0 options:UIViewKeyframeAnimationOptionCalculationModeCubic animations:^{

        //开始时间:1.0*0.0 持续时间:1.0*0.4
        [UIView addKeyframeWithRelativeStartTime:0.0f relativeDuration:0.4f animations:^{
            //执行t1动画 缩放并旋转角度
            fromView.layer.transform = t1;
            //fromView的透明度
            fromView.alpha = 0.6;
        }];
        //开始时间:1.0*0.1 持续时间:1.0*0.5
        [UIView addKeyframeWithRelativeStartTime:0.1f relativeDuration:0.5f animations:^{
            //执行t2动画 向上平移和缩放
            fromView.layer.transform = t2;
        }];
        //开始时间:1.0*0.0 持续时间:1.0*1.0
        [UIView addKeyframeWithRelativeStartTime:0.0f relativeDuration:1.0f animations:^{
            //toView向上滑入
            toView.frame = frame;
        }];

    } completion:^(BOOL finished) {
        //过渡动画结束
        [transitionContext completeTransition:![transitionContext transitionWasCancelled]];
    }];


}
dismiss动画:
-(void)RunDismissAnimation:(id)transitionContext fromVC:(UIViewController *)fromVC toVC:(UIViewController *)toVC fromView:(UIView *)fromView toView:(UIView *)toView {


    CGRect frame = [transitionContext initialFrameForViewController:fromVC];
    toView.frame = frame;

    CGRect frameOffScreen = frame;
    frameOffScreen.origin.y = frame.size.height;

    CATransform3D t1 = CATransform3DIdentity;
    t1.m34 = 1.0/-1000;
    t1 = CATransform3DScale(t1, 0.95, 0.95, 1);
    t1 = CATransform3DRotate(t1, 15.0f * M_PI/180.0f, 1, 0, 0);

    //关键帧过渡动画
    [UIView animateKeyframesWithDuration:1.0 delay:0 options:UIViewKeyframeAnimationOptionCalculationModeCubic animations:^{

        [UIView addKeyframeWithRelativeStartTime:0.0f relativeDuration:1.0f animations:^{
            //滑出屏幕
            fromView.frame = frameOffScreen;
        }];

        [UIView addKeyframeWithRelativeStartTime:0.35f relativeDuration:0.35f animations:^{
            //执行t1,沿着x,y放大,沿x旋转
            toView.layer.transform = t1;
            //透明度变为1.0
            toView.alpha = 1.0;
        }];
        [UIView addKeyframeWithRelativeStartTime:0.75f relativeDuration:0.25f animations:^{
            //还原3D状态
            toView.layer.transform = CATransform3DIdentity;
        }];
    } completion:^(BOOL finished) {

        [transitionContext completeTransition:![transitionContext transitionWasCancelled]];
    }];
最终效果图:
本篇详解到此结束。如有疑问请留言给小编,小编给大家做解答。
问题1:自定义动画转场后,调用dismissViewControllerAnimated,上一级的ViewController不会触发viewWillAppear。
解决方法:
第一步在自定义转场中实现改协议方法。
-(void)animationEnded:(BOOL)transitionCompleted{
    if (!transitionCompleted) {
        _toVC.view.transform = CGAffineTransformIdentity;
    }
}
第二步下面方法加入一行代码:
- (void)animateTransition:(id)transitionContext {

    UIViewController *fromVC = [transitionContext viewControllerForKey:UITransitionContextFromViewControllerKey];
    _toVC = [transitionContext viewControllerForKey:UITransitionContextToViewControllerKey];
    UIView *toView = _toVC.view;
    UIView *fromView = fromVC.view;

  //toVC 调用viewWillAppear
    [_toVC beginAppearanceTransition:YES animated:YES];

    if(self.isDismissed){
        [self RunDismissAnimation:transitionContext fromVC:fromVC toVC:_toVC fromView:fromView toView:toView];
    } else {
        [self RunPresentAnimation:transitionContext fromVC:fromVC toVC:_toVC fromView:fromView toView:toView];
    }

//    调用此方法
//    fromVC 调用viewDidDisappear
    [fromVC beginAppearanceTransition:NO animated:YES];
点击此处源码下载:源码
其实自定义动画转场并不是特别难,需要自己动手做一次。


