一、Android Studio 默认自动生成的 jar 包
众所周知 Android Studio 会在 library 所依赖的 app运行 或 build 之后自动生成 jar 包,路径为 Module根目录/build/intermediates/packaged-classes/debug/classes.jar,这样生成的jar是可以用的,但不是我们可以控制的,所以我们需要通过其他方式来生成jar包。
注意:
若发现 Android Studio 项目 packaged-classes 文件夹下没有 release 目录,可能是没有将 module 添加到主 module 依赖中。
方式1:主module右键 --> 倒数第二个Open Module Setting--> 上面最后一个选项Dependencies-->右边绿色加号-->Module dependency......然后确定
方式2:主 Module 的 gradle 的 dependencies(平时添加第三方库的地方)中加上 implementation project(':librarytest')
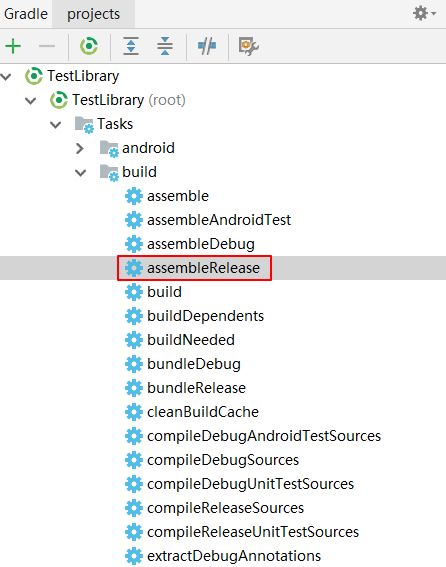
点击 assembleRelease 生成 release 包,packaged-classes 目录下就会生成 release 目录了
二、自定义生成 jar 包
方式 A :点击 Android Studio 右侧(一般在这个位置)的 Gradle 面板,在项目或者该类库的目录中找到 Tasks -> other -> makeJar 命令,双击这个makeJar之后等一会就会编译好jar包。
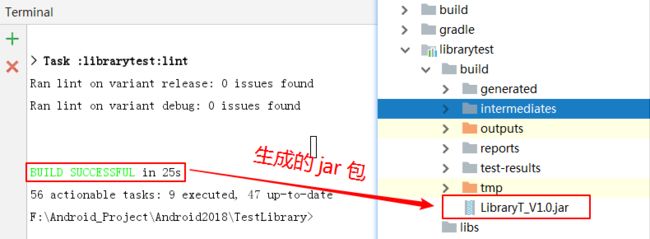
打包成功后:在配置的指定目录下生成jar包
方式 B :通过 cmd 命令行,在项目根目录下,执行 gradlew makeJar 命令,看到编译完成的信息以后就OK了,也能生成一样的jar包,和直接使用①中的方式是等价的。
注意:使用此方式前要配置好 gradle 的“ 环境变量 ”,否则直接在项目根目录下找不到这个命令。使用 cmd 比较费劲,不推荐。
方式 C :在 Android Studio 终端窗口中输入 gradlew makeJar 命令。
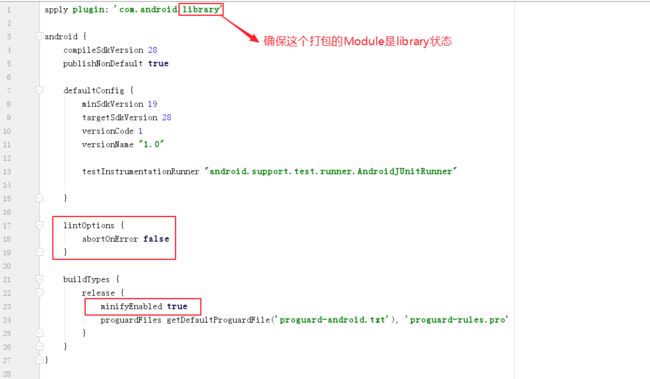
首先,需要将待打包 module 项目中的 build.gradle 文件进行修改,如下图:
其次,在 library 的 app:build.gradle 中添加如下代码:
方法一:
// 方法一
def _BASENAME = "LibraryT"; //  jar包名字可以自由更改
def _VERSION = "_V1.0";
def _DestinationPath = "build"; //生成jar包的位置
def zipFile = file('build/intermediates/packaged-classes/debug/classes.jar'); // 待打包文件位置

task deleteBuild(type:Delete){
    delete _DestinationPath + _BASENAME + _VERSION + ".jar"
}
task makeJar(type:Jar){
    from zipTree(zipFile)
    from fileTree(dir:'src/main',includes:['assets/**']) //将assets目录打入jar包
    baseName = _BASENAME + _VERSION
    destinationDir = file(_DestinationPath)
}
makeJar.dependsOn(deleteBuild, build)
方法二:
首先,在方法一的基础上把在 library 的 app:build.gradle 中添加的代码修改为如下:
task clearJar(type: Delete) {
    delete 'build/libs/LibraryT.jar'
    delete 'libs/LibraryT.jar'
}
//打包任务
task makeJar(type: Jar) {
    //指定生成的jar名
    baseName 'LibraryT'
    //从哪里打包class文件
    from('build/intermediates/javac/debug/compileDebugJavaWithJavac/classes/com/example/eagleview/librarytest')
    //release 路径,这个classes的路径不一定是从javac文件下,也有可能在 intermediates 目录下,所以只要找到相应的路径修改即可
//    from('build/intermediates/javac/release/compileReleaseJavaWithJavac/classes/com/example/eagleview/librarytest')
    //打包到jar后的目录结构
    into('com/example/eagleview/librarytest/')
    //去掉不需要打包的目录和文件
    exclude('BuildConfig.class', 'R.class')
    //去掉R$开头的文件
    exclude { it.name.startsWith('R$'); }
}
makeJar.dependsOn(clearJar, build)
这个方法可以解决com.android.dex.DexException: Multiple dex files define 此类的错误
原因是sdk 的jar包中打入了BuildConfig.class,解决方法很简单:解包,删除里面的 BuildConfig.class,然后重新打包 jar。
具体如下:
- 解压jar包: jar xf xxx.jar
- 删除解压后目录里面的//BuildConfig.class
- 重新打包: jar cvf xxx.jar *
当然这样的方法有点粗糙,而且我们也绝对不希望给其他开发者带来困扰,所以我们可以有选择的将我们需要的class文件打包,把类似 BuildConfig.class / R.class ......文件排除在打包,完美解决问题
在proguard-rules.pro文件中配置混淆文件
# 表示混淆时不使用大小写混合类名
-dontusemixedcaseclassnames

# 表示不跳过library中的非public的类
-dontskipnonpubliclibraryclasses

# 打印混淆的详细信息
-verbose

# Optimization is turned off by default. Dex does not like code run
# through the ProGuard optimize and preverify steps (and performs some
# of these optimizations on its own).
-dontoptimize

# 表示不进行校验,这个校验作用 在java平台上的
-dontpreverify
# Note that if you want to enable optimization, you cannot just
# include optimization flags in your own project configuration file;
# instead you will need to point to the
# "proguard-android-optimize.txt" file instead of this one from your
# project.properties file.
#使用注解需要添加
-keepattributes *Annotation*
-keep public class com.google.vending.licensing.ILicensingService
-keep public class com.android.vending.licensing.ILicensingService

# For native methods, see http://proguard.sourceforge.net/manual/examples.html#native
#指定不混淆所有的JNI方法
-keepclasseswithmembernames class * {
    native ;
}

# keep setters in Views so that animations can still work.
# see http://proguard.sourceforge.net/manual/examples.html#beans
#所有View的子类及其子类的get、set方法都不进行混淆
-keepclassmembers public class * extends android.view.View {
   void set*(***);
   *** get*();
}

# We want to keep methods in Activity that could be used in the XML attribute onClick
# 不混淆Activity中参数类型为View的所有方法
-keepclassmembers class * extends android.app.Activity {
   public void *(android.view.View);
}

# For enumeration classes, see http://proguard.sourceforge.net/manual/examples.html#enumerations
# 不混淆Enum类型的指定方法
-keepclassmembers enum * {
    public static **[] values();
    public static ** valueOf(java.lang.String);
}

# 不混淆Parcelable和它的子类,还有Creator成员变量
-keepclassmembers class * implements android.os.Parcelable {
  public static final android.os.Parcelable$Creator CREATOR;
}

# 不混淆R类里及其所有内部static类中的所有static变量字段
-keepclassmembers class **.R$* {
    public static ;
}

# The support library contains references to newer platform versions.
# Don't warn about those in case this app is linking against an older
# platform version.  We know about them, and they are safe.
# 不提示兼容库的错误警告
-dontwarn android.support.**

# Understand the @Keep support annotation.
-keep class android.support.annotation.Keep

-keep @android.support.annotation.Keep class * {*;}

-keepclasseswithmembers class * {
    @android.support.annotation.Keep ;
}

-keepclasseswithmembers class * {
    @android.support.annotation.Keep ;
}

-keepclasseswithmembers class * {
    @android.support.annotation.Keep (...);
}


###########################以下是需要手动的混淆配置协议###############################


-libraryjars "C:\Program Files\Java\jre1.8.0_191\lib\rt.jar"
#-libraryjars "C:\Users\admin\AppData\Local\Android\sdk\platforms\android-26\android.jar"
# 注意:以上两个路径需要将以上路径是自己jar包的位置,需要根据自己情况进行修改,如果报重复配置的错误,注释掉即可

#代码迭代优化的次数,默认5
-optimizationpasses 5
#混淆时不会产生形形色色的类名
-dontusemixedcaseclassnames


#忽略警告
-ignorewarnings
#以下是不需要混淆的文件
 -keep class com.android.sdk.demo.LogUtils{
     *;
 }
 -keep class com.android.sdk.demo.StorageUtils{
     *;
 }
三、直接使用 aar 包
将被嵌入的应用打包成 aar 包,这也是 Android Studio 的一种新特性,可以将应用所使用的资源性文件一起打包。编译即可打包生成 aar 包,而且也不用担心漏掉资源问题。
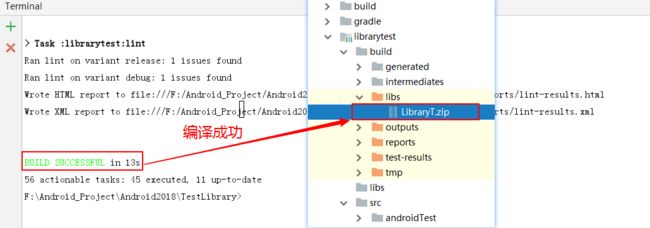
如果Project 中 Module 是一个应用,则在 Module 的 build.gradle 文件中定义属性为:apply plugin: 'com.android.application';而如果 Mudule 是一个被引用的依赖 lib 库的话,则在 Module 的 build.gradle 文件中定义属性为: apply plugin: 'com.android.library;所以当我们将应用 Module 打包出 aar 文件的时候,需要修改类型属性。正常情况下,直接重新编译 Module,生成的 aar 包在 Module 根目录的/build/outputs/aar/,如下图:
下面介绍将 aar 包添加到其他 Android 工程:
首先,将 aar 包复制到 libs 目录下
其次,配置build.gradle文件:
在 要调用aar 包的 build.gradle 中加入:
apply plugin: 'com.android.application'

android {
    ...
    repositories {
        flatDir {
            dirs 'libs'
        }
    }
}

dependencies {
    ...
    compile(name:'librarytest-release', ext:'aar')
}
最后,clean一下工程,重新编译。


